2019 FORD F-450 towing
[x] Cancel search: towingPage 7 of 666

Lane Keeping System
...............................250
Blind Spot Information System .............
253
Cross Traffic Alert .......................................
258
Steering ..........................................................
260
Pre-Collision Assist ....................................
262
Load Carrying
Load Limit .....................................................
266
Bed Ramps ....................................................
270
Towing
Towing a Trailer ............................................
273
Trailer Reversing Aids .................................
275
Trailer Sway Control ..................................
282
Recommended Towing Weights ..........
283
Essential Towing Checks .........................
287
Towing the Vehicle on Four Wheels .....
296
Driving Hints
Breaking-In ...................................................
299
Economical Driving ....................................
299
Driving Through Water .............................
300
Floor Mats .....................................................
300
Snow Plowing ...............................................
301
Roadside Emergencies
Roadside Assistance ................................
304
Hazard Flashers ..........................................
305
Fire Extinguisher .........................................
305
Warning Triangle .........................................
305
Fuel Shutoff .................................................
305
Jump Starting the Vehicle .......................
306
Post-Crash Alert System .........................
308
Transporting the Vehicle .........................
308
Towing Points ..............................................
309
Customer Assistance
Getting the Services You Need ................
311
In California (U.S. Only) .............................
312The Better Business Bureau (BBB) Auto
Line Program (U.S. Only) ......................
313
Utilizing the Mediation/Arbitration Program (Canada Only) .......................
314
Getting Assistance Outside the U.S. and Canada ........................................................
314
Ordering Additional Owner's Literature ........................................................................\
.
316
Reporting Safety Defects (U.S. Only) ........................................................................\
.
316
Reporting Safety Defects (Canada Only) ........................................................................\
.
316
Fuses
Fuse Specification Chart ..........................
318
Changing a Fuse ..........................................
327
Maintenance
General Information ..................................
329
Opening and Closing the Hood .............
329
Under Hood Overview - 6.2L ..................
330
Under Hood Overview - 6.7L Diesel ......
331
Under Hood Overview - 6.8L ..................
333
Engine Oil Dipstick - 6.2L/6.8L ..............
334
Engine Oil Dipstick - 6.7L Diesel ............
334
Engine Oil Check - 6.2L/6.8L .................
334
Engine Oil Check - 6.7L Diesel ...............
335
Changing the Engine Oil and Oil Filter ........................................................................\
336
Changing the Crankcase Vent Filter Element ......................................................
337
Oil Change Indicator Reset .....................
338
Engine Coolant Check - 6.2L/6.8L .......
339
Engine Coolant Check - 6.7L Diesel ......
343
Automatic Transmission Fluid Check ........................................................................\
346
Transfer Case Fluid Check ......................
349
Brake Fluid Check .......................................
350
Power Steering Fluid Check ...................
350
Washer Fluid Check ....................................
351
Draining the Fuel Filter Water Trap - 6.7L Diesel ............................................................
351
4
Super Duty (TFE) Canada/United States of America, enUSA, Edition date: 201804, Fourth-Printing Table of Contents
Page 83 of 666
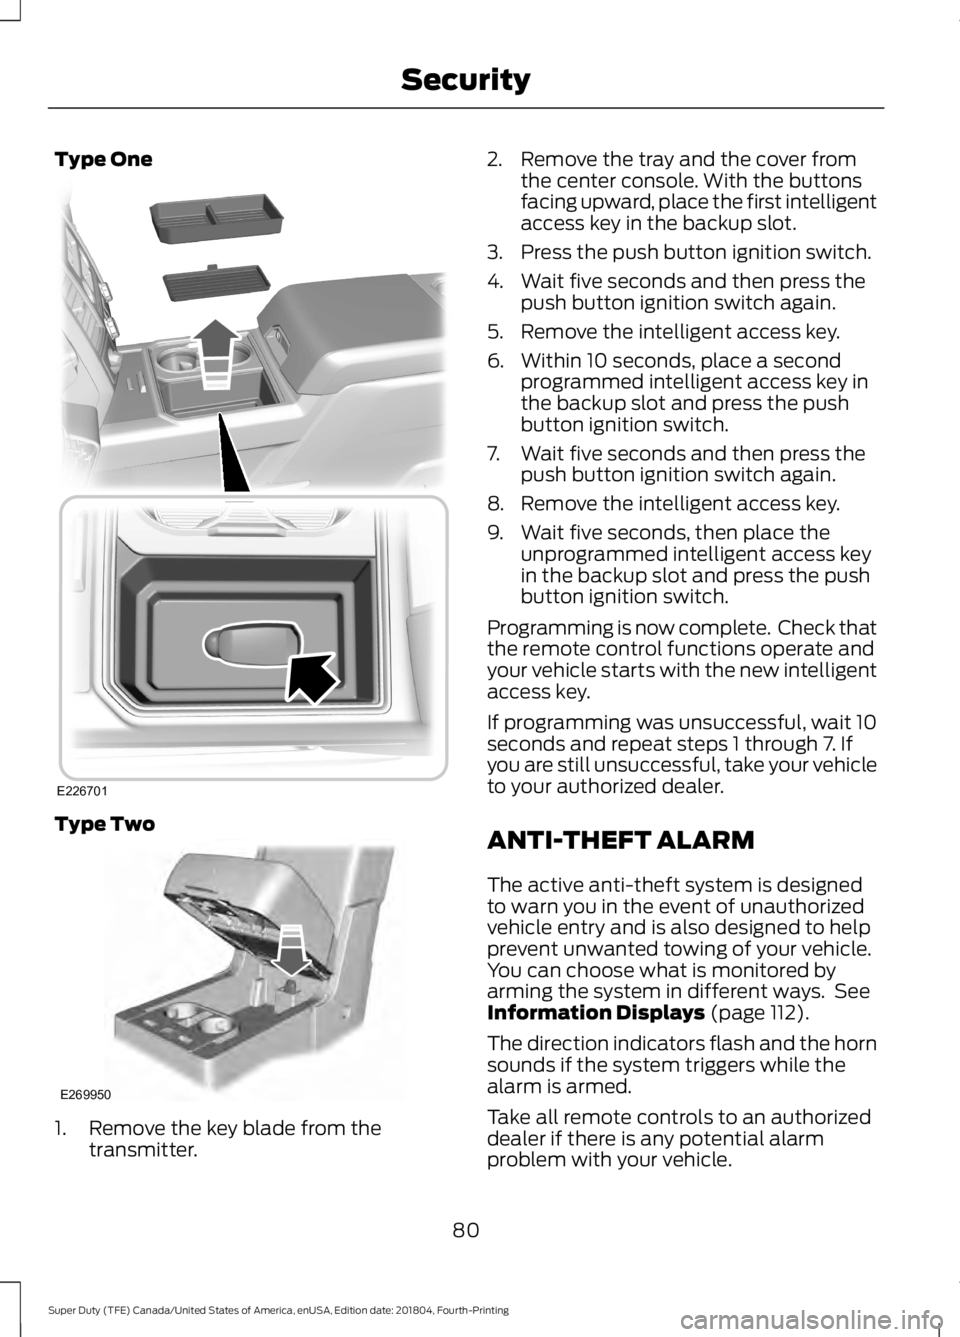
Type One
Type Two
1. Remove the key blade from the
transmitter. 2. Remove the tray and the cover from
the center console. With the buttons
facing upward, place the first intelligent
access key in the backup slot.
3. Press the push button ignition switch.
4. Wait five seconds and then press the push button ignition switch again.
5. Remove the intelligent access key.
6. Within 10 seconds, place a second programmed intelligent access key in
the backup slot and press the push
button ignition switch.
7. Wait five seconds and then press the push button ignition switch again.
8. Remove the intelligent access key.
9. Wait five seconds, then place the unprogrammed intelligent access key
in the backup slot and press the push
button ignition switch.
Programming is now complete. Check that
the remote control functions operate and
your vehicle starts with the new intelligent
access key.
If programming was unsuccessful, wait 10
seconds and repeat steps 1 through 7. If
you are still unsuccessful, take your vehicle
to your authorized dealer.
ANTI-THEFT ALARM
The active anti-theft system is designed
to warn you in the event of unauthorized
vehicle entry and is also designed to help
prevent unwanted towing of your vehicle.
You can choose what is monitored by
arming the system in different ways. See
Information Displays (page 112).
The direction indicators flash and the horn
sounds if the system triggers while the
alarm is armed.
Take all remote controls to an authorized
dealer if there is any potential alarm
problem with your vehicle.
80
Super Duty (TFE) Canada/United States of America, enUSA, Edition date: 201804, Fourth-Printing SecurityE226701 E269950
Page 84 of 666
Using the System
You can select two levels of alarm security.
You can change the level of security when
the ignition is switched off through the
information display with the two options
below:
Perimeter Only (If Equipped)
Perimeter only monitors the following:
•
Doors.
• Hood.
• Tailgate.
All Sensors (If Equipped)
All sensors monitors the following:
• Doors.
• Hood.
• Tailgate.
• Movement inside your vehicle.
• Change in vehicle inclination, for
example, unwanted towing.
Note: Do not choose all sensors monitor
mode when the vehicle is in transport or if
movement within the vehicle is likely to
occur.
Note: For correct operation of the interior
motion detection system, make sure you
close all the windows prior to arming the
system. This helps prevent accidental alarm
activation due to external influences.
Additionally, the interior motion sensing
system does not arm if any door is ajar.
Arming the Alarm
The alarm is ready to arm when there is
not a key in the ignition. Lock your vehicle
using the remote control or keyless entry
keypad. You can also lock your vehicle
using the lock sensor on the exterior door
handle if your vehicle is equipped with
intelligent access. See Locking and
Unlocking (page 69). The direction indicators flash once after
you lock your vehicle. This indicates the
alarm is in the pre-armed mode. It fully
arms after 20 seconds.
Disarming the Alarm
Disarm the alarm by any of the following
actions:
•
Press the power door unlock button
within the 20-second pre-armed mode.
• Unlock the doors with the remote
control or keyless entry keypad. If
equipped with intelligent access, you
can use the unlock sensor on the
exterior door handle. See
Locking and
Unlocking (page 69).
• Switch the ignition on or start your
vehicle.
• Use a key in the driver door lock
cylinder to unlock your vehicle, then
switch the ignition on within 12
seconds.
81
Super Duty (TFE) Canada/United States of America, enUSA, Edition date: 201804, Fourth-Printing Security
Page 102 of 666
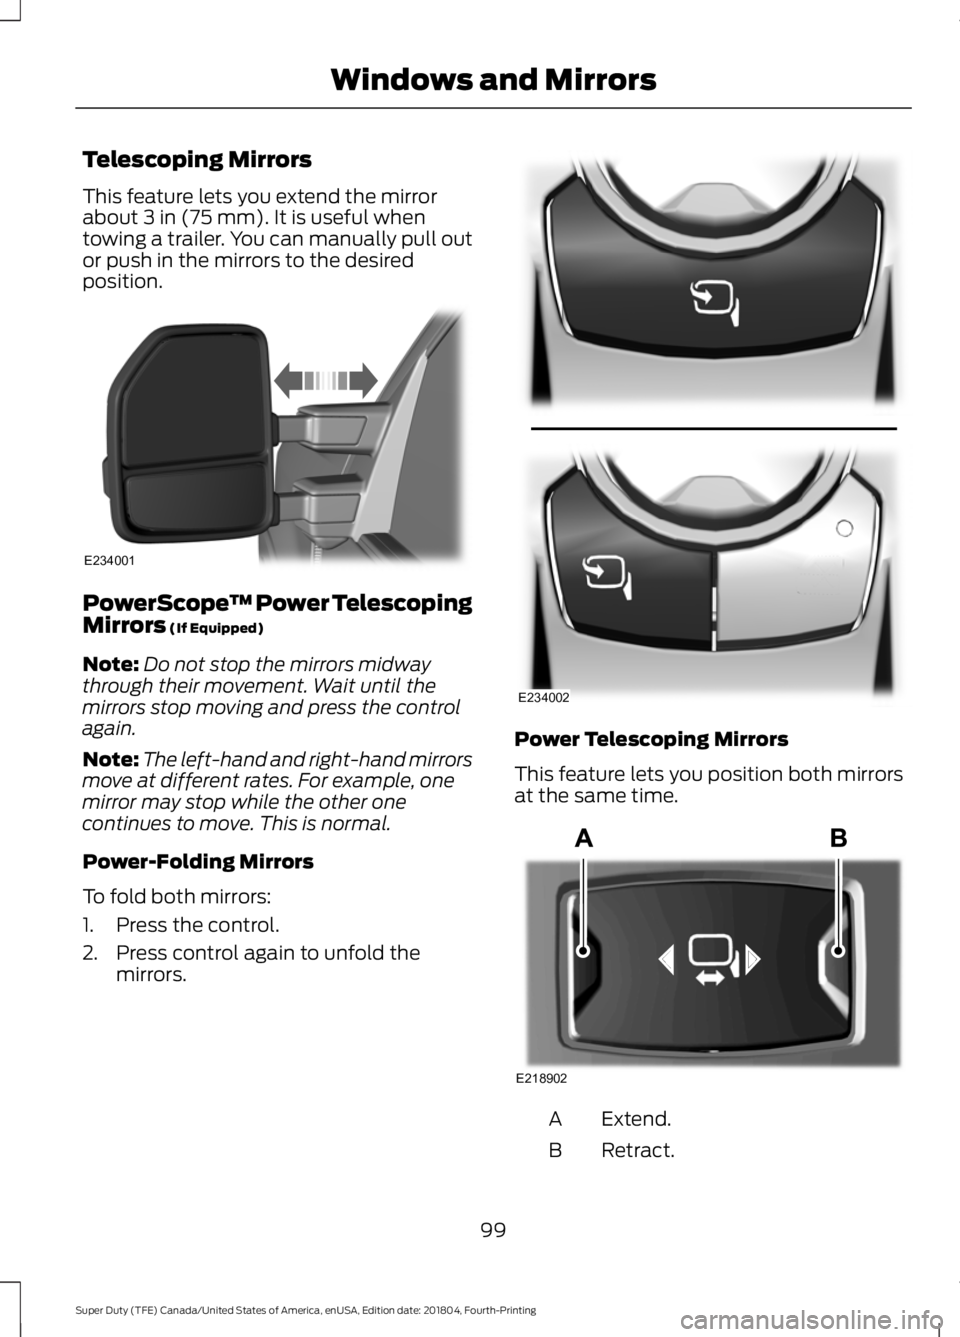
Telescoping Mirrors
This feature lets you extend the mirror
about 3 in (75 mm). It is useful when
towing a trailer. You can manually pull out
or push in the mirrors to the desired
position. PowerScope
™ Power Telescoping
Mirrors
(If Equipped)
Note: Do not stop the mirrors midway
through their movement. Wait until the
mirrors stop moving and press the control
again.
Note: The left-hand and right-hand mirrors
move at different rates. For example, one
mirror may stop while the other one
continues to move. This is normal.
Power-Folding Mirrors
To fold both mirrors:
1. Press the control.
2. Press control again to unfold the mirrors. Power Telescoping Mirrors
This feature lets you position both mirrors
at the same time.
Extend.
A
Retract.
B
99
Super Duty (TFE) Canada/United States of America, enUSA, Edition date: 201804, Fourth-Printing Windows and MirrorsE234001 E234002 E218902
Page 103 of 666

To adjust your mirrors, press the
adjustment control to position the mirrors.
Note:
Moving the mirrors 10 or more times
within one minute, or repeated folding,
unfolding and telescoping of the mirrors
while holding the control down during full
travel, may disable the system to protect
the motors from overheating. Wait
approximately three minutes with the
vehicle running, and up to 10 minutes with
the vehicle off, for the system to reset and
for function to return to normal.
Loose Mirror
If your power-folding mirrors are manually
folded, they may not work properly even
after you re-position them. You need to
reset them if:
• The mirrors vibrate when you drive.
• The mirrors feel loose.
• The mirrors do not stay in the folded or
unfolded position.
• One of the mirrors is not in its normal
driving position.
To reset the power-fold feature, use the
power-folding mirror control to fold and
unfold the mirrors. You may hear a loud
noise as you reset the power-folding
mirrors. This sound is normal. Repeat this
process as needed each time the mirrors
are manually folded.
Heated Exterior Mirrors (If Equipped)
See
Heated Exterior Mirrors (page 151).
Memory Mirrors
(If Equipped)
You can save and recall the mirror
positions through the memory function.
See
Memory Function (page 158). Direction Indicator Mirrors (If Equipped)
While the vehicle is running, the
forward-facing portion of the appropriate
mirror housing blinks when you switch on
the direction indicator.
Puddle Lamps
(If Equipped)
The lamps on the bottom part of the mirror
housing light when you use your
transmitter to unlock the doors or when
you open a door.
Clearance Lamps
(If Equipped)
The lower, outer part of the mirror housings
light when you switch the headlamps or
parking lamps on.
Spot Lamps
(If Equipped)
The area lights are on the forward-facing
portion of the mirror housing. You can
switch them on and off by using the
controls located on the instrument panel.
See
Lighting (page 91).
Trailer Towing Camera System
(If
Equipped)
See
360 Degree Camera (page 237).
Blind Spot Information System
(If
Equipped)
See
Blind Spot Information System
(page 253).
INTERIOR MIRROR WARNING:
Do not adjust the
mirrors when your vehicle is moving. This
could result in the loss of control of your
vehicle, serious personal injury or death.
100
Super Duty (TFE) Canada/United States of America, enUSA, Edition date: 201804, Fourth-Printing Windows and Mirrors
Page 109 of 666

Engine Oil Pressure Gauge
Indicates engine oil pressure. The needle
should stay in the normal operating range
(between L and H). If the needle falls
below the normal range, stop your vehicle,
turn off the engine and check the engine
oil level. Add oil if needed. If the oil level is
correct, have your vehicle checked by an
authorized dealer.
Engine Coolant Temperature
Gauge
WARNING: Do not remove the
coolant reservoir cap when the engine is
on or the cooling system is hot. Wait 10
minutes for the cooling system to cool
down. Cover the coolant reservoir cap
with a thick cloth to prevent the
possibility of scalding and slowly remove
the cap. Failure to follow this instruction
could result in personal injury.
Indicates engine coolant temperature. At
normal operating temperature, the level
indicator will be in the normal range. If the
engine coolant temperature exceeds the
normal range, stop your vehicle as soon as
safely possible, switch off the engine and
let the engine cool.
Fuel Gauge
Note: The fuel gauge may vary slightly
when your vehicle is moving or on a slope.
The fuel gauge indicates about how much
fuel is in the fuel tank.
The arrow adjacent to the fuel pump
symbol indicates on which side of your
vehicle the fuel filler door is located. Low Fuel Reminder
A low fuel level reminder displays and
sounds when the distance to empty
reaches
75 mi (120 km) to empty for
MyKey, and at 50 mi (80 km), 25 mi
(40 km), 10 mi (20 km) and 0 mi (0 km)
for all vehicle keys.
Note: The low fuel reminder can appear at
different fuel gauge positions depending on
fuel economy conditions. This variation is
normal.
Transmission Fluid Temperature
Gauge
Indicates transmission fluid temperature.
At normal operating temperature, the level
indicator will be in the normal range. If the
transmission fluid temperature exceeds
the normal range, stop the vehicle as soon
as safely possible and verify the airflow is
not restricted such as snow or debris
blocking airflow through the grill. Also,
higher than normal operating temperature
can be caused by special operation
conditions (i.e. snowplowing, towing or
off-road use). Operating the transmission
for extended periods with the gauge in the
higher than normal area may cause
internal transmission damage. You need
to alter the severity of your driving
conditions to lower the transmission
temperature into the normal range. If the
gauge continues to show high
temperatures, see an authorized dealer.
Turbo Boost Gauge
(If Equipped)
Indicates the amount of manifold air
pressure in the engine.
DEF Gauge
(If Equipped)
Indicates the current DEF level.
106
Super Duty (TFE) Canada/United States of America, enUSA, Edition date: 201804, Fourth-Printing Instrument Cluster
Page 119 of 666
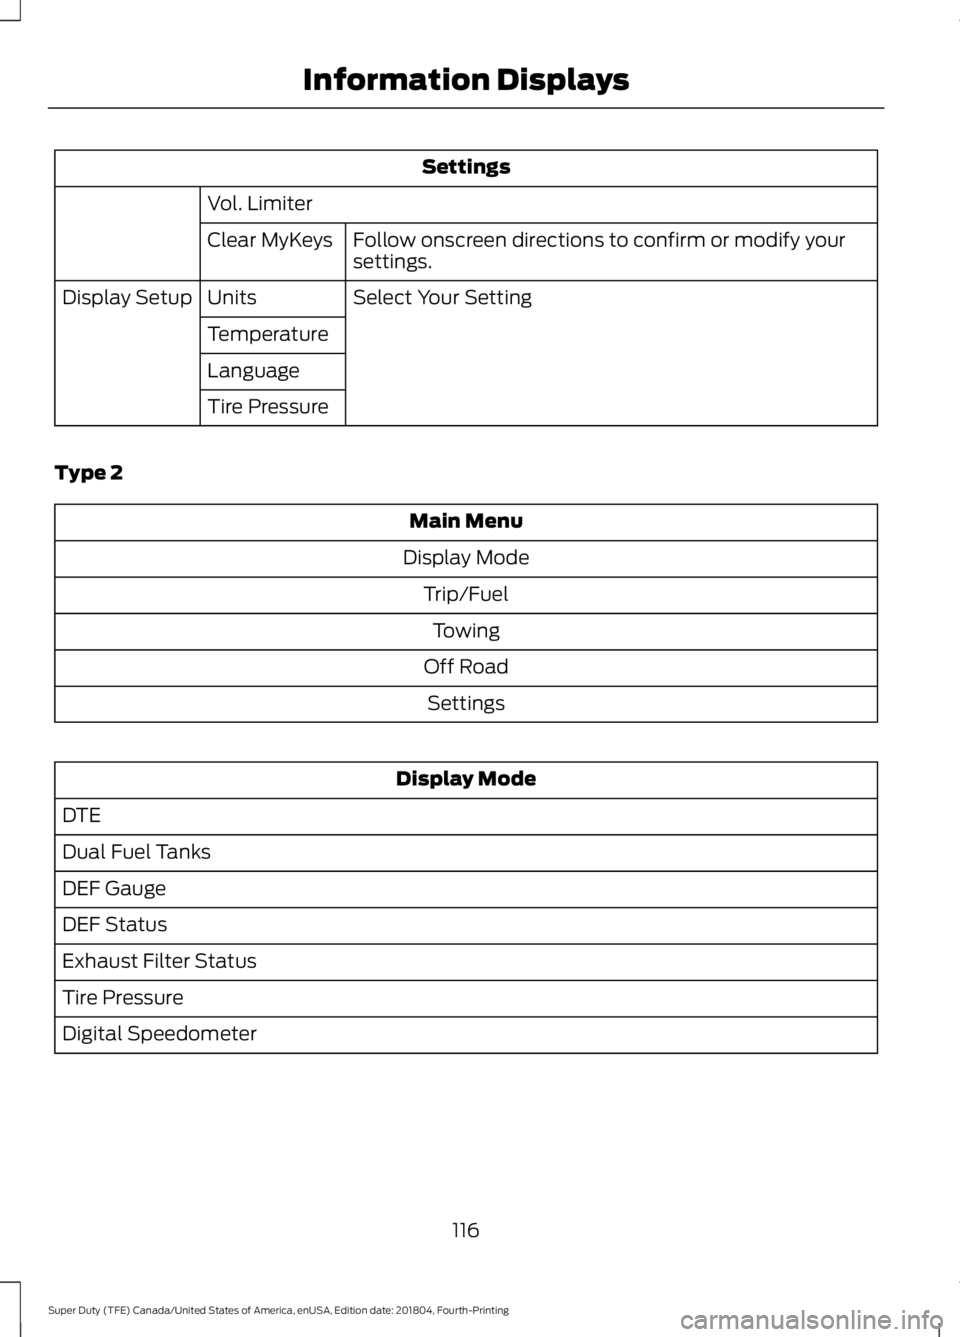
Settings
Vol. Limiter Follow onscreen directions to confirm or modify your
settings.
Clear MyKeys
Select Your Setting
Units
Display Setup
Temperature
Language
Tire Pressure
Type 2 Main Menu
Display Mode Trip/FuelTowing
Off Road Settings Display Mode
DTE
Dual Fuel Tanks
DEF Gauge
DEF Status
Exhaust Filter Status
Tire Pressure
Digital Speedometer
116
Super Duty (TFE) Canada/United States of America, enUSA, Edition date: 201804, Fourth-Printing Information Displays
Page 121 of 666
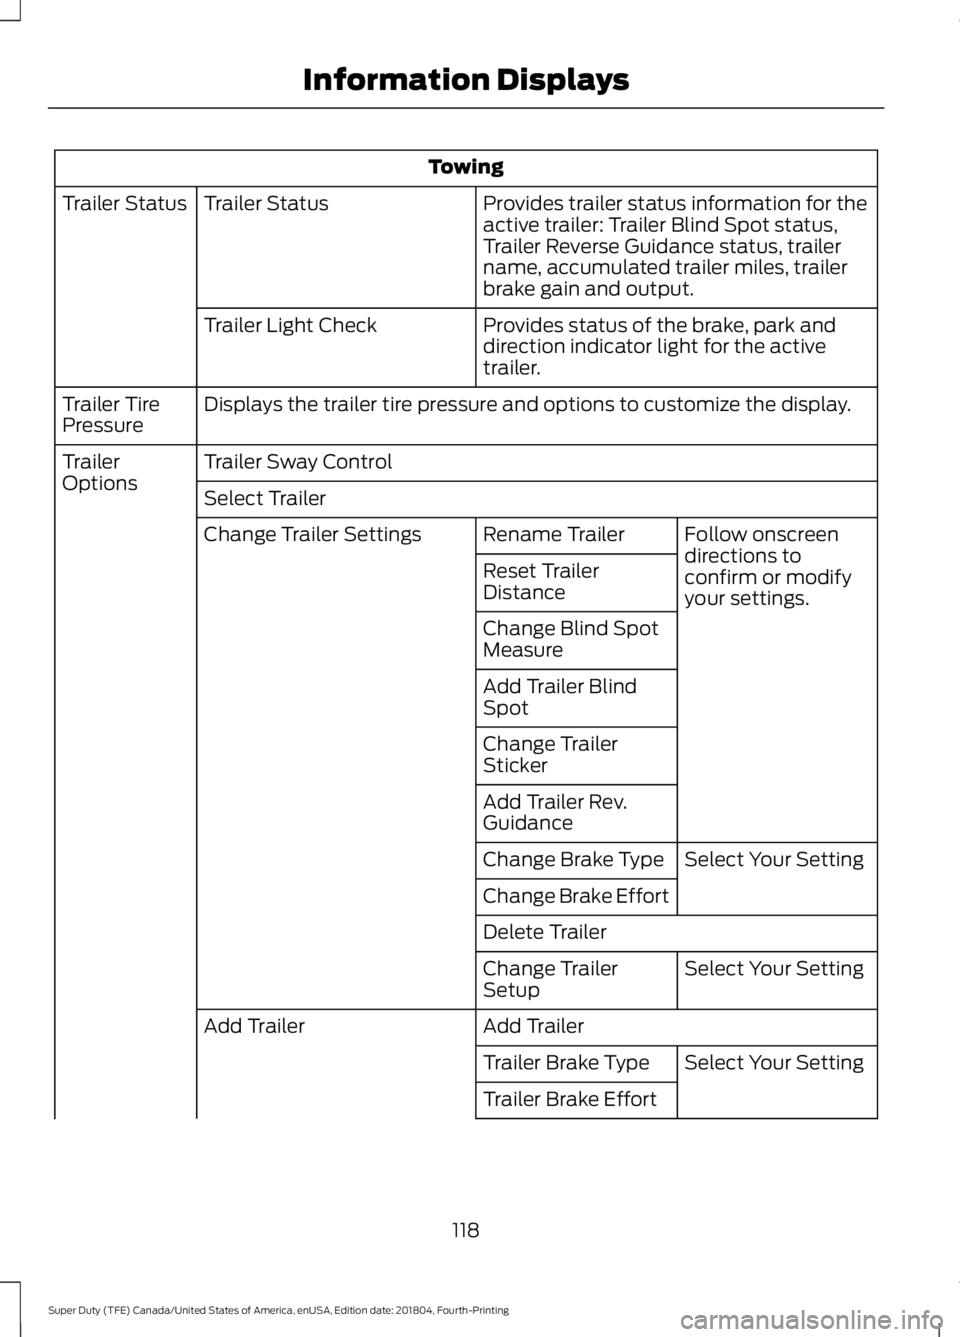
Towing
Provides trailer status information for the
active trailer: Trailer Blind Spot status,
Trailer Reverse Guidance status, trailer
name, accumulated trailer miles, trailer
brake gain and output.
Trailer Status
Trailer Status
Provides status of the brake, park and
direction indicator light for the active
trailer.
Trailer Light Check
Displays the trailer tire pressure and options to customize the display.
Trailer Tire
Pressure
Trailer Sway Control
Trailer
Options
Select Trailer
Follow onscreen
directions to
confirm or modify
your settings.
Rename Trailer
Change Trailer Settings
Reset Trailer
Distance
Change Blind Spot
Measure
Add Trailer Blind
Spot
Change Trailer
Sticker
Add Trailer Rev.
GuidanceSelect Your Setting
Change Brake Type
Change Brake Effort
Delete Trailer
Select Your Setting
Change Trailer
Setup
Add Trailer
Add Trailer
Select Your Setting
Trailer Brake Type
Trailer Brake Effort
118
Super Duty (TFE) Canada/United States of America, enUSA, Edition date: 201804, Fourth-Printing Information Displays