2019 FORD F-450 ECO mode
[x] Cancel search: ECO modePage 406 of 666

•
To reduce the chances of interference
from another vehicle, perform the
system reset procedure at least 3 ft
(1 m) away from another Ford Motor
Company vehicle undergoing the
system reset procedure at the same
time.
• Do not wait more than two minutes
between resetting each tire sensor or
the system can time-out and you have
to repeat the entire procedure on all
four wheels.
• A double horn sounds indicating the
need to repeat the procedure.
Performing the System Reset Procedure
- Single Rear Wheel
Read the entire procedure before
attempting.
1. Drive the vehicle above
20 mph
(32 km/h) for at least two minutes,
then park in a safe location where you
can easily get to all four tires and have
access to an air pump.
2. Place the ignition in the off position and
keep the key in the ignition.
3. Cycle the ignition to the on position with the engine off.
4. Turn the hazard flashers on then off three times. You must accomplish this
within 10 seconds. If you successfully
enter the reset mode, the horn sounds
once, the system indicator flashes and
a message shows in the information
display. If this does not occur, please
try again starting at step 2. If after
repeated attempts to enter the reset
mode, the horn does not sound, the
system indicator does not flash and no
message shows in the information
display, seek service from your
authorized dealer. 5. Train the tire pressure monitoring
system sensors in the tires using the
following system reset sequence
starting with the left front tire in the
following clockwise order: Left front -
driver side front tire, Right front -
passenger side front tire, Right rear -
passenger side rear tire, Left rear -
driver side rear tire.
6. Remove the valve cap from the valve stem on the left front tire. Decrease the
air pressure until the horn sounds.
Note: The single horn tone confirms that
the sensor identification code has been
learned by the module for this position. If a
double horn is heard, the reset procedure
was unsuccessful, and you must repeat it.
7. Remove the valve cap from the valve stem on the right front tire. Decrease
the air pressure until the horn sounds.
8. Remove the valve cap from the valve stem on the right rear tire. Decrease the
air pressure until the horn sounds.
9. Remove the valve cap from the valve stem on the left rear tire. Decrease the
air pressure until the horn sounds.
Training is complete after the horn
sounds for the last tire trained, driver
side rear tire, the system indicator
stops flashing, and a message shows
in the information display.
10. Turn the ignition off. If two short horn
beeps are heard, the reset procedure
was unsuccessful and you must
repeat it. If after repeating the
procedure and two short beeps are
heard when the ignition is turned to
off, seek assistance from your
authorized dealer.
403
Super Duty (TFE) Canada/United States of America, enUSA, Edition date: 201804, Fourth-Printing Wheels and Tires
Page 407 of 666

11.
Set all four tires to the recommended
air pressure as indicated on the
Safety Compliance Certification
Label, affixed to either the door hinge
pillar, door-latch post, or the door
edge that meets the door-latch post,
next to the driver seating position or
Tire Label located on the B-Pillar or
the edge of the driver door.
Performing the System Reset Procedure
- Dual Rear Wheel
For further information see
Understanding Your Tire Pressure
Monitoring System and refer to Dual
Rear Wheel, earlier in this section.
Read the entire procedure before
attempting.
1. Drive the vehicle above
20 mph
(32 km/h) for at least two minutes,
then park in a safe location where you
can easily get to all six tires and have
access to an air pump.
2. Place the ignition in the off position and
keep the key in the ignition.
3. Cycle the ignition to the on position with the engine off.
4. Turn the hazard flashers on then off three times. You must accomplish this
within 10 seconds. If you successfully
enter the reset mode, the horn sounds
once, the system indicator flashes and
a message shows in the information
display. If this does not occur, please
try again starting at step 2. If after
repeated attempts to enter the reset
mode, the horn does not sound, the
system indicator does not flash and no
message shows in the information
display, seek service from your
authorized dealer. 5. Train the tire pressure monitoring
system sensors in the tires using the
following system reset sequence
starting with the left front tire in the
following order: Left front - driver side
front tire, Right front - passenger side
front tire, Right outer rear -passenger
side rear outer tire, Right inner rear -
passenger side rear inner tire, Left outer
rear - driver side rear outer tire, Left
inner rear - driver side rear inner tire.
6. Remove the valve cap from the valve stem on the left front tire. Decrease the
air pressure until the horn sounds.
Note: The single horn chirp confirms that
the sensor identification code has been
learned by the module for this position. If a
double horn is heard, the reset procedure
was unsuccessful, and you must repeat it.
7. Remove the valve cap from the valve stem on the right front tire. Decrease
the air pressure until the horn sounds.
8. Remove the valve cap from the valve stem on the right outer rear tire.
Decrease the air pressure until the horn
sounds.
9. Remove the valve cap from the valve stem on the right inner rear tire.
Decrease the air pressure until the horn
sounds.
10. Remove the valve cap from the valve
stem on the left outer rear tire.
Decrease the air pressure until the
horn sounds.
11. Remove the valve cap from the valve
stem on the left inner rear tire.
Decrease the air pressure until the
horn sounds. Training is complete
after the horn sounds for the last tire
trained, the system indicator stops
flashing, and a message is shown in
the information display.
404
Super Duty (TFE) Canada/United States of America, enUSA, Edition date: 201804, Fourth-Printing Wheels and Tires
Page 449 of 666

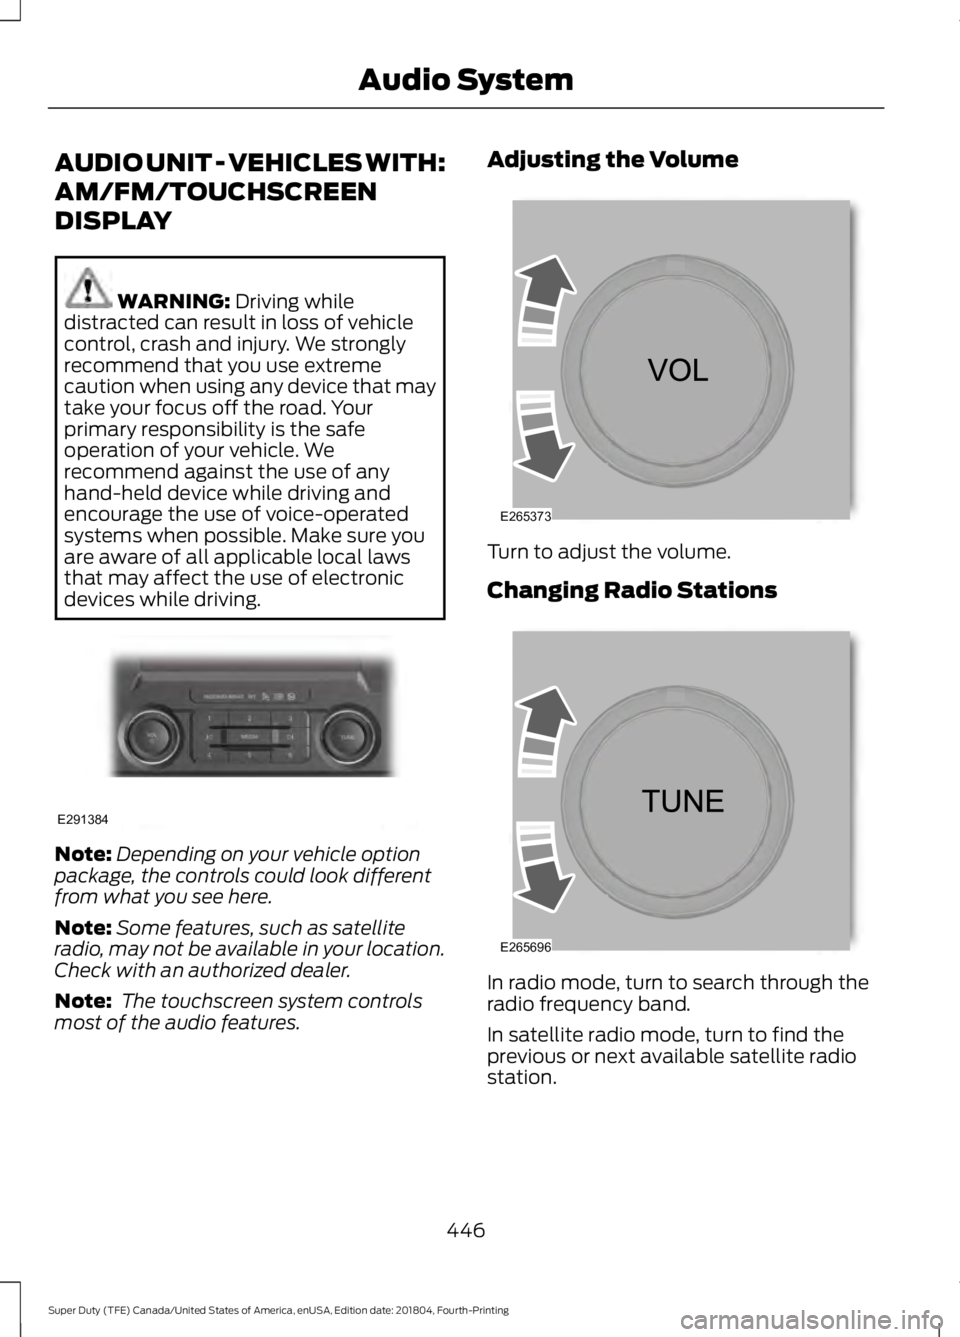
AUDIO UNIT - VEHICLES WITH:
AM/FM/TOUCHSCREEN
DISPLAY
WARNING: Driving while
distracted can result in loss of vehicle
control, crash and injury. We strongly
recommend that you use extreme
caution when using any device that may
take your focus off the road. Your
primary responsibility is the safe
operation of your vehicle. We
recommend against the use of any
hand-held device while driving and
encourage the use of voice-operated
systems when possible. Make sure you
are aware of all applicable local laws
that may affect the use of electronic
devices while driving. Note:
Depending on your vehicle option
package, the controls could look different
from what you see here.
Note: Some features, such as satellite
radio, may not be available in your location.
Check with an authorized dealer.
Note: The touchscreen system controls
most of the audio features. Adjusting the Volume
Turn to adjust the volume.
Changing Radio Stations
In radio mode, turn to search through the
radio frequency band.
In satellite radio mode, turn to find the
previous or next available satellite radio
station.
446
Super Duty (TFE) Canada/United States of America, enUSA, Edition date: 201804, Fourth-Printing Audio SystemE291384 E265373 E265696
Page 450 of 666

Selecting the Audio Modes
Press and release the button to
access different audio modes,
for example AM and FM.
Setting a Memory Preset
Tune to a station, then press and hold one
of the memory preset buttons on the
touchscreen. The audio briefly mutes while
the system saves the station and returns
once the station is stored.
Switching the Audio Unit On and
Off Press and release the button.
Using Seek, Fast Forward and
Reverse In radio mode, select a frequency band and
press and release either button. The
system stops at the first station it finds in
that direction.
In satellite radio mode, press and release
to select the next or previous satellite radio
station. If you select a specific category,
such as jazz, rock or news, press to find the
next or previous station in that category. AUDIO UNIT - VEHICLES WITH:
AM/FM/SYNC WARNING: Driving while
distracted can result in loss of vehicle
control, crash and injury. We strongly
recommend that you use extreme
caution when using any device that may
take your focus off the road. Your
primary responsibility is the safe
operation of your vehicle. We
recommend against the use of any
hand-held device while driving and
encourage the use of voice-operated
systems when possible. Make sure you
are aware of all applicable local laws
that may affect the use of electronic
devices while driving.
Note: Some features, such as satellite
radio, may not be available in your location.
Check with an authorized dealer.
Accessing the Clock Settings Press and release the button to
access the clock setting.
Use the center arrow controls to
change the hours and minutes.
Accessing the Media Source Menu Press and release the button to
open the media source menu.
You can press this multiple times to
change to a SYNC-Media device or scroll
through the media sources using the arrow
buttons. Press
OK to select a source.
Accessing the Menu Press and release the button to
access different audio system
features.
447
Super Duty (TFE) Canada/United States of America, enUSA, Edition date: 201804, Fourth-Printing Audio SystemE265035 E265045 E265044 E265036 E265035 E265038
Page 457 of 666

Note:
This receiver includes the eCos
real-time operating system. eCos is
published under the eCos License.
Satellite Radio Reception Factors Potential satellite radio reception issues
For optimal reception performance, keep the antenna
clear of snow and ice build-up and keep luggage and other
material as far away from the antenna as possible.
Antenna obstructions
Hills, mountains, tall buildings, bridges, tunnels, freeway
overpasses, parking garages, dense tree foliage and
thunderstorms can interfere with your reception.
Terrain
When you pass a ground-based broadcast-repeating
tower, a stronger signal may overtake a weaker one and
the audio system may mute.
Station overload
Your display may show ACQUIRING . . . to indicate the
interference and the audio system may mute.
Satellite radio signal interfer-
ence
SiriusXM Satellite Radio Service
Note: SiriusXM reserves the unrestricted
right to change, rearrange, add or delete
programming including canceling, moving
or adding particular channels, and its prices,
at any time, with or without notice to you.
Ford Motor Company shall not be
responsible for any such programming
changes. SiriusXM satellite radio is a
subscription-based satellite radio service
that broadcasts a variety of music, sports,
news, weather, traffic and entertainment
programming. Your factory-installed
SiriusXM satellite radio system includes
hardware and a limited subscription term,
which begins on the date of sale or lease
of your vehicle. See an authorized dealer
for availability.
For more information on extended
subscription terms (a service fee is
required), the online media player and a
complete list of SiriusXM satellite radio
channels, and other features, please visit
www.siriusxm.com in the United States,
www.siriusxm.ca in Canada, or call
SiriusXM at 1-888-539-7474.
Satellite Radio Electronic Serial
Number (ESN)
You need your ESN to activate, modify or
track your satellite radio account. When in
satellite radio mode, tune to channel 0.
454
Super Duty (TFE) Canada/United States of America, enUSA, Edition date: 201804, Fourth-Printing Audio SystemE208625
Page 463 of 666

System Interaction and Feedback
The system provides feedback through
audible tones, prompts, questions and
spoken confirmations depending on the
situation and the chosen level of
interaction. You can customize the voice
recognition system to provide more or less
instruction and feedback.
The default setting is to a higher level of
interaction in order to help you learn to use
the system. You can change these settings
at any time.
Adjusting the Interaction Level Press the voice button. When
prompted, say:
Action and Description
Voice Command
voice settings
Then either of the following: Provides more detailed interaction and
guidance. (Recommended for first time
users.)
interaction mode novice
Provides less audible interaction and guid-
ance.
interaction mode advanced
Confirmation Prompts
Confirmation prompts are short questions
the system asks when it is not sure of your
request or when there is more than one
possible response to your request.
To adjust this setting press the voice button, when prompted say: Action and Description
Voice Command
voice settings
Then either of the following: Make a best guess from the command; you
may still occasionally be asked to confirm
settings.
confirmation prompts off
Clarify your voice command with a short
question.
confirmation prompts on
Phone Confirmation
Using phone confirmations the system
asks you to verify before placing any calls. 460
Super Duty (TFE) Canada/United States of America, enUSA, Edition date: 201804, Fourth-Printing SYNC™ (If Equipped)E142599
Page 464 of 666

To adjust this setting press the voice button, when prompted say:
Action and Description
Voice Command
voice settings
Then any of the following: When enabled, this feature will prompt you
to confirm any voice initiated call command
prior to the call being placed.
phone confirmation on
The system will make a best guess; you
may still occasionally be asked to confirm
settings.
phone confirmation off
Changing the Voice Settings
In addition to using voice commands to
change the voice settings, you can also use
the menu in the audio display.
To change the voice settings press the
Menu button then select: Menu Item
SYNC-Settings
Voice settings
Note: Depending on the current climate
control settings, the fan speed may
automatically go down while issuing voice
commands or while making and receiving
phone calls via SYNC to reduce the amount
of background noise in the vehicle. The fan
speed will automatically return to normal
operation once the voice session ends. Fan
speed can also be adjusted normally during
a voice session, simply press fan buttons (or
turn fan knob) to increase or decrease fan
speed to desired setting. To disable this automatic fan speed
reduction feature during voice sessions,
press and hold the climate control AC and
Recirculated air buttons simultaneously,
release and then increase fan speed within
2 seconds. To re-enable this feature, repeat
the above sequence.
USING SYNC™ WITH YOUR
PHONE
Hands-free calling is one of the main
features of SYNC. While the system
supports a variety of features, many are
dependent on your cellular phone's
functionality. At a minimum, most cellular
phones with Bluetooth wireless technology
support the following functions:
•
Answering an incoming call.
• Ending a call.
• Using privacy mode.
• Dialing a number.
• Redialing.
• Call waiting notification.
• Caller ID.
461
Super Duty (TFE) Canada/United States of America, enUSA, Edition date: 201804, Fourth-Printing SYNC™ (If Equipped)
Page 485 of 666

Description and Action
Message
This will enter the media menu.
Options
Then any of the following: Description and Action
Message
Choose to shuffle or repeat your music. Once you make your
choice, it remains on until you switch it off.
Shuffle
Choose to shuffle or repeat your music. Once you make your
choice, it remains on until you switch it off.
Repeat track
You can play similar types of music to the current playlist
from the USB port. The system uses the metadata informa-
tion of each track to compile a playlist. The system then
creates a new list of similar tracks and then begins playing.
Each track must have the metadata tags populated for this
feature. With certain playing devices, if your metadata tags
Similar music
are not populated, the tracks will not be available in voice
recognition, the play menu or this option. However, if you
place these tracks onto your playing device in mass storage
device mode they are available in voice recognition, the play
menu or this option. The system places unknowns into any
unpopulated metadata tag.
Resets the USB index. After the new indexing is complete
you can choose what to play from the USB song library.
Reset USB
Accessing Your USB Song Library
1. Plug the device into your vehicle's USB
port. 2. Press the MEDIA button (next to the
audio display) to select USB playback. Description and Action
Message
This menu allows you to select and play your media files by
artist, album, genre, playlist or track.
Browse USB
If there are no media files to access, the
display indicates there is no media.
482
Super Duty (TFE) Canada/United States of America, enUSA, Edition date: 201804, Fourth-Printing SYNC™
(If Equipped)