2019 FORD E SERIES ignition
[x] Cancel search: ignitionPage 100 of 329

Canceling the Set Speed
Tap the brake pedal to cancel the setspeed.
Note:The system remembers the setspeed.
Resuming the Set Speed
Press and release to resume theset speed.
Switching Cruise Control Off
Press and release when thesystem is in standby mode, orswitch the ignition off.
Note:You erase the set speed when youswitch the system off.
97
E-Series (TE4) Canada/United States of America, enUSA, Edition date: 201804, Second-Printing
Cruise Control (If Equipped) E265297
Page 114 of 329

When used properly, the trailer brakecontroller assists in smooth and effectivetrailer braking by powering the trailer’selectric or electric-over-hydraulic brakeswith a proportional output based on thetowing vehicle’s brake pressure.
The controller user interface consists ofthe following:
A: + and - (Gain adjustment buttons):Pressing these buttons adjusts thecontroller's power output to the trailerbrakes in 0.5 increments. You can increasethe gain setting to 10.0 (maximum trailerbraking) or decrease it to 0 (no trailerbraking). The gain setting displays in themessage center.
The controller shows gain setting, outputbar graph, and trailer connectivity statusin the information display. They appear inthe information display as follows:
•Trailer Brake Controller Gain (withouttrailer connected): Shows the currentgain setting during a given ignition cycleand when adjusting the gain. This alsodisplays if you use the manual controllever or make gain adjustments withno trailer connected.
•Trailer Brake Controller Gain Output:Displays when you push your vehicle'sbrake pedal, or upon use of the manualcontrol. Bar indicators illuminate in theinformation display to indicate theamount of power going to the trailerbrakes relative to the brake pedal ormanual control input. One bar indicatesthe least amount of output; six barsindicate maximum output.
•Trailer Connected: Displays when thesystem senses a correct trailer wiringconnection (a trailer with electric trailerbrakes) during a given ignition cycle.
•Trailer Disconnected: Displays,accompanied by a single audible time,when the system senses a trailerconnection and then a disconnection,either intentional or unintentional,during a given ignition cycle. It alsodisplays if a truck or trailer-wiring faultoccurs causing the trailer to appeardisconnected. This message can alsodisplay if you use the manual controllever without a trailer connected.
B: Manual control lever: Slide the controllever to the left to switch on the trailer'selectric brakes independent of the towvehicle's. See the following Procedure forAdjusting Gain section for instructionson proper use of this feature. If you use themanual control while the brake is alsoapplied, the greater of the two inputsdetermines the power sent to the trailerbrakes.
111
E-Series (TE4) Canada/United States of America, enUSA, Edition date: 201804, Second-Printing
TowingE183395
Page 116 of 329

Points to Remember
Note:Do not attempt removal of the trailerbrake controller without consulting theWorkshop Manual. Damage to the unit mayresult.
•Adjust gain setting before using thetrailer brake controller for the first time.
•Adjust gain setting, using the procedureabove, whenever road, weather andtrailer or vehicle loading conditionschange from when the gain was initiallyset.
•Only use the manual control lever forproper adjustment of the gain duringtrailer setup. Misuse, such asapplication during trailer sway, couldcause instability of trailer or towvehicle.
•Avoid towing in adverse weatherconditions. The trailer brake controllerdoes not provide anti-lock control ofthe trailer wheels. Trailer wheels canlock up on slippery surfaces, resultingin reduced stability of trailer and towvehicle.
•The trailer brake controller is equippedwith a feature that reduces output atvehicle speeds below 11 mph (18 km/h)so trailer and vehicle braking is not jerkyor harsh. This feature is only availablewhen applying the brakes using yourvehicle's brake pedal, not thecontroller.
•The controller interacts with the brakecontrol system and powertrain controlsystem of your vehicle to provide thebest performance on different roadconditions.
•Your vehicle's brake system and thetrailer brake system workindependently of each other. Changingthe gain setting on the controller doesnot affect the operation of yourvehicle's brakes whether you attach atrailer or not.
•When you switch the engine off, thecontroller output is disabled and thedisplay and module shut down. Thecontroller module and display turn onwhen you switch the ignition on.
•The trailer brake controller is only afactory-installed or dealer-installeditem. Ford is not responsible forwarranty or performance of thecontroller due to misuse or customerinstallation.
Trailer Lamps
WARNING: Never connect anytrailer lamp wiring to the vehicle's taillamp wiring; this may damage theelectrical system resulting in fire. Contactyour authorized dealer as soon aspossible for assistance in proper trailertow wiring installation. Additionalelectrical equipment may be required.
Trailer lamps are required on most towedvehicles. Make sure all running lights, brakelights, direction indicators and hazard lightsare working.
Before Towing a Trailer
Practice turning, stopping and backing upto get the feel of your vehicle-trailercombination before starting on a trip.When turning, make wider turns so thetrailer wheels clear curbs and otherobstacles.
When Towing a Trailer
•Do not drive faster than 70 mph(113 km/h) during the first 500 mi(800 km).
•Do not make full-throttle starts.
•Check your hitch, electrical connectionsand trailer wheel lug nuts thoroughlyafter you have traveled 50 mi (80 km).
113
E-Series (TE4) Canada/United States of America, enUSA, Edition date: 201804, Second-Printing
Towing
Page 118 of 329

TOWING THE VEHICLE ON
FOUR WHEELS
Emergency Towing
WARNING: If your vehicle has asteering wheel lock make sure theignition is in the accessory or on positionwhen being towed.
You can flat-tow (all wheels on theground, regardless of the powertrain ortransmission configuration) your disabledvehicle (without access to wheel dolliesor vehicle transport trailer) under thefollowing conditions:
•Your vehicle is facing forward so youtow it in a forward direction.
•You shift into Neutral (N). If you cannotshift into Neutral (N), you may need tooverride the transmission. SeeTransmission (page 87).
•Maximum speed is 35 mph (56 km/h).
•Maximum distance is 50 mi (80 km).
Recreational Towing
Note: Put your climate control system inrecirculated air mode to prevent exhaustfumes from entering the vehicle. SeeClimate Control (page 66).
Follow these guidelines if you have a needfor recreational (RV) towing. An exampleof recreational towing would be towingyour vehicle behind a motorhome. Theseguidelines are to make sure you do notdamage the transmission during towing.
Do not tow your vehicle with any wheelson the ground, as vehicle or transmissiondamage may occur. It is recommended totow your vehicle with all four wheels offthe ground, for example when using avehicle transport trailer. Otherwise, youcannot tow your vehicle.
115
E-Series (TE4) Canada/United States of America, enUSA, Edition date: 201804, Second-Printing
Towing
Page 136 of 329

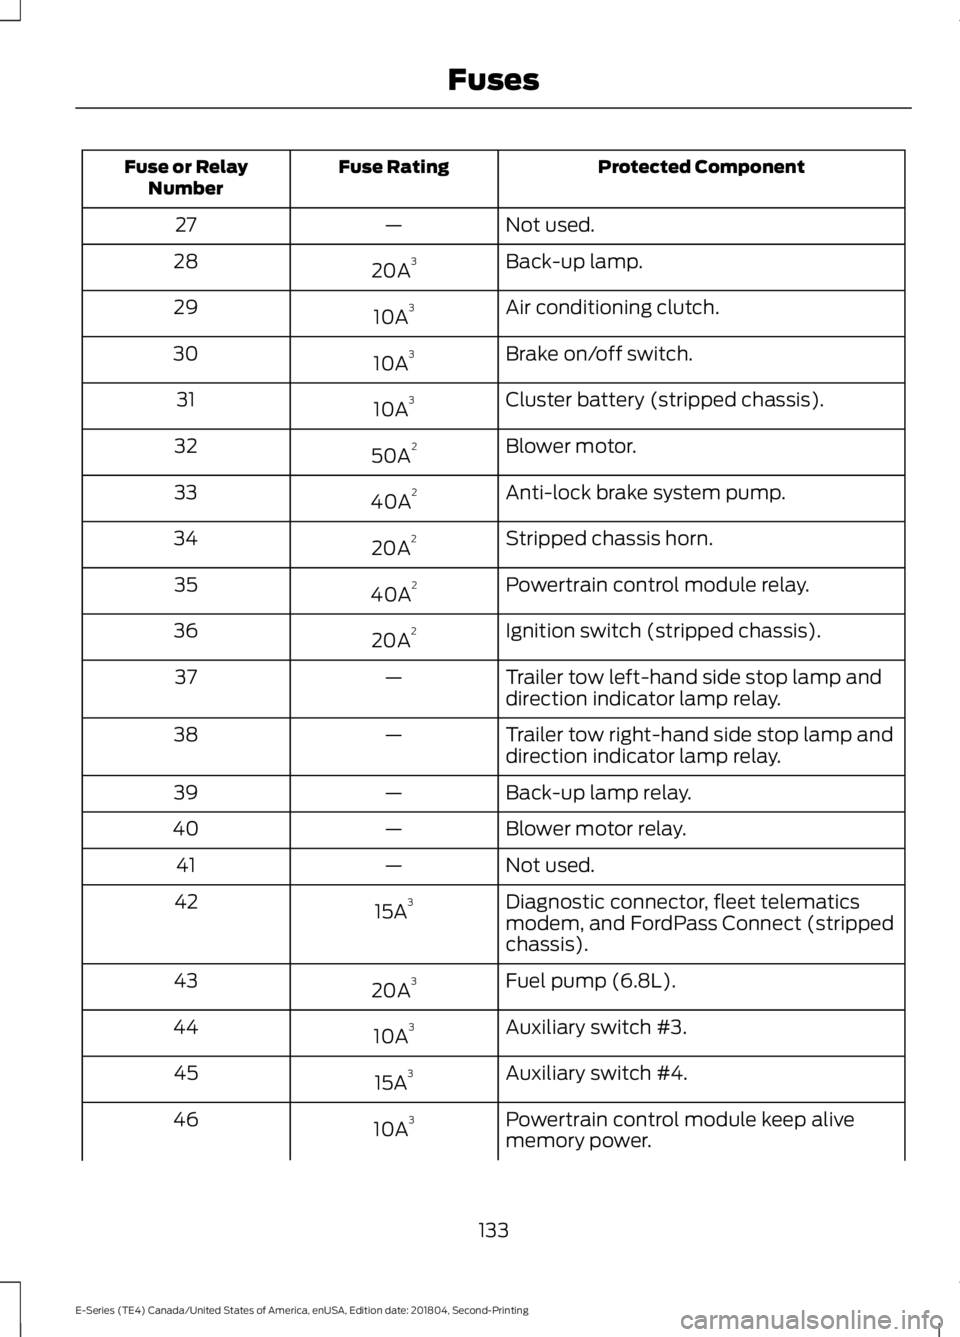
Protected ComponentFuse RatingFuse or RelayNumber
Not used.—27
Back-up lamp.20A328
Air conditioning clutch.10A329
Brake on/off switch.10A330
Cluster battery (stripped chassis).10A331
Blower motor.50A232
Anti-lock brake system pump.40A233
Stripped chassis horn.20A234
Powertrain control module relay.40A235
Ignition switch (stripped chassis).20A236
Trailer tow left-hand side stop lamp anddirection indicator lamp relay.—37
Trailer tow right-hand side stop lamp anddirection indicator lamp relay.—38
Back-up lamp relay.—39
Blower motor relay.—40
Not used.—41
Diagnostic connector, fleet telematicsmodem, and FordPass Connect (strippedchassis).
15A342
Fuel pump (6.8L).20A343
Auxiliary switch #3.10A344
Auxiliary switch #4.15A345
Powertrain control module keep alivememory power.10A346
133
E-Series (TE4) Canada/United States of America, enUSA, Edition date: 201804, Second-Printing
Fuses
Page 138 of 329

Protected ComponentFuse RatingFuse or RelayNumber
Power point 1 (instrument panel).20A267
Modified vehicle.50A268
Not used.—69
Stripped chassis.30A270
Not used.—71
Cigarette lighter/power point.20A272
Not used.—73
Power seat.30A274
Vehicle power 1.20A375Powertrain control module power.
Vehicle power 2.20A376Powertrain control module emissionsrelated components.
Vehicle power 3.10A377Powertrain control module generalcomponents.
Vehicle power 4.15A378Engine ignition coil relay coil.
Vehicle power 5.10A379Transmission.
Cluster run/start (stripped chassis).10A380
Not used.—81
Not used.—82
Fuel pump diode.—83
135
E-Series (TE4) Canada/United States of America, enUSA, Edition date: 201804, Second-Printing
Fuses
Page 141 of 329

Protected ComponentFuse RatingFuse or RelayNumber
Ignition switch feed.20A27
Audio mute (start).5A28
Cluster (except stripped chassis).5A29
Not used (spare).5A30
Not used (spare).10A31
Restraints module.10A32
Trailer brake controller.10A33
Not used (spare).5A34
Cutaway run/start.10A35
Passive anti-theft system radio frequencymodule.5A36
Climate control.10A37Stripped chassis #1 run/start.
Not used (spare).20A38
Radio.20A39
Not used (spare).20A40
Radio.15A41Switch illumination.Automatic dimming rear view mirror.Power inverter.
Auxiliary switch.10A42
Stripped chassis instrument panelconnector #1.10A43
Trailer tow battery charge relay.10A44
Wipers.5A45Stripped chassis engine connector 3.
Passenger airbag deactivation indicator.7.5A46
Windows accessory delay circuit breaker.30A47
Delayed accessory relay.—48
138
E-Series (TE4) Canada/United States of America, enUSA, Edition date: 201804, Second-Printing
Fuses
Page 147 of 329

Only use oils certified for gasoline enginesby the American Petroleum Institute (API).An oil with this trademark symbolconforms to the current engine andemission system protection standards andfuel economy requirements of theInternational Lubricants SpecificationAdvisory Committee (ILSAC).
To top up the engine oil level do thefollowing:
1. Clean the area surrounding the engineoil filler cap before you remove it.
2. Remove the engine oil filler cap. SeeUnder Hood Overview (page 142).Turn it counterclockwise and removeit.
3. Add engine oil that meets Fordspecifications. See Capacities andSpecifications (page 203). You mayhave to use a funnel to pour the engineoil into the opening.
4. Recheck the oil level.
5. If the oil level is correct, replace thedipstick and make sure it is fully seated.
6. Replace the engine oil filler cap. Turnit clockwise until you feel a strongresistance.
Note: Do not add oil further than themaximum mark. Oil levels above themaximum mark may cause engine damage.
Note:Make sure you install the oil filler capcorrectly.
Note:Soak up any spillage with anabsorbent cloth immediately.
OIL CHANGE INDICATOR
RESET
Resetting the Oil Life MonitoringSystem
Only reset the oil life monitoring systemafter changing the engine oil and oil filter.
To reset the oil life monitoring system dothe following:
1.Switch the ignition on. Do not start theengine.
2. Fully press the accelerator and brakepedals at the same time.
3.Keep the accelerator and brake pedalsfully pressed.
4. After three seconds, a messagedisplays confirming the reset procedureis in progress.
5. After 25 seconds, a message displaysconfirming the reset procedure iscomplete.
6. Release the accelerator and brakepedals.
7. Switch the ignition off.
ENGINE COOLANT CHECK
WARNING: Do not remove thecoolant reservoir cap when the engine ison or the cooling system is hot. Wait 10minutes for the cooling system to cooldown. Cover the coolant reservoir capwith a thick cloth to prevent thepossibility of scalding and slowly removethe cap. Failure to follow this instructioncould result in personal injury.
WARNING: Do not put coolant inthe windshield washer reservoir. Ifsprayed on the windshield, coolant couldmake it difficult to see through thewindshield.
144
E-Series (TE4) Canada/United States of America, enUSA, Edition date: 201804, Second-Printing
Maintenance