2019 FORD E SERIES brake
[x] Cancel search: brakePage 116 of 329

Points to Remember
Note:Do not attempt removal of the trailerbrake controller without consulting theWorkshop Manual. Damage to the unit mayresult.
•Adjust gain setting before using thetrailer brake controller for the first time.
•Adjust gain setting, using the procedureabove, whenever road, weather andtrailer or vehicle loading conditionschange from when the gain was initiallyset.
•Only use the manual control lever forproper adjustment of the gain duringtrailer setup. Misuse, such asapplication during trailer sway, couldcause instability of trailer or towvehicle.
•Avoid towing in adverse weatherconditions. The trailer brake controllerdoes not provide anti-lock control ofthe trailer wheels. Trailer wheels canlock up on slippery surfaces, resultingin reduced stability of trailer and towvehicle.
•The trailer brake controller is equippedwith a feature that reduces output atvehicle speeds below 11 mph (18 km/h)so trailer and vehicle braking is not jerkyor harsh. This feature is only availablewhen applying the brakes using yourvehicle's brake pedal, not thecontroller.
•The controller interacts with the brakecontrol system and powertrain controlsystem of your vehicle to provide thebest performance on different roadconditions.
•Your vehicle's brake system and thetrailer brake system workindependently of each other. Changingthe gain setting on the controller doesnot affect the operation of yourvehicle's brakes whether you attach atrailer or not.
•When you switch the engine off, thecontroller output is disabled and thedisplay and module shut down. Thecontroller module and display turn onwhen you switch the ignition on.
•The trailer brake controller is only afactory-installed or dealer-installeditem. Ford is not responsible forwarranty or performance of thecontroller due to misuse or customerinstallation.
Trailer Lamps
WARNING: Never connect anytrailer lamp wiring to the vehicle's taillamp wiring; this may damage theelectrical system resulting in fire. Contactyour authorized dealer as soon aspossible for assistance in proper trailertow wiring installation. Additionalelectrical equipment may be required.
Trailer lamps are required on most towedvehicles. Make sure all running lights, brakelights, direction indicators and hazard lightsare working.
Before Towing a Trailer
Practice turning, stopping and backing upto get the feel of your vehicle-trailercombination before starting on a trip.When turning, make wider turns so thetrailer wheels clear curbs and otherobstacles.
When Towing a Trailer
•Do not drive faster than 70 mph(113 km/h) during the first 500 mi(800 km).
•Do not make full-throttle starts.
•Check your hitch, electrical connectionsand trailer wheel lug nuts thoroughlyafter you have traveled 50 mi (80 km).
113
E-Series (TE4) Canada/United States of America, enUSA, Edition date: 201804, Second-Printing
Towing
Page 117 of 329

•When stopped in congested or heavytraffic during hot weather, place thegearshift in position P to aid engine andtransmission cooling and to help A/Cperformance.
•Switch off the speed control withheavy loads or in hilly terrain. Thespeed control may turn offautomatically when you are towing onlong, steep grades.
•Shift to a lower gear when driving downa long or steep hill. Do not apply thebrakes continuously, as they mayoverheat and become less effective.
•If your transmission is equipped with aGrade Assist or Tow/Haul feature, usethis feature when towing. This providesengine braking and helps eliminateexcessive transmission shifting foroptimum fuel economy andtransmission cooling.
•If your vehicle is equipped withAdvanceTrac with RSC, this systemmay turn on during typical corneringmaneuvers with a heavily loaded trailer.This is normal. Turning the corner at aslower speed while towing may reducethis tendency.
•If you are towing a trailer frequently inhot weather, hilly conditions, at thegross combined weight rating (or anycombination of these factors), considerrefilling your rear axle with syntheticgear lubricant. See Capacities andSpecifications (page 198).
•Allow more distance for stopping witha trailer attached. Anticipate stops andbrake gradually.
•Avoid parking on a grade. However, ifyou must park on a grade:
1. Turn the steering wheel to point yourvehicle tires away from traffic flow.
2. Set your vehicle parking brake.
3. Place the automatic transmission inposition P.
4. Place wheel chocks in front and backof the trailer wheels. (Chocks notincluded with vehicle.)
Your vehicle may be equipped with atemporary or conventional spare tire. A"temporary" spare tire is different in size(diameter or width), tread-type(All-Season or All Terrain) or is from adifferent manufacturer than the road tireson your vehicle. Consult information on thetire label or Safety Compliance label forlimitations when using.
Launching or Retrieving a Boat orPersonal Watercraft (PWC)
Note:Disconnect the wiring to the trailerbefore backing the trailer into the water.
Note:Reconnect the wiring to the trailerafter removing the trailer from the water.
When backing down a ramp during boatlaunching or retrieval:
•Do not allow the static water level torise above the bottom edge of the rearbumper.
•Do not allow waves to break higherthan 6 in (15 cm) above the bottomedge of the rear bumper.
Exceeding these limits may allow water toenter vehicle components:
•Causing internal damage to thecomponents.
•Affecting driveability, emissions andreliability.
Replace the rear axle lubricant anytimethe rear axle has been submerged in water.Water may have contaminated the rearaxle lubricant, which is not normallychecked or changed unless a leak issuspected or other axle repair is required.
114
E-Series (TE4) Canada/United States of America, enUSA, Edition date: 201804, Second-Printing
Towing
Page 120 of 329

•Do not warm up your vehicle on coldmornings.
•Reduce the use of air conditioning andheat.
•Avoid using speed control in hillyterrain.
•Do not rest your foot on the brakepedal while driving.
•Avoid carrying unnecessary weight.
•Avoid adding particular accessories toyour vehicle (e.g. bug deflectors,rollbars/light bars, running boards, skiracks).
•Avoid driving with the wheels out ofalignment.
DRIVING THROUGH WATER
WARNING: Do not drive throughflowing or deep water as you may losecontrol of your vehicle.
Note:Driving through standing water cancause vehicle damage.
Note:Engine damage can occur if waterenters the air filter.
Before driving through standing water,check the depth. Never drive through waterthat is higher than the bottom of the wheelhubs.
When driving through standing water, drivevery slowly and do not stop your vehicle.Your brake performance and traction maybe limited. After driving through water andas soon as it is safe to do so:
•Lightly press the brake pedal to dry thebrakes and to check that they work.
•Check that the horn works.
•Check that the exterior lights work.
•Turn the steering wheel to check thatthe steering power assist works.
FLOOR MATS
WARNING: Use a floor matdesigned to fit the footwell of yourvehicle that does not obstruct the pedalarea. Failure to follow this instructioncould result in the loss of control of yourvehicle, personal injury or death.
WARNING: Pedals that cannotmove freely can cause loss of vehiclecontrol and increase the risk of seriouspersonal injury.
117
E-Series (TE4) Canada/United States of America, enUSA, Edition date: 201804, Second-Printing
Driving HintsE176913
Page 135 of 329

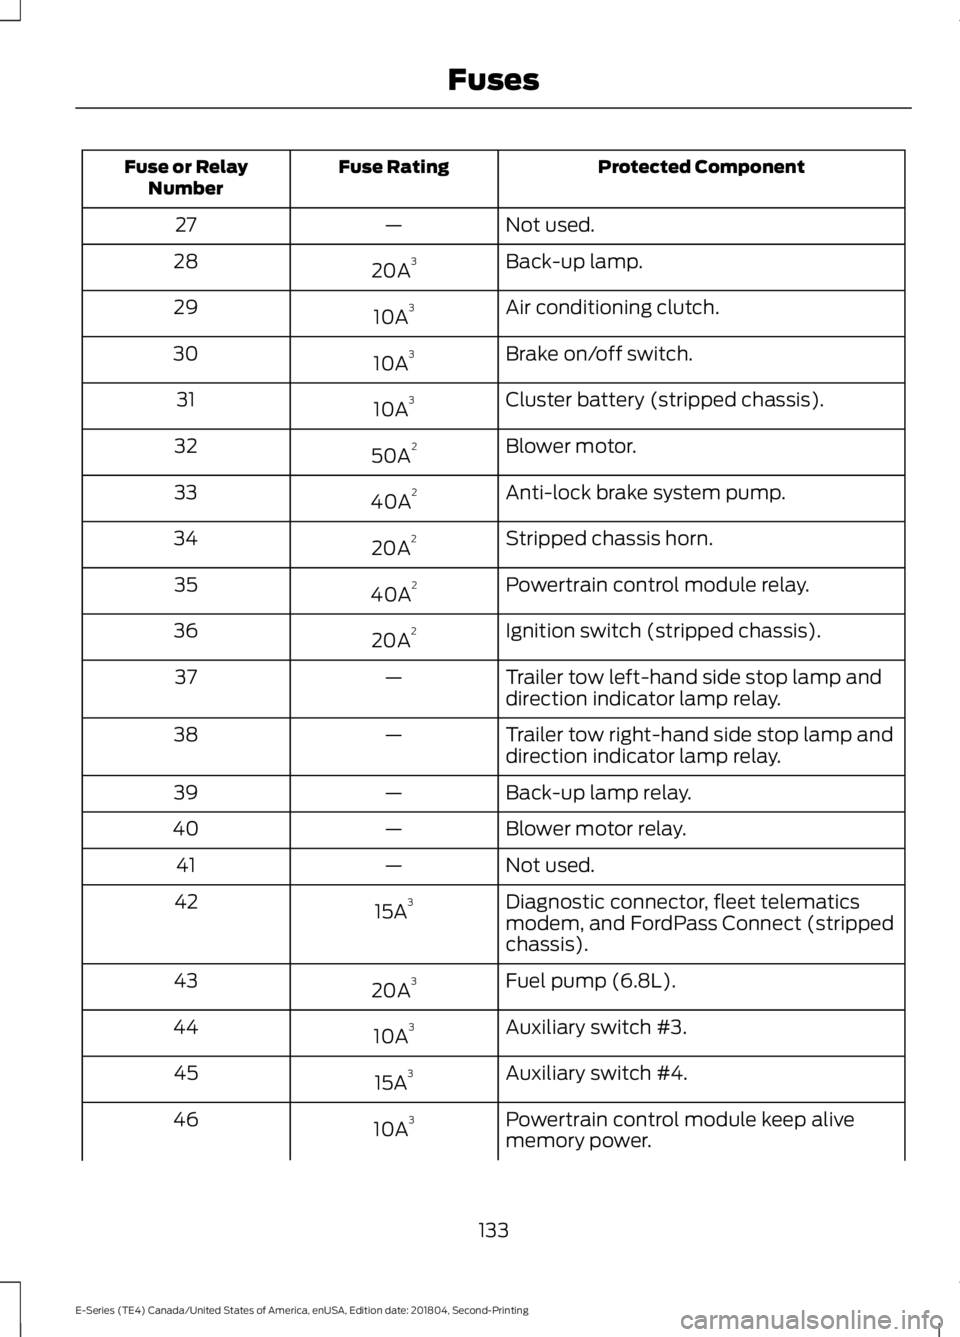
Protected ComponentFuse RatingFuse or RelayNumber
Trailer tow park lamp relay.—6
Auxiliary switch #4 relay.—7
Auxiliary switch #3 relay.—8
Modified vehicle and stripped chassis run/start relay.—9
Cooling fan relay (6.2L engine).—10
Cooling fan (6.2L engine).50A111
Modified vehicle and stripped chassis run/start.40A212
Starter solenoid relay.30A213
Run start relay.40A214
Modified vehicle and stripped chassisbattery.40A215
Auxiliary air conditioning blower.50A216
Trailer tow battery charge.50A217Trailer tow park feed.
Electric trailer brake.30A218Trailer brake controller.
Auxiliary switch #1.30A219
Auxiliary switch #2.30A220
Fuel pump (6.2L).20A221
Not used.—22
Air conditioning clutch relay.—23
Horn relay (stripped chassis).—24
Run start relay.—25
Not used.—26
132
E-Series (TE4) Canada/United States of America, enUSA, Edition date: 201804, Second-Printing
Fuses
Page 136 of 329

Protected ComponentFuse RatingFuse or RelayNumber
Not used.—27
Back-up lamp.20A328
Air conditioning clutch.10A329
Brake on/off switch.10A330
Cluster battery (stripped chassis).10A331
Blower motor.50A232
Anti-lock brake system pump.40A233
Stripped chassis horn.20A234
Powertrain control module relay.40A235
Ignition switch (stripped chassis).20A236
Trailer tow left-hand side stop lamp anddirection indicator lamp relay.—37
Trailer tow right-hand side stop lamp anddirection indicator lamp relay.—38
Back-up lamp relay.—39
Blower motor relay.—40
Not used.—41
Diagnostic connector, fleet telematicsmodem, and FordPass Connect (strippedchassis).
15A342
Fuel pump (6.8L).20A343
Auxiliary switch #3.10A344
Auxiliary switch #4.15A345
Powertrain control module keep alivememory power.10A346
133
E-Series (TE4) Canada/United States of America, enUSA, Edition date: 201804, Second-Printing
Fuses
Page 137 of 329

Protected ComponentFuse RatingFuse or RelayNumber
Canister vent control valve.Powertrain control module relay coil.
Anti-lock brake system relay coil.40A247
Trailer tow stop lamp and direction indic-ator lamps.20A248
Wiper motor.30A249
Not used.—50
Cutaway.20A251
Modified vehicle and stripped chassis run/start relay coil.10A352
Anti-lock brake system run/start feed.10A353
Fuel pump relay coil.10A354
Not used.—55
Not used.—56
Trailer tow park lamp.20A357
Trailer tow back-up lamp.15A358
Not used.—59
Not used.—60
Not used.—61
Auxiliary switch #2 relay.—62
Trailer tow battery charge.30A263
Not used.—64
Power point 2 (glove box).20A265
Power point 3 (cutaway B+).20A266
134
E-Series (TE4) Canada/United States of America, enUSA, Edition date: 201804, Second-Printing
Fuses
Page 139 of 329

Protected ComponentFuse RatingFuse or RelayNumber
Not used.—84
Auxiliary switch #1 relay.—85
1 Cartridge fuse2 A1S fuse3 Mini fuse
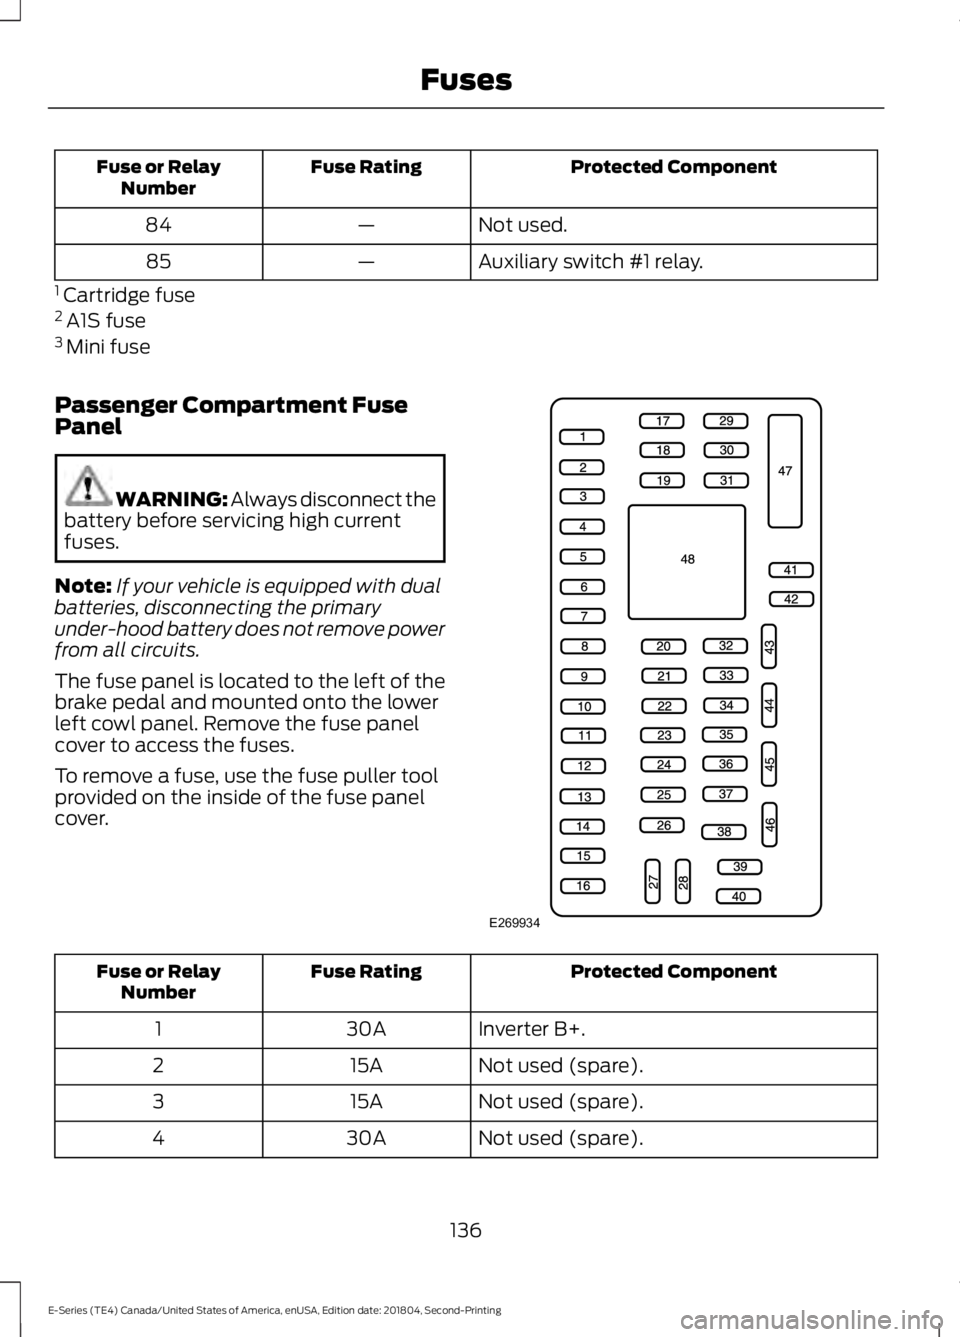
Passenger Compartment FusePanel
WARNING: Always disconnect thebattery before servicing high currentfuses.
Note:If your vehicle is equipped with dualbatteries, disconnecting the primaryunder-hood battery does not remove powerfrom all circuits.
The fuse panel is located to the left of thebrake pedal and mounted onto the lowerleft cowl panel. Remove the fuse panelcover to access the fuses.
To remove a fuse, use the fuse puller toolprovided on the inside of the fuse panelcover.
Protected ComponentFuse RatingFuse or RelayNumber
Inverter B+.30A1
Not used (spare).15A2
Not used (spare).15A3
Not used (spare).30A4
136
E-Series (TE4) Canada/United States of America, enUSA, Edition date: 201804, Second-Printing
FusesE269934
Page 140 of 329

Protected ComponentFuse RatingFuse or RelayNumber
Passenger compartment fuse panel.10A5Brake-shift interlock.
Direction indicators lamps.20A6Hazard lamps.Stop lamps.
Left-side headlamp low beam.10A7
Right-side headlamp low beam.10A8
Courtesy lamps.15A9
Switch illumination.15A10
Not used (spare).10A11
Not used (spare).7.5A12
Mirrors.5A13
SYNC10A14Global positioning system module.
Not used (spare).10A15
Not used (spare).15A16
Door locks.20A17
Not used (spare).20A18
Not used (spare).25A19
Diagnostic connector, fleet telematicsmodem, and FordPass Connect (exceptstripped chassis).
15A20
Not used (spare).15A21
Parking lamps.15A22License plate lamps.
Headlamp high beams.15A23
Horn (except stripped chassis).20A24
Demand lighting.10A25
Cluster (except stripped chassis).10A26
137
E-Series (TE4) Canada/United States of America, enUSA, Edition date: 201804, Second-Printing
Fuses