Page 65 of 332

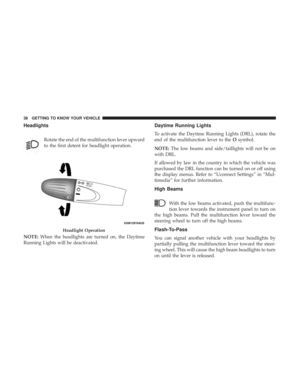
NOTE:Rail lubrication is recommended every 2,000 cycles,
or if scratching noises due to dust are present. Refer to
“Fluids And Lubricants” in “Technical Specifications” for
information.
WARNING!
The convertible top does not provide the structural
protection that a reinforced metal roof does and the
fabric top cannot be expected to prevent the ejection of
the occupants in a collision. Therefore, it is important
that all occupants wear their seat belts at all times.
Death or serious injuries could occur if you are ejected
from the vehicle during a collision.
CAUTION!
Failure to follow these cautions may cause interior
water damage, stains or mildew on the top material:
• Avoid high-pressure car washes, as they can damage
the top material. Also, increased water pressure may
force water past the weather strips.
• Remove any standing water from the top and dry the
surface before opening it. Operating the top, opening
(Continued)
CAUTION! (Continued)
a door or lowering a window while the top is wet
may allow water to drip into the vehicle’s interior.
• Use care when washing the vehicle, water pressure
directed at the weather strip seals may cause water to
leak into the vehicle’s interior.
Power Convertible Top Relearn Procedure
If your power convertible top does not operate in the Auto
Opening/Closing mode (automatically opening/closing to
the one-quarter open and three-quarters open comfort
stops), or if the remote keyless power top function is
inoperable, or if the trunk lid does not open - the following
relearn procedure may be necessary.
1. Confirm that the door/trunk lid are closed.
2. Begin with the top in the fully closed position (using manual mode).
3. Hold the open button to move the top to the fully open position.
4. Continue to hold the open button for an additional 30 seconds.
5. Release the open button.
3
GETTING TO KNOW YOUR VEHICLE 63
Page 66 of 332

6. Hold the closed button to move the top to the fullyclosed position.
7. Continue to hold the closed button until the top begins to cycle fully open, then release the closed button.
At the end of step 7 the top will automatically cycle to the
fully open position, and then close to the one-quarter open
position.
This will confirm that the relearn procedure was success-
ful.
Auto open/close will now be functional, as well as trunk
lid operation, and remote keyless power top function.
NOTE: DO NOT interrupt this activity.
If the power convertible top does not relearn, repeat the
procedure a second time.
Wind Stop
The Wind Stop installs in the backseat area of the vehicle.
The Wind Stop will not interfere with power top operation.
Therefore, it can remain installed when the top is up.
HOOD
Opening
To open the hood, two latches must be released.
1. Pull the bottom of the RED hood release lever, located on the left kick panel, rearward.
Hood Release Lever
64 GETTING TO KNOW YOUR VEHICLE
Page 67 of 332
2. Rotate the safety catch under the front edge of the hood,near the center, and raise the hood. 3. Lift the hood prop rod that clips to the right side (left
side when standing in front of the hood) of the engine
compartment. Place the hood prop rod in the hole of
hood hinge to secure the hood in the open position.
In hot climates, the prop rod may be hot. Pick up the prop
rod at the foam on the end of the prop rod.
Hood Safety Latch Location
Hood Prop Rod
3
GETTING TO KNOW YOUR VEHICLE 65
Page 68 of 332
Closing
WARNING!
Be sure the hood is fully latched before driving your
vehicle. If the hood is not fully latched, it could open
when the vehicle is in motion and block your vision.
Failure to follow this warning could result in serious
injury or death.
CAUTION!
To prevent possible damage, do not slam the hood to
close it. Lower hood to approximately 12 inches (30 cm)
and drop the hood to close. Make sure hood is fully
closed for both latches. Never drive vehicle unless
hood is fully closed, with both latches engaged.
LIFTGATE
Opening
To unlock the liftgate, use the key fob or activate the power
door lock switches located on the driver door handle.
To open the liftgate, squeeze the liftgate release handle and
pull the liftgate open with one fluid motion.
Liftgate Handle
66 GETTING TO KNOW YOUR VEHICLE
Page 69 of 332
WARNING!
•Driving with the liftgate open can allow poisonous
exhaust gases into your vehicle. You and your pas-
sengers could be injured by these fumes. Keep the
liftgate closed when you are operating the vehicle.
• If you are required to drive with the liftgate open,
make sure that all windows are closed, and the
climate control blower switch is set at high speed. Do
not use the recirculation mode.
NOTE: Gas props support the liftgate in the open position.
However, because the gas pressure drops with tempera-
ture, it may be necessary to assist the props when opening
the liftgate in cold weather.
INTERNAL EQUIPMENT
Storage
Glove Compartment
The glove compartment is located on the passenger side of
the instrument panel.
To open the glove compartment, pull the release handle.
Glove Compartment Latch
3
GETTING TO KNOW YOUR VEHICLE 67
Page 70 of 332
Cupholders
Front Cupholders
For the driver and front passenger, cupholders are located
on the floor console between the front seats.
Rear Cupholders
For rear passengers, there are cupholders located on the
floor between the front driver and passenger seats.
Front Cupholders
Rear Cupholders
68 GETTING TO KNOW YOUR VEHICLE
Page 71 of 332
Sun Visors
The driver and passenger sun visors are located on the
headliner, near the front windshield. The sun visors can be
rotated downward or up against the door glass. Both sun
visors are equipped with courtesy mirrors. To view the
courtesy mirror, slide the mirror cover outward.
Electrical Power Outlets
There is a standard 12 Volt (13 Amp) power outlet, located
in the floor console, for added convenience. This power
outlet can power mobile phones, electronics and other low
power devices.
Power is available when the ignition switch is in the
ON/RUN or START position. Insert the cigar lighter or
accessory plug into the outlet for use. To preserve the
Slide Courtesy Mirror Cover Outward(Passenger Side Shown)
Center Stack Power Outlet
3
GETTING TO KNOW YOUR VEHICLE 69
Page 72 of 332
heating element, do not hold the lighter in the heating
position.
CAUTION!
•Do not exceed the maximum power of 160 Watts
(13 Amps) at 12 Volts. If the 160 Watts (13 Amps)
power rating is exceeded, the fuse protecting the
system will need to be replaced.
•
Power outlets are designed for accessory plugs only. Do
not insert any other object in the power outlets as this
will damage the outlet and blow the fuse. Improper use
of the power outlet can cause damage not covered by
your New Vehicle Limited Warranty.
WARNING!
To avoid serious injury or death:
• Only devices designed for use in this type of outlet
should be inserted into any 12 Volt outlet.
• Do not touch with wet hands.
• Close the lid when not in use and while driving the
vehicle.
(Continued)
Power Outlet Fuse Location – Underhood
F15 Fuse 15 A Blue Cigar Lighter Front Console/Aux Power Outlet
70 GETTING TO KNOW YOUR VEHICLE