Page 291 of 490

Front Park/Turn Signal Lamps
1. Raise the hood to access the rear of the headlamphousing.
2. Twist the turn signal socket and remove from the headlamp housing, then pull the bulb out.
3.
Push the new bulb into the socket and reinstall the socket
by twisting until locked into the headlamp housing.
Fog Lamps
NOTE: Access to the fog lamp bulb is from the rear of the
fascia. On the left rear side of the fascia, remove the push
pin and lower the hinged access door on the air dam.
1. From behind the bumper fascia, or the access panel on the air dam, squeeze the two tabs on the side of the bulb
socket and pull straight out from the fog lamp.
CAUTION!
Do not touch the new bulb with your fingers. Oil
contamination will severely shorten bulb life. If the
bulb comes in contact with an oily surface, clean the
bulb with rubbing alcohol.
2. Disconnect the wire harness from the bulb. 3. Reconnect the wiring harness to the new bulb and
reinstall by inserting the new bulb straight into the fog
lamp until it locks into place.
Rear Tail, Stop, Turn Signal, Side Marker And
Backup Lamps
1. Raise the liftgate.
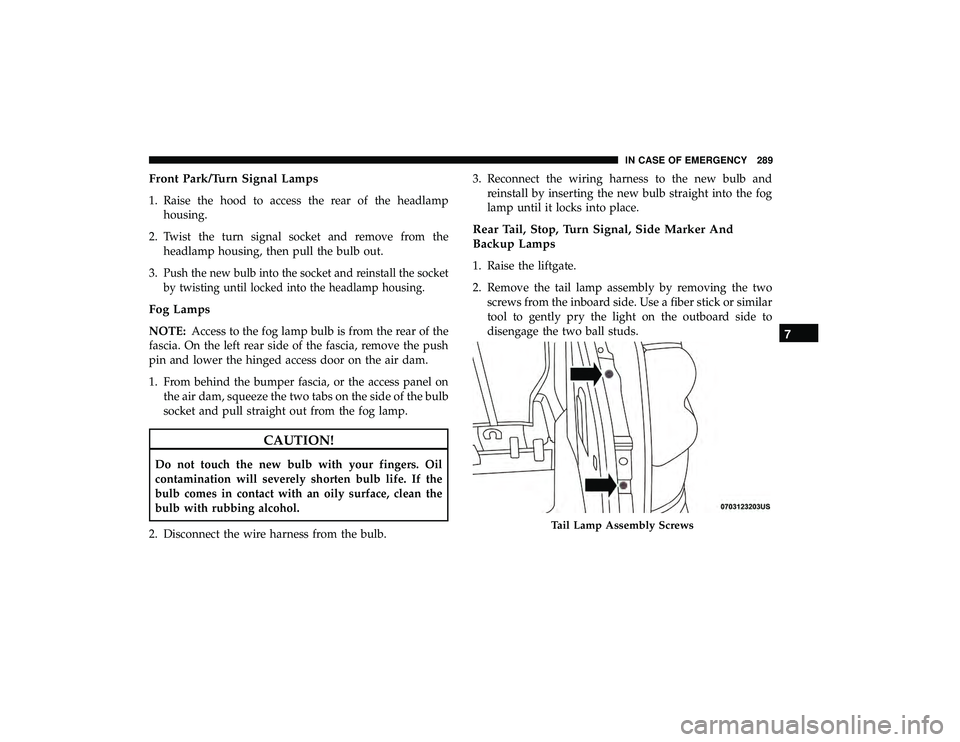
2. Remove the tail lamp assembly by removing the twoscrews from the inboard side. Use a fiber stick or similar
tool to gently pry the light on the outboard side to
disengage the two ball studs.
Tail Lamp Assembly Screws
7
IN CASE OF EMERGENCY 289
Page 292 of 490

NOTE:•If a screwdriver is used, make sure a soft material is
placed between the vehicle body and tool so not to
scratch the paint.
• The PRY location is best closest to the studs while
dislodging them separately.
3. Twist the socket and remove from the lamp assembly.
4. Pull the bulb to remove it from the socket.
5. Replace the bulb, reinstall the socket, and reattach the lamp assembly.
Center High-Mounted Stop Lamp (CHMSL)
The CHMSL uses LED lamps that are not serviceable
separately. The CHMSL must be replaced as an assembly.
See your authorized dealer.
License Lamp
The license plate lamp is located under the tailgate light
bar and above the license plate.
1. Using a small screwdriver, press inward the locking tabon the outboard side of the lamp assembly and pull
down on the lamp assembly for removal. 2. Twist and remove the socket from the lamp assembly
and pull the bulb out to remove.
3. Push the bulb into the socket, twist the socket into the lamp assembly and reinstall the lamp assembly into
place ensuring the locking tab is secure.
FUSES
WARNING!
•When replacing a blown fuse, always use an appro-
priate replacement fuse with the same amp rating as
the original fuse. Never replace a fuse with another
fuse of higher amp rating. Never replace a blown
fuse with metal wires or any other material. Do not
place a fuse inside a circuit breaker cavity or vice
versa. Failure to use proper fuses may result in
serious personal injury, fire and/or property damage.
• Before replacing a fuse, make sure that the ignition is
off and that all the other services are switched off
and/or disengaged.
• If the replaced fuse blows again, contact an autho-
rized dealer.
(Continued)
290 IN CASE OF EMERGENCY
Page 296 of 490
CavityCartridge Fuse Mini-Fuse Description
J15 40 Amp Green –Front Blower
J17 40 Amp Green –Starter Solenoid
J18 20 Amp Blue –Powertrain Control Module Trans Range
J19 60 Amp Yellow –Radiator Fan
J20 30 Amp Pink –Front Wiper LO/HI
J21 20 Amp Blue –Front/Rear Washer
J22 25 Amp Clear –Sunroof Module
M1 –15 Amp Blue Rear Center Brake Lamp/Brake Switch
M2 –20 Amp Yellow Front Fog Lamps
M3 –20 Amp Yellow Vacuum Pump Motor
M5 –25 Amp Clear Inverter
M6 –20 Amp Yellow Power Outlet #1 (ACC), Rain Sensor, Cigar
Lighter (Instrument Panel or with ConsoleRear)
M7 –20 Amp Yellow Power Outlet #2 (BATT/ACC SELECT) –
Center Seat or with Console Rear
M8 –20 Amp Yellow Front Heated Seat — If Equipped
M9 –20 Amp Yellow Rear Heated Seat — If Equipped
294 IN CASE OF EMERGENCY
Page 297 of 490
CavityCartridge Fuse Mini-Fuse Description
M10 –15 Amp Blue Ignition Off Draw — Video System, Satellite
Radio, DVD, Hands-Free Module, UniversalGarage Door Opener, Vanity Lamp, Stream- ing Video Module — If Equipped
M11 –10 Amp Red Climate Control System
M12 –30 Amp Green Amplifier/Radio
M13 –20 Amp Yellow Instrument Cluster, SIREN, Clock Module,
Multifunction Control Switch – If Equipped
M14 –20 Amp Yellow Trailer Tow — If Equipped
M15 –20 Amp Yellow Rear View Mirror, Instrument Cluster, Multi-
function Control Switch, Tire Pressure Moni-tor
M16 –10 Amp Red Airbag Module/Occupant Classification
Module
M17 –15 Amp Blue Left Tail/License/Park Lamp, Running
Lamps
M18 –15 Amp Blue Right Tail/Park/Run Lamp
M19 –25 Amp Clear Powertrain
M20 –15 Amp Blue Instrument Cluster Interior Light, Switch
Bank, Steering Column Module, SwitchSteering Wheel
7
IN CASE OF EMERGENCY 295
Page 298 of 490
CavityCartridge Fuse Mini-Fuse Description
M21 –20 Amp Yellow Powertrain
M22 –10 Amp Red Horn
M23 –10 Amp Red Horn
M24 –25 Amp Clear Rear Wiper
M25 –20 Amp Yellow Fuel Pump
M26 –10 Amp Red Power Mirror Switch, Driver Window Switch
M27 –10 Amp Red Wireless Control Module, Keyless Entry
Module
M28 –10 Amp Red Powertrain, Transmission Control Module
M29 –10 Amp Red Occupant Classification Module
M30 –15 Amp Blue Diagnostic Feed
M31 –20 Amp Yellow Back-Up Lamps
M32 –10 Amp Red Airbag Module, THATCHUM — If
Equipped
M33 –10 Amp Red Powertrain
M34 –10 Amp Red Park Assist, Heater Climate Control Module,
Headlamp Wash, Compass, Rear Camera,
Door Lamps, Flashlight, Relay Diesel Cabin Heater
M35 –10 Amp Red Heated Mirrors
296 IN CASE OF EMERGENCY
Page 310 of 490

WARNING!
Being under a jacked-up vehicle is dangerous. The
vehicle could slip off the jack and fall on you. You
could be crushed. Never get any part of your body
under a vehicle that is on a jack. If you need to get
under a raised vehicle, take it to a service center where
it can be raised on a lift.
3. Place the wrench on the jack screw and turn to the right until the jack head is properly engaged in the appropri-
ate location. Do not raise the vehicle until you are sure
the jack is securely engaged.
4. Raise the vehicle by turning the jack screw to the right, using the swivel wrench. Raise the vehicle only until the
tire just clears the surface and enough clearance is
obtained to install the compact spare tire. Minimum tire
lift provides maximum stability.
WARNING!
Raising the vehicle higher than necessary can make the
vehicle less stable. It could slip off the jack and hurt
someone near it. Raise the vehicle only enough to
remove the tire. 5. Remove the wheel lug nuts. For vehicles with wheel
covers, remove the cover from the wheel by hand by
holding down the wheel and pulling on convenient
features on the cover. Do not pry the wheel cover off.
Then pull the wheel off the hub.
6. Install the compact spare tire. Lightly tighten all the lug nuts until the wheel sits flush onto the hub and there is
no play. The nuts will have to be fully tightened once the
vehicle is lowered. Tightening an improperly seated
wheel under vehicle load can damage the threads, cause
vibration, and undermine safety.
CAUTION!
Be sure to mount the spare tire with the valve stem
facing outward. The vehicle could be damaged if the
spare tire is mounted incorrectly.
308 IN CASE OF EMERGENCY
Page 313 of 490

WARNING!
Verify that both retainer tabs of the wheel spacer have
been properly extended through the center of the
wheel and compact spare tire/cover assembly. Failure
to properly engage both retainer tabs could result in
loss of the compact spare tire and cover assembly,
which will cause vehicle damage and may cause loss of
vehicle control and serious personal injury.
CAUTION!
The compact spare tire/cover assembly must be used
when the compact spare tire is stored. Failure to use
this cover could drastically reduce the life of the
compact spare tire.
4. Using the winch T-handle, rotate the drive nut to the right until the compact spare tire/cover assembly is
drawn into place against the underside of the vehicle. 5. Continue to rotate the nut to the right until you hear the
winch mechanism click three times. It cannot be over-
tightened. Check under the vehicle to ensure the com-
pact spare tire/cover assembly is positioned correctly
against the underside of the vehicle.
CAUTION!
The winch mechanism is designed specifically to stow
a compact spare tire only. Do not attempt to use the
winch to stow the full size deflated tire, or any other
full-size tire, as the tire may not be held securely.
Vehicle damage may result.
Road Tire Installation
Vehicles Equipped With Wheel Covers
1. Mount the road tire on the axle.
2. To ease the installation process for steel wheels withwheel covers, install two lug nuts on the mounting
studs which are on each side of the valve stem. Install
the lug nuts with the cone shaped end of the nut toward
the wheel. Lightly tighten the lug nuts.
7
IN CASE OF EMERGENCY 311
Page 314 of 490

3. Align the valve notch in the wheel cover with the valvestem on the wheel. Install the cover by hand, snapping
the cover over the two lug nuts. Do not use a hammer or
excessive force to install the cover.
4. Install the remaining lug nuts with the cone shaped end of the nut toward the wheel. Lightly tighten all the lug
nuts until the wheel sits flush onto the hub and there is
no play. The nuts will have to be fully tightened once the vehicle is lowered. Tightening an improperly seated
wheel under vehicle load can damage the threads, cause
vibration, and undermine safety.
WARNING!
To avoid the risk of forcing the vehicle off the jack, do
not tighten the wheel nuts fully until the vehicle has
been lowered. Failure to follow this warning may
result in serious injury.
5. Lower the vehicle to the ground by turning the jack handle counterclockwise.
6. Finish tightening the lug nuts. Push down on the wrench while at the end of the handle for increased
leverage. Tighten the lug nuts in a star pattern until each
nut has been tightened twice. Refer to “Torque Specifi-
cations” in “Technical Specifications” for proper wheel
lug nut torque. If in doubt about the correct tightness,
have them checked with a torque wrench by an autho-
rized dealer or at a service station.
7. After 25 miles (40 km) check the lug nut torque with a torque wrench to ensure that all lug nuts are properly
seated against the wheel.
Tire And Wheel Cover Or Center Cap
1 — Valve Stem 4 — Wheel Cover
2 — Valve Notch 5 — Mounting Stud
3 — Wheel Lug Nut 312 IN CASE OF EMERGENCY