2019 DODGE CHARGER SRT service
[x] Cancel search: servicePage 6 of 496
INTRODUCTION
Dear Customer,
Congratulations on selecting your new vehicle. Be assured
that it represents precision workmanship, distinctive styl-
ing, and high quality. This Owner ’s Manual has been
prepared with the assistance of service and engineering
specialists to acquaint you with the operation and mainte-
nance of your vehicle. It is supplemented by Warranty
Information, and customer oriented documents. In the
attached Warranty Booklet, you will find a description of
the services that FCA offers to its customers, the Warranty
Certificate and the details of the terms and conditions for
maintaining its validity. Please take the time to read all of
these publications carefully before driving your vehicle for
the first time. Following the instructions, recommenda-
tions, tips, and important warnings in this manual will
help assure safe and enjoyable operation of your vehicle.
Be sure you are familiar with all vehicle controls, particu-
larly those used for braking, steering, transmission, and
transfer case shifting (if equipped). Learn how your vehicle
handles on different road surfaces. Your driving skills will
improve with experience.This Owner ’s Manual describes all versions of this vehicle.
Options and equipment dedicated to specific markets or
versions are not expressly indicated in the text. Therefore,
you should only consider the information which is related
to the trim level, engine, and version that you have
purchased. Any content introduced throughout the Own-
er ’s Information, that may or may not be applicable to your
vehicle, will be identified with the wording “If Equipped”.
All data contained in this publication are intended to help
you use your vehicle in the best possible way. FCA aims at
a constant improvement of the vehicles produced. For this
reason, it reserves the right to make changes to the model
described for technical and/or commercial reasons. For
further information, contact an authorized dealer.
NOTE:
After reviewing the Owner ’s Information, it should
be stored in the vehicle for convenient referencing, and
remain with the vehicle when sold.
When it comes to service, remember that an authorized
dealer knows your vehicle best, has factory-trained techni-
cians and genuine MOPAR® parts, and cares about your
satisfaction.
4 INTRODUCTION
Page 29 of 496
NOTE:When having the Sentry Key Immobilizer System
serviced, bring all vehicle keys with you to an authorized
dealer.
General Information
The following regulatory statement applies to all radio
frequency (RF) devices equipped in this vehicle:
This device complies with Part 15 of the FCC Rules and
with Industry Canada license-exempt RSS standard(s).
Operation is subject to the following two conditions:
1. This device may not cause harmful interference, and
2. This device must accept any interference received, in- cluding interference that may cause undesired opera-
tion.
NOTE: Changes or modifications not expressly approved
by the party responsible for compliance could void the
user ’s authority to operate the equipment.
IGNITION SWITCH
Keyless Push Button Ignition
This feature allows the driver to operate the ignition with
the push of a button as long as the key fob is in the
passenger compartment.
The Keyless Push Button Ignition has four operating
positions, three of which are labeled and will illuminate
when in position. The three positions are OFF, ACC, and
ON/RUN. The fourth position is START. During start,
ON/RUN will illuminate.
NOTE: If the ignition switch does not change with the
push of a button, the key fob may have a low or dead
battery. In this situation, a back up method can be used to
operate the ignition switch. Put the nose side (side opposite
of the emergency key) of the key fob against the ENGINE
START/STOP button and push to operate the ignition
switch.
3
GETTING TO KNOW YOUR VEHICLE 27
Page 36 of 496
If the vehicle security light turns on during normal vehicle
operation (vehicle running for longer than ten seconds), it
indicates that there is a fault in the electronics. Should this
occur, have the vehicle serviced as soon as possible by an
authorized dealer.
CAUTION!
The Sentry Key Immobilizer system is not compatible
with some aftermarket remote starting systems. Use of
these systems may result in vehicle starting problems
and loss of security protection.
All of the key fobs provided with your new vehicle have
been programmed to the vehicle electronics.
Key Programming
Programming key fobs may be performed at an authorized
dealer.
Replacement Keys
NOTE: Only key fobs that are programmed to the vehicle
electronics can be used to start and operate the vehicle.
Once a key fob is programmed to a vehicle, it cannot be
programmed to any other vehicle.
CAUTION!
• Always remove the key fobs from the vehicle and
lock all doors when leaving the vehicle unattended.
• For vehicles equipped with Keyless Enter-N-Go —
Ignition, always remember to place the ignition in
the OFF position.
NOTE: Duplication of key fobs may be performed at an
authorized dealer. This procedure consists of programming
a blank key fob to the vehicle electronics. A blank key fob
is one that has never been programmed.
When having the Sentry Key Immobilizer System serviced,
bring all vehicle keys with you to an authorized dealer.
General Information
The following regulatory statement applies to all radio
frequency (RF) devices equipped in this vehicle:
This device complies with Part 15 of the FCC Rules and
with Industry Canada license-exempt RSS standard(s).
Operation is subject to the following two conditions:
1. This device may not cause harmful interference, and
34 GETTING TO KNOW YOUR VEHICLE
Page 44 of 496
General Information
The following regulatory statement applies to all radio
frequency (RF) devices equipped in this vehicle:
This device complies with Part 15 of the FCC Rules and
with Industry Canada license-exempt RSS standard(s).
Operation is subject to the following two conditions:
1. This device may not cause harmful interference, and
2. This device must accept any interference received, in-cluding interference that may cause undesired opera-
tion.
NOTE: Changes or modifications not expressly approved
by the party responsible for compliance could void the
user ’s authority to operate the equipment.
Automatic Unlock Doors On Exit
The doors will unlock automatically on vehicles with
power door locks if:
1. The Automatic Unlock Doors On Exit feature is enabled.
2. The vehicle was in motion, then speed returned to 0 mph (0 km/h) and the transmission is placed in PARK. 3. The driver door is opened.
4. The doors were not previously unlocked.
NOTE: Automatic Unlock Doors On Exit Programming
To change the current setting, refer to “Uconnect Settings”
in “Multimedia” for further information.
Use the Automatic Unlock Doors On Exit feature in accor-
dance with local laws.
Automatic Door Locks — If Equipped
The auto door lock feature default condition is enabled.
When enabled, the door locks will lock automatically when
the vehicle’s speed exceeds 15 mph (24 km/h). The auto
door lock feature can be enabled or disabled by an autho-
rized dealer per written request of the customer. Please see
an authorized dealer for service.
Child-Protection Door Lock System — Rear Doors
To provide a safer environment for small children riding in
the rear seats, the rear doors are equipped with Child-
Protection Door Lock system.
42 GETTING TO KNOW YOUR VEHICLE
Page 58 of 496
NOTE:
•The head restraint should only be removed by qualified
technicians, for service purposes only. If the center rear
head restraint requires removal, see an authorized
dealer.
• The outboard head restraints are not adjustable.
WARNING!
ALL the head restraints MUST be reinstalled in the
vehicle to properly protect the occupants. Follow the
re-installation instructions above prior to operating the
vehicle or occupying a seat.
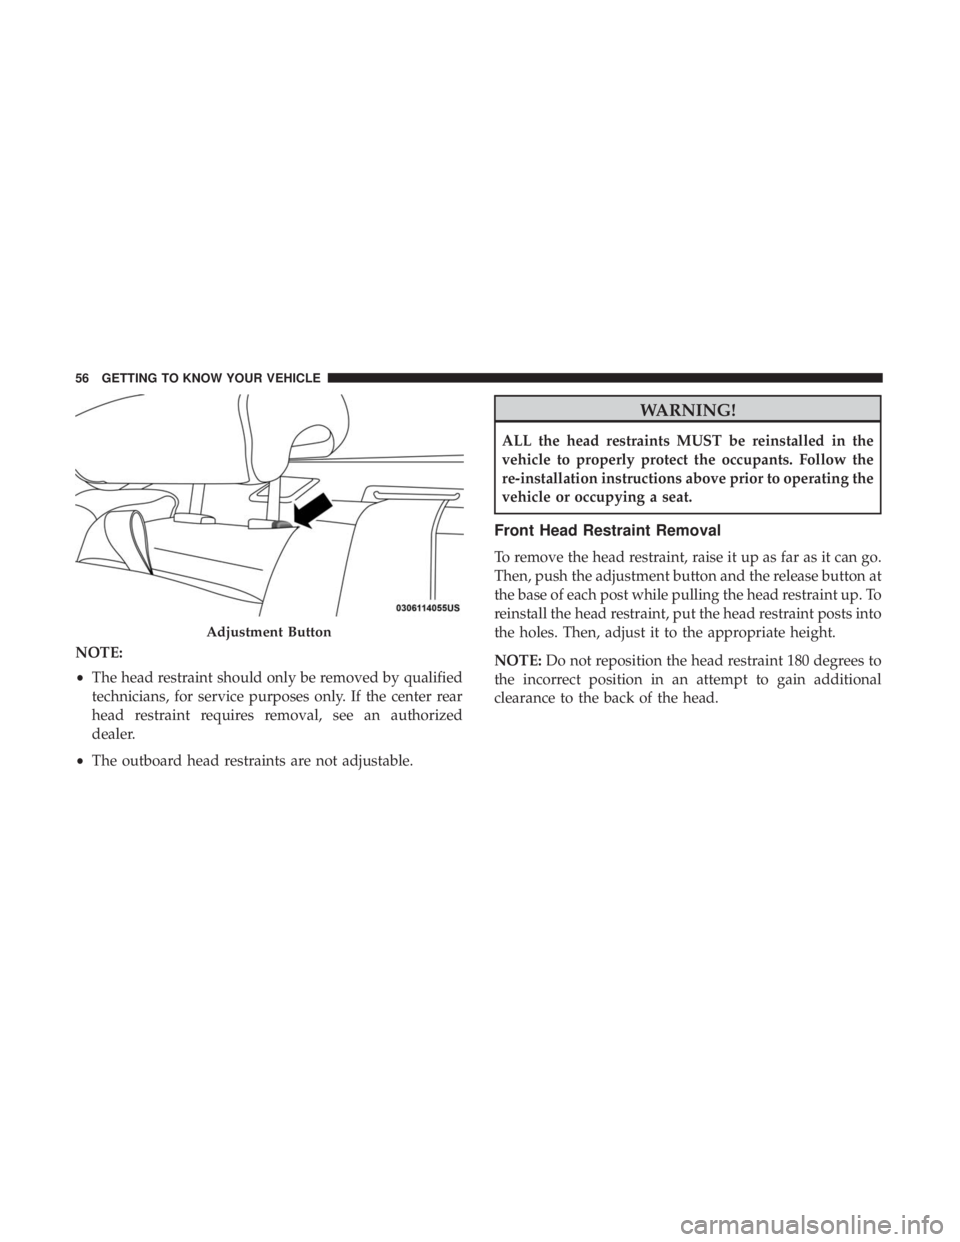
Front Head Restraint Removal
To remove the head restraint, raise it up as far as it can go.
Then, push the adjustment button and the release button at
the base of each post while pulling the head restraint up. To
reinstall the head restraint, put the head restraint posts into
the holes. Then, adjust it to the appropriate height.
NOTE: Do not reposition the head restraint 180 degrees to
the incorrect position in an attempt to gain additional
clearance to the back of the head.
Adjustment Button
56 GETTING TO KNOW YOUR VEHICLE
Page 83 of 496
Vacation/Storage
Before you store your vehicle, or keep it out of service (i.e.,
vacation) for two weeks or more, run the air conditioning
system at idle for about five minutes, in fresh air with the
blower setting on high. This will ensure adequate system
lubrication to minimize the possibility of compressor dam-
age when the system is started again.
Window Fogging
Vehicle windows tend to fog on the inside in mild, rainy,
and/or humid weather. To clear the windows, select De-
frost or Mix mode and increase the front blower speed. Do
not use the Recirculation mode without A/C for long
periods, as fogging may occur.
CAUTION!
Failure to follow these cautions can cause damage to
the heating elements:
•Use care when washing the inside of the rear win-
dow. Do not use abrasive window cleaners on the
(Continued)
CAUTION! (Continued)
interior surface of the window. Use a soft cloth and a
mild washing solution, wiping parallel to the heat-
ing elements. Labels can be peeled off after soaking
with warm water.
•
Do not use scrapers, sharp instruments, or abrasive
window cleaners on the interior surface of the window.
• Keep all objects a safe distance from the window.
Outside Air Intake
Make sure the air intake, located directly in front of the
windshield, is free of obstructions, such as leaves. Leaves
collected in the air intake may reduce airflow, and if they
enter the plenum, they could plug the water drains. In
Winter months, make sure the air intake is clear of ice,
slush, and snow.
Cabin Air Filter
The climate control system filters out dust and pollen from
the air. Contact an authorized dealer to service your cabin
air filter, and to have it replaced when needed.
3
GETTING TO KNOW YOUR VEHICLE 81
Page 111 of 496
3. Speedometer•Indicates vehicle speed.
4. Fuel Gauge •The pointer shows the level of fuel in the fuel tank
when the Keyless Push Button Ignition is in the
ON/RUN position.
•
The fuel pump symbol points to the side of the
vehicle where the fuel door is located.
5. Temperature Gauge
•The temperature gauge shows engine coolant tem-
perature. Any reading within the normal range indi-
cates that the engine cooling system is operating
satisfactorily.
• The gauge pointer will likely indicate a higher tem-
perature when driving in hot weather, up mountain
grades, or when towing a trailer. It should not be
allowed to exceed the upper limits of the normal
operating range.
WARNING!
A hot engine cooling system is dangerous. You or
others could be badly burned by steam or boiling
coolant. You may want to call an authorized dealer for
service if your vehicle overheats. If you decide to look
under the hood yourself, see “Servicing And Mainte-
nance.” Follow the warnings under the Cooling System
Pressure Cap paragraph.
CAUTION!
Driving with a hot engine cooling system could dam-
age your vehicle. If the temperature gauge reads “H,”
pull over and stop the vehicle. Idle the vehicle with the
air conditioner turned off until the pointer drops back
into the normal range. If the pointer remains on the
“H,” turn the engine off immediately and call an
authorized dealer for service.
NOTE: The hard telltales will illuminate for a bulb check
when the ignition is first cycled.
4
GETTING TO KNOW YOUR INSTRUMENT PANEL 109
Page 124 of 496
•Evaluate the latest driving cycles (distance, driving time
and parking time).
• The vehicle should have service performed if the mes-
sage is still present during consecutive trips and the
evaluation of the vehicle and driving pattern did not
help to identify the cause.
WARNING LIGHTS AND MESSAGES
The warning/indicator lights will illuminate in the instru-
ment panel together with a dedicated message and/or
acoustic signal when applicable. These indications are
indicative and precautionary and as such must not be
considered as exhaustive and/or alternative to the infor-
mation contained in the Owner ’s Manual, which you are
advised to read carefully in all cases. Always refer to the
information in this chapter in the event of a failure indica-
tion. All active telltales will display first if applicable. The
system check menu may appear different based upon
equipment options and current vehicle status. Some tell-
tales are optional and may not appear.
Red Warning Lights
— Air Bag Warning Light
This warning light will illuminate to indicate a fault with
the air bag, and will turn on for four to eight seconds as a
bulb check when the ignition is placed in the ON/RUN or
ACC/ON/RUN position. This light will illuminate with a
single chime when a fault with the air bag has been
detected, it will stay on until the fault is cleared. If the light
is either not on during startup, stays on, or turns on while
driving, have the system inspected at an authorized dealer
as soon as possible.
— Brake Warning Light
This warning light monitors various brake functions, in-
cluding brake fluid level and parking brake application. If
the brake light turns on it may indicate that the parking
brake is applied, that the brake fluid level is low, or that
there is a problem with the anti-lock brake system reser-
voir.
122 GETTING TO KNOW YOUR INSTRUMENT PANEL