2019 DODGE CHARGER SRT fuel pressure
[x] Cancel search: fuel pressurePage 111 of 496
3. Speedometer•Indicates vehicle speed.
4. Fuel Gauge •The pointer shows the level of fuel in the fuel tank
when the Keyless Push Button Ignition is in the
ON/RUN position.
•
The fuel pump symbol points to the side of the
vehicle where the fuel door is located.
5. Temperature Gauge
•The temperature gauge shows engine coolant tem-
perature. Any reading within the normal range indi-
cates that the engine cooling system is operating
satisfactorily.
• The gauge pointer will likely indicate a higher tem-
perature when driving in hot weather, up mountain
grades, or when towing a trailer. It should not be
allowed to exceed the upper limits of the normal
operating range.
WARNING!
A hot engine cooling system is dangerous. You or
others could be badly burned by steam or boiling
coolant. You may want to call an authorized dealer for
service if your vehicle overheats. If you decide to look
under the hood yourself, see “Servicing And Mainte-
nance.” Follow the warnings under the Cooling System
Pressure Cap paragraph.
CAUTION!
Driving with a hot engine cooling system could dam-
age your vehicle. If the temperature gauge reads “H,”
pull over and stop the vehicle. Idle the vehicle with the
air conditioner turned off until the pointer drops back
into the normal range. If the pointer remains on the
“H,” turn the engine off immediately and call an
authorized dealer for service.
NOTE: The hard telltales will illuminate for a bulb check
when the ignition is first cycled.
4
GETTING TO KNOW YOUR INSTRUMENT PANEL 109
Page 116 of 496
Vehicle Info
Push and release theupordown arrow button until the
“Vehicle Info” menu is displayed in the instrument cluster
display. Push and release the rightorleft arrow button to
scroll through the submenus items of “Vehicle Info.” Fol-
low the directional prompts to access or reset any of the
following “Vehicle Info” submenu items:
• Tire Pressure Monitor
• Coolant Temp
• Trans Temp
• Oil Temp
• Oil Pressure
• Oil Life
• Battery Voltage
• Storage Mode
• Through this option, the vehicle can be placed into
Storage Mode.
• Intake Air Temp
• Engine Torque
• Engine Power •
Air-Fuel Ratio — If Equipped
• Boost Pressure — If Equipped
• Intercooler (I/C) Temp — If Equipped
Performance Features
WARNING!
Measurement of vehicle statistics with the Perfor-
mance Features is intended for off-highway or track
use only and should not be done on any public
roadways. It is recommended that these features be
used in a controlled environment and within the limits
of the law. The capabilities of the vehicle as measured
by the performance pages must never be exploited in a
reckless or dangerous manner, which can jeopardize
the user ’s safety or the safety of others. Only a safe,
attentive, and skillful driver can prevent accidents.
Push and release the upordown arrow button until the
Performance menu is displayed in the instrument cluster
display. Push the rightorleft arrow button to enter the
submenus.
114 GETTING TO KNOW YOUR INSTRUMENT PANEL
Page 130 of 496
— Electronic Stability Control (ESC) Off Warning
Light — If Equipped
This warning light indicates the Electronic Stability Control
(ESC) is off.
Each time the ignition is turned to ON/RUN or ACC/ON/
RUN, the ESC system will be on, even if it was turned off
previously.
The ESC OFF indicator will be lit any time the Traction
Mode is set to Sport, Track or Full OFF in Drive Modes.
— Low Washer Fluid Warning Light — If
Equipped
This warning light will illuminate when the windshield
washer fluid is low.
— Tire Pressure Monitoring System (TPMS)
Warning Light
The warning light switches on and a message is displayed
to indicate that the tire pressure is lower than the recom-
mended value and/or that slow pressure loss is occurring.
In these cases, optimal tire duration and fuel consumption
may not be guaranteed. Should one or more tires be in the condition mentioned
above, the display will show the indications corresponding
to each tire.
CAUTION!
Do not continue driving with one or more flat tires as
handling may be compromised. Stop the vehicle,
avoiding sharp braking and steering. If a tire puncture
occurs, repair immediately using the dedicated tire
repair kit and contact an authorized dealer as soon as
possible.
Each tire, including the spare (if provided), should be
checked monthly when cold and inflated to the inflation
pressure recommended by the vehicle manufacturer on the
vehicle placard or tire inflation pressure label. (If your
vehicle has tires of a different size than the size indicated
on the vehicle placard or tire inflation pressure label, you
should determine the proper tire inflation pressure for
those tires.)
As an added safety feature, your vehicle has been
equipped with a Tire Pressure Monitoring System (TPMS)
that illuminates a low tire pressure telltale when one or
128 GETTING TO KNOW YOUR INSTRUMENT PANEL
Page 131 of 496
more of your tires is significantly under-inflated. Accord-
ingly, when the low tire pressure telltale illuminates, you
should stop and check your tires as soon as possible, and
inflate them to the proper pressure. Driving on a signifi-
cantly under-inflated tire causes the tire to overheat and
can lead to tire failure. Under-inflation also reduces fuel
efficiency and tire tread life, and may affect the vehicle’s
handling and stopping ability.
Please note that the TPMS is not a substitute for proper tire
maintenance, and it is the driver ’s responsibility to main-
tain correct tire pressure, even if under-inflation has not
reached the level to trigger illumination of the TPMS low
tire pressure telltale.
Your vehicle has also been equipped with a TPMS malfunc-
tion indicator to indicate when the system is not operating
properly. The TPMS malfunction indicator is combined
with the low tire pressure telltale. When the system detects
a malfunction, the telltale will flash for approximately one
minute and then remain continuously illuminated. This
sequence will continue upon subsequent vehicle start-ups
as long as the malfunction exists. When the malfunction
indicator is illuminated, the system may not be able to
detect or signal low tire pressure as intended. TPMS
malfunctions may occur for a variety of reasons, includingthe installation of replacement or alternate tires or wheels
on the vehicle that prevent the TPMS from functioning
properly. Always check the TPMS malfunction telltale after
replacing one or more tires or wheels on your vehicle to
ensure that the replacement or alternate tires and wheels
allow the TPMS to continue to function properly.
CAUTION!
The TPMS has been optimized for the original equip-
ment tires and wheels. TPMS pressures and warning
have been established for the tire size equipped on
your vehicle. Undesirable system operation or sensor
damage may result when using replacement equip-
ment that is not of the same size, type, and/or style.
Aftermarket wheels can cause sensor damage. Using
aftermarket tire sealants may cause the Tire Pressure
Monitoring System (TPMS) sensor to become inoper-
able. After using an aftermarket tire sealant it is
recommended that you take your vehicle to your au-
thorized dealer to have your sensor function checked.
— Low Fuel Warning Light
When the fuel level reaches approximately 2 gal (7.5 L), this
light will turn on and a chime will sound. The light will
remain on until fuel is added.
4
GETTING TO KNOW YOUR INSTRUMENT PANEL 129
Page 162 of 496
CAUTION!(Continued)
•After inspecting or adjusting the tire pressure always
reinstall the valve stem cap. This will prevent mois-
ture and dirt from entering the valve stem, which
could damage the TPMS sensor.
NOTE:
• The TPMS is not intended to replace normal tire care and
maintenance or to provide warning of a tire failure or
condition.
• The TPMS should not be used as a tire pressure gauge
while adjusting your tire pressure.
• Driving on a significantly under-inflated tire causes the
tire to overheat and can lead to tire failure. Under-
inflation also reduces fuel efficiency and tire tread life,
and may affect the vehicle’s handling and stopping
ability.
• The TPMS is not a substitute for proper tire mainte-
nance, and it is the driver ’s responsibility to maintain
correct tire pressure using an accurate tire pressure
gauge, even if under-inflation has not reached the level
to trigger illumination of the TPMS Warning Light. •
Seasonal temperature changes will affect tire pressure,
and the TPMS will monitor the actual tire pressure in the
tire.
Premium System
The Tire Pressure Monitor System (TPMS) uses wireless
technology with wheel rim mounted electronic sensors to
monitor tire pressure levels. Sensors, mounted to each
wheel as part of the valve stem, transmit tire pressure
readings to the receiver module.
NOTE: It is particularly important for you to check the tire
pressure in all of the tires on your vehicle monthly and to
maintain the proper pressure.
The TPMS consists of the following components:
• Receiver module
• Four tire pressure monitoring sensors
• Various tire pressure monitoring system messages,
which display in the instrument cluster
• Tire Pressure Monitoring System Warning Light
160 SAFETY
Page 301 of 496
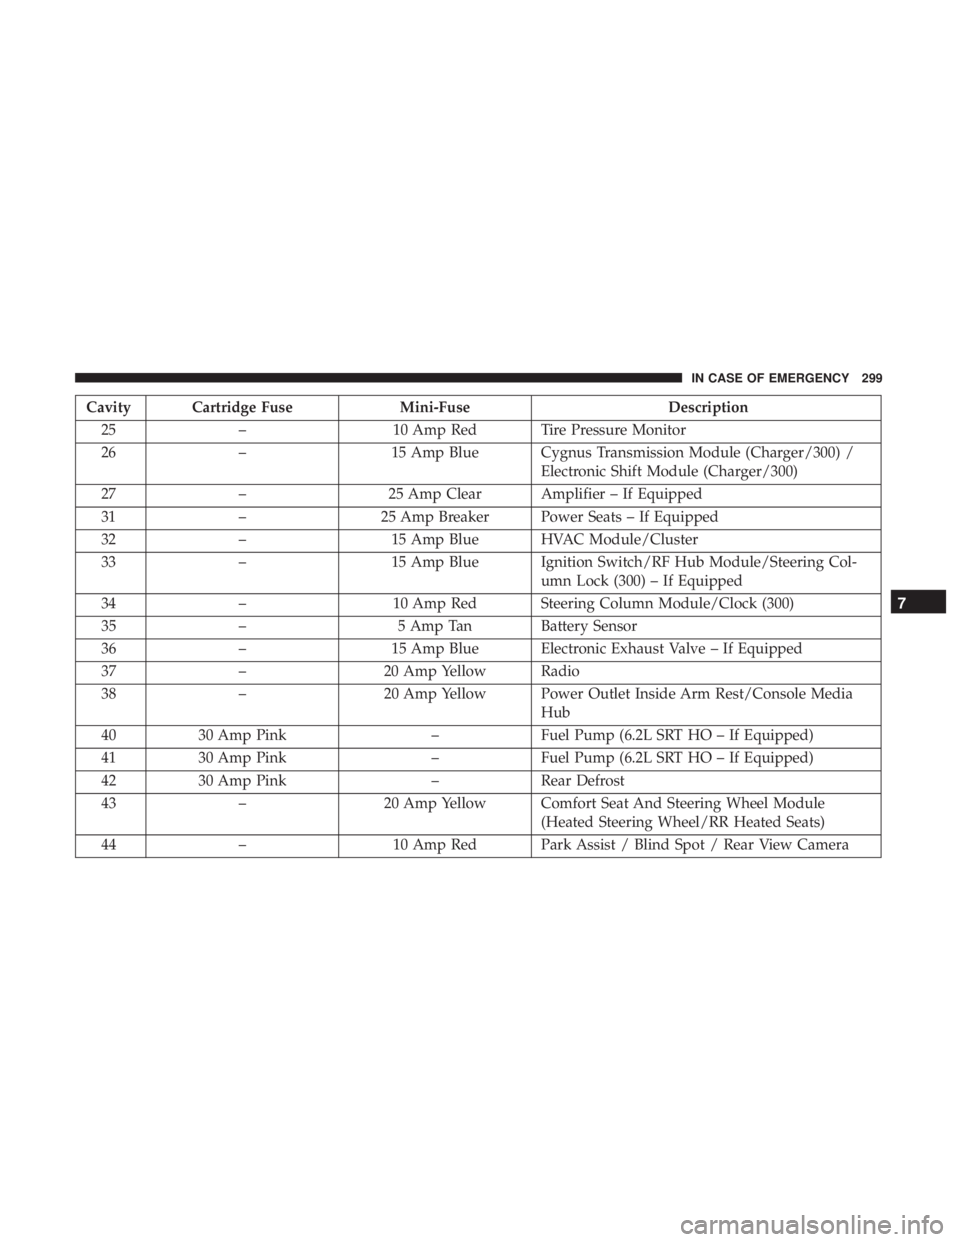
Cavity Cartridge FuseMini-FuseDescription
25 – 10 Amp Red Tire Pressure Monitor
26 – 15 Amp Blue Cygnus Transmission Module (Charger/300) /
Electronic Shift Module (Charger/300)
27 – 25 Amp Clear Amplifier – If Equipped
31 – 25 Amp Breaker Power Seats – If Equipped
32 – 15 Amp Blue HVAC Module/Cluster
33 – 15 Amp Blue Ignition Switch/RF Hub Module/Steering Col-
umn Lock (300) – If Equipped
34 – 10 Amp Red Steering Column Module/Clock (300)
35 – 5 Amp Tan Battery Sensor
36 – 15 Amp Blue Electronic Exhaust Valve – If Equipped
37 – 20 Amp Yellow Radio
38 – 20 Amp Yellow Power Outlet Inside Arm Rest/Console Media
Hub
40 30 Amp Pink –Fuel Pump (6.2L SRT HO – If Equipped)
41 30 Amp Pink –Fuel Pump (6.2L SRT HO – If Equipped)
42 30 Amp Pink –Rear Defrost
43 – 20 Amp Yellow Comfort Seat And Steering Wheel Module
(Heated Steering Wheel/RR Heated Seats)
44 – 10 Amp Red Park Assist / Blind Spot / Rear View Camera
7
IN CASE OF EMERGENCY 299
Page 368 of 496
Fuel Economy
Underinflated tires will increase tire rolling resistance
resulting in higher fuel consumption.
Tread Wear
Improper cold tire inflation pressures can cause abnormal
wear patterns and reduced tread life, resulting in the need
for earlier tire replacement.
Ride Comfort And Vehicle Stability
Proper tire inflation contributes to a comfortable ride.
Over-inflation produces a jarring and uncomfortable ride.
Tire Inflation Pressures
The proper cold tire inflation pressure is listed on the
driver’s side B-Pillar or rear edge of the driver’s side door.
At least once a month:
•Check and adjust tire pressure with a good quality
pocket-type pressure gauge. Do not make a visual
judgement when determining proper inflation. Tires
may look properly inflated even when they are under-
inflated.
• Inspect tires for signs of tire wear or visible damage.
CAUTION!
After inspecting or adjusting the tire pressure, always
reinstall the valve stem cap. This will prevent moisture
and dirt from entering the valve stem, which could
damage the valve stem.
Inflation pressures specified on the placard are always
“cold tire inflation pressure”. Cold tire inflation pressure is
defined as the tire pressure after the vehicle has not been
driven for at least three hours, or driven less than 1 mile
(1.6 km) after sitting for a minimum of three hours. The
cold tire inflation pressure must not exceed the maximum
inflation pressure molded into the tire sidewall.
Check tire pressures more often if subject to a wide range
of outdoor temperatures, as tire pressures vary with tem-
perature changes.
Tire pressures change by approximately 1 psi (7 kPa) per
12°F (7°C) of air temperature change. Keep this in mind
when checking tire pressure inside a garage, especially in
the Winter.
Example: If garage temperature = 68°F (20°C) and the
outside temperature = 32°F (0°C) then the cold tire inflation
366 SERVICING AND MAINTENANCE
Page 407 of 496
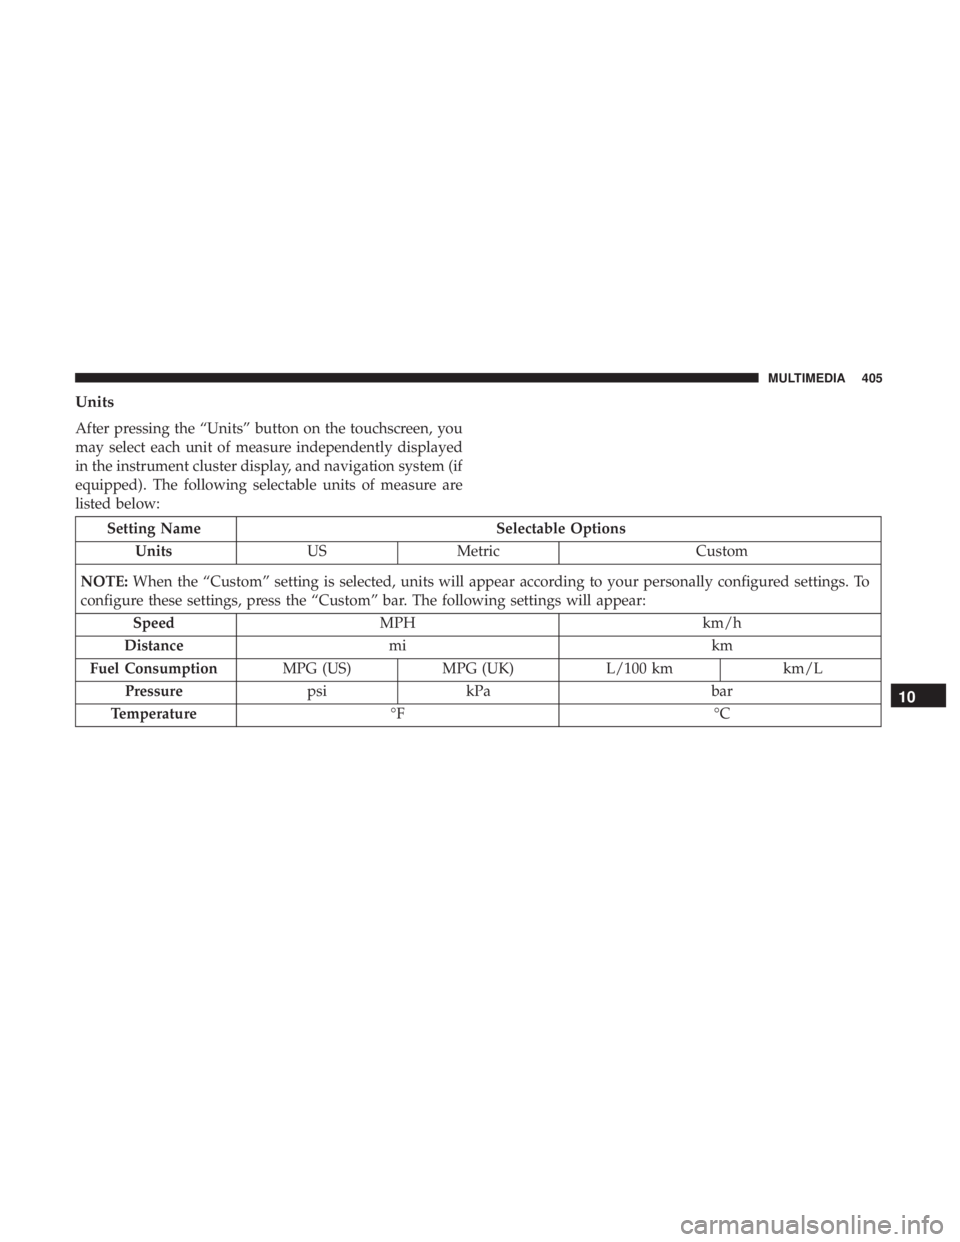
Units
After pressing the “Units” button on the touchscreen, you
may select each unit of measure independently displayed
in the instrument cluster display, and navigation system (if
equipped). The following selectable units of measure are
listed below:
Setting NameSelectable Options
Units USMetric Custom
NOTE: When the “Custom” setting is selected, units will appear according to your personally configured settings. To
configure these settings, press the “Custom” bar. The following settings will appear:
Speed MPH km/h
Distance mi km
Fuel Consumption MPG (US)MPG (UK) L/100 km km/L
Pressure psikPa bar
Temperature °F °C
10
MULTIMEDIA 405