2019 DODGE CHARGER SRT parking brake
[x] Cancel search: parking brakePage 226 of 496
NOTE:After selecting any gear range, wait a moment to
allow the selected gear to engage before accelerating. This
is especially important when the engine is cold.
PARK (P)
This range supplements the parking brake by locking the
transmission. The engine can be started in this range.
Never attempt to use PARK while the vehicle is in motion.
Apply the parking brake when exiting the vehicle in this
range.
When parking on a level surface, you may shift the
transmission into PARK first, and then apply the parking
brake.
When parking on a hill, apply the parking brake before
shifting the transmission to PARK. As an added precau-
tion, turn the front wheels toward the curb on a downhill
grade and away from the curb on an uphill grade.
When exiting the vehicle, always:
• Apply the parking brake.
• Shift the transmission into PARK.
• Turn the ignition OFF.
• Remove the key fob from the vehicle.WARNING!
•Never use the PARK position as a substitute for the
parking brake. Always apply the parking brake fully
when exiting the vehicle to guard against vehicle
movement and possible injury or damage.
• Your vehicle could move and injure you and others if
it is not in PARK. Check by trying to move the
transmission gear selector out of PARK with the
brake pedal released. Make sure the transmission is
in PARK before exiting the vehicle.
• The transmission may not engage PARK if the ve-
hicle is moving. Always bring the vehicle to a
complete stop before shifting to PARK, and verify
that the transmission gear position indicator solidly
indicates PARK (P) without blinking. Ensure that the
vehicle is completely stopped, and the PARK posi-
tion is properly indicated, before exiting the vehicle.
• It is dangerous to shift out of PARK or NEUTRAL if
the engine speed is higher than idle speed. If your
foot is not firmly pressing the brake pedal, the
vehicle could accelerate quickly forward or in re-
verse. You could lose control of the vehicle and hit
someone or something. Only shift into gear when the
(Continued)
224 STARTING AND OPERATING
Page 227 of 496
WARNING!(Continued)
engine is idling normally and your foot is firmly
pressing the brake pedal.
• Unintended movement of a vehicle could injure
those in or near the vehicle. As with all vehicles, you
should never exit a vehicle while the engine is
running. Before exiting a vehicle, always come to a
complete stop, then apply the parking brake, shift
the transmission into PARK, and turn the ignition
OFF. When the ignition is in the OFF mode, the
transmission is locked in PARK, securing the vehicle
against unwanted movement.
• When exiting the vehicle, always make sure the
ignition is in the OFF mode, remove the key fob from
the vehicle, and lock the vehicle.
• Never leave children alone in a vehicle, or with
access to an unlocked vehicle. Allowing children to
be in a vehicle unattended is dangerous for a number
of reasons. A child or others could be seriously or
fatally injured. Children should be warned not to
touch the parking brake, brake pedal or the trans-
mission gear selector.
(Continued)
WARNING! (Continued)
•Do not leave the key fob in or near the vehicle (or in a
location accessible to children), and do not leave the
ignition in the ACC or ON/RUN mode. A child could
operate power windows, other controls, or move the
vehicle.
CAUTION!
•Before moving the transmission gear selector out of
PARK, you must start the engine, and also press the
brake pedal. Otherwise, damage to the gear selector
could result.
• DO NOT race the engine when shifting from PARK
or NEUTRAL into another gear range, as this can
damage the drivetrain.
The following indicators should be used to ensure that you
have properly engaged the transmission into the PARK posi-
tion:
• Look at the transmission gear position display and
verify that it indicates the PARK position (P), and is not
blinking.
• With the brake pedal released, verify that the gear
selector will not move out of PARK.
6
STARTING AND OPERATING 225
Page 228 of 496
REVERSE (R)
This range is for moving the vehicle backward. Shift into
REVERSE only after the vehicle has come to a complete
stop.
NEUTRAL (N)
Use this range when the vehicle is standing for prolonged
periods with the engine running. Apply the parking brake
and shift the transmission into PARK if you must exit the
vehicle.
WARNING!
Do not coast in NEUTRAL and never turn off the
ignition to coast down a hill. These are unsafe practices
that limit your response to changing traffic or road
conditions. You might lose control of the vehicle and
have a collision.
CAUTION!
Towing the vehicle, coasting, or driving for any other
reason with the transmission in NEUTRAL can cause
severe transmission damage.
(Continued)
CAUTION!(Continued)
Refer to “Recreational Towing” in “Starting And Op-
erating” and “Towing A Disabled Vehicle” in “In Case
Of Emergency” for further information.
DRIVE (D)
This range should be used for most city and highway
driving. It provides the smoothest upshifts and downshifts,
and the best fuel economy. The transmission automatically
upshifts through all forward gears. The DRIVE position
provides optimum driving characteristics under all normal
operating conditions.
When frequent transmission shifting occurs (such as when
operating the vehicle under heavy loading conditions, in
hilly terrain, or traveling into strong head winds), use the
AutoStick shift control (refer to “AutoStick” in this section
for further information) to select a lower gear. Under these
conditions, using a lower gear will improve performance
and extend transmission life by reducing excessive shifting
and heat buildup.
During extremely cold temperatures (-22°F [-30°C] or be-
low), transmission operation may be modified depending
on engine and transmission temperature as well as vehicle
226 STARTING AND OPERATING
Page 243 of 496
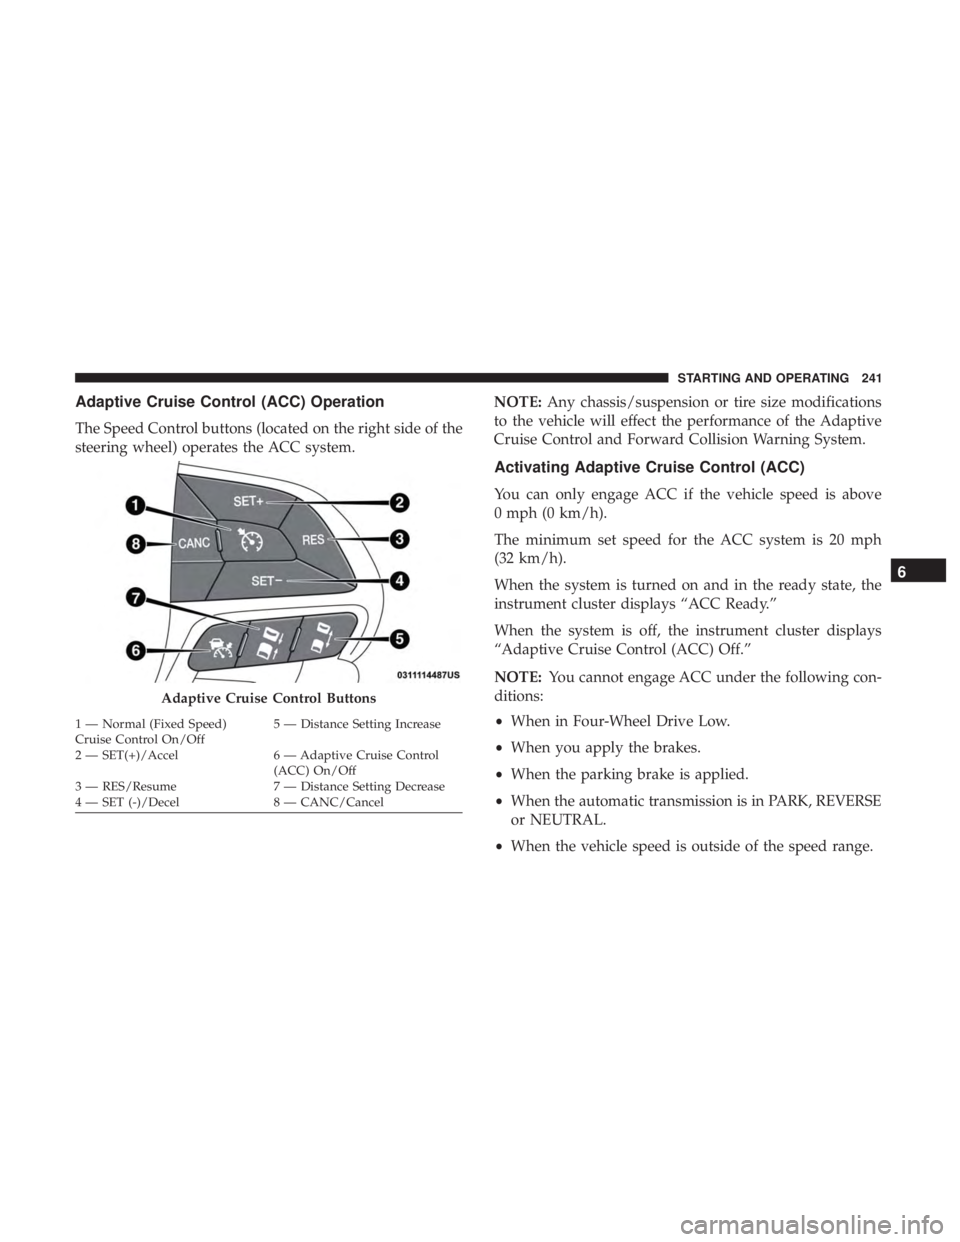
Adaptive Cruise Control (ACC) Operation
The Speed Control buttons (located on the right side of the
steering wheel) operates the ACC system.NOTE:
Any chassis/suspension or tire size modifications
to the vehicle will effect the performance of the Adaptive
Cruise Control and Forward Collision Warning System.
Activating Adaptive Cruise Control (ACC)
You can only engage ACC if the vehicle speed is above
0 mph (0 km/h).
The minimum set speed for the ACC system is 20 mph
(32 km/h).
When the system is turned on and in the ready state, the
instrument cluster displays “ACC Ready.”
When the system is off, the instrument cluster displays
“Adaptive Cruise Control (ACC) Off.”
NOTE: You cannot engage ACC under the following con-
ditions:
• When in Four-Wheel Drive Low.
• When you apply the brakes.
• When the parking brake is applied.
• When the automatic transmission is in PARK, REVERSE
or NEUTRAL.
• When the vehicle speed is outside of the speed range.
Adaptive Cruise Control Buttons
1 — Normal (Fixed Speed)
Cruise Control On/Off 5 — Distance Setting Increase
2 — SET(+)/Accel 6 — Adaptive Cruise Control (ACC) On/Off
3 — RES/Resume 7 — Distance Setting Decrease
4 — SET (-)/Decel 8 — CANC/Cancel
6
STARTING AND OPERATING 241
Page 245 of 496
To Set A Desired ACC Speed
When the vehicle reaches the speed desired, push the SET
(+)button or the SET (-)button and release. The instrument
cluster display will display the set speed.
If the system is set when the vehicle speed is below 20 mph
(32 km/h), the set speed shall be defaulted to 20 mph
(32 km/h). If the system is set when the vehicle speed is
above 20 mph (32 km/h), the set speed shall be the current
speed of the vehicle.
NOTE: ACC cannot be set if there is a stationary vehicle in
front of your vehicle in close proximity.
Remove your foot from the accelerator pedal. If you do not,
the vehicle may continue to accelerate beyond the set
speed. If this occurs:
• The message “DRIVER OVERRIDE” will display in the
instrument cluster display.
• The system will not be controlling the distance between
your vehicle and the vehicle ahead. The vehicle speed
will only be determined by the position of the accelera-
tor pedal.
To Cancel
The following conditions cancel the system:
• The brake pedal is applied.
• The CANC button is pushed.
• An Anti-Lock Brake System (ABS) event occurs.
• The gear selector is removed from the DRIVE position.
• The braking temperature exceeds normal range (over-
heated).
• The Electronic Stability Control/Traction Control Sys-
tem (ESC/TCS) activates.
• The vehicle parking brake is applied.
• Driver seatbelt is unbuckled at low speeds.
• Driver door is opened at low speeds.
• The driver switches ESC to full-off mode.
NOTE: If your vehicle stays at standstill for longer than
two seconds, then the system will cancel and the brake
force will be ramped-out. The driver will have to apply the
brakes to keep the vehicle at a standstill.
6
STARTING AND OPERATING 243
Page 260 of 496
Metric Speed (km/h)
•Pushing the SET (+)button once will result in a 1 km/h
increase in set speed. Each subsequent tap of the button
results in an increase of 1 km/h.
• If the button is continually pushed, the set speed will
continue to increase in 10 km/h increments until the
button is released. The increase in set speed is reflected
in the instrument cluster display.
To Decrease Speed
When the Normal (Fixed Speed) Cruise Control is set, you
can decrease speed by pushing the SET (-)button.
The driver’s preferred units can be selected through the
instrument cluster display. Refer to “Getting To Know Your
Instrument Panel” for more information. The speed decre-
ment shown is dependant on the speed of U.S. (mph) or
Metric (km/h) units:
U.S. Speed (mph)
• Pushing the SET (-)button once will result in a 1 mph
decrease in set speed. Each subsequent tap of the button
results in a decrease of 1 mph. •
If the button is continually pushed, the set speed will
continue to decrease in 5 mph decrements until the
button is released. The decrease in set speed is reflected
in the instrument cluster display.
Metric Speed (km/h)
• Pushing the SET (-)button once will result in a 1 km/h
decrease in set speed. Each subsequent tap of the button
results in a decrease of 1 km/h.
• If the button is continually pushed, the set speed will
continue to decrease in 10 km/h decrements until the
button is released. The decrease in set speed is reflected
in the instrument cluster display.
To Cancel
The following conditions will cancel the Normal (Fixed
Speed) Cruise Control without clearing the memory:
• The brake pedal is applied.
• The CANC button is pushed.
• The Electronic Stability Control/Traction Control Sys-
tem (ESC/TCS) activates.
• The vehicle parking brake is applied.
258 STARTING AND OPERATING
Page 307 of 496
WARNING!(Continued)
•A loose Tire Service Kit thrown forward in a colli-
sion or hard stop could endanger the occupants of
the vehicle. Always stow the Tire Service Kit in the
place provided. Failure to follow these warnings can
result in injuries that are serious or fatal to you, your
passengers, and others around you.
• Take care not to allow the contents of Tire Service Kit
to come in contact with hair, eyes, or clothing. Tire
Service Kit sealant is harmful if inhaled, swallowed,
or absorbed through the skin. It causes skin, eye, and
respiratory irritation. Flush immediately with plenty
of water if there is any contact with eyes or skin.
Change clothing as soon as possible, if there is any
contact with clothing.
• Tire Service Kit Sealant solution contains latex. In
case of an allergic reaction or rash, consult a physi-
cian immediately. Keep Tire Service Kit out of reach
of children. If swallowed, rinse mouth immediately
with plenty of water and drink plenty of water. Do
not induce vomiting! Consult a physician immedi-
ately.
Sealing A Tire With Tire Service Kit
(A) Whenever You Stop To Use Tire Service Kit:
1. Pull over to a safe location and turn on the vehicle’s Hazard Warning flashers.
2. Verify that the valve stem (on the wheel with the deflated tire) is in a position that is near to the ground.
This will allow the Tire Service Kit Hoses (6) and (7) to
reach the valve stem and keep the Tire Service Kit flat on
the ground. This will provide the best positioning of the
kit when injecting the sealant into the deflated tire and
running the air pump. Move the vehicle as necessary to
place the valve stem in this position before proceeding.
3. Place the transmission in PARK (auto transmission) or in Gear (manual transmission) and place the ignition in the
OFF position.
4. Apply the parking brake.
(B) Setting Up To Use Tire Service Kit:
1. Push in the Mode Select Knob (5) and turn to the Sealant Mode position.
2. Uncoil the Sealant Hose (6) and then remove the cap from the fitting at the end of the hose.
7
IN CASE OF EMERGENCY 305
Page 315 of 496
WARNING!(Continued)
•A loose Tire Service Kit thrown forward in a colli-
sion or hard stop could endanger the occupants of
the vehicle. Always stow the Tire Service Kit in the
place provided. Failure to follow these warnings can
result in injuries that are serious or fatal to you, your
passengers, and others around you.
• Take care not to allow the contents of Tire Service Kit
to come in contact with hair, eyes, or clothing. Tire
Service Kit sealant is harmful if inhaled, swallowed,
or absorbed through the skin. It causes skin, eye, and
respiratory irritation. Flush immediately with plenty
of water if there is any contact with eyes or skin.
Change clothing as soon as possible, if there is any
contact with clothing.
• Tire Service Kit Sealant solution contains latex. In
case of an allergic reaction or rash, consult a physi-
cian immediately. Keep Tire Service Kit out of reach
of children. If swallowed, rinse mouth immediately
with plenty of water and drink plenty of water. Do
not induce vomiting! Consult a physician immedi-
ately.
Sealing A Tire With Tire Service Kit
(A) Whenever You Stop To Use Tire Service Kit:
1. Pull over to a safe location and turn on the vehicle’s Hazard Warning flashers.
2. Verify that the valve stem (on the wheel with the deflated tire) is in a position that is near to the ground.
This will allow the Tire Service Kit Hoses (3) and (5) to
reach the valve stem and keep the Tire Service Kit flat on
the ground. This will provide the best positioning of the
kit when injecting the sealant into the deflated tire and
running the air pump. Move the vehicle as necessary to
place the valve stem in this position before proceeding.
3. Place the transmission in PARK (auto transmission) or in Gear (manual transmission) and place the ignition in the
OFF position.
4. Apply the parking brake.
(B) Setting Up To Use Tire Service Kit:
1. Push in the Mode Select Knob (2) and turn to the Sealant Mode position.
2. Uncoil the Sealant Hose (3) and then remove the cap from the fitting at the end of the hose.
7
IN CASE OF EMERGENCY 313