2019 DODGE CHARGER SRT brakes
[x] Cancel search: brakesPage 272 of 496
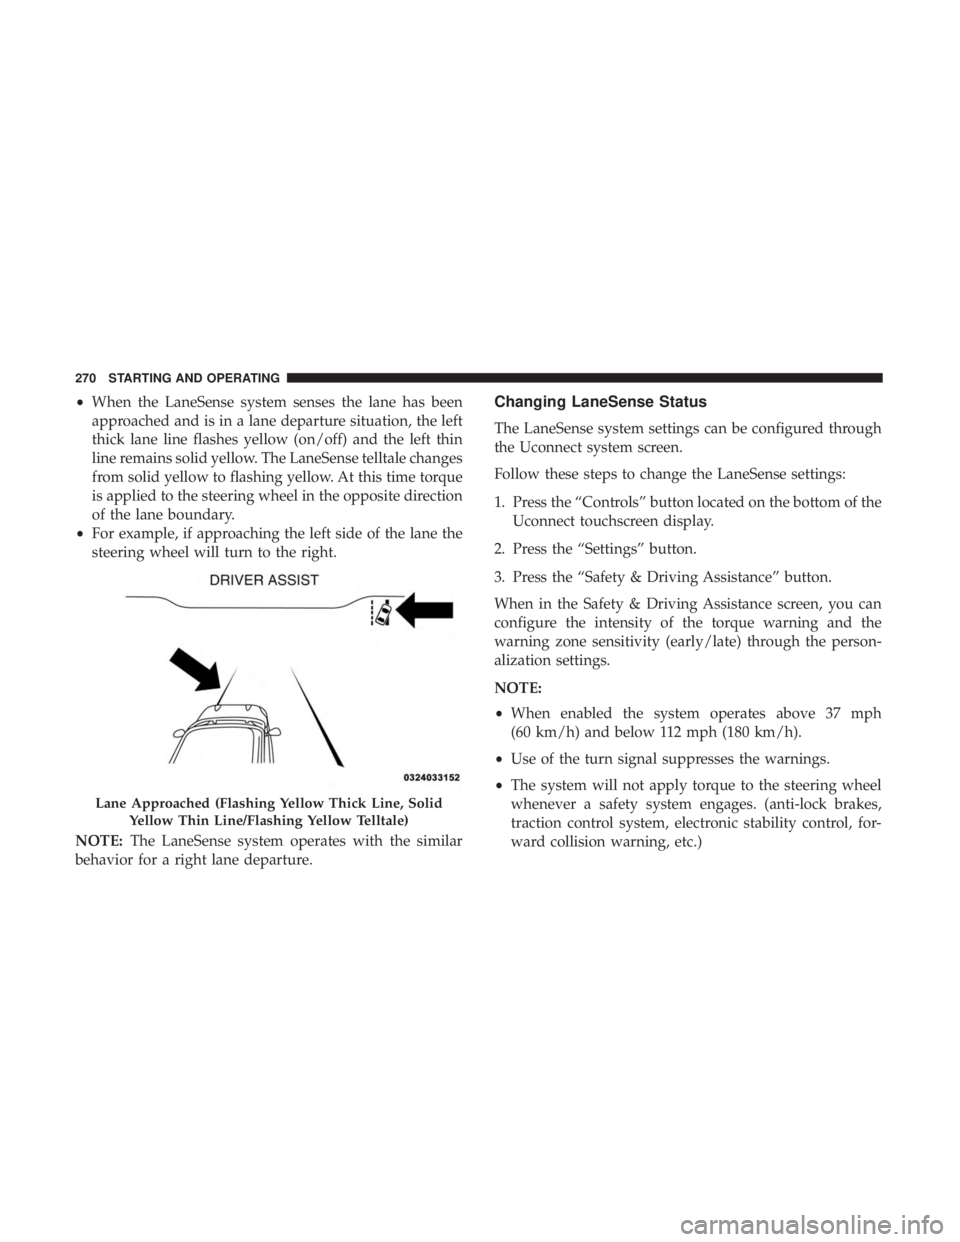
•When the LaneSense system senses the lane has been
approached and is in a lane departure situation, the left
thick lane line flashes yellow (on/off) and the left thin
line remains solid yellow. The LaneSense telltale changes
from solid yellow to flashing yellow. At this time torque
is applied to the steering wheel in the opposite direction
of the lane boundary.
• For example, if approaching the left side of the lane the
steering wheel will turn to the right.
NOTE: The LaneSense system operates with the similar
behavior for a right lane departure.Changing LaneSense Status
The LaneSense system settings can be configured through
the Uconnect system screen.
Follow these steps to change the LaneSense settings:
1. Press the “Controls” button located on the bottom of the Uconnect touchscreen display.
2. Press the “Settings” button.
3. Press the “Safety & Driving Assistance” button.
When in the Safety & Driving Assistance screen, you can
configure the intensity of the torque warning and the
warning zone sensitivity (early/late) through the person-
alization settings.
NOTE:
• When enabled the system operates above 37 mph
(60 km/h) and below 112 mph (180 km/h).
• Use of the turn signal suppresses the warnings.
• The system will not apply torque to the steering wheel
whenever a safety system engages. (anti-lock brakes,
traction control system, electronic stability control, for-
ward collision warning, etc.)
Lane Approached (Flashing Yellow Thick Line, Solid
Yellow Thin Line/Flashing Yellow Telltale)
270 STARTING AND OPERATING
Page 279 of 496
Figure out the weight on the front and rear of the vehicle
separately. It is important that you distribute the load
evenly over the front and rear axles.
Overloading can cause potential safety hazards and shorten
useful service life. Heavier axles or suspension components do
not necessarily increase the vehicle’s GVWR.
Loading
To load your vehicle properly, first figure out its empty
weight, axle-by-axle and side-by-side. Store heavier items
down low and be sure you distribute their weight as
evenly as possible. Stow all loose items securely before
driving. If weighing the loaded vehicle shows that you
have exceeded either GAWR, but the total load is within
the specified GVWR, you must redistribute the weight.
Improper weight distribution can have an adverse effect on
the way your vehicle steers and handles and the way the
brakes operate.
NOTE:
•Refer to the “Vehicle Certification Label” affixed to the
rear of the driver’s door for your vehicle’s GVWR and
GAWRs.
• Refer to the “Tire Placard” for your vehicle’s proper tire
pressure.
TRAILER TOWING
Trailer towing is not permitted with this vehicle.
RECREATIONAL TOWING (BEHIND MOTORHOME,
ETC.)
Recreational towing (with all four wheels on the ground, or
using a tow dolly) is NOT ALLOWED. The only accept-
able method for towing this vehicle (behind another ve-
hicle) is on a vehicle trailer with all four wheels OFFthe
ground.
CAUTION!
Towing this vehicle in violation of the above require-
ments can cause severe transmission damage. Damage
from improper towing is not covered under the New
Vehicle Limited Warranty.
DRIVING TIPS
Driving On Slippery Surfaces
Information in this section will aid in safe controlled
launches in adverse conditions.
6
STARTING AND OPERATING 277
Page 281 of 496
Driving Through Water
Driving through water more than a few inches/centimeters
deep will require extra caution to ensure safety and pre-
vent damage to your vehicle.
Flowing/Rising Water
WARNING!
Do not drive on or across a road or path where water is
flowing and/or rising (as in storm run-off). Flowing
water can wear away the road or path’s surface and
cause your vehicle to sink into deeper water. Further-
more, flowing and/or rising water can carry your ve-
hicle away swiftly. Failure to follow this warning may
result in injuries that are serious or fatal to you, your
passengers, and others around you.
Shallow Standing Water
Although your vehicle is capable of driving through shal-
low standing water, consider the following Cautions and
Warnings before doing so.
WARNING!
•Driving through standing water limits your vehicle’s
traction capabilities. Do not exceed 5 mph (8 km/h)
when driving through standing water.
• Driving through standing water limits your vehicle’s
braking capabilities, which increases stopping dis-
tances. Therefore, after driving through standing
water, drive slowly and lightly press on the brake
pedal several times to dry the brakes.
• Failure to follow these warnings may result in inju-
ries that are serious or fatal to you, your passengers,
and others around you.
CAUTION!
• Always check the depth of the standing water before
driving through it. Never drive through standing
water that is deeper than the bottom of the tire rims
mounted on the vehicle.
• Determine the condition of the road or the path that
is under water and if there are any obstacles in the
way before driving through the standing water.
(Continued)
6
STARTING AND OPERATING 279
Page 333 of 496
Miles:6,000
12,000
18,000
24,000
30,000
36,000
42,000
48,000
54,000
60,000
66,000
72,000
78,000
84,000
90,000
96,000
102,000
108,000 114,000
120,000
126,000
132,000
138,000
144,000
150,000
Or Months: 6 12 18 24 30 36 42 48 54 60 66 72 78 84 90 96 102 108 114 120 126 132 138 144 150
Or Kilometers:
10,000
20,000
30,000
40,000
50,000
60,000
70,000
80,000
90,000
100,000
110,000
120,000
130,000
140,000
150,000
160,000
170,000
180,000
190,000
200,000
210,000
220,000
230,000
240,000
250,000
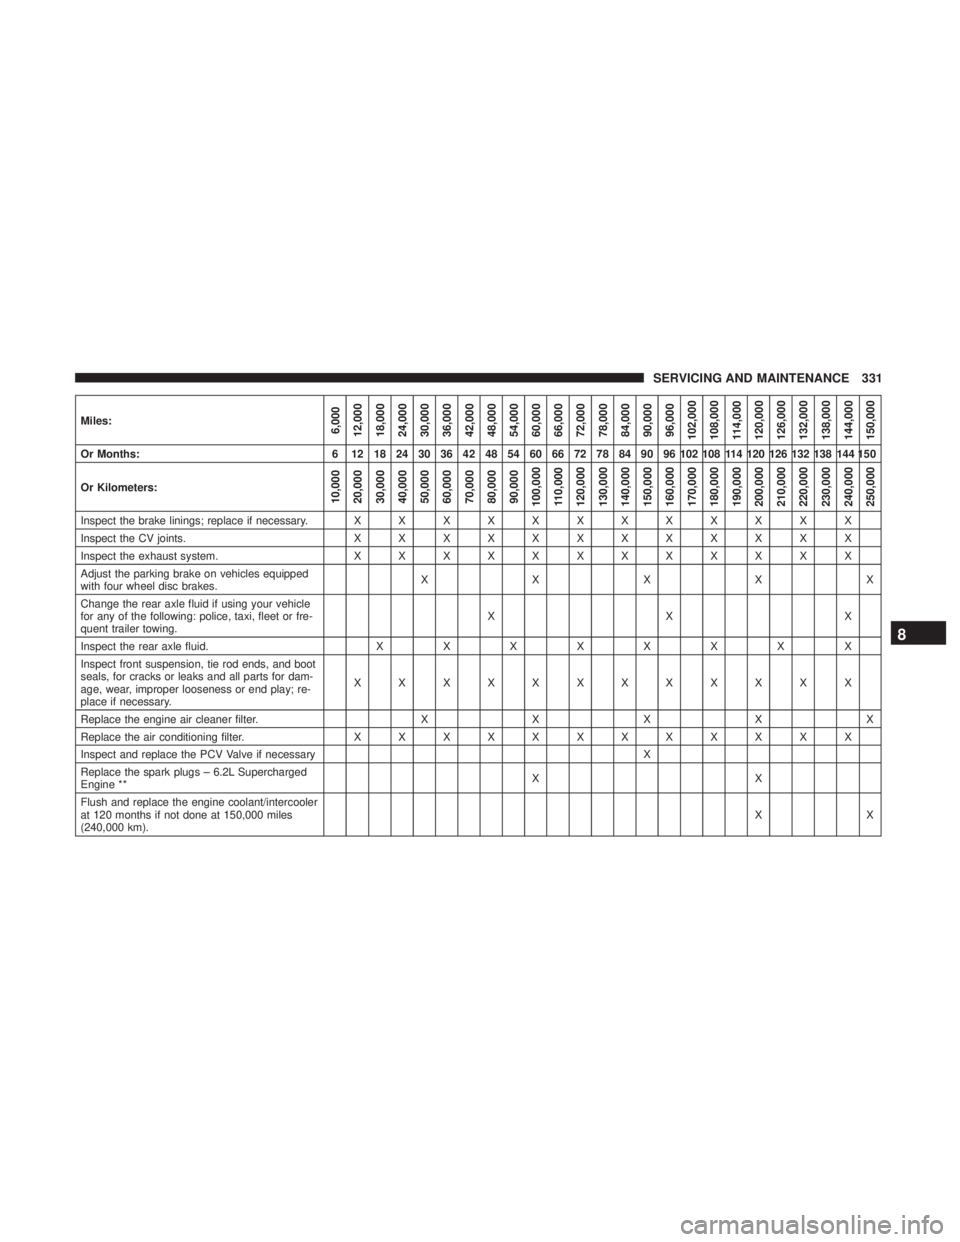
Inspect the brake linings; replace if necessary. X X X X X X X X X X X X
Inspect the CV joints. X X X X X X X X X X X X
Inspect the exhaust system. X X X X X X X X X X X X
Adjust the parking brake on vehicles equipped
with four wheel disc brakes. XXXXX
Change the rear axle fluid if using your vehicle
for any of the following: police, taxi, fleet or fre-
quent trailer towing. XX X
Inspect the rear axle fluid. XXXXXXXX
Inspect front suspension, tie rod ends, and boot
seals, for cracks or leaks and all parts for dam-
age, wear, improper looseness or end play; re-
place if necessary. XXXXXXXXXXXX
Replace the engine air cleaner filter. X X X X X
Replace the air conditioning filter. X X X X X X X X X X X X
Inspect and replace the PCV Valve if necessary X
Replace the spark plugs – 6.2L Supercharged
Engine ** XX
Flush and replace the engine coolant/intercooler
at 120 months if not done at 150,000 miles
(240,000 km). XX
8
SERVICING AND MAINTENANCE 331
Page 355 of 496

WARNING!
Riding the brakes can lead to brake failure and possi-
bly a collision. Driving with your foot resting or riding
on the brake pedal can result in abnormally high brake
temperatures, excessive lining wear, and possible
brake damage. You would not have your full braking
capacity in an emergency.
Fluid Level Check — Brake Master Cylinder
Check the fluid level in the master cylinder immediately if
the brake system warning light indicates system failure.
Check the fluid level in the master cylinder when perform-
ing underhood services.
Clean the top of the master cylinder area before removing
the cap. Add fluid to bring the level up to the top of the
“FULL” mark on the side of the master cylinder reservoir.
Overfilling of fluid is not recommended because it may
cause leaking in the system.Add enough fluid to bring the level up to the requirements
described on the brake fluid reservoir. With disc brakes,
fluid level can be expected to fall as the brake pads wear.
However, low fluid level may be caused by a leak and a
checkup may be needed.
Use only brake fluid that has been recommended by the
manufacturer, and has been kept in a tightly closed con-
tainer to avoid contamination from foreign matter or
moisture.
Refer to “Fluids And Lubricants” in “Technical Specifica-
tions” for further information.
WARNING!
•
Use only manufacturer’s recommended brake fluid.
Refer to “Fluids And Lubricants” in “Technical
Specifications” for further information. Using the
wrong type of brake fluid can severely damage your
brake system and/or impair its performance. The
proper type of brake fluid for your vehicle is also
identified on the original factory installed hydraulic
master cylinder reservoir.
(Continued)
8
SERVICING AND MAINTENANCE 353
Page 377 of 496
Wheel And Wheel Trim Care
All wheels and wheel trim, especially aluminum and chrome
plated wheels, should be cleaned regularly using mild (neutral
Ph) soap and water to maintain their luster and to prevent
corrosion. Wash wheels with the same soap solution recom-
mended for the body of the vehicle and remember to always
wash when the surfaces are not hot to the touch.
Your wheels are susceptible to deterioration caused by salt,
sodium chloride, magnesium chloride, calcium chloride,
etc., and other road chemicals used to melt ice or control
dust on dirt roads. Use a soft cloth or sponge and mild soap
to wipe away promptly. Do not use harsh chemicals or a
stiff brush. They can damage the wheel’s protective coating
that helps keep them from corroding and tarnishing.
CAUTION!
Avoid products or automatic car washes that use acidic
solutions or strong alkaline additives or harsh brushes.
Many aftermarket wheel cleaners and automatic car
washes may damage the wheel’s protective finish.
Such damage is not covered by the New Vehicle
Limited Warranty. Only car wash soap, Mopar Wheel
Cleaner or equivalent is recommended.When cleaning extremely dirty wheels including excessive
brake dust, care must be taken in the selection of tire and
wheel cleaning chemicals and equipment to prevent dam-
age to the wheels. Mopar Wheel Treatment or Mopar
Chrome Cleaner or their equivalent is recommended or
select a non-abrasive, non-acidic cleaner for aluminum or
chrome wheels.
CAUTION!
Do not use scouring pads, steel wool, a bristle brush,
metal polishes or oven cleaner. These products may
damage the wheel’s protective finish. Such damage is
not covered by the New Vehicle Limited Warranty.
Only car wash soap, Mopar Wheel Cleaner or equiva-
lent is recommended.
NOTE: If you intend parking or storing your vehicle for an
extended period after cleaning the wheels with wheel
cleaner, drive your vehicle and apply the brakes to remove
the water droplets from the brake components. This activ-
ity will remove the red rust on the brake rotors and prevent
vehicle vibration when braking.
8
SERVICING AND MAINTENANCE 375
Page 389 of 496

In the event power assist is lost for any reason (for
example, repeated brake applications with the engine
OFF), the brakes will still function. The effort required to
brake the vehicle will be much greater than that required
with the power system operating.
NOTE:Your vehicle is equipped with a high performance
braking system. The brake pads are a semi-metallic com-
pound, which offer superior fade resistance for consistent
operation. A compromise to using this type of brake pad is
that the brakes may produce more brake dust and may
squeal slightly under certain weather and operating con-
ditions (i.e., during light brake applications). These are
considered normal conditions.
WHEEL AND TIRE TORQUE SPECIFICATIONS
Proper lug nut/bolt torque is very important to ensure that
the wheel is properly mounted to the vehicle. Any time a
wheel has been removed and reinstalled on the vehicle, the
lug nuts/bolts should be torqued using a properly cali-
brated torque wrench using a high quality six sided (hex)
deep wall socket.
Torque Specifications
Lug Nut/Bolt Torque **Lug Nut/Bolt
Size Lug Nut/Bolt
Socket Size
111 Ft-Lbs (150 N·m) M14 x 1.50 22 mm
**Use only your authorized dealer recommended lug nuts/
bolts and clean or remove any dirt or oil before tightening.
Inspect the wheel mounting surface prior to mounting the
tire and remove any corrosion or loose particles.
Wheel Mounting Surface
9
TECHNICAL SPECIFICATIONS 387
Page 480 of 496
About Your Brakes........................ .386
Adaptive Cruise Control (ACC) (Cruise Control) . . . .239
Adding Engine Coolant (Antifreeze) .............349
Adding Fuel ............................. .273
Adding Washing Fluid ...................... .334
Additives, Fuel ........................... .389
Adjust Forward ................................46
Rearward ...............................46
AirBag ................................ .178
Advance Front Air Bag ....................178
Air Bag Operation ....................... .179
Air Bag Warning Light .....................176
Driver Knee Air Bag ..................... .180
Enhanced Accident Response .............186, 326
Event Data Recorder (EDR) .................326
FrontAirBag .......................... .178
If Deployment Occurs .....................185
Knee Impact Bolsters ..................... .180
Maintaining Your Air Bag System .............187
Maintenance ........................... .187
Redundant Air Bag Warning Light ............177
Side Air Bags .......................... .181
Transporting Pets ....................... .204
Air Bag Light ...................... .122, 176, 205Air Cleaner, Engine (Engine Air Cleaner Filter)
......338
Air Conditioner Maintenance ..................339
Air Conditioner Refrigerant ................339, 340
Air Conditioner System ..................... .339
Air Conditioning ........................ .74, 79
Air Conditioning Filter ....................81, 340
Air Conditioning, Operating Tips ................80
Air Filter ............................... .338
Air Pressure Tires................................. .366
Alarm Arm The System ...................... .35, 36
Panic ..................................22
Rearm The System ........................36
Security
Alarm....................... .35, 126
Alarm System Security Alarm ...........................35
Alterations/Modifications Vehicle .................................5
Android Auto ............................ .467
Antifreeze (Engine Coolant) ................349, 392
Disposal .............................. .351
Anti-Lock Brake System (ABS) .................138
Anti-Lock Warning Light .....................130
Apple CarPlay ........................... .468
478 INDEX