2019 DODGE CHARGER light
[x] Cancel search: lightPage 310 of 560
WARNING!(Continued)
SiriusXM Guardian features and applications in this
vehicle. Only use Uconnect features and SiriusXM
Guardian services when it is safe to do so. Failure to do
so may result in an accident involving serious injury or
death.
NOTE:
• Your vehicle may be transmitting data as authorized by
the subscriber.
• The SOS and ASSIST buttons will only function if you
are connected to an operable LTE (voice/data) or 4G
(data) network. Other Uconnect services will only be
operable if your SiriusXM Guardian service is active and
you are connected to an operable LTE (voice/data) or 4G
(data) network.
ASSIST Call
The ASSIST Button is used to automatically connect you to
any one of the following support centers:
• Roadside Assistance – If you get a flat tire, or need a tow,
just push the ASSIST button and you will be connected to a representative for assistance. Roadside Assistance
will know what vehicle you’re driving and its location.
Additional fees may apply for roadside Assistance.
• SiriusXM Guardian Customer Care – In-vehicle support
for SiriusXM Guardian.
• Vehicle Customer Care – Total support for all other
vehicle issues.
SOS Call
1. Push the SOS Call button on the Rearview Mirror.
NOTE: In case the SOS Call button is pushed in error, there
will be a ten second delay before the SOS Call system
initiates a call to a SOS operator. To cancel the SOS Call
connection, push the SOS call button on the Rearview
Mirror or press the cancellation button on the Device
Screen. Termination of the SOS Call will turn off the green
LED light on the Rearview Mirror.
2. The LED light located between the ASSIST and SOS buttons on the Rearview Mirror will turn green once a
connection to a SOS operator has been made.
308 IN CASE OF EMERGENCY
Page 312 of 560
WARNING!(Continued)
Emergency Services Agent. All occupants should exit
the vehicle immediately and move to a safe location.
•
Never place anything on or near the vehicle’s operable
network and GPS antennas. You could prevent oper-
able network and GPS signal reception, which can
prevent your vehicle from placing an emergency call.
An operable network and GPS signal reception is
required for the SOS Call system to function properly.
• The SOS Call system is embedded into the vehicle’s
electrical system. Do not add aftermarket electrical
equipment to the vehicle’s electrical system. This
may prevent your vehicle from sending a signal to
initiate an emergency call. To avoid interference that
can cause the SOS Call system to fail, never add
aftermarket equipment (e.g., two-way mobile radio,
CB radio, data recorder, etc.) to your vehicle’s electri-
cal system or modify the antennas on your vehicle.
IF YOUR VEHICLE LOSES BATTERY POWER FOR
ANY REASON (INCLUDING DURING OR AFTER
AN ACCIDENT), THE UCONNECT FEATURES,
APPS AND SERVICES, AMONG OTHERS, WILL
NOT OPERATE.
(Continued)
WARNING! (Continued)
•Modifications to any part of the SOS Call system
could cause the air bag system to fail when you need
it. You could be injured if the air bag system is not
there to help protect you.
SOS Call System Limitations
Vehicles sold in Mexico DO NOThave SOS Call system
capabilities.
SOS or other emergency line operators in Mexico may not
answer or respond to SOS system calls.
If the SOS Call system detects a malfunction, any of the
following may occur at the time the malfunction is de-
tected, and at the beginning of each ignition cycle:
• The Rearview Mirror light located between the ASSIST
and SOS buttons will continuously be illuminated red.
• The Device Screen will display the following message
“Vehicle device requires service. Please contact your
dealer.”
• An In-Vehicle Audio message will state “Vehicle device
requires service. Please contact your dealer.”
310 IN CASE OF EMERGENCY
Page 313 of 560

WARNING!
•Ignoring the Rearview Mirror light could mean you
will not have SOS Call services. If the Rearview
Mirror light is illuminated, have an authorized
dealer service the SOS Call system immediately.
• The Occupant Restraint Control module turns on the
air bag Warning Light on the instrument panel if a
malfunction in any part of the system is detected. If
the Air Bag Warning Light is illuminated, have an
authorized dealer service the Occupant Restraint
Control system immediately.
Even if the SOS Call system is fully functional, factors
beyond FCA US LLC’s control may prevent or stop the SOS
Call system operation. These include, but are not limited
to, the following factors:
• Delayed accessories mode is active.
• The ignition is in the OFF position.
• The vehicle’s electrical systems are not intact.
• The SOS Call system software and/or hardware are
damaged during a crash. •
The vehicle battery loses power or becomes discon-
nected during a vehicle crash.
•LTE (voice/data) or 4G (data) network and/or Global
Positioning Satellite signals are unavailable or obstructed.
• Equipment malfunction at the SOS operator facility.
• Operator error by the SOS operator.
• LTE (voice/data) or 4G (data) network congestion.
• Weather.
• Buildings, structures, geographic terrain, or tunnels.
WARNING!
ALWAYS obey traffic laws and pay attention to the
road. ALWAYS drive safely with your hands on the
steering wheel. You have full responsibility and as-
sume all risks related to the use of the Uconnect and
SiriusXM Guardian features and applications in this
vehicle. Only use Uconnect features and SiriusXM
Guardian services when it is safe to do so. Failure to do
so may result in an accident involving serious injury or
death.
7
IN CASE OF EMERGENCY 311
Page 315 of 560

Bulb Number
Visor Vanity Lamps A6220
Glove Compartment
Lamp – If Equipped 194
Door Courtesy 562
Shift Indicator Lamp JKLE14140
Center High-Mount Stop
Lamp (CHMSL) LED (Serviced At Autho-
rized Dealer)
Optional Door Map
Pocket/Cup Holder LED (Serviced At Autho-
rized Dealer)
For lighted switches, see your authorized dealer for
replacement instructions.
Exterior Bulbs
Bulb Number
Low/High Beam Head-
lamp (Standard Halogen
Bi Function Projector) 9005SL+
Low/High Beam Head-
lamp – High Intensity
Discharge (Premium HID
Bi Function Projector) D3S (Serviced At Autho-
rized Dealer)
Bulb Number
Front Park/Turn Lamp LED (Serviced At Autho- rized Dealer)
Front Fog Lamp –
If Equipped LED (Serviced At Autho-
rized Dealer)
Front Side Marker LED (Serviced At Autho-
rized Dealer)
Rear Tail Lamp LED (Serviced At Autho-
rized Dealer)
Rear Stop/Turn Lamp LED (Serviced At Autho- rized Dealer)
Rear Side Marker LED (Serviced At Autho-
rized Dealer)
Backup Lamp LED (Serviced At Autho-
rized Dealer)
License LED (Serviced At Autho-
rized Dealer)
7
IN CASE OF EMERGENCY 313
Page 316 of 560

Replacing Exterior Bulbs
Front Low/High Beam Headlamp — Models With
Halogen Headlamps
1. Open the hood.
NOTE:Removal of the air cleaner filter housing may be
necessary prior to replacing bulbs in the headlamp assem-
bly on the driver side of the vehicle.
2. Remove the large dust cap from the headlamp housing by turning it counterclockwise.
3. Turn the bulb counterclockwise, and remove.
CAUTION!
Do not touch the new bulb with your fingers. Oil
contamination will severely shorten bulb life. If the
bulb comes in contact with any oily surface, clean the
bulb with rubbing alcohol.
4. Disconnect the bulb from the socket assembly and install the replacement bulb.
5. Reinstall the bulb and socket assembly into the head- lamp assembly, and then turn it clockwise.
6. Reinstall the dust cap.
Front Low/High Beam Headlamp — Models With
High Intensity Discharge Headlamps (HID)
The headlamps are a type of high voltage discharge tube.
High voltage can remain in the circuit even with the
headlamp switch off and the key removed. Because of this,
you should not attempt to service a headlamp bulb
yourself. If a headlamp bulb fails, take your vehicle to an
authorized dealer for service.
WARNING!
A transient high voltage occurs at the bulb sockets of
HID headlamps when the headlamp switch is turned
ON. It may cause serious electrical shock or electrocu-
tion if not serviced properly. See your authorized
dealer for service.
NOTE: On vehicles equipped with HID headlamps, when
the headlamps are turned on, there is a blue hue to the
lights. This diminishes and becomes more white after
approximately 10 seconds, as the system charges.
Front/Rear Side Marker Lamp
The Side Markers use LED lamps that are not serviceable
separately. The Side Markers must be replaced as an
assembly, see your authorized dealer.
314 IN CASE OF EMERGENCY
Page 323 of 560
CAUTION!
•When installing the power distribution center cover,
it is important to ensure the cover is properly posi-
tioned and fully latched. Failure to do so may allow
water to get into the power distribution center and
possibly result in an electrical system failure.
(Continued)
CAUTION! (Continued)
•When replacing a blown fuse, it is important to use
only a fuse having the correct amperage rating. The
use of a fuse with a rating other than indicated may
result in a dangerous electrical system overload. If a
properly rated fuse continues to blow, it indicates a
problem in the circuit that must be corrected.
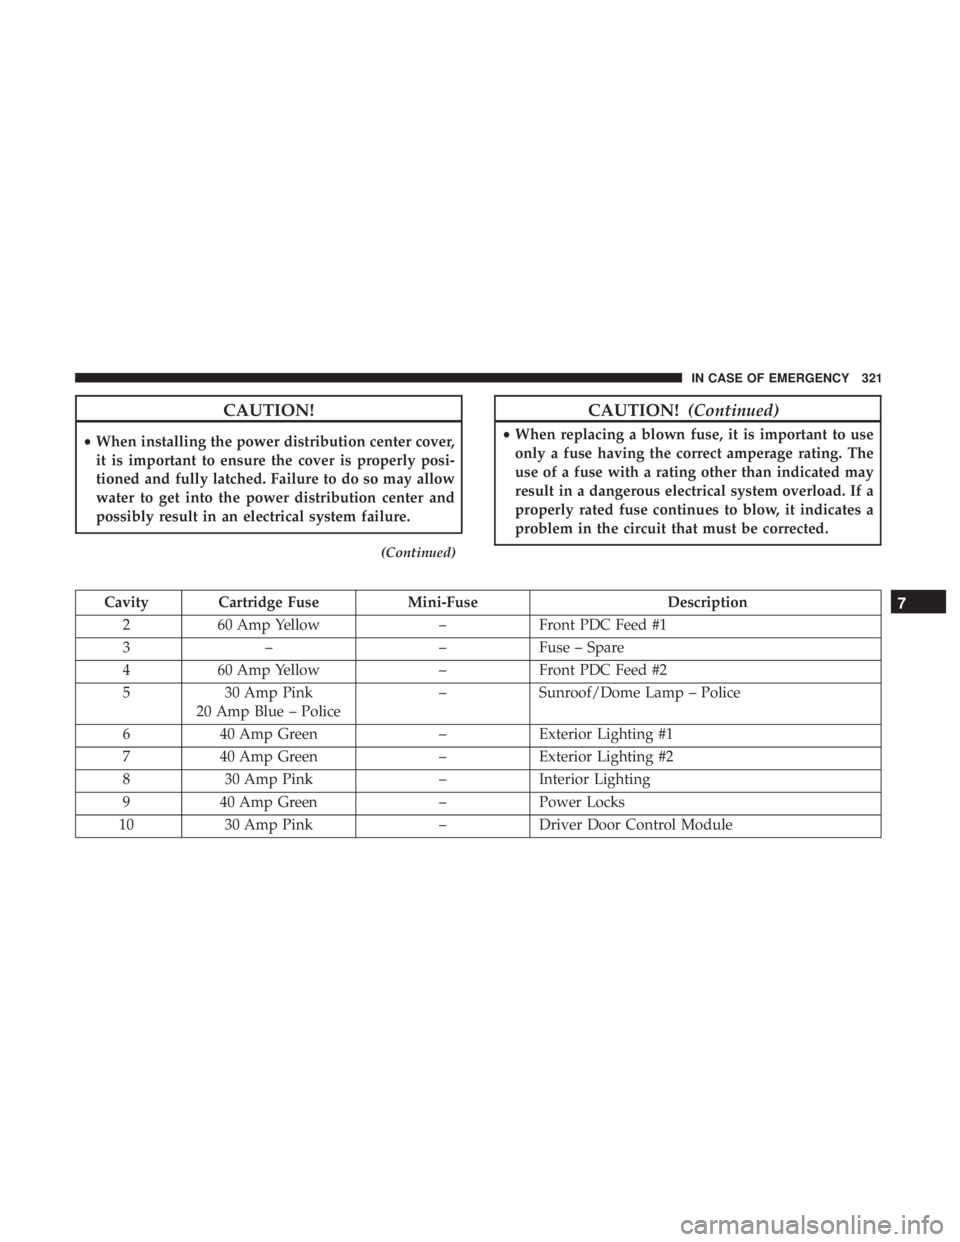
Cavity Cartridge Fuse Mini-FuseDescription
2 60 Amp Yellow –Front PDC Feed #1
3 – –Fuse – Spare
4 60 Amp Yellow –Front PDC Feed #2
5 30 Amp Pink
20 Amp Blue – Police –
Sunroof/Dome Lamp – Police
6 40 Amp Green –Exterior Lighting #1
7 40 Amp Green –Exterior Lighting #2
8 30 Amp Pink –Interior Lighting
9 40 Amp Green –Power Locks
10 30 Amp Pink –Driver Door Control Module7
IN CASE OF EMERGENCY 321
Page 324 of 560
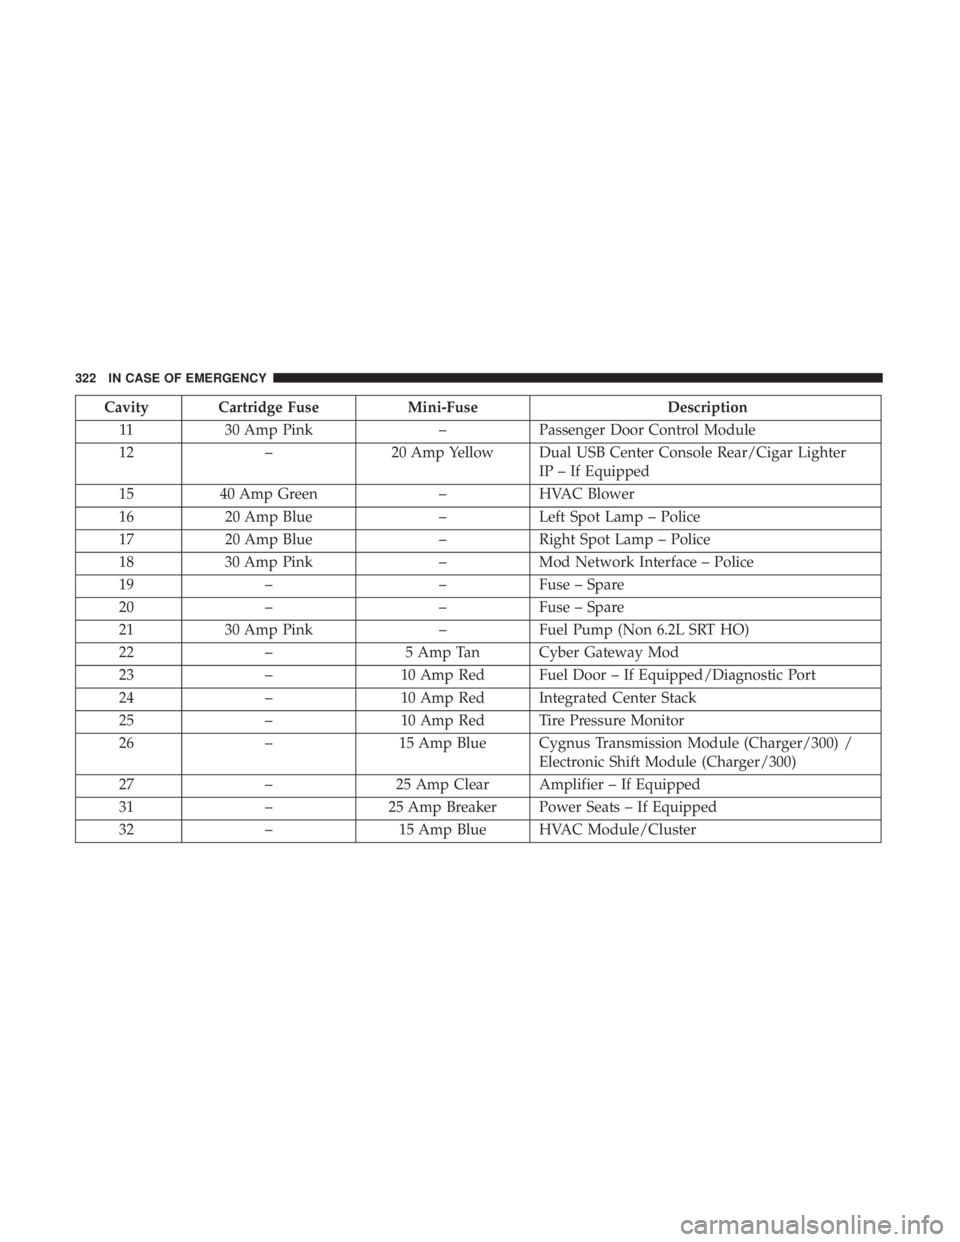
Cavity Cartridge FuseMini-FuseDescription
11 30 Amp Pink –Passenger Door Control Module
12 –20 Amp Yellow Dual USB Center Console Rear/Cigar Lighter
IP – If Equipped
15 40 Amp Green –HVAC Blower
16 20 Amp Blue –Left Spot Lamp – Police
17 20 Amp Blue –Right Spot Lamp – Police
18 30 Amp Pink –Mod Network Interface – Police
19 – –Fuse – Spare
20 – –Fuse – Spare
21 30 Amp Pink –Fuel Pump (Non 6.2L SRT HO)
22 –5 Amp Tan Cyber Gateway Mod
23 –10 Amp Red Fuel Door – If Equipped/Diagnostic Port
24 –10 Amp Red Integrated Center Stack
25 –10 Amp Red Tire Pressure Monitor
26 –15 Amp Blue Cygnus Transmission Module (Charger/300) /
Electronic Shift Module (Charger/300)
27 –25 Amp Clear Amplifier – If Equipped
31 –25 Amp Breaker Power Seats – If Equipped
32 –15 Amp Blue HVAC Module/Cluster
322 IN CASE OF EMERGENCY
Page 325 of 560
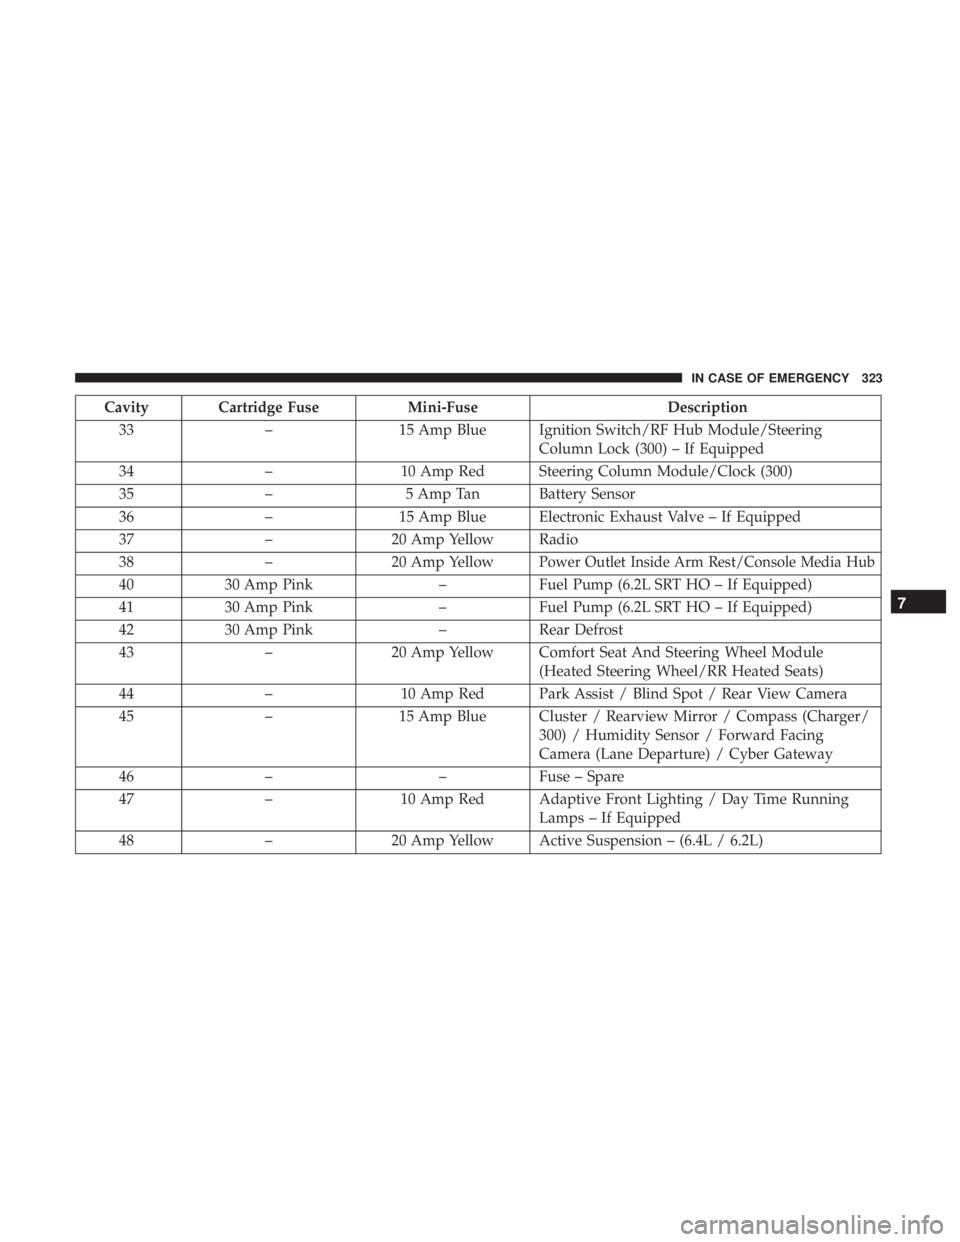
Cavity Cartridge FuseMini-FuseDescription
33 –15 Amp Blue Ignition Switch/RF Hub Module/Steering
Column Lock (300) – If Equipped
34 –10 Amp Red Steering Column Module/Clock (300)
35 –5 Amp Tan Battery Sensor
36 –15 Amp Blue Electronic Exhaust Valve – If Equipped
37 –20 Amp Yellow Radio
38 –20 Amp Yellow
Power Outlet Inside Arm Rest/Console Media Hub
4030 Amp Pink –Fuel Pump (6.2L SRT HO – If Equipped)
41 30 Amp Pink –Fuel Pump (6.2L SRT HO – If Equipped)
42 30 Amp Pink –Rear Defrost
43 –20 Amp Yellow Comfort Seat And Steering Wheel Module
(Heated Steering Wheel/RR Heated Seats)
44 –10 Amp Red Park Assist / Blind Spot / Rear View Camera
45 –15 Amp Blue Cluster / Rearview Mirror / Compass (Charger/
300) / Humidity Sensor / Forward Facing
Camera (Lane Departure) / Cyber Gateway
46 – –Fuse – Spare
47 –10 Amp Red Adaptive Front Lighting / Day Time Running
Lamps – If Equipped
48 –20 Amp Yellow Active Suspension – (6.4L / 6.2L)
7
IN CASE OF EMERGENCY 323