Page 223 of 500
For the first 1500 miles (2414 km):
•Do not participate in track events, sport driving schools,
or similar activities during the first 1500 miles (2414 km).
NOTE: Check engine oil with every refueling and add if
necessary. Oil and fuel consumption may be higher
through the first oil change interval. Running the engine
with an oil level below the add mark can cause severe
engine damage.
PARKING BRAKE
Before leaving the vehicle, make sure that the parking
brake is fully applied and place the gear selector in the
PARK or REVERSE (manual transmission only) position.
When the parking brake is applied and the ignition switch
is in the ON/RUN position, the “Brake Warning Light” in
the instrument cluster will illuminate. NOTE:
•
When the parking brake is applied and the transmission
is placed in gear, the “Brake Warning Light” will flash. If
vehicle speed is detected, a chime will sound to alert the
driver. Fully release the parking brake before attempting
to move the vehicle.
• This light only shows that the parking brake is applied.
It does not show the degree of brake application.
When parking on a hill, it is important to turn the front
wheels toward the curb on a downhill grade and away
from the curb on an uphill grade. For vehicles equipped
with an automatic transmission, apply the parking brake
before placing the gear selector in PARK, otherwise the
load on the transmission locking mechanism may make it
difficult to move the gear selector out of PARK. The
parking brake should always be applied whenever the
driver is not in the vehicle.
6
STARTING AND OPERATING 221
Page 227 of 500
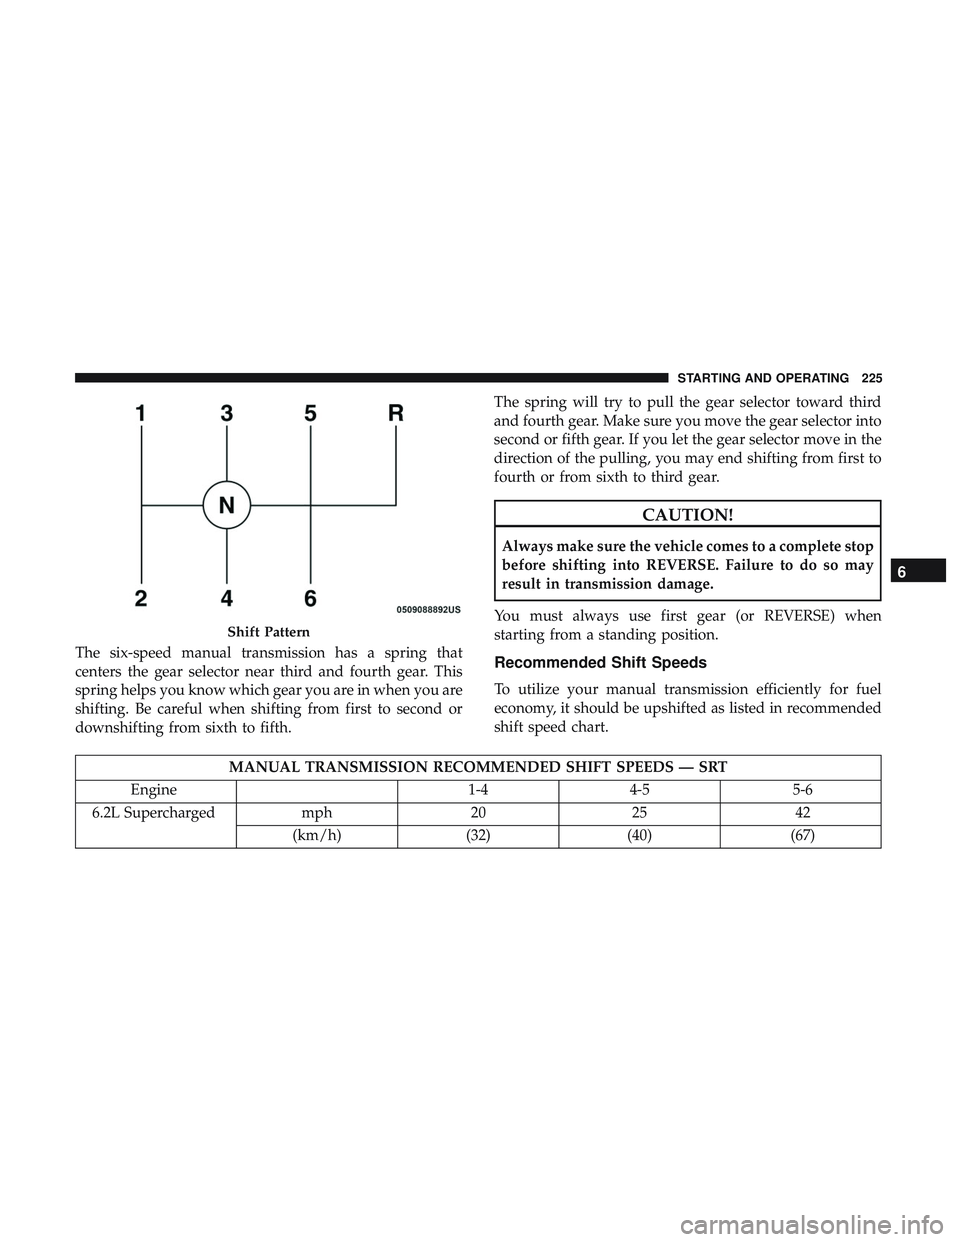
The six-speed manual transmission has a spring that
centers the gear selector near third and fourth gear. This
spring helps you know which gear you are in when you are
shifting. Be careful when shifting from first to second or
downshifting from sixth to fifth.The spring will try to pull the gear selector toward third
and fourth gear. Make sure you move the gear selector into
second or fifth gear. If you let the gear selector move in the
direction of the pulling, you may end shifting from first to
fourth or from sixth to third gear.
CAUTION!
Always make sure the vehicle comes to a complete stop
before shifting into REVERSE. Failure to do so may
result in transmission damage.
You must always use first gear (or REVERSE) when
starting from a standing position.
Recommended Shift Speeds
To utilize your manual transmission efficiently for fuel
economy, it should be upshifted as listed in recommended
shift speed chart.
MANUAL TRANSMISSION RECOMMENDED SHIFT SPEEDS — SRT
Engine 1-44-5 5-6
6.2L Supercharged mph2025 42
(km/h) (32)(40) (67)
Shift Pattern
6
STARTING AND OPERATING 225
Page 228 of 500
Earlier upshifts during cruise conditions (relatively steady
speeds) may result in increased fuel economy.
Higher upshift speeds may be used to obtain a desired
acceleration rate.
NOTE:
•Your vehicle is equipped with a transmission reverse
inhibitor system. Always depress the clutch pedal fully
to the floor before shifting into reverse. When vehicle
speed is greater than 3 mph (5 km/h), the reverse
inhibitor activates to help prevent shifts into REVERSE.
When at a complete stop, you may notice lighter shift
efforts into REVERSE with the ignition switch in the ON
position (RUN position for Keyless Enter-N-Go), as
compared to the ignition LOCK position (OFF position
for Keyless Enter-N-Go). This is normal operation of the
transmission reverse inhibitor system.
• Due to the high performance nature of your drivetrain,
you may hear your transmission. This can be most
noticeable when the vehicle is idling in NEUTRAL with
the clutch engaged (clutch pedal released), but it may
also be heard when driving at low engine RPM. Also,
this may be more noticeable when the transmission is
warm. This is a normal condition and is not an indica-
tion of a problem with your clutch or transmission.1–4 Skip Shift
In Auto Drive Mode, Default, or Street Drive Modes, there
are times when you must shift the transmission directly
from first gear to fourth gear instead of from first gear to
second gear. This is to help you get the best possible fuel
economy from your vehicle. This occurs when the engine
coolant (antifreeze) is higher than 106°F (41°C), vehicle
speed is greater than 19 mph (30 km/h) but less than
21 mph (34 km/h), and the transmission is in first gear, and
the accelerator is at ¼ throttle or less.
NOTE: The1-4Skip Shift feature is disabled when
selecting Track, Sport, or Custom Drive Modes. Refer to
“SRT Drive Modes” in the “Multimedia” section for further
descriptions of these modes.
After you shift the transmission to fourth gear, you can
press the clutch in and shift to another forward gear.
Downshifting
To maintain a safe speed and prolong brake life, downshift
to maintain a safe speed when descending a steep grade.
226 STARTING AND OPERATING
Page 235 of 500
The following indicators should be used to ensure that you
have properly engaged the transmission into the PARK
position:
•When shifting into PARK, push the lock button on the
gear selector and firmly move the selector all the way
forward until it stops and is fully seated.
• Look at the transmission gear position display and
verify that it indicates the PARK position (P), and is not
blinking.
• With the brake pedal released, verify that the gear
selector will not move out of PARK.
REVERSE (R)
This range is for moving the vehicle backward. Shift into
REVERSE only after the vehicle has come to a complete
stop.
NEUTRAL (N)
Use this range when the vehicle is standing for prolonged
periods with the engine running. Apply the parking brake
and shift the transmission into PARK if you must exit the
vehicle.WARNING!
Do not coast in NEUTRAL and never turn off the
ignition to coast down a hill. These are unsafe practices
that limit your response to changing traffic or road
conditions. You might lose control of the vehicle and
have a collision.
CAUTION!
Towing the vehicle, coasting, or driving for any other
reason with the transmission in NEUTRAL can cause
severe transmission damage.
Refer to “Recreational Towing” in “Starting And Op-
erating” and “Towing A Disabled Vehicle” in “In Case
Of Emergency” for further information.
DRIVE (D)
This range should be used for most city and highway
driving. It provides the smoothest upshifts and downshifts,
and the best fuel economy. The transmission automatically
upshifts through all forward gears. The DRIVE position
provides optimum driving characteristics under all normal
operating conditions.
6
STARTING AND OPERATING 233
Page 276 of 500
CAUTION!
•To avoid vehicle damage, ParkView should only be
used as a parking aid. The ParkView camera is
unable to view every obstacle or object in your drive
path.
• To avoid vehicle damage, the vehicle must be driven
slowly when using ParkView to be able to stop in
time when an obstacle is seen. It is recommended
that the driver look frequently over his/her shoulder
when using ParkView.
NOTE: If snow, ice, mud, or any foreign substance builds
up on the camera lens, clean the lens, rinse with water, and
dry with a soft cloth. Do not cover the lens.
REFUELING THE VEHICLE
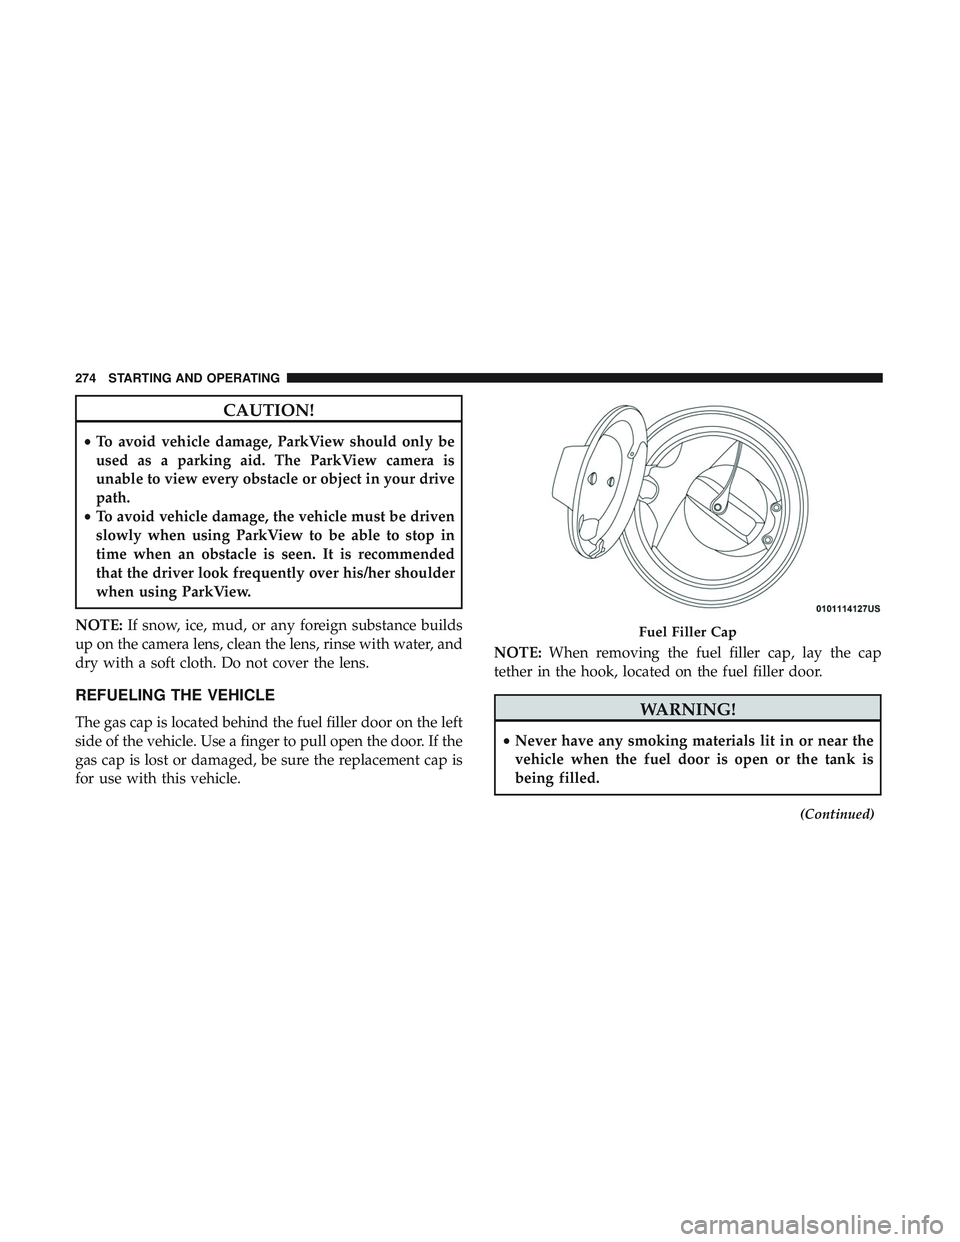
The gas cap is located behind the fuel filler door on the left
side of the vehicle. Use a finger to pull open the door. If the
gas cap is lost or damaged, be sure the replacement cap is
for use with this vehicle. NOTE:
When removing the fuel filler cap, lay the cap
tether in the hook, located on the fuel filler door.WARNING!
• Never have any smoking materials lit in or near the
vehicle when the fuel door is open or the tank is
being filled.
(Continued)
Fuel Filler Cap
274 STARTING AND OPERATING
Page 277 of 500
WARNING!(Continued)
•Never add fuel when the engine is running. This is
in violation of most state and federal fire regulations
and may cause the “Malfunction Indicator Light” to
turn on.
• A fire may result if fuel is pumped into a portable
container that is inside of a vehicle. You could be
burned. Always place fuel containers on the ground
while filling.
CAUTION!
•Damage to the fuel system or emissions control
system could result from using an improper fuel
tank filler tube cap.
• A poorly fitting fuel filler cap could let impurities
into the fuel system.
• A poorly fitting fuel filler cap may cause the “Mal-
function Indicator Light (MIL)” to turn on.
• To avoid fuel spillage and overfilling, do not “top
off” the fuel tank after filling. When the fuel nozzle
“clicks” or shuts off, the fuel tank is full. NOTE:
•
When the fuel nozzle “clicks” or shuts off, the fuel tank
is full.
• Tighten the gas cap until you hear a “clicking” sound.
This is an indication that the gas cap is tightened
properly. The MIL in the instrument cluster may turn on
if the gas cap is not secured properly. Make sure that the
gas cap is tightened each time the vehicle is refueled.
Loose Fuel Filler Cap Message
If the vehicle diagnostic system determines that the fuel
filler cap is loose, improperly installed, or damaged, a
”gASCAP” message will display in the odometer or a
“Check Gascap” message will display in the instrument
cluster. If this occurs, tighten the fuel filler cap properly
and press the Trip Odometer button to turn off the mes-
sage. If the problem continues, the message will appear the
next time the vehicle is started.
A loose, improperly installed, or damaged fuel filler cap
may also turn on the MIL.
6
STARTING AND OPERATING 275
Page 301 of 500
CavityCartridge Fuse Mini-Fuse Description
12 –20 Amp Yellow Dual USB Center Console
Rear/Cigar Lighter IP – If
Equipped
15 40 Amp Green –HVAC Blower
16 20 Amp Blue –Left Spot Lamp – Police
17 20 Amp Blue –Right Spot Lamp – Police
18 30 Amp Pink –Mod Network Interface –
Police
19 ––Fuse – Spare
20 ––Fuse – Spare
21 30 Amp Pink –Fuel Pump (Non 6.2L SRT HO)
22 –5 Amp Tan Cyber Gateway Mod
23 –10 Amp Red Fuel Door – If Equipped/
Diagnostic Port
24 –10 Amp Red Integrated Center Stack
25 –10 Amp Red Tire Pressure Monitor
26 –15 Amp Blue Cygnus Transmission Module
(Charger/300) / Electronic
Shift Module (Charger/300)
27 –25 Amp Clear Amplifier – If Equipped
31 –25 Amp Breaker Power Seats – If Equipped
7
IN CASE OF EMERGENCY 299
Page 302 of 500
CavityCartridge Fuse Mini-Fuse Description
32 –15 Amp Blue HVAC Module/Cluster
33 –15 Amp Blue Ignition Switch/RF Hub
Module/Steering Column Lock
(300) – If Equipped
34 –10 Amp Red Steering Column Module/
Clock (300)
35 –5 Amp Tan Battery Sensor
36 –15 Amp Blue Electronic Exhaust Valve – If
Equipped
37 –20 Amp Yellow Radio
38 –20 Amp Yellow Power Outlet Inside Arm
Rest/Console Media Hub
40 30 Amp Pink –Fuel Pump (6.2L SRT HO – If
Equipped)
41 30 Amp Pink –Fuel Pump (6.2L SRT HO – If
Equipped)
42 30 Amp Pink –Rear Defrost
43 –20 Amp Yellow Comfort Seat And Steering
Wheel Module (Heated Steer-
ing Wheel/RR Heated Seats)
300 IN CASE OF EMERGENCY