2019 DODGE CHALLENGER SRT seats
[x] Cancel search: seatsPage 52 of 500
Front Ventilated Seats — If Equipped
Located in the seat cushion and seat back are fans that
draw the air from the passenger compartment and move
air through fine perforations in the seat cover to help keep
the driver and front passenger cooler in higher ambient
temperatures. The fans operate at two speeds, HI and LO.
The front ventilated seats control buttons are located
within the Uconnect system. You can gain access to the
control buttons through the climate screen or the controls
screen.
•Press the ventilated seat button
once to choose HI.
•Press the ventilated seat buttona second time to
choose LO.
• Press the ventilated seat buttona third time to turn
the ventilated seat off.
NOTE: The engine must be running for the ventilated seats
to operate.
Vehicles Equipped With Remote Start
On models that are equipped with remote start, the venti-
lated seats can be programmed to come on during a remote
start. This feature can be programmed through the Uconnect
system. Refer to “Uconnect Settings” in “Multimedia” for
further information.
Vehicles Without Rear Seating Installed
All passenger occupants within the vehicle must be in a
seat equipped with a Seat Belt System and Head Restraint
for the safety of the passenger. If the rear seat has been
removed, do not ride in that area.
This vehicle has been designed to maximize total perfor-
mance. In doing so, the deletion of the rear seat may affect
the NVH (Noise, Vibration, and Harshness) characteristics.
As a result, the interior (driver cockpit) Noise, Vibration,
and Harshness (NVH) will be louder overall.
WARNING!
•
If the rear seat has been removed, do not ride in that
area. In a collision, people riding in this area are
more likely to be seriously injured or killed.
• It is dangerous to ride in a cargo area, inside or
outside of a vehicle. In a collision, people riding in
this area are more likely to be seriously injured or
killed.
(Continued)
50 GETTING TO KNOW YOUR VEHICLE
Page 54 of 500
NOTE:
•The front passenger seat needs to slide back to the
“remembered” pre-set position for the fore-aft adjuster
to be properly locked. For example, if the front passen-
ger has the seat adjusted full rear and exits the vehicle to
let a rear passenger enter using the easy entry handle,
the fore-aft adjuster needs to slide back to the full rear
position. If the adjuster is not returned to the original
pre-set position, the seat will appear to be loose.
• Also, if the front passenger uses the easy entry handle
and then lifts up the recliner handle without moving the
seat back to its original pre-set position, the recliner will
not lock until it is moved to the full recline position.
HEAD RESTRAINTS
Head restraints are designed to reduce the risk of injury by
restricting head movement in the event of a rear-impact.
Head restraints should be adjusted so that the top of the
head restraint is located above the top of your ear.
WARNING!
•All occupants, including the driver, should not oper-
ate a vehicle or sit in a vehicle’s seat until the head
restraints are placed in their proper positions in
order to minimize the risk of neck injury in the event
of a crash.
• Head restraints should never be adjusted while the
vehicle is in motion. Driving a vehicle with the head
restraints improperly adjusted or removed could
cause serious injury or death in the event of a
collision.
NOTE: Do not reverse the head restraints (making the rear
of the head restraint face forward) in an attempt to gain
additional clearance to the back of your head.
Reactive Head Restraints — Front Seats
The front driver and passenger seats are equipped with
Reactive Head Restraints (RHR). In the event of a rear
impact, the RHRs will automatically extend forward mini-
mizing the gap between the back of the occupants head
and the RHR.
52 GETTING TO KNOW YOUR VEHICLE
Page 97 of 500
WARNING!
If containers of hot liquid are place in the cupholder,
they can spill when the door is closed, burning the
occupants. Be careful when closing the doors to avoid
injury.
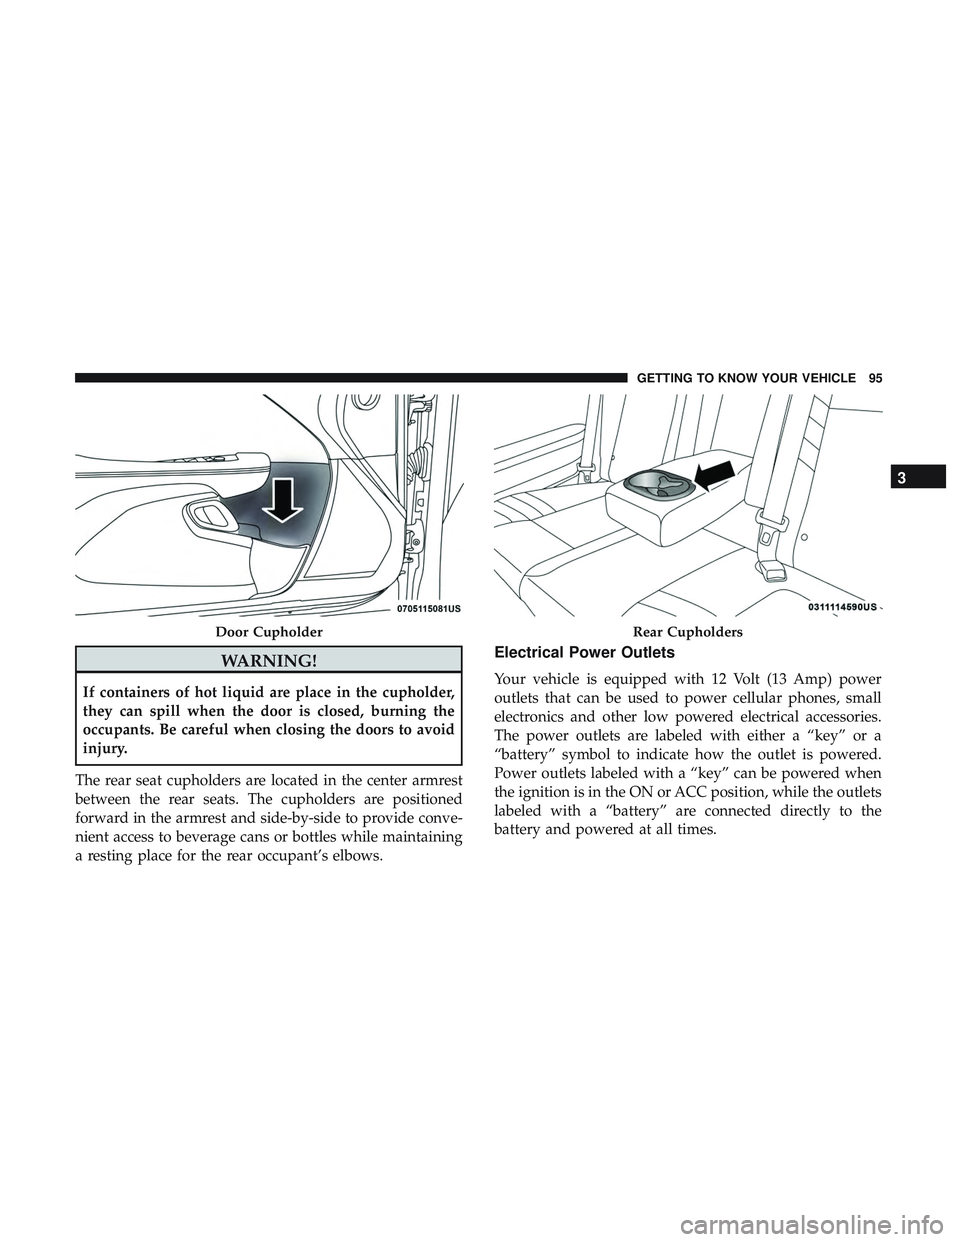
The rear seat cupholders are located in the center armrest
between the rear seats. The cupholders are positioned
forward in the armrest and side-by-side to provide conve-
nient access to beverage cans or bottles while maintaining
a resting place for the rear occupant’s elbows.
Electrical Power Outlets
Your vehicle is equipped with 12 Volt (13 Amp) power
outlets that can be used to power cellular phones, small
electronics and other low powered electrical accessories.
The power outlets are labeled with either a “key” or a
“battery” symbol to indicate how the outlet is powered.
Power outlets labeled with a “key” can be powered when
the ignition is in the ON or ACC position, while the outlets
labeled with a “battery” are connected directly to the
battery and powered at all times.
Door CupholderRear Cupholders
3
GETTING TO KNOW YOUR VEHICLE 95
Page 118 of 500

NOTE:
•The charging system is independent from load reduc-
tion. The charging system performs a diagnostic on the
charging system continuously.
• If the Battery Charge Warning Light is on it may indicate
a problem with the charging system. Refer to “Battery
Charge Warning Light” in “Getting To Know Your
Instrument Panel” for further information.
The electrical loads that may be switched off (if equipped),
and vehicle functions which can be affected by load
reduction:
• Heated Seat/Vented Seats/Heated Wheel
• Heated/Cooled Cup Holders — If Equipped
• Rear Defroster And Heated Mirrors
• HVAC System
• 115V AC Power Inverter System
• Audio and Telematics System
Loss of the battery charge may indicate one or more of the
following conditions: •
The charging system cannot deliver enough electrical
power to the vehicle system because the electrical loads
are larger than the capability of the charging system. The
charging system is still functioning properly.
• Turning on all possible vehicle electrical loads (e.g.
HVAC to max settings, exterior and interior lights,
overloaded power outlets +12V, 115V AC, USB ports)
during certain driving conditions (city driving, towing,
frequent stopping).
• Installing options like additional lights, upfitter electri-
cal accessories, audio systems, alarms and similar de-
vices.
• Unusual driving cycles (short trips separated by long
parking periods).
• The vehicle was parked for an extended period of time
(weeks, months).
• The battery was recently replaced and was not charged
completely.
• The battery was discharged by an electrical load left on
when the vehicle was parked.
116 GETTING TO KNOW YOUR INSTRUMENT PANEL
Page 162 of 500
If your vehicle is not equipped with a rear seat, FCA
recommends that you do not allow children 12 years old
and under to ride in your vehicle.
2. A child who is not big enough to wear the vehicle seatbelt properly (refer to “Child Restraints” in this section
for further information) must be secured in the appro-
priate child restraint or belt-positioning booster seat in a
rear seating position.
3. If a child from 2 to 12 years old (not in a rear-facing child restraint) must ride in the front passenger seat, move the
seat as far back as possible and use the proper child
restraint. (refer to “Child Restraints” in this section for
further information).
4. Never allow children to slide the shoulder belt behind them or under their arm.
5. You should read the instructions provided with your child restraint to make sure that you are using it
properly.
6. All occupants should always wear their lap and shoul- der belts properly. 7. The driver and front passenger seats should be moved
back as far as practical to allow the front air bags room
to inflate.
8. Do not lean against the door or window. If your vehicle has side air bags, and deployment occurs, the side air
bags will inflate forcefully into the space between occu-
pants and the door and occupants could be injured.
9. If the air bag system in this vehicle needs to be modified to accommodate a disabled person, refer to the “Cus-
tomer Assistance” section for customer service contact
information.
WARNING!
•Never place a rear-facing child restraint in front of an
air bag. A deploying passenger front air bag can
cause death or serious injury to a child 12 years or
younger, including a child in a rear-facing child
restraint.
• Never install a rear-facing child restraint in the front
seat of a vehicle. Only use a rear-facing child re-
straint in the rear seat. If the vehicle does not have a
rear seat, do not transport a rear-facing child restraint
in that vehicle.
160 SAFETY
Page 163 of 500
Seat Belt Systems
Buckle up even though you are an excellent driver, even on
short trips. Someone on the road may be a poor driver and
could cause a collision that includes you. This can happen
far away from home or on your own street.
Research has shown that seat belts save lives, and they can
reduce the seriousness of injuries in a collision. Some of the
worst injuries happen when people are thrown from the
vehicle. Seat belts reduce the possibility of ejection and the
risk of injury caused by striking the inside of the vehicle.
Everyone in a motor vehicle should be belted at all times.
Vehicles Without Rear Seating Installed
If your vehicle does not have factory installed rear passen-
ger seats, the features described in this section may not be
available in your vehicle.
This vehicle has been designed to maximize total perfor-
mance. In doing so, deletion of rear seats may affect the
NVH (Noise, Vibration, and Harshness) characteristics. As
a result, the interior (driver cockpit) Noise, Vibration, and
Harshness (NVH) will be louder overall. Furthermore, the
rear seats and seat belt system are deleted to increase
vehicle performance.
WARNING!
•If the rear seat has been removed, do not ride in that
area. In a collision, people riding in this area are
more likely to be seriously injured or killed.
• It is dangerous to ride in a cargo area, inside or
outside of a vehicle. In a collision, people riding in
this area are more likely to be seriously injured or
killed.
• Only ride in available seating positions equipped
with seat belt systems. Always properly wear your
seat belt. Failure to do so could result in an increased
risk of serious injury or death in the event of an
accident.
• Be sure everyone in your vehicle is in a seat and
using a seat belt properly. Occupants, including the
driver, should always wear their seat belts whether
or not an air bag is also provided at their seating
positions to minimize the risk of severe injury or
death in the event of a crash.
(Continued)
5
SAFETY 161
Page 166 of 500
WARNING!(Continued)
•It is dangerous to ride in a cargo area, inside or
outside of a vehicle. In a collision, people riding in
these areas are more likely to be seriously injured or
killed.
• Do not allow people to ride in any area of your
vehicle that is not equipped with seats and seat belts.
• Be sure everyone in your vehicle is in a seat and
using a seat belt properly. Occupants, including the
driver, should always wear their seat belts whether
or not an air bag is also provided at their seating
position to minimize the risk of severe injury or
death in the event of a crash.
• Wearing your seat belt incorrectly could make your
injuries in a collision much worse. You might suffer
internal injuries, or you could even slide out of the
seat belt. Follow these instructions to wear your seat
belt safely and to keep your passengers safe, too.
• Two people should never be belted into a single seat
belt. People belted together can crash into one an-
other in a collision, hurting one another badly. Never
use a lap/shoulder belt or a lap belt for more than one
person, no matter what their size.
WARNING!
•A lap belt worn too high can increase the risk of
injury in a collision. The seat belt forces won’t be at
the strong hip and pelvic bones, but across your
abdomen. Always wear the lap part of your seat belt
as low as possible and keep it snug.
• A twisted seat belt may not protect you properly. In
a collision, it could even cut into you. Be sure the seat
belt is flat against your body, without twists. If you
can’t straighten a seat belt in your vehicle, take it to
an authorized dealer immediately and have it fixed.
• A seat belt that is buckled into the wrong buckle will
not protect you properly. The lap portion could ride
too high on your body, possibly causing internal
injuries. Always buckle your seat belt into the
buckle nearest you.
• A seat belt that is too loose will not protect you
properly. In a sudden stop, you could move too far
forward, increasing the possibility of injury. Wear
your seat belt snugly.
(Continued)
164 SAFETY
Page 172 of 500
In Automatic Locking Mode, the shoulder belt is automati-
cally pre-locked. The seat belt will still retract to remove
any slack in the shoulder belt. Use the Automatic Locking
Mode anytime a child restraint is installed in a seating
position that has a seat belt with this feature. Children 12
years old and under should always be properly restrained
in the rear seat of a vehicle with a rear seat.
WARNING!
•Never place a rear-facing child restraint in front of an
air bag. A deploying passenger front air bag can
cause death or serious injury to a child 12 years or
younger, including a child in a rear-facing child
restraint.
• Never install a rear-facing child restraint in the front
seat of a vehicle. Only use a rear-facing child re-
straint in the rear seat. If the vehicle does not have a
rear seat, do not transport a rear-facing child restraint
in that vehicle.
How To Engage The Automatic Locking Mode
1. Buckle the combination lap and shoulder belt.
2. Grasp the shoulder portion and pull downward until the entire seat belt is extracted. 3. Allow the seat belt to retract. As the seat belt retracts,
you will hear a clicking sound. This indicates the seat
belt is now in the Automatic Locking Mode.
How To Disengage The Automatic Locking Mode
Unbuckle the combination lap/shoulder belt and allow it
to retract completely to disengage the Automatic Locking
Mode and activate the vehicle sensitive (emergency) lock-
ing mode.WARNING!
• The seat belt assembly must be replaced if the
switchable Automatic Locking Retractor (ALR) fea-
ture or any other seat belt function is not working
properly when checked according to the procedures
in the Service Manual.
• Failure to replace the seat belt assembly could in-
crease the risk of injury in collisions.
• Do not use the Automatic Locking Mode to restrain
occupants who are wearing the seat belt or children
who are using booster seats. The locked mode is only
used to install rear-facing or forward-facing child
restraints that have a harness for restraining the
child.
170 SAFETY