Page 203 of 500

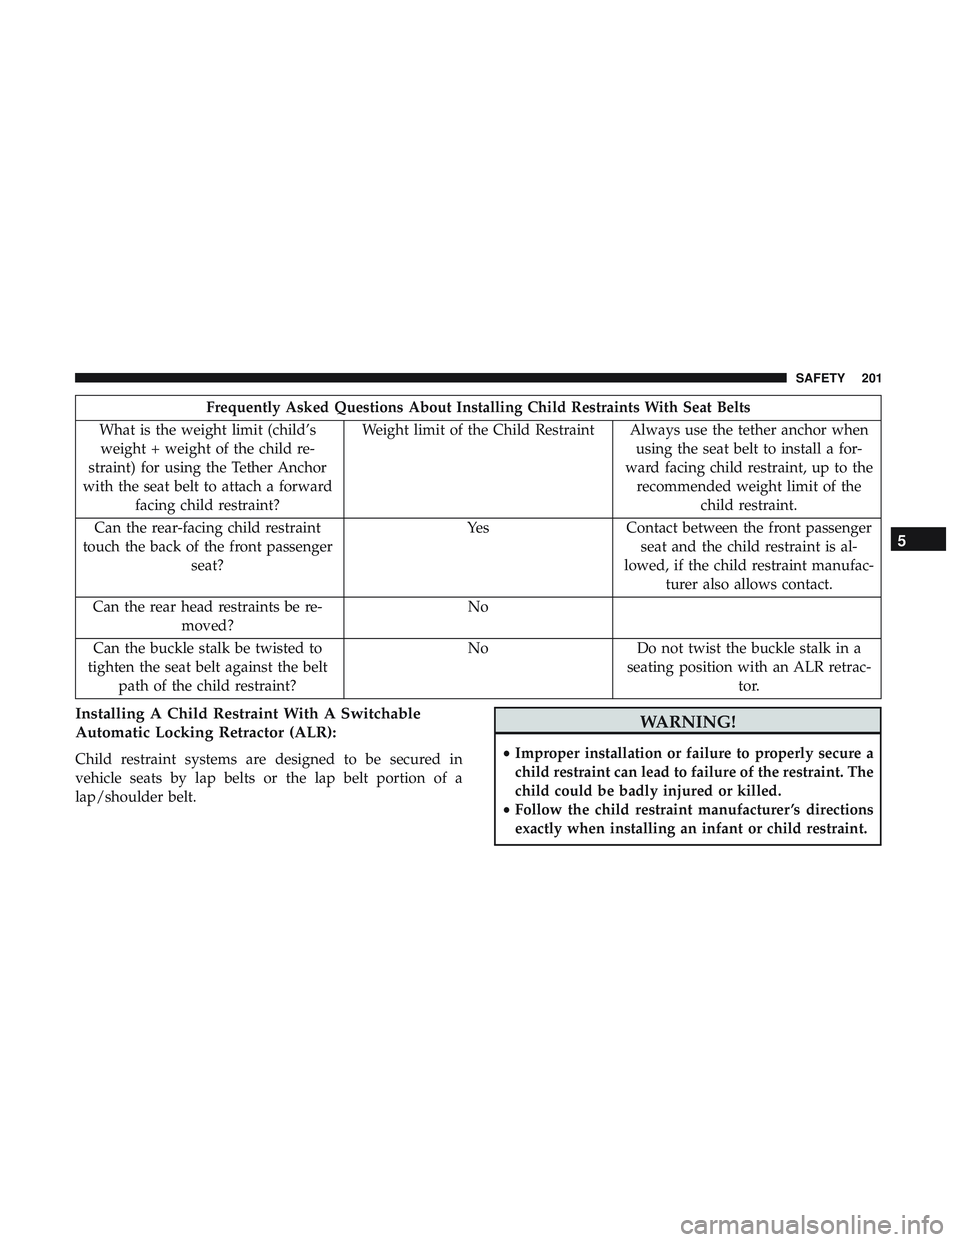
Frequently Asked Questions About Installing Child Restraints With Seat Belts
What is the weight limit (child’s weight + weight of the child re-
straint) for using the Tether Anchor
with the seat belt to attach a forward facing child restraint? Weight limit of the Child Restraint Always use the tether anchor when
using the seat belt to install a for-
ward facing child restraint, up to the recommended weight limit of the child restraint.
Can the rear-facing child restraint
touch the back of the front passenger seat? Yes
Contact between the front passenger
seat and the child restraint is al-
lowed, if the child restraint manufac- turer also allows contact.
Can the rear head restraints be re- moved? No
Can the buckle stalk be twisted to
tighten the seat belt against the belt path of the child restraint? No
Do not twist the buckle stalk in a
seating position with an ALR retrac- tor.
Installing A Child Restraint With A Switchable
Automatic Locking Retractor (ALR):
Child restraint systems are designed to be secured in
vehicle seats by lap belts or the lap belt portion of a
lap/shoulder belt.
WARNING!
•Improper installation or failure to properly secure a
child restraint can lead to failure of the restraint. The
child could be badly injured or killed.
• Follow the child restraint manufacturer ’s directions
exactly when installing an infant or child restraint.
5
SAFETY 201
Page 204 of 500

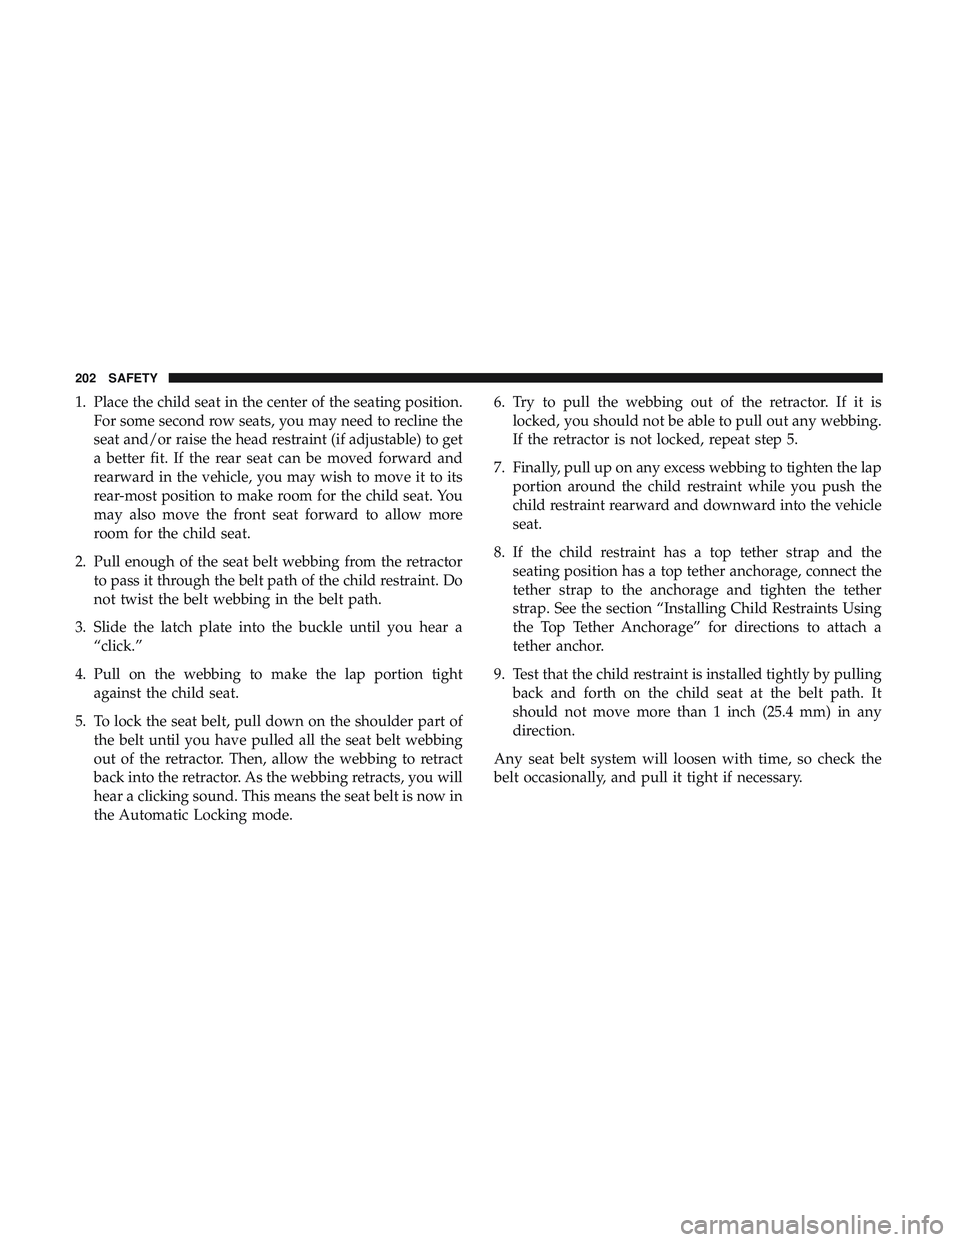
1. Place the child seat in the center of the seating position.For some second row seats, you may need to recline the
seat and/or raise the head restraint (if adjustable) to get
a better fit. If the rear seat can be moved forward and
rearward in the vehicle, you may wish to move it to its
rear-most position to make room for the child seat. You
may also move the front seat forward to allow more
room for the child seat.
2. Pull enough of the seat belt webbing from the retractor to pass it through the belt path of the child restraint. Do
not twist the belt webbing in the belt path.
3. Slide the latch plate into the buckle until you hear a “click.”
4. Pull on the webbing to make the lap portion tight against the child seat.
5. To lock the seat belt, pull down on the shoulder part of the belt until you have pulled all the seat belt webbing
out of the retractor. Then, allow the webbing to retract
back into the retractor. As the webbing retracts, you will
hear a clicking sound. This means the seat belt is now in
the Automatic Locking mode. 6. Try to pull the webbing out of the retractor. If it is
locked, you should not be able to pull out any webbing.
If the retractor is not locked, repeat step 5.
7. Finally, pull up on any excess webbing to tighten the lap portion around the child restraint while you push the
child restraint rearward and downward into the vehicle
seat.
8. If the child restraint has a top tether strap and the seating position has a top tether anchorage, connect the
tether strap to the anchorage and tighten the tether
strap. See the section “Installing Child Restraints Using
the Top Tether Anchorage” for directions to attach a
tether anchor.
9. Test that the child restraint is installed tightly by pulling back and forth on the child seat at the belt path. It
should not move more than 1 inch (25.4 mm) in any
direction.
Any seat belt system will loosen with time, so check the
belt occasionally, and pull it tight if necessary.
202 SAFETY
Page 205 of 500

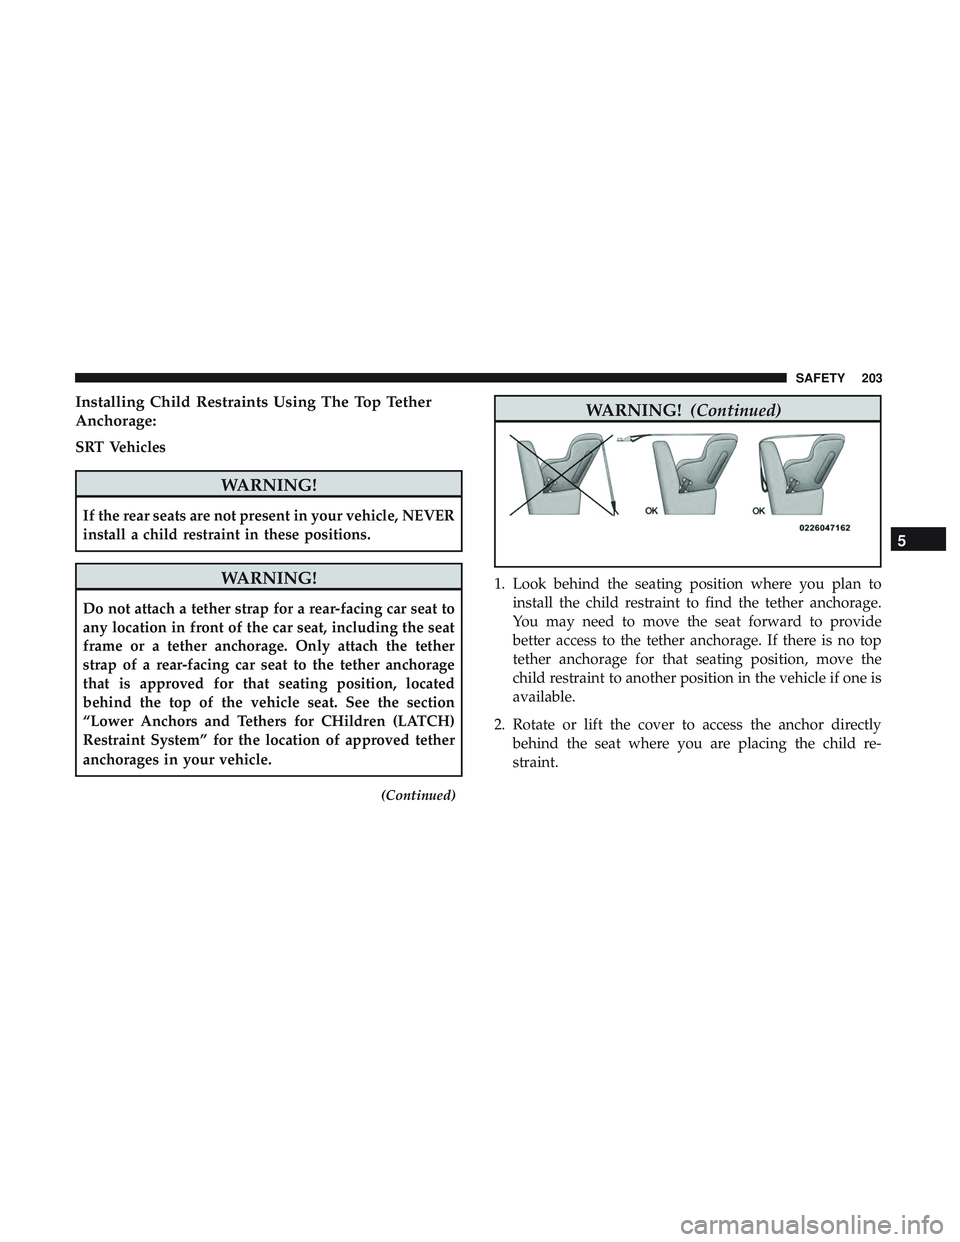
Installing Child Restraints Using The Top Tether
Anchorage:
SRT Vehicles
WARNING!
If the rear seats are not present in your vehicle, NEVER
install a child restraint in these positions.
WARNING!
Do not attach a tether strap for a rear-facing car seat to
any location in front of the car seat, including the seat
frame or a tether anchorage. Only attach the tether
strap of a rear-facing car seat to the tether anchorage
that is approved for that seating position, located
behind the top of the vehicle seat. See the section
“Lower Anchors and Tethers for CHildren (LATCH)
Restraint System” for the location of approved tether
anchorages in your vehicle.
(Continued)
WARNING!(Continued)
1. Look behind the seating position where you plan to
install the child restraint to find the tether anchorage.
You may need to move the seat forward to provide
better access to the tether anchorage. If there is no top
tether anchorage for that seating position, move the
child restraint to another position in the vehicle if one is
available.
2. Rotate or lift the cover to access the anchor directly behind the seat where you are placing the child re-
straint.
5
SAFETY 203
Page 206 of 500

3. Route the tether strap to provide the most direct path forthe strap between the anchor and the child seat. If your
vehicle is equipped with adjustable rear head restraints,
raise the head restraint, and where possible, route the
tether strap under the head restraint and between the
two posts. If not possible, lower the head restraint and
pass the tether strap around the outboard side of the
head restraint. 4. Attach the tether strap hook of the child restraint to the
top tether anchorage as shown in the diagram.
5. Remove slack in the tether strap according to the child restraint manufacturer ’s instructions.
NOTE: If your vehicle is not equipped with a rear seat,
FCA recommends that you do not allow children 12 years
old and under to ride in your vehicle. If the rear seats are
not present in your vehicle, NEVER install a child restraint
in these positions. If you must install a forward facing child
restraint in the front passenger seat, then you must use the
seat belt system to secure the restraint. A top tether strap
extension may be needed to reach the tether anchor on the
rear shelf directly behind the passenger seat.
WARNING!
• An incorrectly anchored tether strap could lead to
increased head motion and possible injury to the
child. Use only the anchorage position directly be-
hind the child seat to secure a child restraint top
tether strap.
Tether Strap Mounting
1 — Cover A — Tether Strap Hook
3 — Attaching Strap B — Tether Anchor
204 SAFETY
Page 207 of 500

WARNING!(Continued)
•If your vehicle is equipped with a split rear seat,
make sure the tether strap does not slip into the
opening between the seatbacks as you remove slack
in the strap.
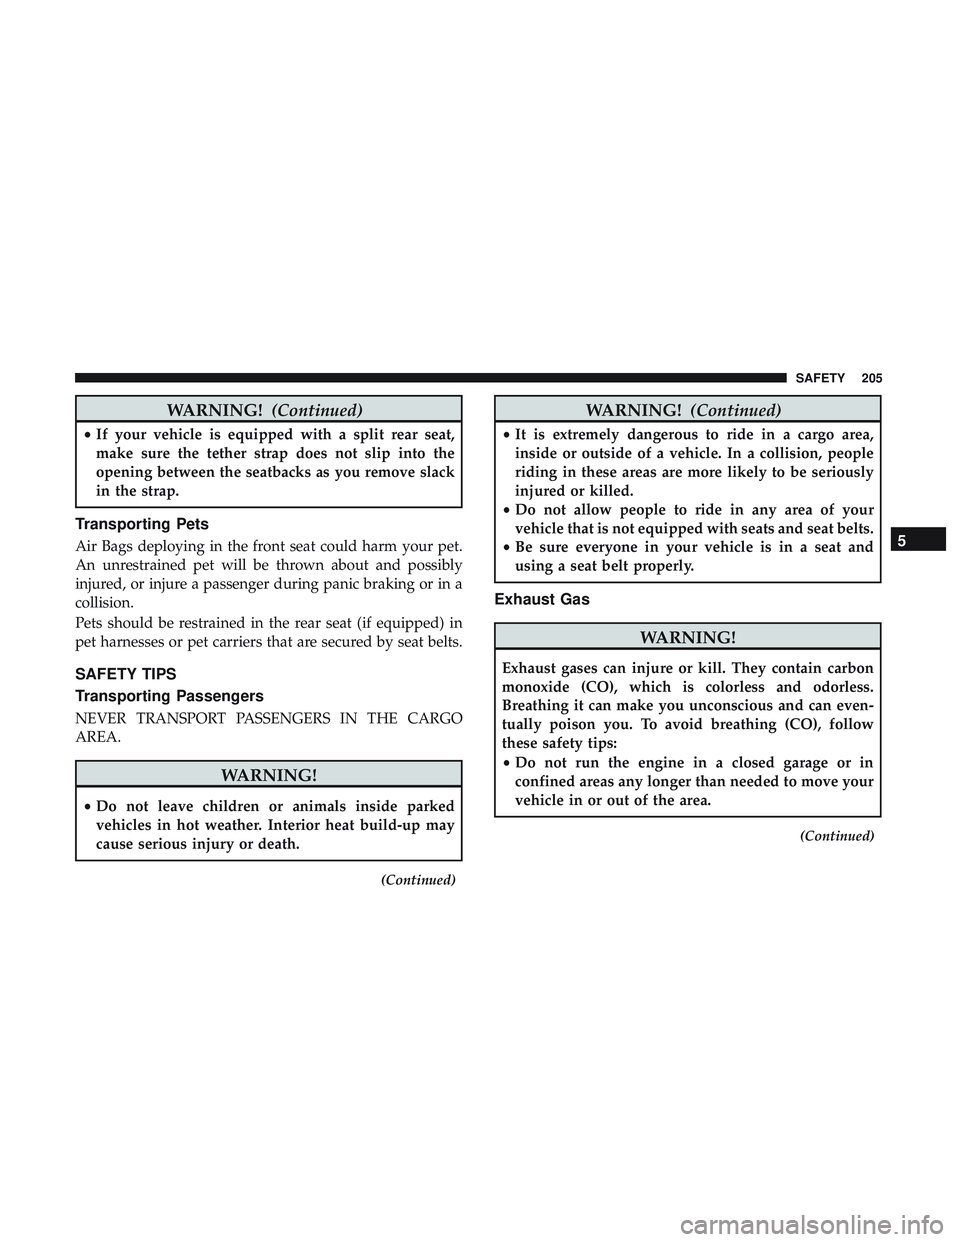
Transporting Pets
Air Bags deploying in the front seat could harm your pet.
An unrestrained pet will be thrown about and possibly
injured, or injure a passenger during panic braking or in a
collision.
Pets should be restrained in the rear seat (if equipped) in
pet harnesses or pet carriers that are secured by seat belts.
SAFETY TIPS
Transporting Passengers
NEVER TRANSPORT PASSENGERS IN THE CARGO
AREA.
WARNING!
•Do not leave children or animals inside parked
vehicles in hot weather. Interior heat build-up may
cause serious injury or death.
(Continued)
WARNING! (Continued)
•It is extremely dangerous to ride in a cargo area,
inside or outside of a vehicle. In a collision, people
riding in these areas are more likely to be seriously
injured or killed.
• Do not allow people to ride in any area of your
vehicle that is not equipped with seats and seat belts.
• Be sure everyone in your vehicle is in a seat and
using a seat belt properly.
Exhaust Gas
WARNING!
Exhaust gases can injure or kill. They contain carbon
monoxide (CO), which is colorless and odorless.
Breathing it can make you unconscious and can even-
tually poison you. To avoid breathing (CO), follow
these safety tips:
•Do not run the engine in a closed garage or in
confined areas any longer than needed to move your
vehicle in or out of the area.
(Continued)
5
SAFETY 205
Page 301 of 500
CavityCartridge Fuse Mini-Fuse Description
12 –20 Amp Yellow Dual USB Center Console
Rear/Cigar Lighter IP – If
Equipped
15 40 Amp Green –HVAC Blower
16 20 Amp Blue –Left Spot Lamp – Police
17 20 Amp Blue –Right Spot Lamp – Police
18 30 Amp Pink –Mod Network Interface –
Police
19 ––Fuse – Spare
20 ––Fuse – Spare
21 30 Amp Pink –Fuel Pump (Non 6.2L SRT HO)
22 –5 Amp Tan Cyber Gateway Mod
23 –10 Amp Red Fuel Door – If Equipped/
Diagnostic Port
24 –10 Amp Red Integrated Center Stack
25 –10 Amp Red Tire Pressure Monitor
26 –15 Amp Blue Cygnus Transmission Module
(Charger/300) / Electronic
Shift Module (Charger/300)
27 –25 Amp Clear Amplifier – If Equipped
31 –25 Amp Breaker Power Seats – If Equipped
7
IN CASE OF EMERGENCY 299
Page 302 of 500
CavityCartridge Fuse Mini-Fuse Description
32 –15 Amp Blue HVAC Module/Cluster
33 –15 Amp Blue Ignition Switch/RF Hub
Module/Steering Column Lock
(300) – If Equipped
34 –10 Amp Red Steering Column Module/
Clock (300)
35 –5 Amp Tan Battery Sensor
36 –15 Amp Blue Electronic Exhaust Valve – If
Equipped
37 –20 Amp Yellow Radio
38 –20 Amp Yellow Power Outlet Inside Arm
Rest/Console Media Hub
40 30 Amp Pink –Fuel Pump (6.2L SRT HO – If
Equipped)
41 30 Amp Pink –Fuel Pump (6.2L SRT HO – If
Equipped)
42 30 Amp Pink –Rear Defrost
43 –20 Amp Yellow Comfort Seat And Steering
Wheel Module (Heated Steer-
ing Wheel/RR Heated Seats)
300 IN CASE OF EMERGENCY
Page 303 of 500
CavityCartridge Fuse Mini-Fuse Description
44 –10 Amp Red Park Assist / Blind Spot /
Rear View Camera
45 –15 Amp Blue Cluster / Rearview Mirror /
Compass (Charger/300) / Hu-
midity Sensor / Forward Fac-
ing Camera (Lane Departure) /
Cyber Gateway
46 ––Fuse – Spare
47 –10 Amp Red Adaptive Front Lighting / Day
Time Running Lamps – If
Equipped
48 –20 Amp Yellow Active Suspension – (6.4L /
6.2L)
49 ––Fuse – Spare
50 ––Fuse – Spare
51 –20 Amp Yellow Front Heated / Vented Seats –
If Equipped
52 –10 Amp Red Heated Cupholders/Rear
Heated Seat Switches – If
Equipped
53 –10 Amp Red HVAC Module/In Vehicle
Temperature Sensor
7
IN CASE OF EMERGENCY 301