Page 424 of 532

NOTE:Interior trims may vary. 6.4L vehicles will receive a
“SRT” button rather than a “Sport” button on the Instru-
ment Panel.
Customer Programmable Features — Uconnect 4
Settings
Press the “Settings” button on the bottom bar, or press the
“Apps
” button, then press the “Settings” button on
the touchscreen to display the menu setting screen. In
this mode the Uconnect system allows you to access all
of the available programmable features.
NOTE: Depending on the vehicle’s options, feature set-
tings may vary.
When making a selection, press the button on the touch-
screen to enter the desired mode. Once in the desired
mode, press and release the preferred setting “option” until
a check-mark appears next to the setting, showing that
setting has been selected. Once the setting is complete,
press the “X” button on the touchscreen to close out of the
settings screen. Pressing the Up or Down Arrow button on
the right side of the screen will allow you to toggle up or
down through the available settings.
The following tables list the settings that may be found
within the Uconnect 4 radio, along with the selectable
options pertaining to each setting.
Uconnect 4C/4C NAV Buttons On Touchscreen And
Buttons On Faceplate
1 — Uconnect Buttons On The Touchscreen
2 — Uconnect Buttons On The Faceplate 422 MULTIMEDIA
Page 428 of 532
Clock
After pressing the “Clock” button on the touchscreen, the
following settings will be available:
Setting NameSelectable Options
Sync Time With GPS — If Equipped On
Off
NOTE:
The “Sync Time With GPS” feature will allow you to automatically have the radio set the time. Set Time Hours +–
Set Time Minutes +–
Time Format 12 hrs24 hrs
Show Time In Status Bar — If Equipped On
Off
NOTE:
The “Show Time In Status Bar” feature will allow you to turn on or shut off the digital clock in the status bar.
426 MULTIMEDIA
Page 432 of 532

Setting NameSelectable Options
Blind Spot Alert — If Equipped Off
LightsLights and Chimes
NOTE:
•When this feature is selected, the Blind Spot Alert feature Provides alerts, visual and/or audible, to indicate objects
in your blind spot. The Blind Spot Alert feature can be activated in “Lights” mode. When this mode is selected, the
Blind Spot Monitor (BSM) system is activated and will only show a visual alert in the exterior mirrors. When
“Lights & Chime” mode is activated, the Blind Spot Monitor (BSM) will show a visual alert in the exterior mirrors
as well as an audible alert when the turn signal is on. When “Off” is selected, the Blind Spot Monitor (BSM) sys-
tem is deactivated.
•If your vehicle has experienced any damage in the area where the sensor is located, even if the fascia is not dam-
aged, the sensor may have become misaligned. Take your vehicle to an authorized dealer to verify sensor align-
ment. Having a sensor that is misaligned will result in the BSM not operating to specification.
ParkView Backup Camera Active Guidelines On
Off
NOTE:
Your vehicle may be equipped with the ParkView Rear Back Up Camera Active Guidelines that allows you to see ac-
tive guidelines over the ParkView Back up camera display whenever the gear selector is put into REVERSE. The im-
age will be displayed on the radio touchscreen display along with a caution note to “check entire surroundings”
across the top of the screen. After five seconds, this note will disappear.
430 MULTIMEDIA
Page 436 of 532
Setting NameSelectable Options
Passive Entry — If Equipped On
Off
NOTE:
This feature allows you to lock and unlock the vehicle’s door(s) without having to push the key fob lock or unlock
buttons. It automatically unlocks the doors when the outside door handle is grabbed. Personal Settings Linked To Key Fob — IfEquipped On
Off
NOTE:
•This feature provides automatic recall of all settings stored to a memory location (driver ’s seat, exterior mirrors,
steering column position and radio station pre-sets) to enhance driver mobility when entering and exiting the ve-
hicle.
•The seat returns to the memorized seat location (if Personal Settings Linked to Key Fob is set to on) when the key
fob is used to unlock the door.
434 MULTIMEDIA
Page 437 of 532

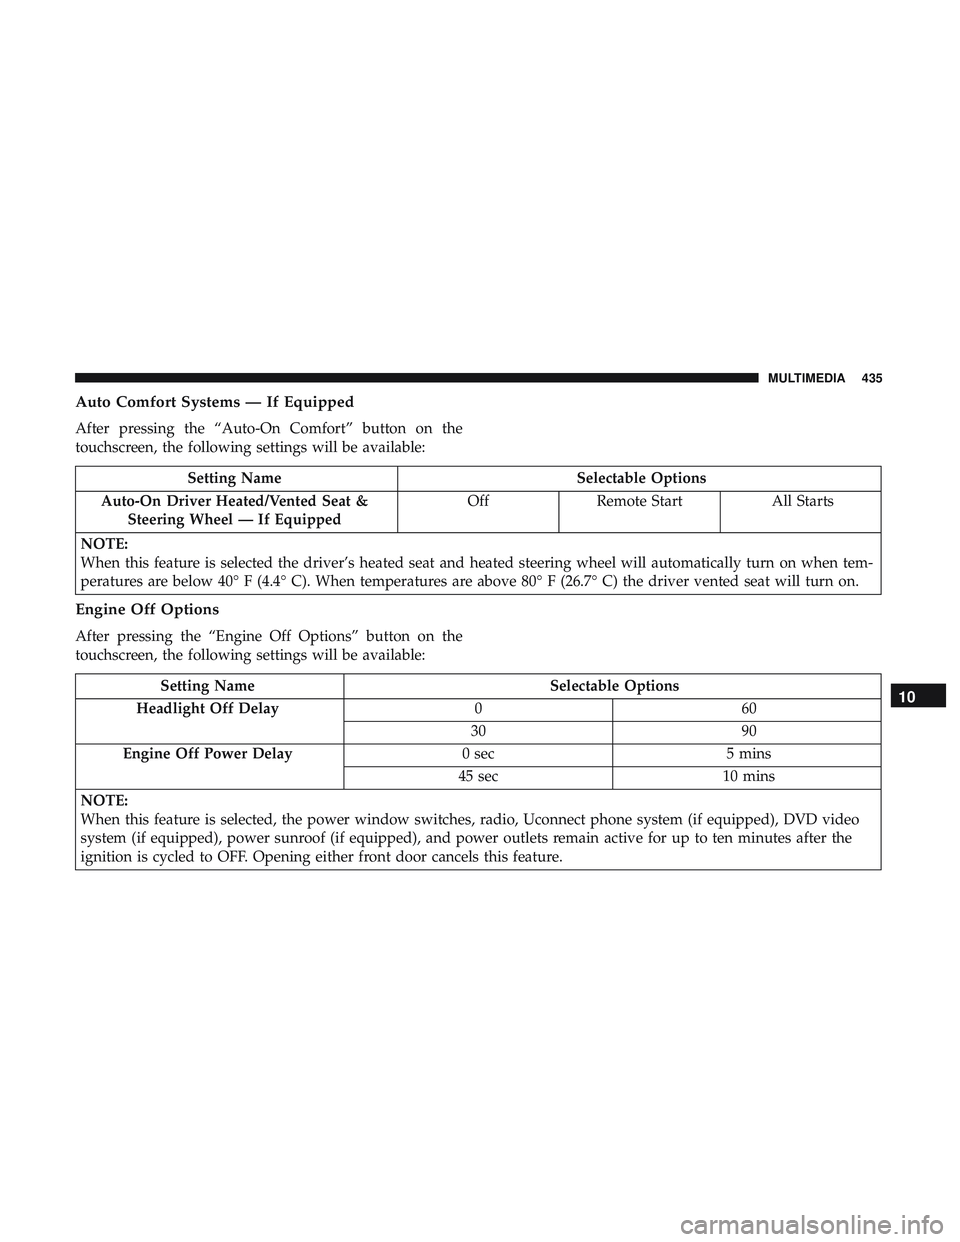
Auto Comfort Systems — If Equipped
After pressing the “Auto-On Comfort” button on the
touchscreen, the following settings will be available:
Setting NameSelectable Options
Auto-On Driver Heated/Vented Seat & Steering Wheel — If Equipped Off
Remote Start All Starts
NOTE:
When this feature is selected the driver’s heated seat and heated steering wheel will automatically turn on when tem-
peratures are below 40° F (4.4° C). When temperatures are above 80° F (26.7° C) the driver vented seat will turn on.
Engine Off Options
After pressing the “Engine Off Options” button on the
touchscreen, the following settings will be available:
Setting Name Selectable Options
Headlight Off Delay 060
30 90
Engine Off Power Delay 0 sec5 mins
45 sec 10 mins
NOTE:
When this feature is selected, the power window switches, radio, Uconnect phone system (if equipped), DVD video
system (if equipped), power sunroof (if equipped), and power outlets remain active for up to ten minutes after the
ignition is cycled to OFF. Opening either front door cancels this feature.10
MULTIMEDIA 435
Page 443 of 532

Setting NameSelectable Options
Subscription Information Subscription Info
NOTE:
New vehicle purchasers or lessees will receive a free limited time subscription to SiriusXM Satellite Radio with your
radio. Following the expiration of the free services, it will be necessary to access the information on the Subscription
Information screen to re-subscribe.
1. Press the “Subscription Info” button on the touchscreen to access the Subscription Information screen.
2. Write down the SIRIUS ID numbers for your receiver. To reactivate your service, either call the number listed on the screen or visit the provider online.
Restore Settings
After pressing the “Restore Settings” button on the touch-
screen, the following settings will be available:
Setting Name Selectable Options
Restore Settings YesCancel
NOTE:
When the “Restore Settings” feature is selected it will reset the Display, Clock, Audio, and Radio Settings to their de-
fault settings. If “Yes” is selected, a pop-up will appear asking �Are you sure you want to reset your settings to de-
fault?” Select “Yes” to restore, or “Cancel” to exit.10
MULTIMEDIA 441
Page 444 of 532

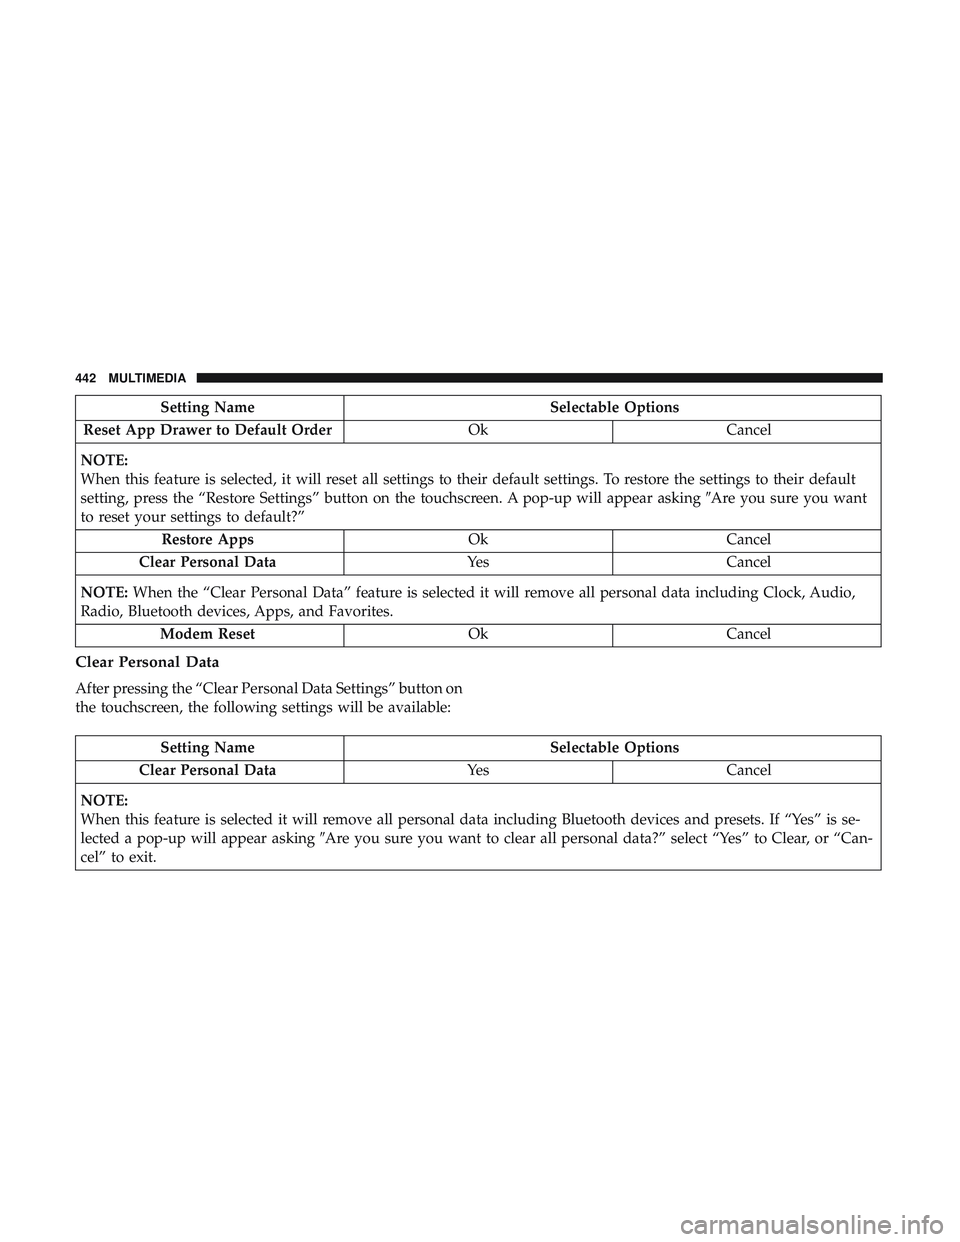
Setting NameSelectable Options
Reset App Drawer to Default Order OkCancel
NOTE:
When this feature is selected, it will reset all settings to their default settings. To restore the settings to their default
setting, press the “Restore Settings” button on the touchscreen. A pop-up will appear asking �Are you sure you want
to reset your settings to default?”
Restore Apps OkCancel
Clear Personal Data YesCancel
NOTE: When the “Clear Personal Data” feature is selected it will remove all personal data including Clock, Audio,
Radio, Bluetooth devices, Apps, and Favorites.
Modem Reset OkCancel
Clear Personal Data
After pressing the “Clear Personal Data Settings” button on
the touchscreen, the following settings will be available:
Setting Name Selectable Options
Clear Personal Data YesCancel
NOTE:
When this feature is selected it will remove all personal data including Bluetooth devices and presets. If “Yes” is se-
lected a pop-up will appear asking �Are you sure you want to clear all personal data?” select “Yes” to Clear, or “Can-
cel” to exit.
442 MULTIMEDIA
Page 449 of 532
Voice
After pressing the “Voice” button on the touchscreen, the
following settings will be available:
Setting NameSelectable Options
Voice Response Length Brief Detailed
Show Command List Neverw/Help Always
Clock & Date
After pressing the “Clock & Date” button on the touch-
screen, the following settings will be available:
Setting Name Selectable Options
Sync Time With GPS — If Equipped On
Off
NOTE:
The “Sync Time With GPS” feature will allow you to automatically have the radio set the time. Set Time Hours +–
Set Time Minutes +–
Time Format 12 hrs24 hrs
AM PM
10
MULTIMEDIA 447