Page 9 of 20

9F Optional equipment
INFOTAINMENT SYSTEM
Refer to your Owner’s Manual for important information about using the infotainment system while driving.
The infotainment system uses a Bluetooth or USB connection to link to a \
compat-ible device, such as a smartphone or portable audio player, and offers h\
ands-free voice control. You can use simple gestures on the touchscreen, such as t\
ap, drag and swipe, to interact with the system. For assistance, contact Customer Ass\
istance at 1-855-4-SUPPORT (1-855-478-7767) or visit my.chevrolet.com/learn.
MANAGING HOME PAGE ICONS
1. Press the Home button.
2. To enter edit mode, touch and hold the Home page icon to move.
3. Continue holding the icon and drag it to the desired position, and then \
release.
See your Infotainment System Manual.
Power/Volume/Mute
BACK Move back one level in the menus
Home page
SEEK Previous radio station or track
SEEK Next radio station or track
Additional Pages: Swipe to view additional pages (if available)
Applications Tray: Shortcuts to applications
ApplicationsF: Touch a screen icon to access an application
Page 10 of 20
 can be stored in any order. The audio source options are on the left side of the page")
10F Optional equipment
INFOTAINMENT SYSTEM
STORING FAVORITES
Radio stations from all bands (AM, FM or SiriusXMF) can be stored in any order. The audio source options are on the left side of the page.
1. Display the desired radio station.
2. Select the desired page of favorite screen buttons.
3. Touch and hold one of the favorite screen buttons until a beep is heard.
4. Repeat the steps to store another favorite item.
Note: To change the number of favorites displayed, go to Settings > System > Favorites.
NATURAL VOICE RECOGNITION
Control the music source and make phone calls hands-free (after pairing\
your Bluetooth-enabled phone) using the natural voice recognition system.
1. Press the Press to Talk button on the steering wheel.
2. The radio will play a prompt followed by a beep.
3. After the beep, say what you want it to do using natural speech. Example\
s: “Call Dave” or “Tune to 99.5 FM.” Say “Help” for assistance.
APPS
In-vehicle apps — connecting to music, news, weather, travel informat\
ion, sports, enter-tainment and more — are available for download to the radio through t\
he Apps icon on the Home page. Downloading and using the apps requires internet connecti\
vity, and may require a data plan, accessed through the vehicle’s 4G LTE Wi-Fi hots\
pot, if active, or a mobile device hotspot. For more information, visit my.chevrolet.com/learn.
APPLE CARPLAY
Apple CarPlay capability is available through a compatible smartphone us\
ing the Apple CarPlay icon on the Home page of the infotainment system. No app is requ\
ired.
1. Connect your compatible phone by plugging the Lightning cable into a USB\
data port. Use your device’s factory-provided Lightning cable. Aftermarket cable\
s may not work.
2. The Apple CarPlay icon will illuminate. Touch the Apple CarPlay icon to \
have your apps displayed.
ANDROID AUTO
Android Auto capability is available through a compatible smartphone usi\
ng the Android Auto icon on the Home page of the infotainment system.
1. Download the Android Auto app to your phone from the Google Play Store.
2. Connect your compatible phone by plugging the phone’s USB cable into \
a USB data port. Use your device’s factory-provided USB cable. Aftermarket cable\
s may not work.
3. The Android Auto icon will illuminate. Touch the Android Auto icon to ha\
ve your apps displayed.
See your Infotainment System Manual.
Page 11 of 20

11F Optional equipment
BLUETOOTH® SYSTEM
Refer to your Owner’s Manual for important information about using the Bluetooth system while driving.
Before using a Bluetooth-enabled device in the vehicle, it must be paire\
d with the in-vehicle Bluetooth system. The pairing process is disabled when the vehic\
le is moving. Not all devices will support all functions. Visit my.chevrolet.com/learn for more information.
PAIR A PHONE
1. To use voice recognition, press the Press to Talk button; after the beep, say “Pair phone”; or to use the infotainment screen, select the Phone icon > Ph\
ones > Connect Phone.
2. Start the pairing process on your phone. From the phone’s Bluetooth s\
ettings, select the name shown on the infotainment screen.
3. Follow the pairing instructions.
4. When pairing is complete, the phone screen is displayed. Depending on th\
e phone, your phone book may be downloaded automatically.
SECONDARY PHONE
A secondary phone can be paired to the Bluetooth system. The system conn\
ects to the phone that is set to First to Connect. The secondary phone can only rece\
ive calls.
To set the first and secondary phones, go to Settings > System > Phone\
s and select the Information icon.
See your Infotainment System Manual.
AUDIO STEERING WHEEL CONTROLSF
Press to Talk
Press to answer an incoming call or to use natural voice recognition with the Bluetooth or OnStar® system.
Press and hold to activate Bluetooth Speech Recognition (Siri or Voice Command) on a paired mobile phone.
End Call/Mute
Press to end or decline a call.
Press to mute/unmute the speakers.
+ – Volume (behind right side of steering wheel)
Press the top or bottom button to adjust the volume.
Next/Previous Favorite Station (behind left side of steering wheel)
Press the top or bottom button to go to the next or previous favorite radio station or track.
Next/Previous Favorite Station buttons shown
See your Infotainment System Manual.
Page 12 of 20

12
An iPod®, iPhone®, MP3 Player, a USB flash drive or a portable U\
SB hard drive can be
connected to the USB data ports located on the center of the instrument \
panel.
To play a device, touch Audio on the infotainment screen; and then touch\
USB from the sources list or touch More to view the USB option.
See your Infotainment System Manual.
With the vehicle’s available 4G LTE Wi-Fi hotspot, up to 7 devices (\
smartphones, tablets and laptops) can be connected to high-speed internet.
To retrieve the SSID and password for the hotspot, select the Wi-Fi Hots\
pot icon on the infotainment screen or go to Settings > System > Wi-Fi Hotspot.
Note: For more information on use and system limitations, visit my.chevrolet.com/learn.
See your Infotainment System Manual.
The Wireless Charging system for smartphones is located at the front of the center console. Visit my.chevrolet.com/learn to check device compatibility. See your phone retailer for details on required phone accessories.
1. The vehicle must be on, or Retained Accessory Power must be active.
2. Remove all objects from the charging pad.
3. Place the smartphone, face up, on the pad.
4. The charging symbol will appear on the infotainment screen when charging. If\
not charging, remove the device for 3 seconds, and rotate it 180 degrees.
See Instruments and Controls in your Owner’s Manual.
Some vehicle features can be customized using the Settings menus and the infotain-ment screen icons. The Settings menus include System, Apps, and Vehicle.
1. Select Settings on the Home page.
2. Select the desired menu item.
3. Select the desired feature and setting.
4. Press to exit each menu.
See Instruments and Controls in your Owner’s Manual.
PORTABLE AUDIO DEVICES
4G LTE WI-FI® HOTSPOTF
WIRELESS CHARGINGF
VEHICLE PERSONALIZATION
F Optional equipment
Page 13 of 20

13
When the vehicle is on, the automatic heated seats and heated steering w\
heel or auto-matic ventilated seats will activate based on the vehicle’s interior \
temperature. Manually turn off the heated or ventilated seats using the seat controls. Manuall\
y turn off the heated steering wheel using the steering wheel control.
To turn the auto heated seats and auto ventilated seats on or off, go to\
Settings > Vehicle > Climate and Air Quality > Auto Heated Seats or Auto Cooled Sea\
ts.
See Instruments and Controls in your Owner’s Manual.
AUTO HEATED/VENTILATED SEATSF
F Optional equipment
CLIMATE CONTROLS
AUTOMATIC OPERATION
Press AUTO.
Set the temperature.
The system automatically controls the fan speed, air delivery, air condi\
tioning and
recirculation to reach the set temperature. Allow time for the system to\
reach the desired temperature. If a function is manually adjusted, the Auto indica\
tor turns off and automatic operation for that function is canceled.
See Climate Controls in your Owner’s Manual.
Recirculation Mode
AUTO Automatic Operation
Power On/Off
Passenger’s Temperature Control
Fan Controls
Driver’s Temperature Control
Driver’s Heated/Ventilated Seat ButtonsF
MAX Defrost
Air Delivery Modes: Defog Vent Floor
Passenger’s Heated/Ventilated Seat ButtonsF
SYNC Synchronize passenger’s temperature setting to driver’s setting
Rear Window Defogger
A/C Air Conditioning Control
Page 14 of 20

14
REAR WINDOW WIPER
Turn the end of the wiper lever.
OFF
INT Intermittent Wipes
ON
Rear Washer Fluid
Push the lever to wash the rear window.
See Instruments and Controls in your Owner’s Manual.
LIGHTING
LAMP CONTROLS
Rotate the knob to activate the exterior lamps.
Off/On
AUTO
Automatically activates the exterior lamps depending on outside lighting conditions.
Parking Lamps
Headlamps
Instrument Panel Brightness
Press the knob to extend it. Rotate the knob to adjust the instrument panel lighting.
INTELLIBEAM SYSTEMF
The IntelliBeam system automatically turns the high-beam headlamps on/off based on traffic conditions. A green indicator displays on the instrument cluster when the system is on; a blue indicator displays when the high-beam headlamps are on.
With the lamp control in the AUTO or Headlamps position, press the button on the turn signal lever to turn the IntelliBeam system on or off.
Note: IntelliBeam activates the high-beam headlamps only when driving over 25 mph.
See Lighting in your Owner’s Manual.
WIPERS AND WASHERS
WINDSHIELD WIPERS
Raise or lower the lever to activate the wipers.
HI Fast Wipes
LO Slow Wipes
INT Intermittent Wipes
Rotate the band up for more frequent wipes or down for less frequent wipes.
OFF
1x Single Wipe
Washer Fluid
Pull the lever to wash the windshield.
F Optional equipment
Page 15 of 20

15
SUNROOFF
DRIVER MODE CONTROL
The sunroof has a comfort stop feature that stops the sunroof from fully opening. This reduces potential wind noise.
Press and release the rear of the Sunroof switch (A) to vent the sunroof. Press the rear of the switch again to express-open the sunroof to the comfort stop position. Press it again to fully open the sunroof.
Press and release the front of the Sunroof switch (A) to express-close the sunroof.
Press and release the rear or front of the Sunshade switch (B) to express-open or express-close the sunshade. Press it again to stop the sunshade.
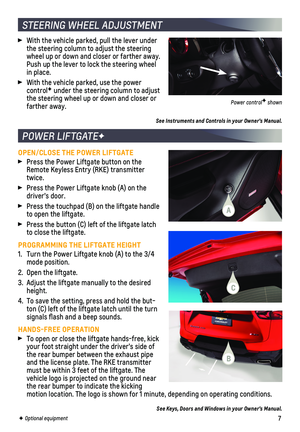
See Keys, Doors and Windows in your Owner’s Manual.
The Driver Mode Control system automatically adjusts various vehicle con\
trol systems based on driving preferences, weather and road conditions on Front-Wheel\
Drive (FWD) and All-Wheel Drive (AWD) models.
Rotate the Driver Mode Control knob on the center console to select the desired mode.
FWD Models
Tour – Use for normal driving
Snow/Ice – Use for enhanced acceleration on snowy roads
Sport – Use for enhanced handling and acceleration on dry pavement
AWD Models
Tour – Use for normal driving
All-Wheel Drive – Use for enhanced responsiveness
Sport – Use for enhanced handling and acceleration on dry pavement
Off-Road – Use for enhanced driving on unpaved roads
Tow/Haul – Use to reduce shift cycling when towing or hauling heavy loads
See Driving and Operating in your Owner’s Manual.
F Optional equipment
FWD model shown
AWD model shown
AB
Page 16 of 20

16
DRIVER ASSISTANCE SYSTEMSF
Safety or driver assistance features are no substitute for the driver’\
s responsibility to operate the vehicle in a safe manner. The driver should remain attentive to traffic, surroundings and road conditions at all times. Read your Owner’s Manual for important feature limitations and information.
SAFETY ALERT SEAT – The driver’s seat pulses — left side, right side or simultan\
eously — to alert the driver of the direction of potential hazards.
Audible alerts or seat pulsing alerts may be selected. To change the ale\
rt settings, go to Settings > Vehicle > Collision/Detection Systems > Alert Type.
LANE CHANGE ALERT WITH SIDE BLIND ZONE ALERT – While driving, the system displays a warning symbol on the left or right side mirror when a vehicle is detect\
ed in that side blind zone area or rapidly approaching that area. The symbol flas\
hes if a turn signal is activated when a vehicle has been detected on the same side.
To turn on or off, go to Settings > Vehicle > Collision/Detection System\
s > Lane Change Alert.
FORWARD COLLISION ALERT – The Vehicle Ahead Indicator is green when a vehicle is detected and is amber when following a vehicle ahead much too closely. When approaching a vehicle directly ahead too rapidly, a red alert flashes on the windshield and the Safety Alert Seat pulses or rapid beeps sound (if selected).
Press the Collision Alert button on the steering wheel to set the alert timing to Far, Medium, or Near. This is \
also the Adaptive Cruise Control following gap setting.
FOLLOWING DISTANCE INDICATOR – The following distance to the vehicle ahead is indi-cated in seconds under the Info menu on the Driver Information Center, i\
f selected in the Info Pages. If no vehicle is detected ahead, dashes are displayed.
FORWARD AUTOMATIC BRAKING – In potential front-end imminent collision situations with detected vehicles, the brakes may be applied, if you haven’t alr\
eady done so, to help reduce damage or avoid collisions at very low speeds.
To set Forward Automatic Braking and Forward Collision Alert to Alert an\
d Brake, Alert, or Off, go to Settings > Vehicle > Collision/Detection Systems > \
Forward Collision System.
LANE KEEP ASSIST WITH LANE DEPARTURE WARNING – The system may help you avoid collisions due to unintentional lane departures. The Lane Keep Assist indicator is green if the system is available to assist. If the vehicle approaches a \
detected lane mark-ing without using a turn signal in that direction, the system may assist\
by gently turning the steering wheel and displaying an amber .
If active driver steering is not detected, the amber may flash and the Safety Alert Seat may pulse or beeps may sound (if selected) on the side of the dep\
arture direction as the lane marking is crossed. The Lane Keep Assist system does not con\
tinuously steer the vehicle; the driver needs to steer and be in complete control of the\
vehicle.
To turn on or off, press the Lane Keep Assist button (A) on the center console.
See Driving and Operating in your Owner’s Manual.
F Optional equipment