Page 1 of 20
AT S
Convenience &
Personalization Guide
2019
cadillac.com
Page 2 of 20
 may not be included in your vehi")
2
Review this quick reference guide for an overview of some important feat\
ures in your Cadillac ATS. Some optional equipment described in this guide (denoted by ♦) may not be included in your vehicle. More information can be found in your Owner's Manual and at my.cadillac.com.
Certain restrictions, precautions and safety procedures apply to your vehicle. Please read your Owner’s Manual for complete instructions.
INSTRUMENT PANEL
Power Mirrors Control
Turn Signal Lever/Exterior Lamps Control
Instrument Cluster/Driver Information Center
Windshield Wipers Lever
Head-Up Display Controls♦
Memory Seat Buttons
Cadillac User Experience Touch ScreenEngine Start/Stop Button
Audio System Controls
Hazard Warning Flashers
Electric Parking Brake Switch♦
Cruise Control/ Voice Recognition Buttons
Tilt/Telescope Steering Column Adjuster
Audio Steering Wheel Controls/ 5-way Control
Trunk ReleaseTraction Control and StabiliTrak/ Auto Stop-Start Disable/Driver Mode Buttons
Heated Seat Buttons♦/Climate Controls
Storage Compartment Access (behind control panel)
Lane Keep Assist with Lane Departure Warning♦/Park Assist Buttons♦
Page 3 of 20

3
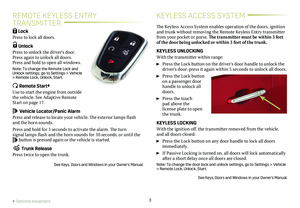
REMOTE KEYLESS ENTRY
TRANSMITTER
KEYLESS ACCESS SYSTEM
Lock
Press to lock all doors.
Unlock
Press to unlock the driver's door. Press again to unlock all doors. Press and hold to open all windows.
Note: To change the Remote Lock and Unlock settings, go to Settings > Vehicle > Remote Lock, Unlock, Start.
Remote Start♦
Use to start the engine from outside the vehicle. See Adaptive Remote Start on page 17.
Vehicle Locator/Panic Alarm
Press and release to locate your vehicle. The exterior lamps flash and the horn sounds.
Press and hold for 3 seconds to activate the alarm. The turn signal lamps flash and the horn sounds for 30 seconds, or until the
button is pressed again or the vehicle is started.
Trunk Release
Press twice to open the trunk.
See Keys, Doors and Windows in your Owner's Manual.
The Keyless Access System enables operation of the doors,
ignition and trunk without removing the Remote Keyless Entry transmitter from your pocket or purse. The transmitter must be within 3 feet of the door being unlocked or within 3 feet of the trunk.
KEYLESS UNLOCKING
With the transmitter within range:
Press the Lock button on the driver’s door handle to unlock the driver’s door; press it again within 5 seconds to unlock all doors.
Press the Lock button on a passenger door handle to unlock all doors.
Press the touch pad above the license plate to open the trunk.
KEYLESS LOCKING
With the ignition off, the transmitter removed from the vehicle, and all doors closed:
Press the Lock button on any door handle to lock all doors immediately.
If Passive Locking is turned on, all doors will lock automat ically after a short delay once all doors are closed.
Note: To change the door lock and unlock settings, go to Settings > Vehicle > Remote Lock, Unlock, Start.
See Keys, Doors and Windows in your Owner's Manual.
♦ Optional equipment
Page 4 of 20
 and then press the ENGINE START/STOP button to start the engine. The green indicato")
4
KEYLESS START
START
With the vehicle in Park or Neutral, press the brake pedal (and clutch pedal, if equipped) and then press the ENGINE START/STOP button to start the engine. The green indicator on the
button will illuminate. ENGINE START/STOP will
illuminate on the button when the headlamps are on.
Note: The Remote Keyless Entry transmitter must be in the vehicle to tur\
n on the ignition. If the transmitter battery is weak, place the transmitter in the pocket at the front of the center console storage area to enable the engine to start. Replace the transmitter battery as soon as possible.
STOP/OFF
Shift to Park (automatic transmission), or 1st or Reverse (manual transmission), and press the ENGINE START/STOP button to turn off the engine.
Power is available to operate the audio system for 10 minutes or until the driver’s door is opened.
ACCESSORY
With the engine off and the brake pedal NOT depressed, press the ENGINE START/STOP button to place the vehicle in Accessory mode. The amber indicator on the button will illuminate.
See Driving and Operating in your Owner’s Manual.
AUTO ENGINE STOP/START OPERATION
(IF EQUIPPED)
A fuel-saving automatic engine stop/start system is included on vehicles equipped with the 2.0L L4 turbocharged engine or 3.6L V6 engine.
While driving, when the brake pedal is applied and the vehicle is at a complete stop, the auto engine stop/start system may turn off the engine, depending on operating conditions. When the engine is off, the tachometer gauge will read AUTO STOP. Upon releasing the brake pedal or applying the accelerator pedal, the engine will restart. After parking the vehicle and turning off the engine, the tachometer gauge will read OFF.
The engine may remain running or restart when the vehicle is stopped if:
• A minimum vehicle speed is not reached.
• The engine or transmission is not at the required operating temperature.
• The outside temperature is not in the required operating range.
• The shift lever is in any gear other than D (Drive).
• The battery charge is low.
• The climate control system requires the engine to run based on the current settings.
• The Auto Stop time is greater than 2 minutes.
AUTO ENGINE STOP/START DISABLE
Press the �$ button on the center console when the engine is running to disable the auto engine stop/start system.
When the system is disabled, the button indicator will not be illu-minated and the �$ symbol on the instrument cluster will change from green to white with a slash through it.
See Driving and Operating in your Owner’s Manual.
Page 5 of 20

VOICE RECOGNITION
Push to Talk
Press to answer an incoming call or interact with the OnStar, Bluetooth or infotainment system.♦
End Call/Mute
Press to end/decline a call or mute/unmute the audio system.
See your Cadillac User Experience Manual.
DRIVER INFORMATION CENTER CONTROL
The 5-way control moves left/right, up/down, and in.
Left/Right
Press to view the left or right clus-ter display. Press the left to exit a display menu.
Up/Down
Press the control bar up or down to scroll through a menu.
SEL Select
Press to select a highlighted menu item.
See Instruments and Controls in your Owner's Manual.
AUDIO CONTROLS
+ – Volume
Press + or – to increase or decrease the volume.
Next/Previous
Press or to select the next or previous favorite radio
station or track.See your Cadillac User Experience Manual.
CRUISE CONTROL/ADAPTIVE CRUISE CONTROL–ADVANCED♦
On/Off
SET Set Speed
With Cruise Control on, press the control bar down fully to set the cruise speed.
RES Resume Speed
With Cruise Control on, press the control bar up fully to resume the previous set speed.
+ – Adjust Speed
When active, press the control bar up (+) or down (–) lightly to increase or decrease the set speed by 1-mph increments; press up or down fully to increase or decrease the set speed to the next 5-mph interval on the speedometer.
Cancel
Press to cancel Cruise Control without erasing the set speed from memory. Press and hold to switch between regular Cruise Control and Adaptive Cruise Control♦.
Following Gap (Adaptive Cruise Control–Advanced♦)
Press repeatedly to select a gap setting (the time between your vehicle and a detected vehicle) of Far, Medium, or Near.
See Driving and Operating in your Owner's Manual.
HEATED STEERING WHEEL♦
On/Off
See Instruments and Controls in your Owner's Manual.
5
STEERING WHEEL CONTROLS
♦ Optional equipment
Page 6 of 20
6
INSTRUMENT CLUSTER
Refer to your Owner’s Manual to learn about the information being relayed by the lights, gauges and indicators of the instrument cluster.
StabiliTrak Off
Low Tire Pressure
Service Electric Parking Brake
Antilock Brake System Warning
Airbag Readiness
Brake System Warning
High Beam Headlamps
Lane Keep Assist/ Lane Departure Warning
Forward Collision Alert
StabiliTrak/Traction Control Engaged
Engine Oil Pressure Warning
Security Notification
Lights On Reminder
Charging System Warning
Low Fuel Warning
Engine Coolant Temperature
Safety Belt Reminder
Adaptive Forward Lighting Activated
PARK Electric Parking Brake Set
Check Engine Warning
Traction Control Off
Cruise Control Activated
Adaptive Cruise Control Activated
�$ AutoStop
Symbols
See Instruments and Controls in your Owner’s Manual.
Page 7 of 20

7
DRIVER INFORMATION CENTER
The Driver Information Center displays a variety of vehicle
information on three display zones. Zones can be personalized to display: digital speedometer, trip odometer, fuel range, average fuel economy, compass, oil life, tire pressure, navigation, phone or other vehicle information.
Use the 5-way control on the right side of the steering wheel to nav-igate and select between the available menus. To select the desired display information:
1. Press the left or right side of the control bar to select one of the three display zones.
2. Press the control bar up or down to scroll through a menu.
3. Press SEL (Select) to select a menu item. Press and hold to reset values on certain screens.
4. Press the left or right side of the control bar to retain the information view and to exit the display zone.
See Instruments and Controls in your Owner’s Manual.
HEAD-UP DISPLAY♦
The Head-Up Display (HUD) projects some operating information onto the windshield. The HUD controls are located on the left side of the instrument panel.
HUD
Lift up or press down to adjust the position of the image. It cannot be adjusted side-to-side.
INFO
Press to select from four displays: Speed View; Audio/Phone View; Navigation View; and Performance View.
Lift up or press down to brighten or dim the display.
Hold down to turn off the display.
ROTATION OPTION
To adjust the angle of the HUD, use the 5-way control to view the Options menu on the instrument cluster and select HUD Rotation. Press up or down to adjust the angle.
See Instruments and Controls in your Owner’s Manual.
♦ Optional equipment
Page 8 of 20
8
CADILLAC USER EXPERIENCE CONTROLS
Applications♦: Touch a screen icon to access the application
Wi-Fi Indicator
Power/Mute: Press and hold to turn the infotainment system On/Off; press to mute/unmute audio
Climate Control Fan Speed Off
Windshield Defrost Mode
Driver’s Temperature Control
Passenger’s Temperature Control
Passenger’s Heated Seat Control♦
Driver’s Heated Seat Control♦
The controls use capacitive technology – simply touch the icon/text to access a feature or adjust a function.
VOLUME: Touch arrows or swipe finger above chrome bar
AUTO: Automatic Climate Control Operation
Rear Window Defog
Recirculation Mode
Home Page
Storage Compartment: Press and hold the bright bar to open/close