Page 17 of 20

17
Forward/Reverse Automatic Braking♦ – In potential front- and rear-end imminent collision situations with vehicles directly ahead or behind, and with some objects behind your vehicle, the brakes may be applied, if you have not already done so, to help reduce the collision's severity or help avoid collisions at very low speeds.
To set Forward Automatic Braking to Alert and Brake, Alert, or Off, go to Settings > Vehicle > Collision/Detection Systems > Forward Collision System.
To set Reverse Automatic Braking to on or off, press the Park Assist button on the left side of the instrument panel. This will also turn on/off the Park Assist and Rear Cross Traffic Alert systems.
Automatic Safety Belt Tightening♦ – The front safety belts auto-matically tighten during emergency braking or steering maneuvers, and release when driving conditions return to normal.
See Driving and Operating in your Owner’s Manual.
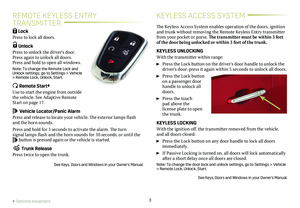
ADAPTIVE REMOTE START♦
STARTING THE VEHICLE
1. Press and release the Lock button on the Remote Keyless Entry transmitter.
2. Immediately press and hold the Remote Start button until the turn signal lamps flash.
When the vehicle starts, the parking lamps will light and remain on while the engine is running. The engine will continue
running for 15 minutes. Repeat these steps for a 15-minute time extension. Remote start can be extended only once.
3. Before driving, simultaneously press the brake pedal and the ENGINE START/STOP button to turn on the ignition.
CANCELING A REMOTE START Press and hold the Remote Start button until the parking lamps turn off.
CLIMATE CONTROL OPERATION
During a remote start, the automatic climate control system will operate at the same setting as when the vehicle was last turned off.
HEATED SEAT OPERATION
Select the Remote Start Auto Heat Seats option in the Settings menu to have the heated seats turn on during a remote start on cold days. The heated seat button indicators do not illuminate and the temperature performance of the unoccupied heated seat may be reduced during the remote start. The heated seats turn off when the ignition is turned on.
See Keys, Doors and Windows in your Owner’s Manual.
AUTO HEATED SEATS/
STEERING WHEEL♦
When the vehicle is on, the automatic heated seats and automatic heated steering wheel will be activated based on the vehicle's interior temperature. The heated seat level is shown on the heated seat control indicators. Turn off the heated seats using the heated seat controls. Turn off the heated steering wheel using the steering wheel control.
To turn the features on or off, go to Settings > Vehicle > Climate and Air Quality.
See Seats and Restraints in your Owner’s Manual.
♦ Optional equipment
DRIVER ASSISTANCE SYSTEMS♦
Page 18 of 20

The traction control
system limits wheelspin and the StabiliTrak
system assists with the stability of the vehicle in difficult driving
conditions. Both systems turn on automatically every time the vehicle is started.
Turn off traction control if the vehicle is stuck and rocking the vehicle is required.
Press the Traction Control/StabiliTrak button on the
center console. The Traction Control Off light on the instrument cluster will illuminate.
Press the button again to turn on traction control.
See Driving and Operating in your Owner's Manual.
18
STABILITRAK®/TRACTION
CONTROL SYSTEMS
The 8-speed automatic transmis-sion has an available Tap Shift mode that allows you to shift gears similar to a manual trans-mission.
USING TAP SHIFT
1. While in Drive (D), use either paddle behind the steering wheel to temporarily take control of gear selection.
2. Pull the right paddle to upshift or the left paddle to
downshift.
If current vehicle speed is too high or too low for the requested gear, \
the shift will not occur. When coming to a stop, the trans mission will automatically shift to 1st gear.
The automatic transmission also can be manually controlled by moving the shift lever to the left gate; tap the lever forward to upshift and rearward to downshift.
See Driving and Operating in your Owner's Manual.
DRIVER MODE CONTROL SYSTEM
The Driver Mode Control System automatically adjusts steering, automatic transmission (if equipped) and Magnetic Ride Control (if equipped) settings in real time.
Press the MODE button on the center console to select Tour (default at each ignition cycle), Sport, or Snow/Ice♦ mode.
See Driving and Operating in your Owner's Manual.
AUTOMATIC TRANSMISSION
TAP SHIFT♦
Page 19 of 20

EXPRESS OPEN/CLOSE THE SUNROOF
Fully press the SLIDE switch to express open the sunroof. Press the switch again while the sunroof is in motion to stop the sunroof at that position.
Fully press the SLIDE switch to express close the
sunroof. Press the switch again while the sunroof is in motion to stop the sunroof at that position.
TILT/CLOSE THE SUNROOF
Press the TILT switch to tilt the sunroof.
Press the TILT switch to close the sunroof.
See Keys, Doors and Windows in your Owner’s Manual.
19
TIRES
TIRE PRESSURE MONITOR
The Low Tire Pressure warning light on the instrument cluster illuminates when one or more of the vehicle’s tires is
significantly underinflated. Fill the tires to the proper tire
pressures listed on the Tire and Loading Information label, located below the driver’s door latch. Current tire pressures can be viewed on the Driver Information Center.
Refer to your Owner's Manual for additional information about normal
monthly tire maintenance.
TIRE SEALANT AND COMPRESSOR KIT♦
The tire sealant and compressor kit can be used to temporarily seal small punctures in the tread area of the tire. The kit is located under the trunk floor. Refer to the kit instructions for complete operating information.
See Vehicle Care in your Owner's Manual.
SUNROOF♦
ELECTRIC PARKING BRAKE♦
REFUELING THE VEHICLE To apply the parking brake, pull the Parking Brake switch on the left side of the instrument panel (auto-matic transmission) or on the center console (manual transmission).
To release the parking brake, turn on the ignition, press the brake pedal, and then press the switch.
See Driving and Operating in your Owner’s Manual.
To open the fuel door, press and release the center of the rear edge of the door. It will pop out slightly. Pull the door open.
The vehicle’s capless fuel system does not have a fuel cap. Fully insert the fuel pump nozzle before starting to fill the tank.
Note: When using a portable gas can, insert the funnel adapter, located \
under the cargo floor, into the capless fuel fill.
See Driving and Operating in your Owner’s Manual.
♦ Optional equipment
Page 20 of 20
 and, if your vehicle is properly equipped, you can start or turn off your engine, lock o")
OWNER PRIVILEGES™
MYCADILLAC MOBILE APP
Download the myCadillac app to your compatible smartphone (or device) and, if your vehicle is properly equipped, you can start or turn off your engine, lock or unlock your doors, view key diagnostic information, set parking information and more.
The app is available on select Apple and Android devices. Service availability, features and functionality vary by vehicle, device and data plan. Device data connection required. Visit onstar.com for more details. Download the mobile app from your compatible mobile device’s app store.
CADILLAC ONLINE OWNER CENTER
Create an account at my.cadillac.com to access an online Owner’s Manual and helpful how-to videos, track your service history and warranty status, manage your OnStar and Connected Services vehicle plans, review your current Vehicle Diagnostics report (active service account required) and more.
ROADSIDE ASSISTANCE 1-800-224-1400 TTY Users: 1-888-889-2438
Roadside Assistance provides every Cadillac owner with the
advantage of contacting a Cadillac advisor and, when appropriate, a Cadillac-trained dealer technician who can provide on-site services, including towing service, battery jump-starting, lock-out service, fuel delivery and flat tire assistance. Services are provided for up to 6 years/70,000 miles, whichever occurs first.
OnStar Roadside Assistance: If you have a current OnStar Safety & Security plan, push the blue OnStar button or red Emergency button to get the help you need. An OnStar advisor will use GPS technology to pinpoint your vehicle location and contact the near-est service provider.
To learn more about OnStar services, press the blue OnStar
button, call 1-888-466-7827, visit onstar.com or refer to your Owner’s Manual.
CUSTOMER ASSISTANCE 1-800-458-8006
Cadillac Customer Assistance is available anytime to answer
questions or provide additional information.
!84156148=A!
Certain restrictions, precautions and safety procedures apply to your ve\
hicle. Please read your Owner’s Manual for complete instructions. All information c\
ontained in this guide is based on the latest information available at the time of printing and is subject to change without notice. Copyright 2018 by General Motors. All rights reserved.
We recommend always using ACDelco or genuine GM service parts.
Page:
< prev 1-8 9-16 17-24