2019 AUDI TT ROADSTER service
[x] Cancel search: servicePage 163 of 304
8S8012721BA
Media
— Selecting the previous or next track/chapter
:
press the On/Off knob on the MMI control
panel briefly to the left Kd or right DDI.
— Fast-forwarding and rewinding audio/video
files: press and hold the On/Off knob on the
MMI control panel to the left Kd or right Pel for
a longer time.
— Pausing or resuming playback: press the
On/Off knob on the MMI control panel briefly.
@) Tips
— You can scroll through long lists quickly by
turning the control knob quickly. The scroll-
ing speed depends on the number of list en-
tries.
— For safety reasons, the video image is only
displayed when the vehicle is stationary. On-
ly the sound from the video plays while driv-
ing.
Various categories for selecting audio/video*
files are available in the media center.
Obs Le
7 Artists
A het T aa
enres
Track
(7) ja RZ
EME}
Videos
Fig. 140 Example: USB stick categories
)) Depending on the DVD, this may not be possible during
playback.
> Press the [MEDIA] button. Press the left control
button until the sources overview is displayed.
Select and confirm the desired source.
@ Active source
The active source is highlighted. The active
source symbol (@) may change depending on the
connected device, the online media service*, or
Internet radio*. The device name may be dis-
played (for example: myPhone). As an example, a
USB stick is shown > fig. 139 connected to the
Audi music interface*.
Depending on the active source, you can select
audio/video files* from the following categories
and add them to the playlist:
@ Favorites
The Favorites category appears if at least one en-
try is stored in the favorites list. See > page 163,
Favorites.
@ Artists
All available artists are displayed. Select and con-
firm an artist, an album and then a track.
@ Albums
All available albums are displayed. Select and
confirm an album and then a track.
© Genres
All available genres are displayed. Select and con-
firm
a genre (such as Pop), an artist, an album
and then a song.
© Tracks
All available tracks are displayed. Select and con-
firm
a track.
@ Folders
The folder structure or track/chapter list is dis-
played. Select a folder, if necessary. Select and
confirm a track.
161
Page 164 of 304
Media
Playlists
All available playlists from the source and the
smart playlists are displayed. Select and confirm
a playlist and then a track.
Smart playlists:
— Last played tracks: the last tracks played in the
selected source are displayed.
— Most played: the most played tracks in the se-
lected source are displayed.
— 5 stars to 1 star: tracks from the selected
source are displayed according to their rating.
— Unrated: all files from the selected source
without rating information (for example, in the
ID3 tag) are displayed.
© Videos*
All available video files are displayed. Select and
confirm a video file.
@ Tips
— Only the categories supported by the medi-
um are available. For example, CD/DVD-
ROM tracks cannot be selected with catego-
ries such as Artists, Albums or Genres.
With an iPod (source: Audi music interface
= page 158), the Podcasts, Audio books
and Composers categories are also availa-
ble.
— For safety reasons, the video image is only
displayed when the vehicle is stationary. On-
ly the sound from the video plays while driv-
ing.
— When synchronizing a portable device with
"Cloud“ services, playlists may display incor-
rectly
in the MMI. Use the media center in
the device.
162
a -\-mx-y aay 1iaa)
You can search in the active source by tracks and
video files*, for example
Rock Band
Rock Band
x
a
Saal
ees
Fig. 141 Input field and results list for free text search
Nume
You can open the free text search > fig. 141 de-
pending on the selected source.
Requirement: the playlist > page 163 or media
center > page 161 must be displayed.
Opening free text search
> Keep turning the control knob to the left until
the free text search input field @ 9° fig. 141
appears. Or: push the control knob up.
Using the free text search: see > page 100, Free
text search.
Entries that contain the entered search term are
listed in the results list ©) > fig. 141. You can
search for artists 2) > fig. 141, albums @) or
tracks (@) as well as genres and videos.
(i) Tips
— Only files in the active source will be
searched.
— If you open free text search in the Folders
category (7) > page 161, fig. 140 or the
Composers, Podcasts and Audio books cat-
egories, it will only search through the files
in that folder.
Page 171 of 304
8S8012721BA
Audi smartphone interface
Audi smartphone
interface
Setup
Applies to: vehicles with Audi smartphone interface
You can connect your smartphone to the MMI us-
ing the Audi smartphone interface. Certain con-
tent on your smartphone is adapted to the Info-
tainment system display while driving and can
be operated through the MMI control panel.
Requirement:
The vehicle must be stationary and the ignition
must be switched on.
iPhone generation 5 or higher with Lightning
connector and iOS 7.1.2 operating system or
higher. Or:
A smartphone with the Android Auto app and An-
droid 5.0 Lollipop operating system or higher is
required.
> Connect your smartphone to the Audi music in-
terface > page 159 using the applicable USB
adapter > page 158, fig. 135.
> Select and confirm Activate Apple CarPlay or
Activate Android Auto now.
> Follow the system instructions.
> Pay attention to any additional system prompts
on your smartphone, if applicable.
If you chose not to use Apple CarPlay or Android
Auto when connecting your smartphone for the
first time, you can start the Audi smartphone in-
terface later on using the Connection manager.
> Select: [MENU] button > Audi smartphone in-
terface > Change to connection manager.
> Connect your smartphone to the Audi music in-
terface > page 159 using the applicable USB
adapter > page 158, fig. 135.
>» Select and confirm Audi smartphone interface
in the Connection manager > page 172. You
can select your smartphone in the list of devi-
ces that are already paired > page 173.
> Follow the system instructions.
) In preparation at the time of printing.
ZA WARNING
Driving requires your complete and undivided
attention. As the driver, you have complete re-
sponsibility for safety in traffic. Never operate
mobile devices while driving, because this in-
creases the risk of an accident.
@) Note
Always follow the information found in >@ in
General information on page 125.
@ Tips
— The functions that can be used depend on
the following factors, among others:
—The brand of your smartphone
~The version of the operating system in
your smartphone
— The software version of the app used
— The USB adapter cable and correct connec-
tion
— Your cell phone service provider
— The customized settings on your smart-
phone
— One of the factors above or a combination
of any of them could cause your smart-
phone to be incompatible with the Audi
smartphone interface. Compatibility cannot
be guaranteed for all types of smartphones.
For more information and assistance, refer
to the user guide and the manufacturer of
your smartphone.
— If the connected smartphone has voice con-
trol, you can operate your smartphone using
the external voice recognition system*
=> page 109.
— The menu language shown in the MMI is
based on the settings in your smartphone.
— The time displayed in the MMI is based on
the settings in your smartphone.
— Some MMI functions are not available when
Apple CarPlay or Android Auto is active.
— You cannot connect any mobile devices via
Bluetooth when an Apple CarPlay connec-
tion is active.
169
Page 176 of 304
System settings
Bluetooth settings
— Bluetooth: select and confirm a setting for the
Bluetooth connection visibility. Select Visible
for the MMI to be visible to other devices. Se-
lect Invisible for the MMI to not be visible to
other devices. However, it is still possible to es-
tablish a Bluetooth connection with paired de-
vices when the visibility is switched off. Select
Off to turn visibility off. Then a Bluetooth con-
nection is not possible.
— Bluetooth audio player: when this function is
switched on M, the Bluetooth audio player is
available as a source in the Media menu.
— Delete Bluetooth device: the selected cell
phone/mobile device is disconnected from the
MMI.
— Show Bluetooth profiles: you can Connect or
Disconnect the Handsfree profile and the Di-
rectory/contacts* separately.
— Bluetooth name: the MMI Bluetooth name (for
example ,AUDI MMI 2017“) is displayed and
can be changed.
When the function is switched on M, the symbol
@ © page 101, fig. 107 appears in the Infotain-
ment system display.
Online settings*
— Data connection settings: see > page 129, Cell
phone network
— Data usage counter: the amount of data pack-
ets that are sent and received through the MMI
is displayed. You can reset the data usage infor-
mation to zero using the Reset data counter
option.
— Network status: the mobile network provider
for data service as well as the network status
are displayed.
Wi-Fi settings*
See > page 130, Wi-Fi settings.
SIM PIN settings*
— Automatic PIN entry: when this function is
switched on, the SIM PIN is automatically
saved in the MMI after it is entered for the first
time. The SIM PIN for four different SIM cards
can be saved in the MMI. With the function
174
switched off, the currently stored SIM PIN is
deleted from the MMI. When the automatic
PIN entry is switched on, there are no SIM PIN
prompts.
— Disable PIN query: when switched on, there are
no SIM PIN queries. The automatic PIN entry is
not used in this case.
— Change PIN: you can change the PIN on your
SIM card. First enter the current SIM PIN. The
SIM PIN may only contain digits 0-9. The new
SIM PIN must be entered twice for security and
then it will be saved to the SIM card.
Apple CarPlay sound settings/Android Auto
sound settings
Applies to: vehicles with Audi smartphone interface
See > page 175.
About Apple CarPlay/About Android Auto
Applies to: vehicles with Audi smartphone interface
Here you will find legal information regarding the
use of Apple CarPlay or Android Auto and infor-
mation about device-specific data exchange.
Delete CarPlay device/Delete Android Auto
device
Applies to: vehicles with Audi smartphone interface
Requirement: your cell phone must not be con-
nected to the Audi music interface with a USB
adapter.
Select: Audi smartphone > a device from the list
> right control button.
To remove your cell phone from the list, select
and confirm Delete CarPlay device or Delete An-
droid
Auto device.
(i) Tips
Some SIM cards do not allow the SIM PIN
queries to be switched off.
System update
> Select: [MENU] button > Settings > left control
button > System maintenance.
— System update: insert the storage device with
the update data into the appropriate drive
= page 153. Select and confirm the drive > >
Page 190 of 304
Safety belts
@ Tips
—A fine dust is released when the pyrotechnic
safety belt pretensioners deploy. This is nor-
mal and is not caused by a fire in the vehi-
eles
— The relevant safety requirements must be
observed when the vehicle or components
of the system are scrapped. A qualified
dealership is familiar with these regulations
and will be pleased to pass on the informa-
tion to you.
Service and disposal of safety belt preten-
Serie
The safety belt pretensioners are parts of the
safety belts on your Audi. Installing, removing,
servicing or repairing of belt pretensioners can
damage the safety belt system and prevent it
from working correctly in a collision.
There are some important things you have to
know to make sure that the effectiveness of the
system will not be impaired and that discarded
components do not cause injury or pollute the
environment.
ZA\ WARNING
Improper care, servicing and repair proce-
dures can increase the risk of personal injury
and death by preventing a safety belt preten-
sioner from activating when needed or acti-
vating it unexpectedly:
— The belt pretensioner system can be activat-
ed only once. If belt pretensioners have
been activated, the system must be re-
placed.
— Never repair, adjust, or change any parts of
the safety belt system.
— Safety belt systems including safety belt
pretensioners cannot be repaired. Special
procedures are required for removal, instal-
lation and disposal of this system.
— For any work on the safety belt system, we
strongly recommend that you see your au-
thorized Audi dealer or qualified technician
who has an Audi approved repair manual,
training and special equipment necessary.
188
Page 205 of 304

8S8012721BA
Airbag system
from the airbag as possible. The backrest
must be adjusted to an upright position.
Make sure that the PASSENGER AIR BAG
OFF %; light comes on and stays on all the
time whenever the ignition is switched on.
ZA WARNING
If the PASSENGER AIR BAG OFF %; light does
not go out when an adult is sitting on the
front passenger seat after taking the steps
described above, have the airbag system in-
spected by your Audi dealer before transport-
ing anyone on the front passenger seat.
@ Tips
If the capacitive passenger detection system
determines that the front passenger seat is
empty, the frontal airbag on the passenger
side will be turned off, and the PASSENGER
AIR BAG OFF 3; light will stay on.
Repair, care and disposal of the airbags
Parts of the airbag system are installed at many
different places on your Audi. Installing, remov-
ing, servicing or repairing a part in an area of the
vehicle can damage a part of an airbag system
and prevent that system from working properly
in a collision.
There are some important things you have to
know to make sure that the effectiveness of the
system will not be impaired and that discarded
components do not cause injury or pollute the
environment.
ZA WARNING
Improper care, servicing and repair proce-
dures can increase the risk of personal injury
and death by preventing an airbag from de-
ploying when needed or deploying an airbag
unexpectedly:
— Never cover, obstruct, or change the steer-
ing wheel horn pad or airbag cover or the in-
strument panel or modify them in any way.
— Never attach any objects such as cup holders
or telephone mountings to the surfaces cov-
ering the airbag units.
— For cleaning the horn pad or instrument
panel, use only a soft, dry cloth or one mois-
tened with plain water. Solvents or cleaners
could damage the airbag cover or change
the stiffness or strength of the material so
that the airbag cannot deploy and protect
properly.
— Never repair, adjust, or change any parts of
the airbag system.
— All work on the steering wheel, instrument
panel, front seats or electrical system (in-
cluding the installation of audio equipment,
cellular telephones and CB radios, etc.)
must be performed by a qualified technician
who has the training and special equipment
necessary.
— For any work on the airbag system, we
strongly recommend that you see your au-
thorized Audi dealer or qualified workshop.
— Never modify the front bumper or parts of
the vehicle body.
— Always make sure that the side airbag can
inflate
without interference:
— Never install seat covers or replacement
upholstery over the front seatbacks that
have not been specifically approved by Au-
di.
— Never use additional seat cushions that
cover the areas where the side airbags in-
flate.
— Damage to the original seat covers or to
the seam in the area of the side airbag
module must always be repaired immedi-
ately by an authorized Audi dealer.
— The airbag system can deploy only once. Af-
ter an airbag has been deployed, it must be
replaced with new replacement parts de-
signed and approved especially for your Audi
model version. Replacement of complete
airbag systems or airbag components must
be performed by qualified workshops only.
Make sure that any airbag service action is
entered in your Audi Warranty & Mainte-
nance booklet under AIRBAG REPLACEMENT
RECORD.
— For safety reasons in severe accidents, the
alternator and starter are separated from
203
Page 213 of 304
8S8012721BA
Child safety
— Never install a rearward facing child safety
seat on the front passenger seat if the PAS-
SENGER AIR BAG OFF 3%; light does not
turn on and stay on. Have the system in-
spected immediately by an authorized Audi
dealer or authorized Audi Service Facility.
ZA\ WARNING
— Forward-facing child seats installed on the
front passenger seat may interfere with the
deployment of the airbag and cause serious
personal injury to the child.
— If exceptional circumstances require the use
of a forward-facing child restraint on the
front passenger's seat, the child's safety and
well-being require the following special pre-
cautions to be taken:
— Always make sure that the forward-facing
seat has been designed and certified by its
manufacturer for use on a front passenger
seat with a front and side airbag.
— Always carefully follow the manufacturer's
instructions provided with the child seat or
infant carrier.
— Never put the forward-facing child re-
straint up against or very near the instru-
ment panel.
— Always move the front passenger seat to
the highest position in the up and down
adjustment range and move it back to the
rearmost position in the seat's fore and aft
adjustment range, as far away from the
airbag as possible, before installing the
forward-facing child restraint.
— Always make sure that the safety belt up-
per anchorage is behind the child restraint
and not next to or in front of the child re-
straint so that the safety belt will be prop-
erly positioned.
— Always make sure that nothing prevents
the front passenger's seat from being
moved to the rearmost position in its fore
and aft adjustment range.
— Never place objects on the seat (such as a
laptop, CD player, electronic games device,
power inverter or seat heater for child
seats). These may influence the electrical
capacitance measured by the capacitive
passenger detection system and can also
fly around in an accident and cause serious
personal injury.
— Never place or use any electrical device
(such as a laptop, CD player, electronic
games device, power inverter or seat heat-
er for child seats) on the front passenger
seat if the device is connected to the 12-
volt socket or the cigarette lighter socket.
— Ifa seat heater has been retrofitted or
otherwise added to the front passenger
seat, never install any child restraint sys-
tem on this seat.
— Make sure that there are no wet objects
(such as a wet towel) and no water or oth-
er liquids on the front passenger seat
cushion.
— Always make sure that the PASSENGER
AIR BAG OFF #; light comes on and stays
on all the time whenever the ignition is
switched on.
— Never install a forward-facing child safety
seat on the front passenger seat if the
PASSENGER AIR BAG OFF %; light does
not turn on and stay on. Have the system
inspected immediately by an authorized
Audi dealer or authorized Audi Service Fa-
cility.
— Always buckle the child seat firmly in place
even if a child is not sitting in it. A loose
child seat can fly around during a sudden
stop or in a collision.
— Always read and heed all WARNINGS
whenever using a child restraint in a vehi-
cle > page 182, Safety belts, > page 189,
Airbag system and > page 210, Important
information.
G) Tips
Always replace child restraints that were in-
stalled in a vehicle during a crash. Damage to
a child restraint that is not visible could cause
it to fail in another collision situation.
211
Page 228 of 304
Checking and Filling
diesel misfueling guard. If this is the case,
try turning the nozzle before inserting it in
the fuel filler neck, use a different fuel
pump, or see an authorized Audi dealer or
authorized Audi Service Facility for assis-
tance.
— The misfueling guard does not open when
adding fuel from a fuel container. When re-
fueling with a reserve canister, you must use
the
funnel stored in the luggage compart-
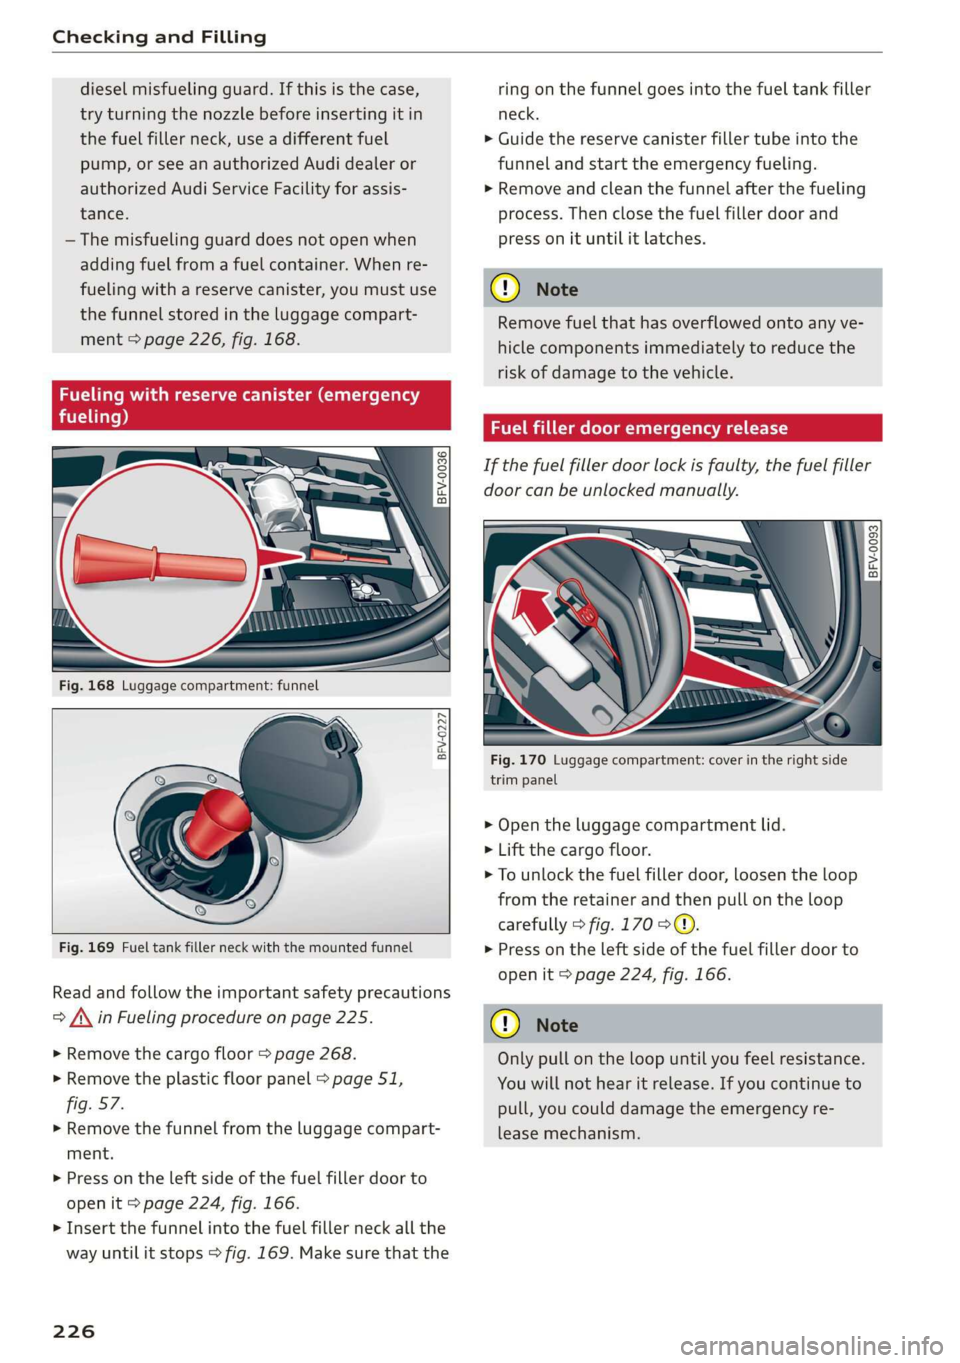
ment > page 226, fig. 168.
Fueling with reserve canister (emergency
fueling)
° i) 3°
8 >
c co
BFV-0227
Fig. 169 Fuel tank filler neck with the mounted funnel
Read and follow the important safety precautions
= A\ in Fueling procedure on page 225.
> Remove the cargo floor > page 268.
> Remove the plastic floor panel > page 51,
fig. 57.
> Remove the funnel from the luggage compart-
ment.
> Press on the left side of the fuel filler door to
open it > page 224, fig. 166.
> Insert the funnel into the fuel filler neck all the
way until it stops > fig. 169. Make sure that the
226
ring on the funnel goes into the fuel tank filler
neck.
> Guide the reserve canister filler tube into the
funnel and start the emergency fueling.
>» Remove and clean the funnel after the fueling
process. Then close the fuel filler door and
press on it until it latches.
() Note
Remove fuel that has overflowed onto any ve-
hicle components immediately to reduce the
risk of damage to the vehicle.
Fuel filler door emergency release
If the fuel filler door lock is faulty, the fuel filler
door can be unlocked manually.
| a 3
= >
cg a
Fig. 170 Luggage compartment: cover in the right side
trim panel
> Open the luggage compartment lid.
> Lift the cargo floor.
> To unlock the fuel filler door, loosen the loop
from the retainer and then pull on the loop
carefully > fig. 170 >@.
> Press on the left side of the fuel filler door to
open it > page 224, fig. 166.
@) Note
Only pull on the loop until you feel resistance.
You will not hear it release. If you continue to
pull, you could damage the emergency re-
lease mechanism.