2019 AUDI TT ROADSTER engine
[x] Cancel search: enginePage 241 of 304

8S8012721BA
Checking and Filling
@) Note
— The concentration of anti-freezing agent
must be adjusted to the vehicle operating
conditions and the climate. A concentration
that is too high can lead to vehicle damage.
— Never add radiator anti-freeze or other addi-
tives to the washer fluid.
— Do not use a glass cleaner that contains
paint solvents, because this could damage
the paint.
Service interval display
The service interval display detects when your ve-
hicle is due for service.
The service interval display works in two stages:
— Inspection or oil change reminder: after a cer-
tain distance driven, a message appears in the
Infotainment system display each time the ig-
nition is switched on or off. The remaining dis-
tance or time is displayed briefly.
— Inspection or oil change due: if your vehicle
has reached an inspection or oil change interval
or both intervals at the same time, the mes-
sage Inspection due! or Oil change due! or Oil
change and inspection due! appears briefly af-
ter switching the ignition on/off.
Checking service intervals
You can check the remaining distance or time un-
til the next oil change or next inspection. Select
in the Infotainment system: the [MENU] button >
Vehicle > left control button > Service & checks >
Service intervals.
Resetting the indicator
An authorized Audi dealer or authorized Audi
Service Facility will reset the service interval dis-
play after performing service.
If you have changed the oil yourself, you must re-
set the oil change interval.
To reset the display, select in the Infotainment
system: the [MENU] button > Vehicle > left con-
trol button > Service & checks > Service intervals
> Reset oil change interval.
CG) Note
— Only reset the oil change indicator if the oil
was changed.
— Following the service intervals is critical to
maintaining the service life and value of
your vehicle, especially the engine. Even if
the mileage on the vehicle is low, do not ex-
ceed the time for the next service.
239
Page 254 of 304

Wheels
limits > page 252.
Tires and vehicle load limits
There
are limits to the amount of
load or weight that any vehicle
and any tire can carry. A vehicle
that is overloaded will not handle
well and is more difficult to stop.
Overloading can not only lead to
loss of vehicle control, but can al-
so damage important parts of the
vehicle and can lead to sudden
tire failure, including a blowout
and sudden deflation that can
cause the vehicle to crash.
Your safety and that of your pas-
sengers also depends on making
sure that load limits are not ex-
ceeded. Vehicle load includes ev-
erybody and everything in and on
252
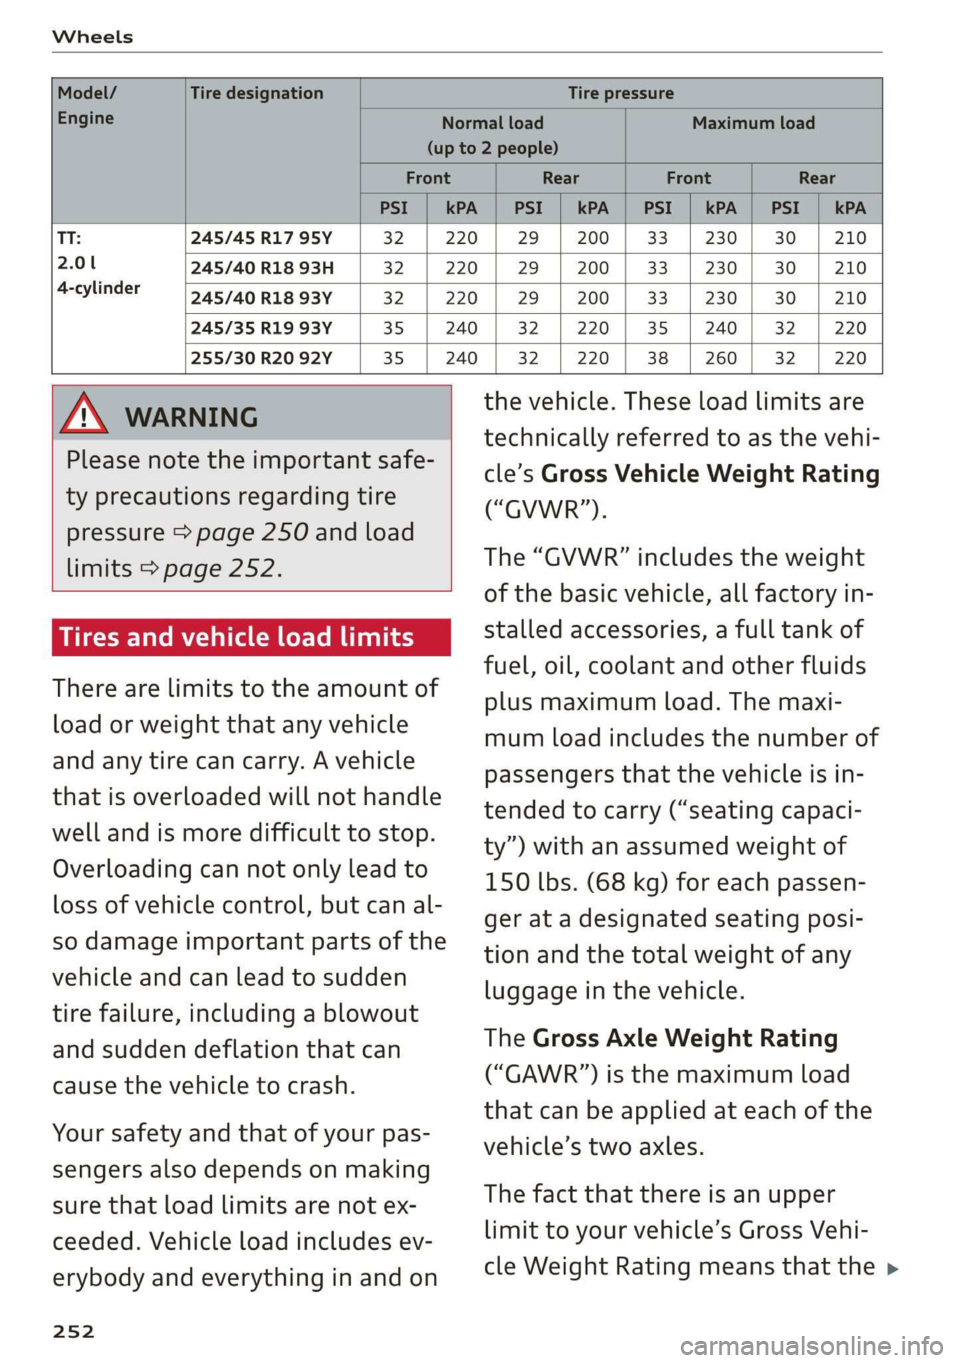
Model/ Tire designation Tire pressure
Engine Normal load Maximum load
(up to 2 people)
Front Rear Front Rear
PSI | kPA | PSI | kPA | PSI | kPA | PSI | kPA
TT: 245/45 R17 95Y 32. | 220 | 29 | 200 | 33 | 230] 30 | 210
2.01 245/40 R18 93H 32 220 | 29 | 200 | 33 | 230 | 30 | 210
4-cylinder — [>45/aorig93y | 32 | 220 | 29 | 200 | 33 | 230 | 30 | 210
245/35 R19 93Y 35 | 240 | 32 | 220 | 35 | 240 | 32 | 220
255/30 R20 92Y 35 | 240 | 32 | 220 | 38 | 260/] 32 | 220
/\ WARNING the vehicle. These load limits are
7 7 ; technically referred to as the vehi-
ease note the important safe- , 7 3 :
rt cle’s Gross Vehicle Weight Rating
ty precautions regarding tire ii ‘i
¥P garang (“GVWR”).
pressure > page 250 and load
The “GVWR” includes the weight
of the basic vehicle, all factory in-
stalled accessories, a full tank of
fuel, oil, coolant and other fluids
plus maximum load. The maxi-
mum load includes the number of
passengers that the vehicle is in-
tended to carry (“seating capaci-
ty”) with an assumed weight of
150 lbs. (68 kg) for each passen-
ger at a designated seating posi-
tion and the total weight of any
luggage in the vehicle.
The Gross Axle Weight Rating
(“GAWR’”) is the maximum load
that can be applied at each of the
vehicle’s two axles.
The fact that there is an upper
limit to your vehicle’s Gross Vehi-
cle Weight Rating means that the >
Page 261 of 304

8S8012721BA
Wheels
installation of replacement or alternate tires or
wheels on the vehicle that prevent the TPMS
from functioning properly. Always check the
TPMS malfunction telltale after replacing one or
more tires or wheels on your vehicle to ensure
that the replacement or alternate tires and
wheels allow the TPMS to continue to function
properly.
Applies to: vehicles with tire pressure monitoring system
The tire pressure monitoring system monitors
the pressure in the four tires when driving.
The system uses sensors that measure the tem-
perature and pressure in the tires. The data is
sent from these sensors to the control module by
radio frequency.
The tire pressure monitoring system shows the
current pressures and temperatures of the tires
in the Infotainment system while driving
= page 259. It also compares the current tire
pressures with the stored tire pressures and gives
a warning if the tire pressure is different from
what is stored > page 260.
The system does not detect if the stored tire
pressures match the recommended tire pres-
sures. You must store the tire pressures again in
each of the following situations > page 260:
— Each time the tire pressures change, for exam-
ple when the load in the vehicle changes
— After replacing a tire
— If wheels with new wheel sensors are used
Z\ WARNING
— The tire pressure monitoring system assists
the driver in monitoring tire pressures. The
driver is responsible for having the tires in-
flated to the correct pressure.
— Do not change the tire pressure when the
temperature of the tire is extremely high.
This could result in serious damage to the
tire and even cause the tire to burst, increas-
ing the risk of an accident.
— A tire with low pressure flexes more. This
heats the tire up too much. This could cause
the tread to separate and even cause the tire
to burst, increasing the risk of an accident.
—The tire pressure monitoring system does
not warn about damage or defects in the
tire construction that could cause the tire to
burst, for example. Inspect your tires regu-
larly.
@ Tips
—If tires are replaced, the sensors and valves
do not need to be removed or replaced. Only
replace the valve stem and, if necessary, the
valve and the wheel electronics. If you have
questions, see an authorized Audi dealer or
authorized Audi Service Facility.
—An incorrect display or a malfunction in the
tire pressure monitoring system can occur
after using the tire mobility kit. Have the
sensors replaced by an authorized Audi
dealer or authorized Audi Service Facility.
— For an explanation on conformity with the
FCC regulations in the United States and the
Industry Canada regulations, see
=> page 283.
Displaying tire pressures and temperatures
Applies to: vehicles with tire pressure monitoring system
Requirement: you must be driving the vehicle.
> Select in the Infotainment system: [MENU] but-
ton > Service & checks > Tire pressure monitor-
ing > Display tire pressure.
— Green: the current tire pressure and the speci-
fied tire pressure are approximately the same.
— Yellow: the current tire pressure is lower than
the specified tire pressure.
The specified tire pressure is the last tire pressure
that was stored > page 260.
Note that the tire pressure also depends on the
temperature of the tire. The tire pressure increas-
es as the engine becomes warmer while driving.
ZA\ WARNING
Read and follow the important information
and notes > page 259. >
259
Page 274 of 304

Emergency assistance
Raising the vehicle
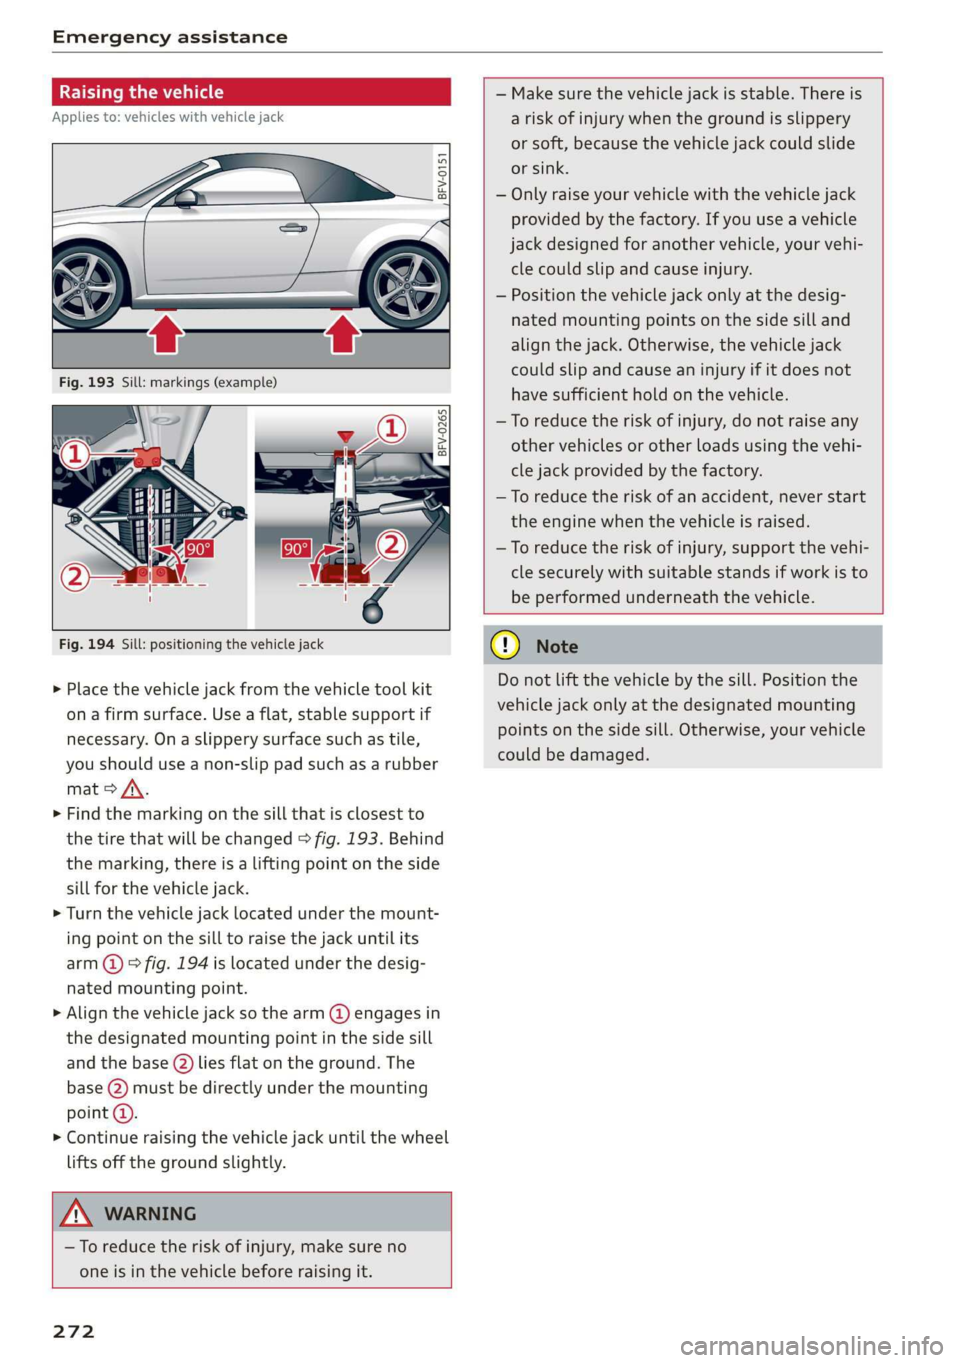
Applies to: vehicles with vehicle jack
A,
BFV-0151
ry oS
a
S| > in oO
Fig. 194 Sill: positioning the vehicle jack
> Place the vehicle jack from the vehicle tool kit
ona firm surface. Use a flat, stable support if
necessary. On a slippery surface such as tile,
you should use a non-slip pad such as a rubber
mat > /\.
> Find the marking on the sill that is closest to
the tire that will be changed > fig. 193. Behind
the marking, there is a lifting point on the side
sill for the vehicle jack.
> Turn the vehicle jack located under the mount-
ing point on the sill to raise the jack until its
arm @) ° fig. 194 is located under the desig-
nated mounting point.
> Align the vehicle jack so the arm (@) engages in
the designated mounting point in the side sill
and the base (2) lies flat on the ground. The
base (2) must be directly under the mounting
point @).
> Continue raising the vehicle jack until the wheel
lifts off the ground slightly.
— Make sure the vehicle jack is stable. There is
a risk of injury when the ground is slippery
or soft, because the vehicle jack could slide
or sink.
— Only raise your vehicle with the vehicle jack
provided by the factory. If you use a vehicle
jack designed for another vehicle, your vehi-
cle could slip and cause injury.
— Position the vehicle jack only at the desig-
nated mounting points on the side sill and
align the jack. Otherwise, the vehicle jack
could slip and cause an injury if it does not
have sufficient hold on the vehicle.
—To reduce the risk of injury, do not raise any
other vehicles or other loads using the vehi-
cle jack provided by the factory.
—To reduce the risk of an accident, never start
the engine when the vehicle is raised.
—To reduce the risk of injury, support the vehi-
cle securely with suitable stands if work is to
be performed underneath the vehicle.
Z\ WARNING
—To reduce the risk of injury, make sure no
one is in the vehicle before raising it.
272
@) Note
Do not lift the vehicle by the sill. Position the
vehicle jack only at the designated mounting
points on the side sill. Otherwise, your vehicle
could be damaged.
Page 276 of 304

Emergency assistance
> The wheel bolt tightening specification must be
90 ft lbs (120 Nm). Have it checked as soon as
possible with a torque wrench. Drive carefully
until then.
> Have the faulty wheel replaced as quickly as
possible.
Spare tire
General information
Applies to: vehicles with space-saving spare tire (compact
spare tire)
—maa
BFV-0166
The spare tire is intended for short-term use only.
Have the damaged tire checked and replaced if
necessary by an authorized Audi dealer or author-
ized Audi Service Facility as soon as possible.
There are some restrictions on the use of the
compact spare tire. The compact spare tire has
been designed specifically for your type of vehi-
cle. Do not replace it with the spare tire from an-
other type of vehicle.
Removing the spare tire
> Turn the handle > fig. 197 @ counter-clock-
wise.
>» Remove the spare tire.
Removing the vehicle jack
> Lift up the cover on the right side of the lug-
gage compartment and remove the vehicle
jack.
Snow chains
For technical reasons, the use of snow chains on
the
compact spare tire is not permitted.
If you have to drive with snow chains and a front
tire fails, mount the spare tire in place of a rear
274
tire. Install the snow chains on the rear tire that
you removed, and install that in place of the
front tire that failed.
Z\ WARNING
— After installing a spare tire, the tire pressure
must be checked as soon as possible.
— Do not drive faster than SO mph (80 km/h)
with a compact spare tire. Driving faster
than that increases the risk of an accident.
— To reduce the risk of an accident, avoid hard
acceleration or braking and driving fast
around curves with the compact spare tire.
— To reduce the risk of an accident, never drive
with more than one compact spare tire.
— Normal summer or winter tires must not be
mounted on the compact spare wheel rim.
Towing
General information
You should only perform the steps that follow if
you have the necessary tools and technical ex-
pertise.
Towing requires a certain amount of practice. Au-
di recommends contacting a towing company to
have the vehicle transported.
You should only have your vehicle towed by an-
other vehicle when disabled in exceptional cir-
cumstances. Inexperienced drivers should not
tow.
Notes on towing
When the engine is stopped, the transmission
will not be sufficiently lubricated if traveling at
high speeds and long distances:
— The maximum permitted towing speed is 30
mph (50 km/h).
— The maximum permitted towing distance is 30
miles (50 km).
Additional information on towing with a tow
truck
The vehicle may only be towed with the front axle
raised. Do not wrap any chains or cables around
the brake lines.
Page 277 of 304

8S8012721BA
Emergency assistance
If the vehicle should be towed with the axle
raised, then the ignition must be switched off to
reduce the risk of damage to the drivetrain.
Tow bar and towing cable
The vehicle can be towed with a tow bar or tow-
ing cable. Both drivers should be familiar with
the special considerations when towing, especial-
ly when using a towing cable.
Always make sure the traction force does not ex-
ceed the permitted level and there are no shock
loading conditions. There is always the risk of the
coupling becoming overloaded when driving off-
road.
For the most safety and security, drive with a tow
bar. You should use a towing cable only if a tow
bar is not available. Use a towing cable made of
synthetic elastic cable similar elastic material.
ZA\ WARNING
— Towing highly increases the risk of an acci-
dent, for example from colliding with the
towing vehicle.
— To reduce the risk of an accident, do not al-
low anyone to remain inside the vehicle
when it is being transported by a tow truck
or a special transporter.
@) Note
— If normal towing is not possible, for exam-
ple if the transmission is faulty or if the
towing distance is greater than 30 miles
(50 km), then transport the vehicle on a
special carrier.
— If the vehicle is towed by a tow truck at the
axle that is not permitted, this can cause se-
vere damage to the transmission.
— The vehicle must not be tow started for
technical reasons.
@) Tips
—If there is a power failure, the selector lever
will not move out of the "P" position. The
parking lock must be released using the
D_ Requirement: the vehicle battery must have a sufficient
charge level.
emergency release before towing the vehi-
cle > page 68.
— Follow the local legal regulations for tow-
ing.
Read and follow the important information under
=> page 274.
Preparations
> Only secure the towing cable or tow bar at the
designated towing loops > page 276,
=> page 276.
> Make sure the towing cable is not twisted. Oth-
erwise it could disconnect from the towing loop
while towing.
» Switch the emergency flashers on in both vehi-
cles > page 40. However, do not do this if it
prohibited by law.
Towing vehicle (front)
> Only start to drive when the towing cable is
taut.
> Be especially careful when accelerating.
> Avoid sudden braking or driving maneuvers.
Vehicle being towed (rear)
» Make sure the ignition is switched on so that
the steering wheel is not locked and so that you
can use the turn signals, the horn, and the
windshield wipers if needed > A\.
> The brake booster only works when the engine
is running. Power steering only works when the
ignition is switched on and the vehicle is roll-
ing )). If the brake booster and power steering
are not functioning, you must press the brake
pedal much harder and use more force to steer.
> Release the parking brake > page 59.
> Select the "N" selector lever position.
> Make sure the towing cable is always taut.
275
>
Page 279 of 304

8S58012721BA
Fuses and bulbs
Fuses and bulbs
Fuses
Replacing fuses
S 6
= o
q
= 2 % a.
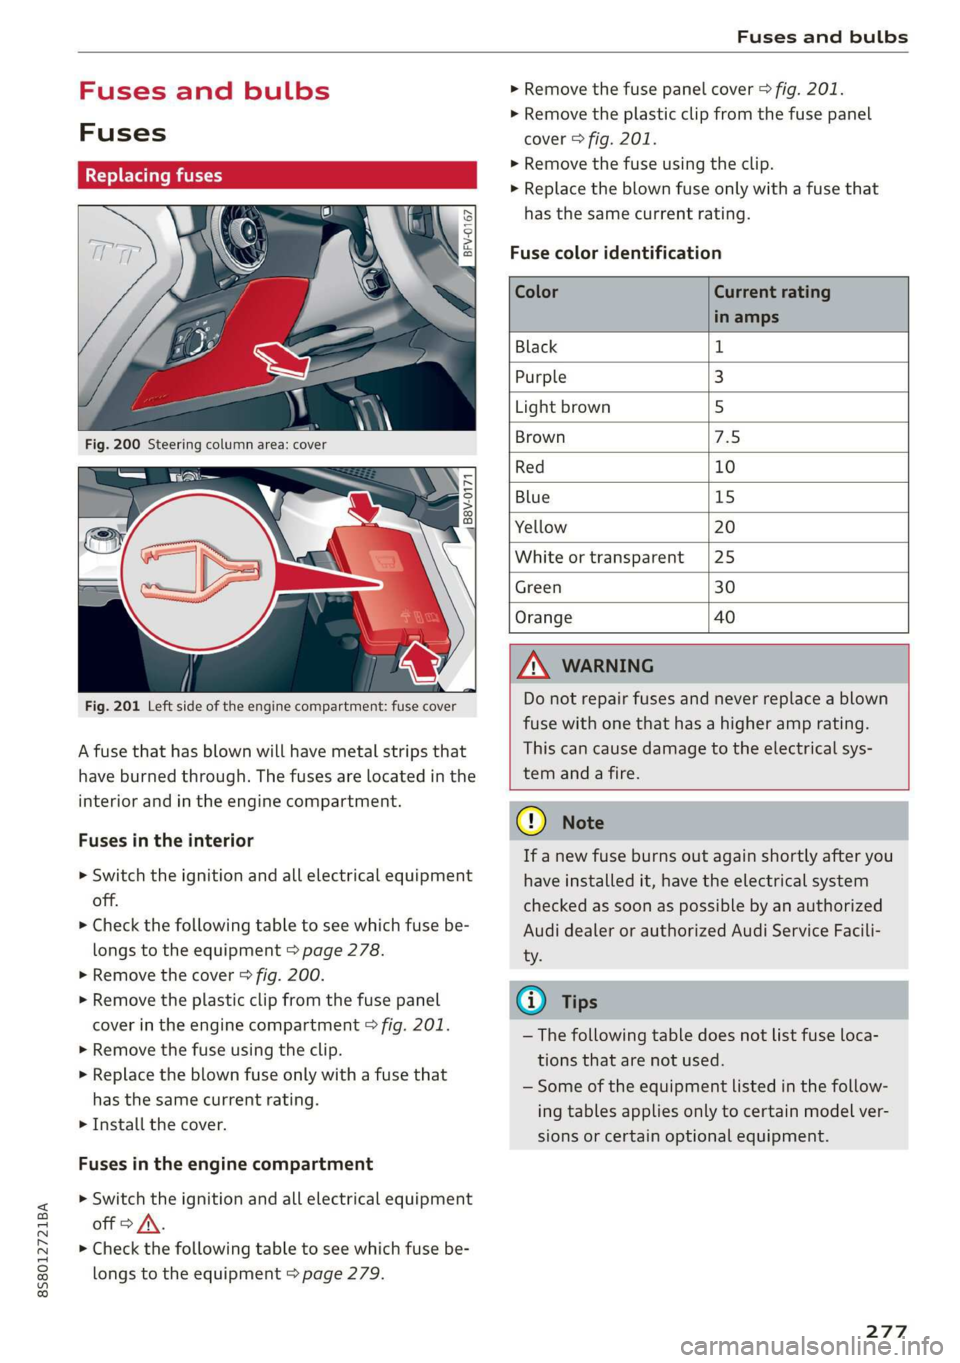
Fig. 201 Left side of the engine compartment: fuse cover
A fuse that has blown will have metal strips that
have burned through. The fuses are located in the
interior and in the engine compartment.
Fuses in the interior
> Switch the ignition and all electrical equipment
off.
> Check the following table to see which fuse be-
longs to the equipment > page 278.
» Remove the cover > fig. 200.
> Remove the plastic clip from the fuse panel
cover in the engine compartment © fig. 201.
> Remove the fuse using the clip.
> Replace the blown fuse only with a fuse that
has the same current rating.
> Install the cover.
Fuses in the engine compartment
> Switch the ignition and all electrical equipment
off > A\.
> Check the following table to see which fuse be-
longs to the equipment > page 279.
> Remove the fuse panel cover > fig. 201.
> Remove the plastic clip from the fuse panel
cover > fig. 201.
> Remove the fuse using the clip.
> Replace the blown fuse only with a fuse that
has the same current rating.
Fuse color identification
Color Current rating
in amps
Black 1
Purple 3
Light brown 5
Brown 1d
Red 10
Blue 15
Yellow 20
White or transparent [25
Green 30
Orange 40
Z\ WARNING
Do not repair fuses and never replace a blown
fuse with one that has a higher amp rating.
This can cause damage to the electrical sys-
tem and a fire.
CG) Note
If a new fuse burns out again shortly after you
have installed it, have the electrical system
checked as soon as possible by an authorized
Audi dealer or authorized Audi Service Facili-
ty.
@) Tips
— The following table does not list fuse loca-
tions that are not used.
— Some of the equipment listed in the follow-
ing tables applies only to certain model ver-
sions or certain optional equipment.
277
Page 280 of 304
![AUDI TT ROADSTER 2019 Owners Manual Fuses and bulbs
Interior fuse assignment
ft
pl Bel Fe
» BEBE ERED
Poo
ns
[24] 25) rao) 27) Fe Ra
23 |
Fsacsomeemr STE 42)
eases eres] b
ro Wa a i ee
1F52) FOL
Re
B8V-0217
AUDI TT ROADSTER 2019 Owners Manual Fuses and bulbs
Interior fuse assignment
ft
pl Bel Fe
» BEBE ERED
Poo
ns
[24] 25) rao) 27) Fe Ra
23 |
Fsacsomeemr STE 42)
eases eres] b
ro Wa a i ee
1F52) FOL
Re
B8V-0217](/manual-img/6/57667/w960_57667-279.png)
Fuses and bulbs
Interior fuse assignment
ft
pl Bel Fe
» BEBE ERED
Poo
ns
[24] 25) rao) 27) Fe Ra
23 |
Fsacsomeemr STE 42)
eases eres] b
ro Wa a i ee
1F52) FOL
Re
B8V-0217
No. | Equipment
F20 | Power lumbar support adjustment
Front passenger's side neck heating (Road-
F22
ster)
Right vehicle electrical system control
F24
module
F25 | Driver side door
F26 | Seat heating
Vehicle electrical system control module
Fae (terminal 30)
F28 | AMI High media port
F29 | Vehicle electrical system control module
F32 | Driver assistance systems
F33 | Airbag
Sockets, interior sound, tail light switch,
F34 | temperature sensor, oil level sensor, neck
heating, garage door opener
Fig. 202 Vehicle interior: fuse assignment
No. Equipment
Diagnosis, headlight range control, air
quality sensor, automatic dimming rear-
view mirror, center instrument panel
switch module
F35
F4 Central computer processor (MIB-2) F36 | Right cornering light / right LED headlight
FS Gateway (diagnostics) F37 | Left cornering light / left LED headlight
Fo Selector lever (automatic transmission)
F7
Climate control system controls, rear win-
dow defogger, tire pressure monitoring
Engine control module, ESC control mod-
F38
ule
F39 | Front passenger side door
F8
Switch for the electromechanical parking
brake, light switch, rain/light sensor, inte-
rior lighting, diagnostic connector, roof
electronics F40
| Cigarette lighter, sockets
F41 | Fuel tank diagnosis
F42 | Central locking area
FQ Steering column switch module
F44 | All wheel drive clutch control module
F10 Vehicle positioning
F45 | Power adjustable driver's side seat
Fll
All wheel drive clutch, left vehicle electri-
cal system control module
F46 | Driver's side neck heating (Roadster)
F49 | Engine start, clutch sensor
F12 Infotainment components
F52 | Control module for suspension control
F1l4 Climate control system blower fan
F53 | Rear window defogger
Fis Electronic steering column lock
F16
Infotainment system components, safety
belt microphone
F17 Instrument cluster
F18 Rearview camera
F19
Convenience access control module
278
The power seats* are protected via circuit break-
ers that automatically switch on after a few sec-
onds after the overload has been reduced.