2019 AUDI TT ROADSTER display
[x] Cancel search: displayPage 97 of 304
8S58012721BA
Multi Media Interface
Requirement: it must be possible to enter text or
numbers and the symbol (@) © fig. 99 must ap-
pear in the Infotainment system display.
— Initial entry: write an individual upper case or
lower case letter or number/symbol on the
MMI touch control pad using your finger. A
symbol that is recognized clearly by the system
is displayed in the Infotainment system display
@ > page 94, fig. 98, confirmed with an audi-
ble signal if necessary, and transferred to the
input field.
— Entering spaces: move your finger across the
MMI touch control pad from left to right.
— Deleting characters: move your finger across
the MMI touch control pad from right to left.
— Deleting characters quickly: move your finger
quickly across the MMI touch control pad from
right to left.
— Selecting the input suggestion: press the con-
trol knob.
— Switching directly to the results list: turn the
control knob to the right.
— Opening the speller: select the right control
button > Open speller. Text or numbers are en-
tered using the speller > page 98.
CMe meee
Applies to: vehicles with MMI touch
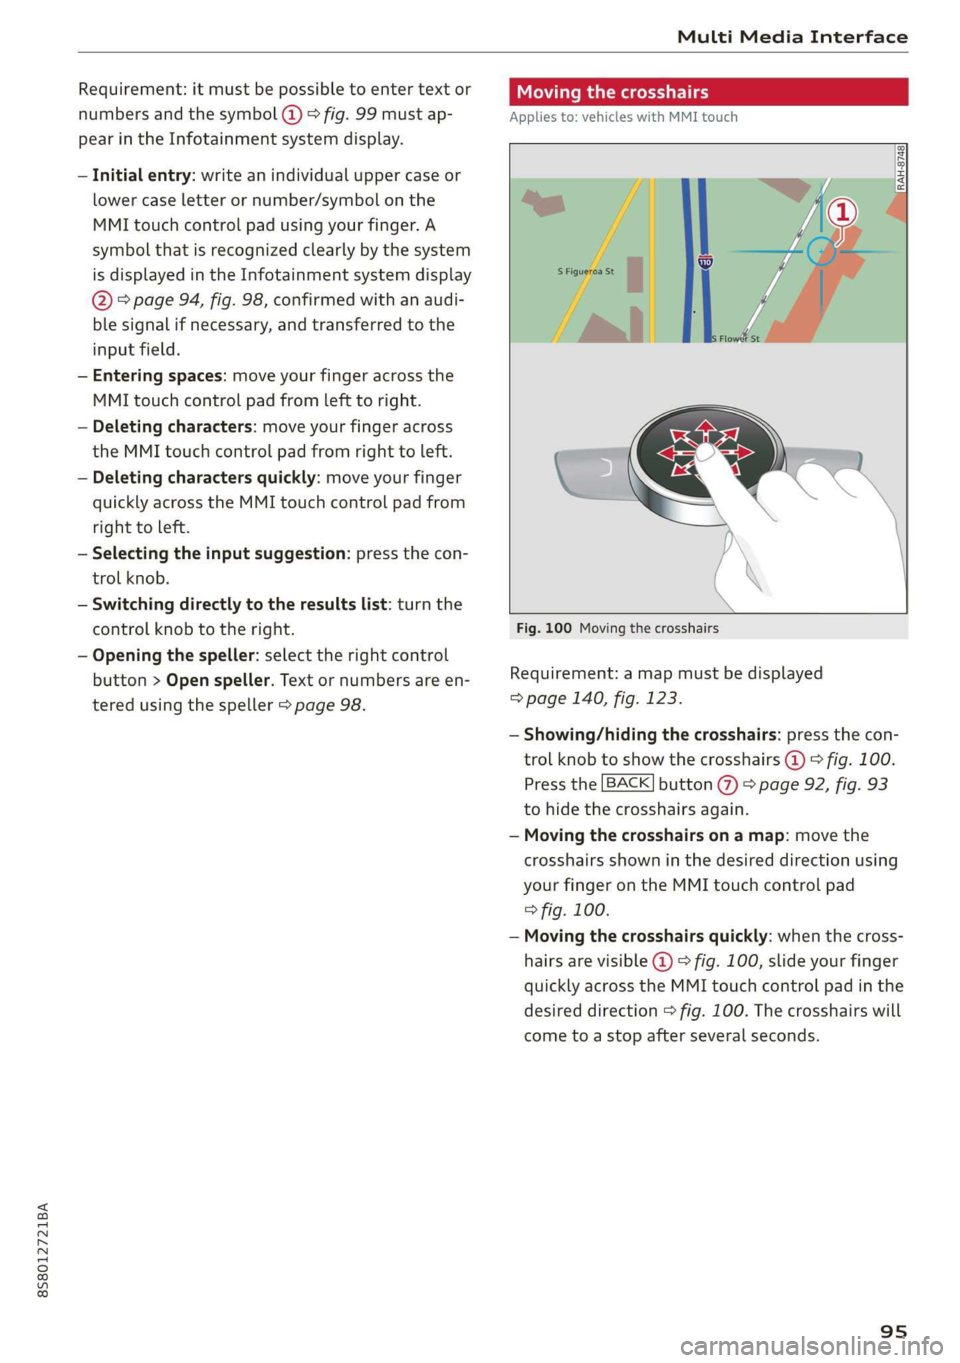
Fig. 100 Moving the crosshairs
Requirement: a map must be displayed
=> page 140, fig. 123.
— Showing/hiding the crosshairs: press the con-
trol knob to show the crosshairs @) © fig. 100.
Press the [BACK] button %) > page 92, fig. 93
to hide the crosshairs again.
— Moving the crosshairs on a map: move the
crosshairs shown in the desired direction using
your finger on the MMI touch control pad
=> fig. 100.
— Moving the crosshairs quickly: when the cross-
hairs are visible @ > fig. 100, slide your finger
quickly across the MMI touch control pad in the
desired direction > fig. 100. The crosshairs will
come to a stop after several seconds.
95
Page 98 of 304
Multi Media Interface
Moving the map
Applies to: vehicles with MMI touch
Zooming in/out on the map
Applies to: vehicles with MMI touch
DIRAH-8744
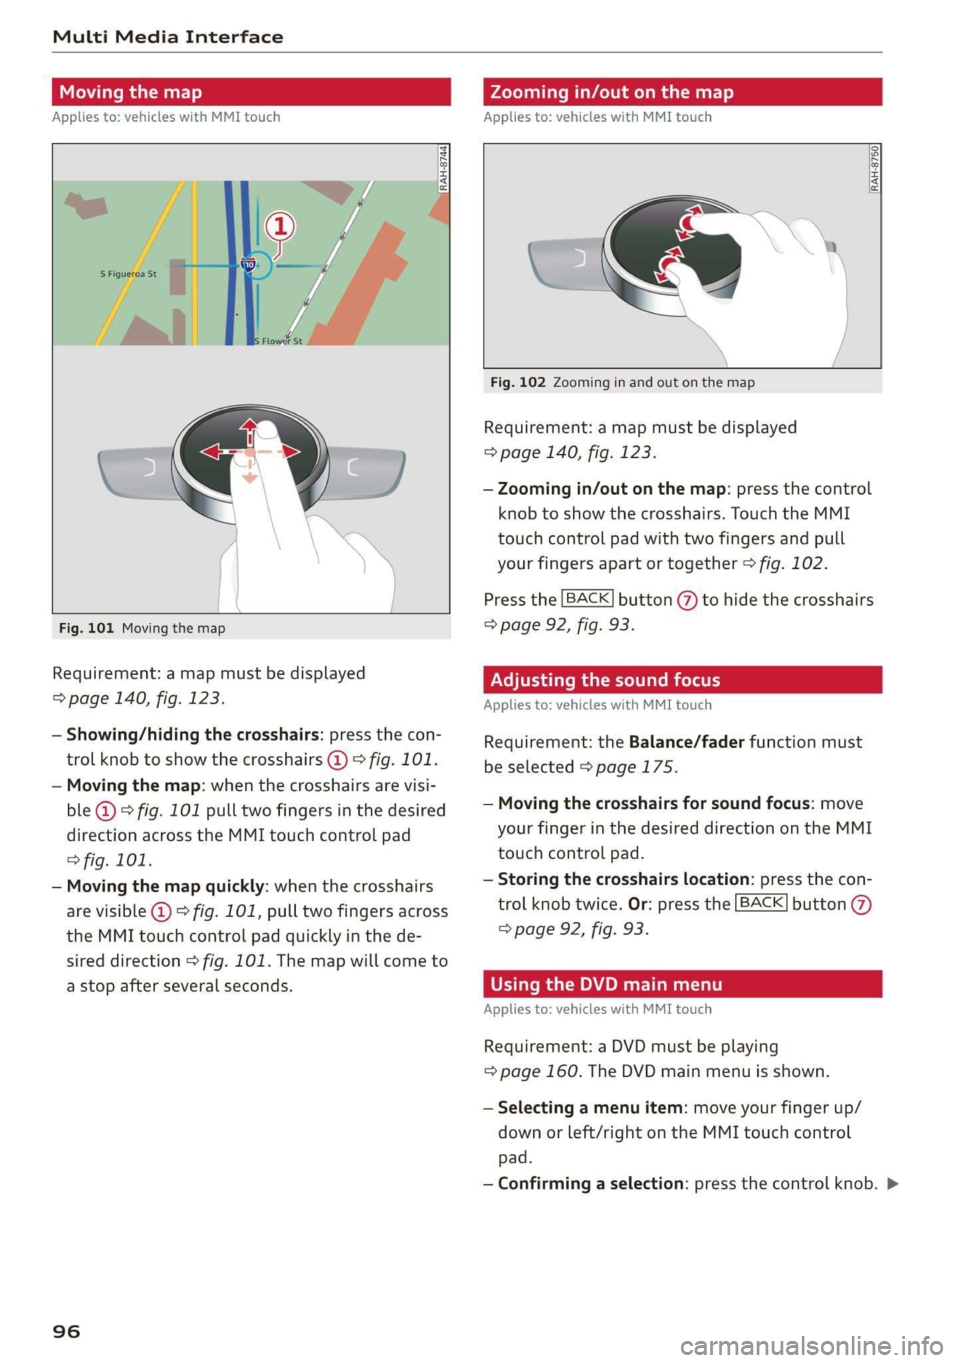
Fig. 101 Moving the map
Requirement: a map must be displayed
=> page 140, fig. 123.
— Showing/hiding the crosshairs: press the con-
trol knob to show the crosshairs @) > fig. 101.
— Moving the map: when the crosshairs are visi-
ble @) > fig. 101 pull two fingers in the desired
direction across the MMI touch control pad
> fig. 101.
— Moving the map quickly: when the crosshairs
are visible @ 9 fig. 101, pull two fingers across
the MMI touch control pad quickly in the de-
sired direction > fig. 101. The map will come to
a stop after several seconds.
96
RAH-8750|
Fig. 102 Zooming in and out on the map
Requirement: a map must be displayed
=> page 140, fig. 123.
— Zooming in/out on the map: press the control
knob to show the crosshairs. Touch the MMI
touch control pad with two fingers and pull
your fingers apart or together > fig. 102.
Press the [BACK] button (7) to hide the crosshairs
=> page 92, fig. 93.
Adjusting the sound focus
Applies to: vehicles with MMI touch
Requirement: the Balance/fader function must
be selected > page 175.
— Moving the crosshairs for sound focus: move
your finger in the desired direction on the MMI
touch control pad.
— Storing the crosshairs location: press the con-
trol knob twice. Or: press the [BACK] button
=> page 92, fig. 93.
OTe Rn APM Tm)
Applies to: vehicles with MMI touch
Requirement: a DVD must be playing
= page 160. The DVD main menu is shown.
— Selecting a menu item: move your finger up/
down or left/right on the MMI touch control
pad.
— Confirming a selection: press the control knob. >
Page 99 of 304
8S8012721BA
Multi Media Interface
@) Tips
The volume of the prompts for the MMI touch
can be adjusted separately > page 176.
Control knob with
joystick function
RAH-8515|
e »
&
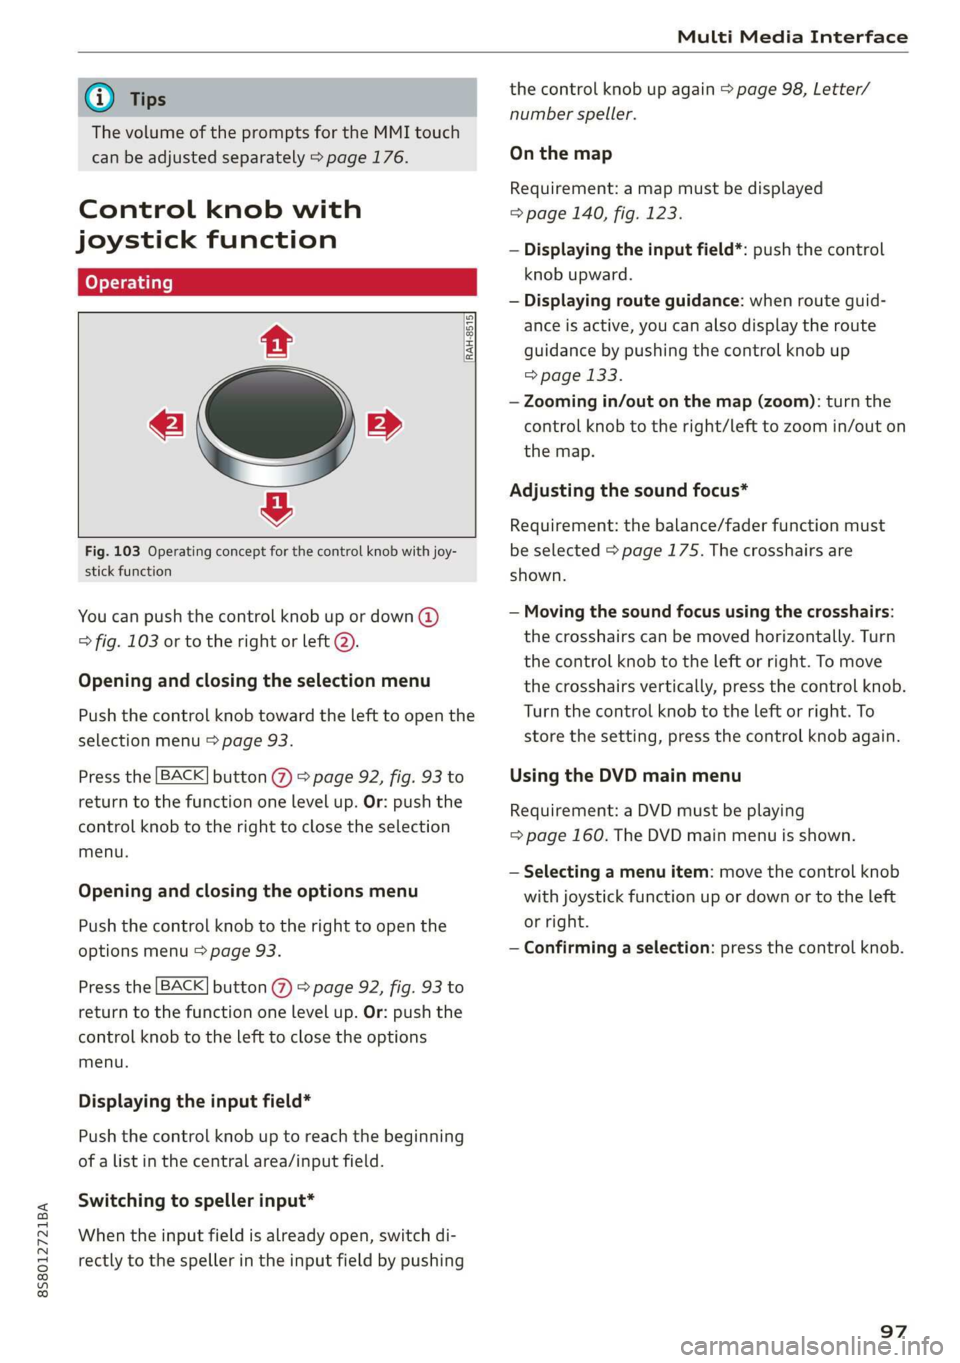
Fig. 103 Operating concept for the control knob with joy-
stick function
You can push the control knob up or down (@)
> fig. 103 or to the right or left @).
Opening and closing the selection menu
Push the control knob toward the left to open the
selection menu > page 93.
Press the [BACK] button () > page 92, fig. 93 to
return to the function one level up. Or: push the
control knob to the right to close the selection
menu.
Opening and closing the options menu
Push the control knob to the right to open the
options menu > page 93.
Press the [BACK] button (@) > page 92, fig. 93 to
return to the function one level up. Or: push the
control knob to the left to close the options
menu.
Displaying the input field*
Push the control knob up to reach the beginning
of a list in the central area/input field.
Switching to speller input*
When the input field is already open, switch di-
rectly to the speller in the input field by pushing
the control knob up again > page 98, Letter/
number speller.
On the map
Requirement: a map must be displayed
=> page 140, fig. 123.
— Displaying the input field*: push the control
knob upward.
— Displaying route guidance: when route guid-
ance is active, you can also display the route
guidance by pushing the control knob up
= page 133.
— Zooming in/out on the map (zoom): turn the
control knob to the right/left to zoom in/out on
the map.
Adjusting the sound focus*
Requirement: the balance/fader function must
be selected > page 175. The crosshairs are
shown.
— Moving the sound focus using the crosshairs:
the crosshairs can be moved horizontally. Turn
the control knob to the left or right. To move
the crosshairs vertically, press the control knob.
Turn the control knob to the left or right. To
store the setting, press the control knob again.
Using the DVD main menu
Requirement: a DVD must be playing
=> page 160. The DVD main menu is shown.
— Selecting a menu item: move the control knob
with joystick function up or down or to the left
or right.
— Confirming a selection: press the control knob.
97
Page 100 of 304

Multi Media Interface
Opening the selection/options menu with
the control knob
Applies to: vehicles with joystick function
©
Pr
RAH-8762|
rer
we
Fig. 104 Opening the selection/options menu with the
control knob
Letter/number speller
Opening/closing the selection menu: push the
control knob to the left (2) > fig. 104 to open the
selection menu. Then you can select and confirm
a function using the control knob.
BACK Press the button @ © page 92, fig. 93 to
return to the function one level up.
Opening/closing the options menu: push the
control knob to the right @) > fig. 104 to open
the options menu. Then you can select and con-
firm a function using the control knob.
Press the [BACK] button (2) > page 92, fig. 93 to
return to the function one level up.
UNAS ares =
me
baa Saal Ce
cE RIL
baie)
-1
Benes
Call list >
ttt ola)
toy Ta ea 8
bom, Michael
Sea)
Fig. 105 Diagram: letter/number speller
You can enter letters, numbers and symbols in
the MMI using the letter/number speller. This op-
tion is available when the input field @) is active
> fig. 105.
— Opening and closing the letter/number spell-
er: move the control knob up/down when the
98
input field is active. Or: select the right control
button > Open speller/Close speller.
— Entering characters: turn the control knob with
the character selection @0 > fig. 105 to the de-
sired symbol. Press the control knob to confirm
the character. Your input is displayed in the in-
put field @). When you have entered all of the >
Page 101 of 304
8S58012721BA
Multi Media Interface
characters, select and confirm [LIST ©. Or:
push the control knob down.
— Entering accented characters (such as 4, ¢, fi,
6)*: turn the control knob with the character
selection @9 > fig. 105 to a character. To open
the selected accented characters, press and
hold the control knob. Turn the control knob
with the character selection @0 > fig. 105 to an
accented character. Press the control knob to
insert the accented character. To close the ac-
cented characters without selecting a character,
press and hold the control knob again. Or: se-
lect and confirm [a6t] 7) > fig. 105. Select and
confirm an accented character.
— Deleting characters: select and confirm] @
=> fig. 105. To delete all characters in the input
field, press and hold the control knob on &] ®
> fig. 105 until all characters in the input field
are deleted.
— Entering special characters: select and con-
firm [82] © © fig. 105 or [123]@). Select and
confirm the desired special character (for ex-
ample, a hyphen or period) with the number
speller.
— Input assistance: in some cases such as in navi-
gation*, there is a word suggestion* @)
=> fig. 105 based on available entries while you
are entering data. You can select this sugges-
tion by pushing the control knob upward.
— Results list: in some cases, such as in the direc-
tory, the system switches automatically to the
results list based on available entries @)
=> fig. 105. Select and confirm a suggestion
from the list.
Requirement: the input field @) > fig. 105 must
be active.
— Switching between speller and MMI touch*:
the handwriting recognition for the MMI touch
control pad* is activated automatically. Simply
start writing.
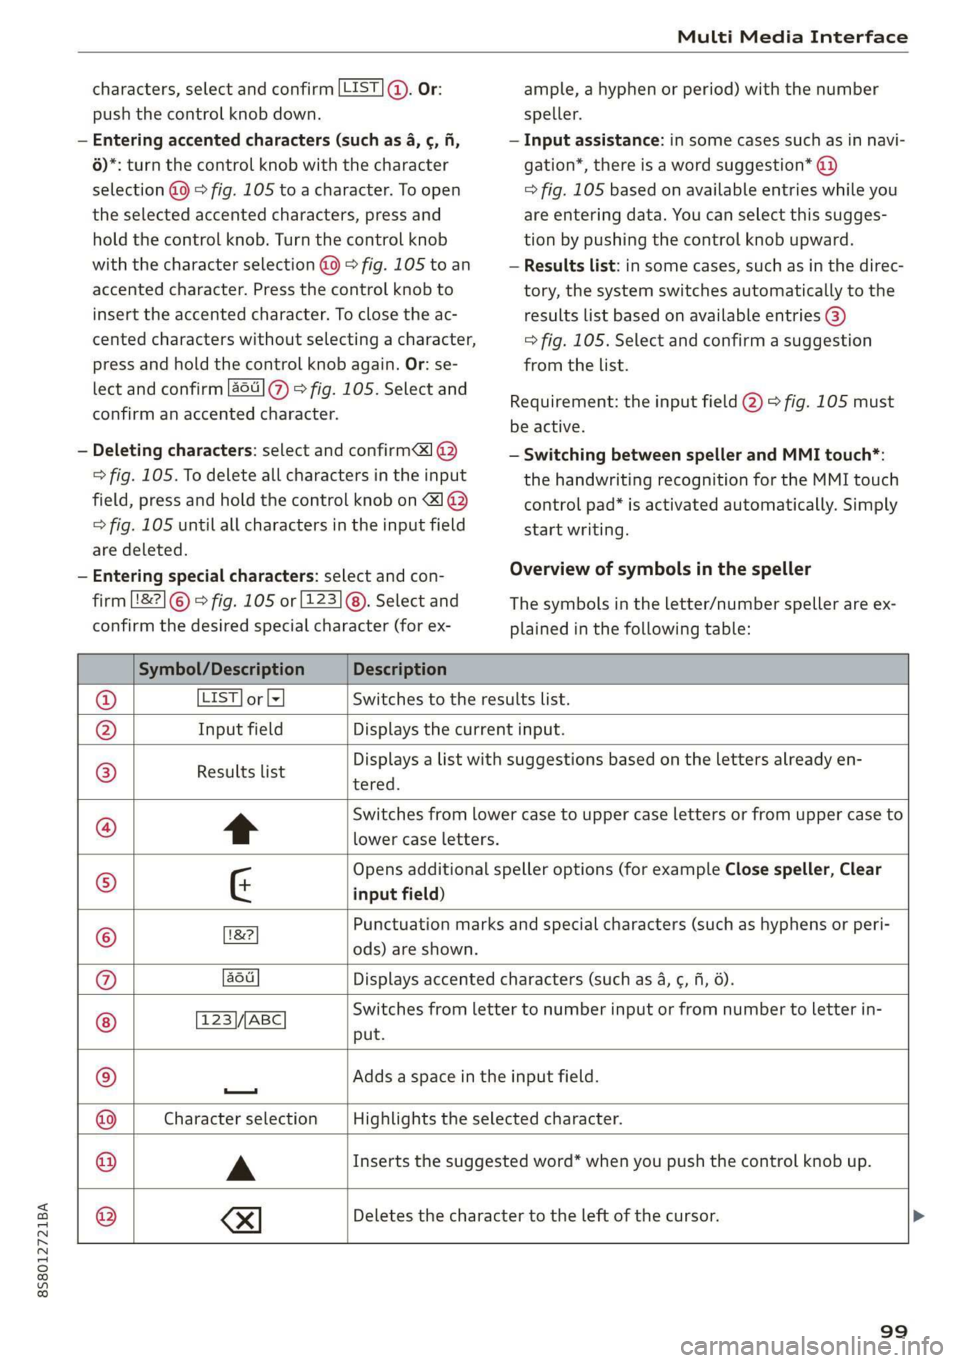
Overview of symbols in the speller
The symbols in the letter/number speller are ex-
plained in the following table:
Symbol/Description Description
LIST] or lz Switches to the results list.
Input field Displays the current input.
Results list
tered.
Displays a list with suggestions based on the letters already en-
t
Switches from lower case to upper case letters or from upper case to
lower case letters.
G
Opens additional speller options (for example Close speller, Clear
input field)
Punctuation marks and special characters (such as hyphens or peri-
©
|O}
©}
@}]O)]
©
EO
18?
ods) are shown.
au Displays accented characters (such as 4, ¢, fi, 6).
TSS/ABC Switches from letter to number input or from number to letter in-
put.
Adds a space in the input field.
—
Character selection Highlights the selected character.
A
Inserts the suggested word* when you push the control knob up.
®
|
©
|O|
©
se)
Deletes the character to the left of the cursor.
99
Page 102 of 304
Multi Media Interface
@) Tips
Accented characters are not available for ev-
ery letter.
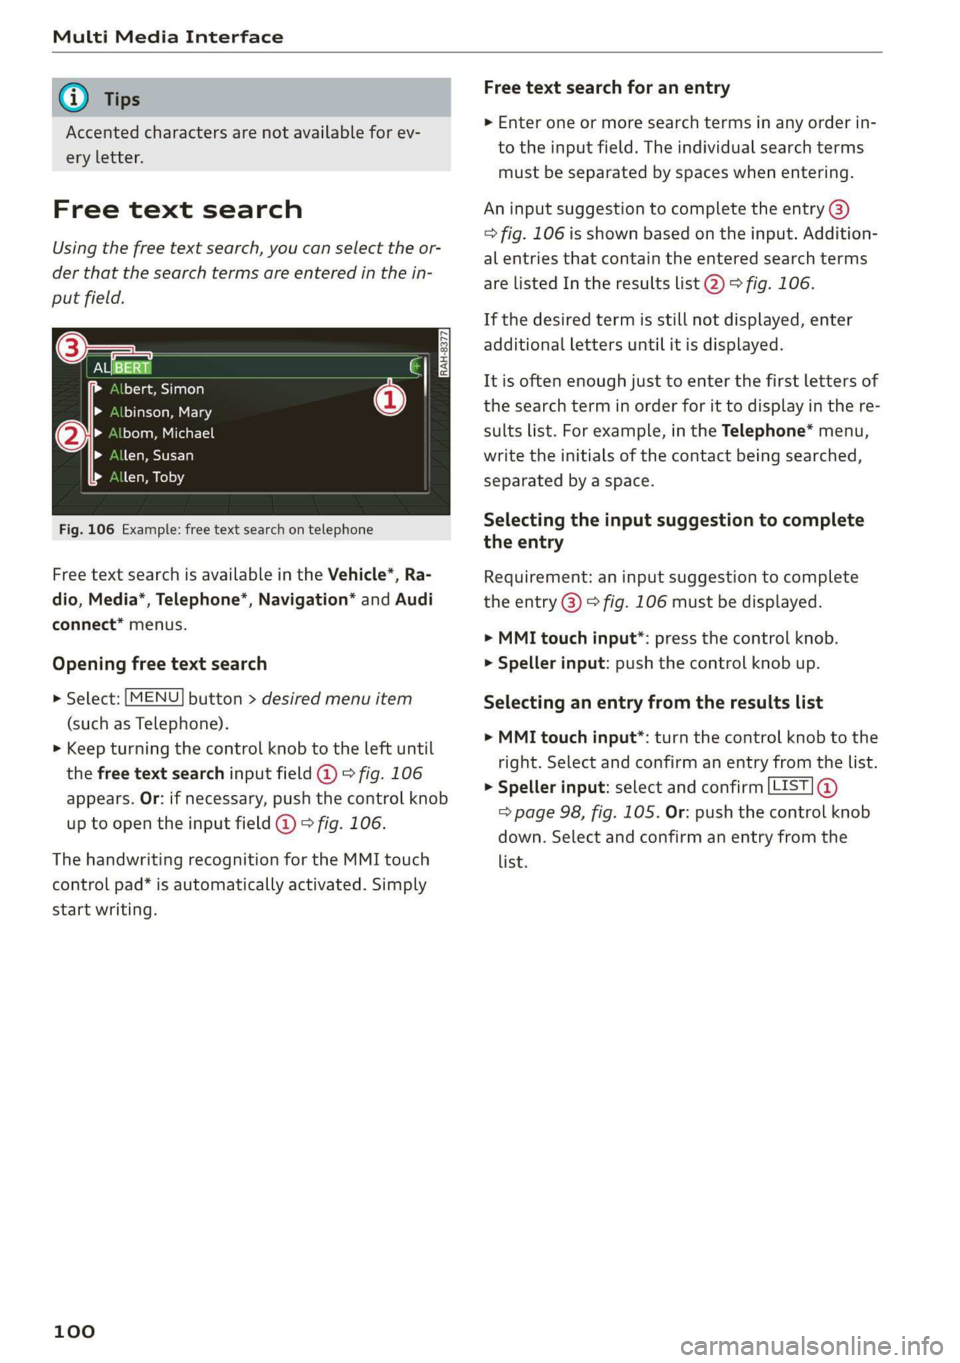
Free text search
Using the free text search, you can select the or-
der that the search terms are entered in the in-
put field.
ONS a0
Lol Ta acy a nrola
binson, Mary
bom, Michael
len, Susan
len, Toby
Fig. 106 Example: free text search on telephone
Free text search is available in the Vehicle*, Ra-
dio, Media*, Telephone”, Navigation* and Audi
connect* menus.
Opening free text search
> Select: [MENU] button > desired menu item
(such as Telephone).
> Keep turning the control knob to the left until
the free text search input field @ > fig. 106
appears. Or: if necessary, push the control knob
up to open the input field @ © fig. 106.
The handwriting recognition for the MMI touch
control pad* is automatically activated. Simply
start writing.
100
Free text search for an entry
> Enter one or more search terms in any order in-
to the input field. The individual search terms
must be separated by spaces when entering.
An input suggestion to complete the entry @)
=> fig. 106 is shown based on the input. Addition-
al entries that contain the entered search terms
are listed In the results list @) > fig. 106.
If the desired term is still not displayed, enter
additional letters until it is displayed.
It is often enough just to enter the first letters of
the search term in order for it to display in the re-
sults list. For example, in the Telephone* menu,
write the initials of the contact being searched,
separated by a space.
Selecting the input suggestion to complete
the entry
Requirement: an input suggestion to complete
the entry @) 9 fig. 106 must be displayed.
> MMI touch input*: press the control knob.
> Speller input: push the control knob up.
Selecting an entry from the results list
> MMI touch input*: turn the control knob to the
right. Select and confirm an entry from the list.
> Speller input: select and confirm [LIST] @
=> page 98, fig. 105. Or: push the control knob
down. Select and confirm an entry from the
list.
Page 103 of 304

8S8012721BA
Multi Media Interface
Menus and Symbols
eis
Additional station information
Preferred picture view
Treble
Radio settings
v Slide show
RAH-9139)
ee ard
Telephone
ba oad sa
Ralf Schmidt
Fig. 107 Diagram: menus and symbols
Symbol/Description Explanation
@ Selected text Selected function
@ TMC TMC/online traffic information reception > page 143
Network coverage for the active data connection > page 129
2G: GSM network
3G: UMTS network
® 2G/3G/LTE* LTE*: LTE network
When a data connection is established, the symbol for an active da-
ta connection appears in the status line on the Infotainment system
display > page 129
®
Data connection signal
strength bars*
Signal strength for the active data connection, or
PIN: enter the PIN (SIM)
PUK: enter the PUK
SIM: Inserting a SIM card > page 126
Jukebox* importing proc-
® a Import audio/video files to the Jukebox” > page 154
© Repeat track The track currently playing is repeated > page 164
All files on the playlist are played in random order > page 164,
@ shuffle Shuffle
Knob Setting for the selected function by turning the control knob
© Arrow Access information by pressing the control knob
Rearing Leave the mobile network for the connected cell phone or the in-
serted mini SIM card
Importing process Import/update the contacts in the directory or the call lists
Bluetooth* Bluetooth device connected > page 155 or > page 110
®
|O|©
Options menu
Select and confirm context-dependent functions as well as settings
within a menu item
101
Page 106 of 304
Voice recognition system
Voice recognition system
Operating
Applies to: vehicles with voice recognition system
You can operate many Infotainment functions
conveniently by speaking.
Requirement: the ignition and the MMI must be
switched on. A system language supported by
the voice recognition system must be set. There
must be no phone calls in progress and the park-
ing aid must not be active.
> Switching on: briefly press the [2] button @)
=> page 14, fig. 10 on the multifunction steer-
ing wheel and say the desired command after
the Beep.
> Switching off: press and hold the |™] button.
Or: say the command Cancel.
> Pausing: say the command Pause. To resume,
press the |] button.
> Correcting: press the [>] button one time ©
=> page 12, fig. 6. Or: say the command Correc-
tion.
Input assistance
The system guides you through the input with
visual and audio feedback.
— Visual input assistance: after switching on
voice recognition, a display with a selection of
possible commands appears. The command
display can be switched on/off under [MENU] >
Settings > left control button > MMI settings >
Speech dialog system.
— Audio input assistance: to have the possible
commands read, press the [2] button on the
multifunction steering wheel briefly and say
Help.
For the system to understand you:
Speak clearly and distinctly at a normal volume.
Speak louder when driving faster.
Emphasize the words in the commands evenly
and do not leave long pauses.
Do not speak a command when the voice recogni-
tion system is making an announcement.
104
Close the doors, the windows, and the sunroof*
to reduce background noise. Make sure that pas-
sengers are not speaking when you are giving a
voice command.
Do not direct the vents toward the handsfree mi-
crophone, which is near the front interior lights
on the roof headliner or on the driver's safety
belt*. For additional information on the safety
belt microphone, see > page 123.
Only
use the system from the driver's seat be-
cause the hands-free microphone is directed to-
ward that seat.
Additional settings
See > page 176, Voice recognition system.
ZA\ WARNING
— Direct your full attention to driving. As the
driver, you have complete responsibility for
safety in traffic. Only use the functions in
such a way that you always maintain com-
plete control over your vehicle in all traffic
situations.
— Do not use the voice recognition system in
emergencies because your voice may change
in stressful situations. The system may take
longer to dial the number or may not be
able to dial it at all. Dial the emergency
number manually.
G) Tips
—The dialog pauses when there is an incom-
ing phone call and will continue if you ig-
nore the call. The dialog ends if you answer
the call.
— There are no voice guidance* prompts when
a dialog is active.
— You can select an item in the list using ei-
ther the voice recognition system or the
control knob.