2019 AUDI TT ROADSTER display
[x] Cancel search: displayPage 18 of 304
![AUDI TT ROADSTER 2019 Owners Manual Instrument cluster
Accessing the sport displays in the central
area
> Open the first Vehicle tab (trip computer) using
the [<>] button on the multifunction steering
wheel.
> Select on the mul AUDI TT ROADSTER 2019 Owners Manual Instrument cluster
Accessing the sport displays in the central
area
> Open the first Vehicle tab (trip computer) using
the [<>] button on the multifunction steering
wheel.
> Select on the mul](/manual-img/6/57667/w960_57667-17.png)
Instrument cluster
Accessing the sport displays in the central
area
> Open the first Vehicle tab (trip computer) using
the [<>] button on the multifunction steering
wheel.
> Select on the multifunction steering wheel: left
control button > Sport displays.
> Turn the left thumbwheel on the multifunction
steering wheel until the desired sport display
appears in the instrument cluster.
Accessing the sport displays in the additional
display
> Select on the multifunction steering wheel:
right control button > Additional display.
> Select the desired additional display.
G meter*
The G meter displays the longitudinal and lateral
acceleration. The maximum values that are
reached are stored and displayed when the vehi-
cle is stationary.
> To reset the stored values, select on the multi-
function steering wheel: right control button >
Reset values.
Engine data*
The engine data displays the current power and
torque.
Tire Pressure Monitoring System*
The tire pressure monitoring system displays the
current tire pressures and temperature. Also see
=> page 258, Tire pressure monitoring system.
Messages
BRAKE/@)/‘C} Brake system
If this indicator light turns on, there is a malfunc-
tion in the brake system.
GG © Brakes: stop vehicle and check brake
fluid level
Stop the vehicle and check the brake fluid level.
See an authorized Audi dealer or authorized Audi
Service Facility for assistance.
Ga / © Warning! No brake booster function
16
If the brake booster is not working, you have to
use much more force when braking the vehicle.
See an authorized Audi dealer or authorized Audi
Service Facility for assistance.
EG / @ Brakes: malfunction! Safely stop ve-
hicle
If the indicator light turns on and this message
appears, there is a malfunction in the brake sys-
tem
1f 9 / Gana B also turn on, there is a mal-
function in the ABS, ESC, and braking distribu-
tion.
Do not continue driving. See an authorized Audi
dealer or authorized Audi Service Facility for as-
sistance > A\.
EG / o Parking brake: malfunction! Safely
stop vehicle. See owner's manual
— If the indicator light and the message appear
when the vehicle is stationary or after switch-
ing the ignition on, check if you can release the
parking brake. If you cannot release the parking
brake, see an authorized Audi dealer or author-
ized Audi Service Facility. If you can release the
parking brake and the message still appears,
see an authorized Audi dealer or authorized Au-
di Service Facility immediately to have the mal-
function corrected.
— If the indicator light and message appear while
driving, the hill start assist or emergency brak-
ing function may be malfunctioning. It may not
be possible to set the parking brake or release
it once it has been set. Do not park your vehicle
on hills. See an authorized Audi dealer or au-
thorized Audi Service Facility for assistance.
The KO] indicator light turns on when the brake
pads are worn. Drive to an authorized Audi dealer
or authorized Audi Service Facility immediately to
have the brake pads checked.
Applies to: USA models: The fa] indicator light
turns on together with the EG indicator light.
ZX WARNING
— Read and follow the warnings in
= page 227, General information before >
Page 33 of 304
8S8012721BA
Opening and closing
Press both of the outer buttons on the con-
trol unit > page 30, fig. 25 until the yellow
LED (2) turns off and the green LED @ blinks.
This procedure clears the standard codes that
were set at the factory and does not need to
be repeated again to program the other but-
tons.
Briefly press the button in the control panel
that you want to program.
Wait until the yellow LED (2) blinks. The pro-
gramming mode is active for five minutes.
Go in front of the vehicle with the original re-
mote control transmitter for the system that
you are programming to the control panel
button.
Programming the button: step 2 at the
radiator grille
6. Hold the remote control transmitter at the
vehicle radiator grille > fig. 26.
Now press the remote control transmitter
until the turn signals on your vehicle blink.
This can take up to 30 seconds.
If the emergency flashers blink three times,
the programming was successful. If the
emergency flashers only blink one time, the
five-minute time limit for programming has
expired or the programming was unsuccess-
ful. Repeat the programming procedure
starting from the third step or change the
distance to the radiator grille.
If the garage door or other systems do not
open with the HomeLink buttons even if the
programming was successful, the system
may use a rolling code instead of a fixed
code. You must also then perform rolling
code programming > page 31.
The other two buttons in the control panel can be
programmed using the instructions given above.
Start with step 3.
Deleting button programming
The programmed buttons cannot be deleted indi-
vidually. They must be deleted all at once. Repro-
gram the buttons if necessary.
> Switch the ignition on.
> Press both of the outer buttons on the control
unit until the yellow LED (2) turns off and the
green LED (@ blinks.
Reprogramming buttons
> Switch the ignition on.
> To reprogram an individual button, press the
desired button until the green LED (@) turns off
and the yellow LED (2) starts to blink (after ap-
proximately 20 seconds). Release the button
immediately. The programming mode is active
for five minutes.
> Continue with step 5.
@ Tips
— The distance needed between the remote
control transmitter and the garage door
opener module in the radiator grille
=> fig. 26 depends on the system you are
programming.
— Depending on the system model, you may
need to release the button on the remote
control transmitter while it is programming
and press it again. Hold every position you
try when programming for at least 15 sec-
onds before trying a new position. Keep an
eye on the vehicle turn signals while doing
this.
Rolling code programming
Applies to: vehicles with garage door opener
On some systems, programming a rolling code is
also necessary.
Identifying a rolling code
> Press the button in the control unit that is al-
ready programmed again and hold it down.
>» Watch the green LED @) > page 30, fig. 25. If
the green LED blinks quickly, the system (such
as a garage door) has a rolling code.
> Program the rolling code as follows:
Activating the system motor unit
> Locate the programming button on the system
motor unit. The exact location and color of the
button may vary depending on the brand.
> Press the programming button on the system
motor unit (usually this will activate a “display” >
31
Page 46 of 304
Lights and Vision
Replacing windshield wiper blades
he
B8R-0379
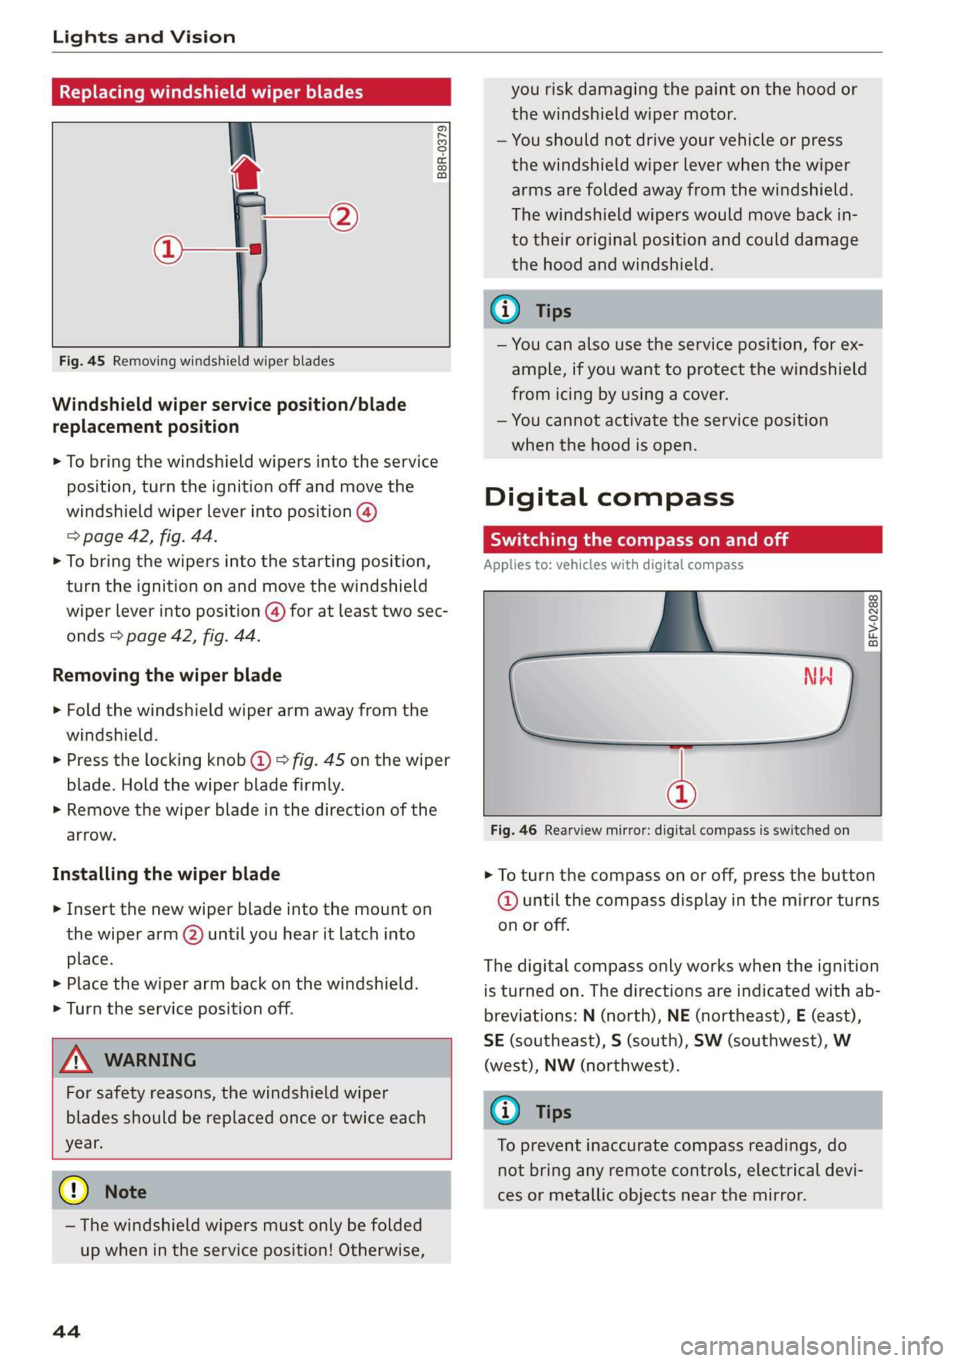
Fig. 45 Removing windshield wiper blades
Windshield wiper service position/blade
replacement position
> To bring the windshield wipers into the service
position, turn the ignition off and move the
windshield wiper lever into position @)
> page 42, fig. 44.
> To bring the wipers into the starting position,
turn the ignition on and move the windshield
wiper lever into position (@) for at least two sec-
onds > page 42, fig. 44.
Removing the wiper blade
> Fold the windshield wiper arm away from the
windshield.
> Press the locking knob (@) > fig. 45 on the wiper
blade. Hold the wiper blade firmly.
> Remove the wiper blade in the direction of the
arrow.
Installing the wiper blade
> Insert the new wiper blade into the mount on
the wiper arm (2) until you hear it latch into
place.
» Place the wiper arm back on the windshield.
> Turn the service position off.
Z\ WARNING
For safety reasons, the windshield wiper
blades should be replaced once or twice each
year.
@) Note
— The windshield wipers must only be folded
up when in the service position! Otherwise,
44
you risk damaging the paint on the hood or
the windshield wiper motor.
— You should not drive your vehicle or press
the windshield wiper lever when the wiper
arms are folded away from the windshield.
The windshield wipers would move back in-
to their original position and could damage
the hood and windshield.
G) Tips
— You can also use the service position, for ex-
ample, if you want to protect the windshield
from icing by using a cover.
— You cannot activate the service position
when the hood is open.
Digital compass
Scale ma meel eR meme a
Applies to: vehicles with digital compass
BFV-0288
NW
@
Fig. 46 Rearview mirror: digital compass is switched on
> To turn the compass on or off, press the button
@ until the compass display in the mirror turns
on or off.
The digital compass only works when the ignition
is turned on. The directions are indicated with ab-
breviations: N (north), NE (northeast), E (east),
SE (southeast), S (south), SW (southwest), W
(west), NW (northwest).
(i) Tips
To prevent inaccurate compass readings, do
not bring any remote controls, electrical devi-
ces or metallic objects near the mirror.
Page 47 of 304
8S58012721BA
Lights and Vision
Adjusting the magnetic zone
Applies to: vehicles with digital compass
BFV-0293
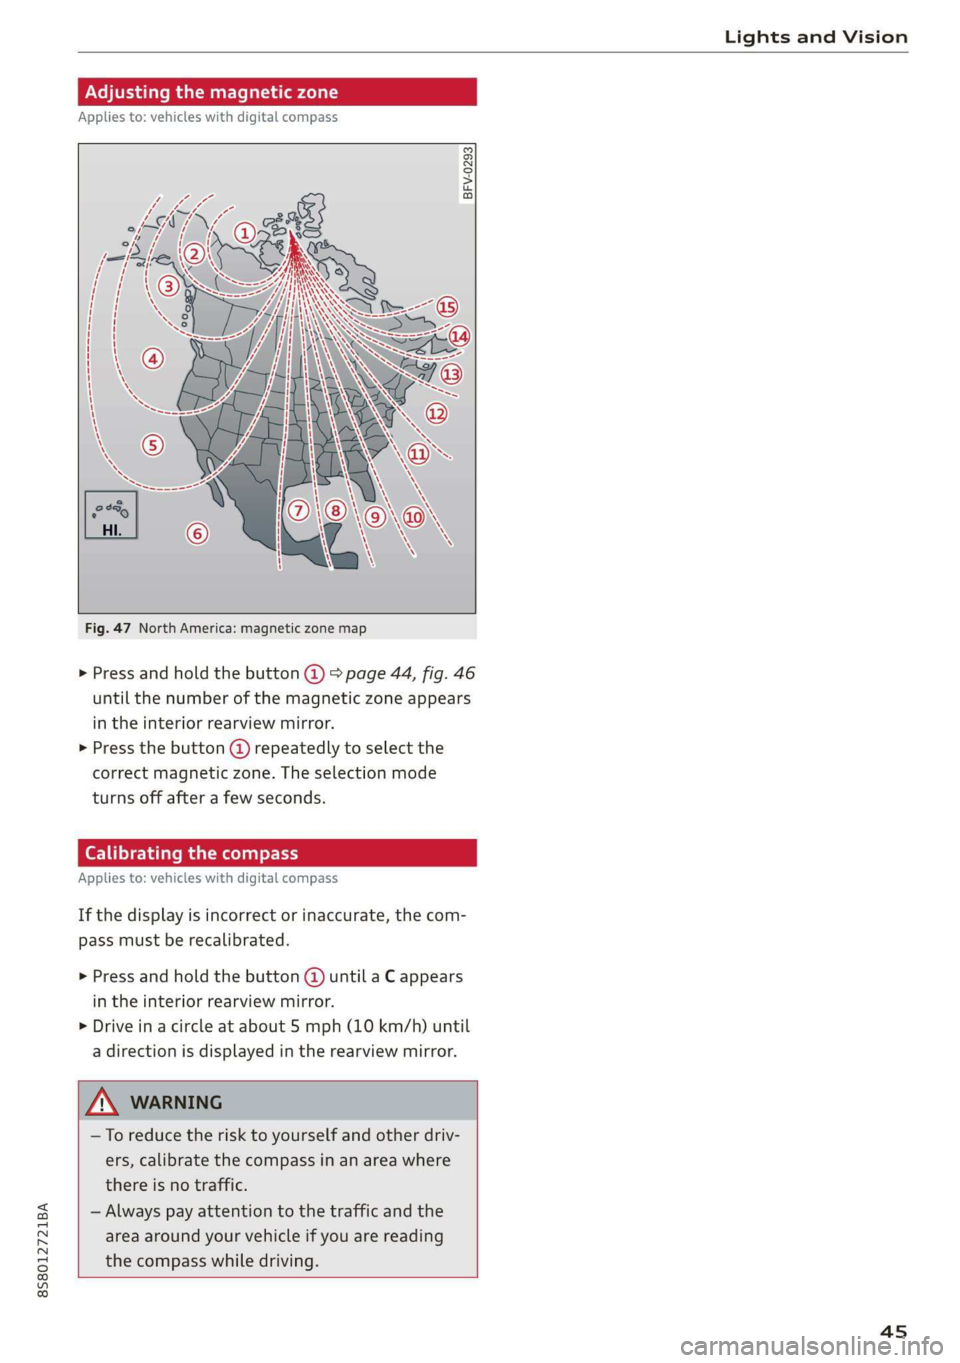
Fig. 47 North America: magnetic zone map
> Press and hold the button @) > page 44, fig. 46
until the number of the magnetic zone appears
in the interior rearview mirror.
> Press the button @) repeatedly to select the
correct magnetic zone. The selection mode
turns off after a few seconds.
Calibrating the compass
Applies to: vehicles with digital compass
If the display is incorrect or inaccurate, the com-
pass must be recalibrated.
> Press and hold the button @ until a C appears
in the interior rearview mirror.
> Drive in a circle at about 5 mph (10 km/h) until
a direction is displayed in the rearview mirror.
—To reduce the risk to yourself and other driv-
ers, calibrate the compass in an area where
there is no traffic.
— Always pay attention to the traffic and the
area around your vehicle if you are reading
the compass while driving.
45
Page 61 of 304

8S58012721BA
Driving
authorized Audi Service Facility immediately to
have the malfunction corrected. To start the en-
gine, press and hold the [START ENGINE STOP
button.
Remote control key: hold back of key
against the designated area. See owner's man-
ual
This message appears if there is no convenience
key inside the vehicle or if the system does not
recognize the key. The convenience key may not
be recognized, for example, if it is covered by an
object that disrupts the signal (such as a brief-
case), or if the key battery is weak. Electronic de-
vices such as cell phones can also interfere with
the signal.
To still be able to start or stop the engine, see
= page 59, Starting the engine when there is a
malfunction.
B Remote control key: key not detected. Is the
key still in the vehicle?
The BSB indicator light turns on and this message
appears if the convenience key was removed from
the vehicle when the engine was running. If the
convenience key is no longer in the vehicle, you
cannot switch the ignition on or start the engine
once you stop it. You also cannot lock the vehicle
from the outside.
Please press the brake pedal
This message appears if you do not press the
brake pedal when starting the engine.
Please select N or P
This message appears when starting or stopping
the engine if the selector lever is not in the "N" or
"P" position. The engine will not start/stop.
Starting the engine when there is a
Tare iira dea)
It may not be possible to start the engine under
certain circumstances, for example, if the bat-
tery
in the vehicle key is drained, if interference is
affecting the key or if there is a system malfunc-
tion.
Fig. 66 Steering column/remote control key: starting the
engine if there is a malfunction
As long as the message ?) Remote control key:
hold back of key against the designated area.
See owner's manual is displayed, you can emer-
gency start your vehicle.
> Press the brake pedal.
> Press the [START ENGINE STOP] button.
> Hold the master key in the location indicated in
the illustration ?) © fig. 66. The engine will
start.
> If the engine does not automatically start,
press the [START ENGINE STOP] button again.
(i) Tips
You can view the message again by pressing
the [START ENGINE STOP] button.
Electromechanical
parking brake
The ©) switch is located under the selector lever
in the center console.
Your vehicle is equipped with an electromechani-
cal parking brake. The parking brake is designed
to prevent the vehicle from rolling unintentional-
ly and replaces the hand brake.
59
Page 62 of 304
Driving
Setting/manually releasing the parking
brake
> Pull the ©) switch to set the parking brake. The
LED in the switch turns on. The PARK (USA mod-
els) (Canada models) indicator light also
turns on in the instrument cluster display.
> To release the parking brake manually, press
the brake or accelerator pedal while the igni-
tion is switched on and press the ©) switch at
the same time. The LED in the button and the
indicator light in the display turn off.
Releasing the parking brake automatically
Requirement: the driver's door must be closed.
> To start driving and release the parking brake
automatically, press the accelerator pedal as
usual.
In addition to releasing the parking brake auto-
matically, other convenience and safety functions
are available when you start driving > page 61,
Starting to drive.
Emergency braking function
You can use the emergency braking function in an
emergency situation, or if the standard brakes
are malfunctioning or the pedal is obstructed.
> Pull and hold the ©) switch.
> As soon as you release the ©) switch or acceler-
ate, the braking stops.
Pulling
and holding the ©) switch while driving
the vehicle activates the emergency braking func-
tion. The hydraulic brake system will brake all
four wheels. The braking effect is similar to heavy
braking > A\.
To reduce the risk of activating the emergency
braking by mistake, a warning tone (buzzer)
sounds when the ©) switch is pulled. Emergency
braking stops as soon as the ©) switch is released
or the accelerator pedal is pressed.
Parking
> Press the brake pedal to stop the vehicle.
> Pull the © switch to set the parking brake.
>» Place the selector lever in the “P” position.
> Turn the engine off > A\.
60
> Turn the steering wheel when parking on in-
clines so that the wheels will roll into the curb
if the vehicle starts moving.
ZA WARNING
— Ifa gear is engaged while the vehicle is sta-
tionary and the engine is running, do not
press the accelerator pedal inadvertently.
Otherwise, the vehicle will start to move im-
mediately and this could result in an acci-
dent.
— Emergency braking should only be used in
an emergency, when the when the standard
brake pedal is malfunctioning or obstructed.
During emergency braking, your vehicle will
brake similar to heavy braking. ESC and the
associated components (ABS, ASR, EDL) can-
not overcome the laws of physics. In corners
and when road or weather conditions are
bad, a full brake application can cause the
vehicle to skid or the rear end to swerve,
which increases the risk of an accident.
— If the power supply fails, you cannot set the
parking brake once it is released. In this
case, park the vehicle on level ground and
secure it by placing the selector lever in the
P position. See an authorized Audi dealer or
authorized Audi Service Facility for assis-
tance.
— If you leave the vehicle, switch the ignition
off and take the vehicle key with you. This
applies particularly when children remain in
the vehicle. Otherwise children could start
the engine, release the parking brake or op-
erate electrical equipment such as power
windows, which increases the risk of an acci-
dent.
— No one should remain in the vehicle when it
is locked - especially children. Locked doors
make it more difficult for emergency work-
ers to get into the vehicle, which puts lives
at risk.
C) Note
Do not leave your vehicle unattended while
the engine is running, because this increases
the risk of an accident.
Page 64 of 304

Driving
changes in speed, and traveling at the maximum
speed.
If desired, the driver can also select the gears
manually (tiptronic mode).
RY ta cela (Oa eid
7
BFV-0245
a
Lee
Fig. 67 Instrument cluster: selector lever positions
The Infotainment system display shows the cur-
rent selector lever position and the engaged
gear.
P - Park
You can only shift into Park when the vehicle is
stationary > A.
To shift in and out of the P selector lever position,
press the interlock button in the selector lever
while pressing the brake pedal.
R - Reverse
Only shift into reverse gear when the vehicle is
stationary and the engine is running at idle
speed > A\.
To select the R selector lever position, press the
interlock button while pressing the brake pedal.
The back-up lights switch on in the R position if
the ignition is switched on.
N - Neutral
The transmission is in idle in this position.
D/S - Normal position for driving forward
In the D/S selector lever position, the transmis-
sion can be operated either in the normal D mode
or in the S sport mode. To select the S sport
mode, pull the selector lever back briefly. Pulling
the lever back again will select the normal D
62
mode. The selected driving mode is shown in the
Infotainment display.
In the normal mode "D", the transmission auto-
matically selects the correct gear. It depends on
engine load, vehicle speed and driving style.
Select the sport mode "S" for sporty driving. The
vehicle makes full use of the engine's power.
Shifting may become noticeable when accelerat-
ing.
To move from selector lever position "N" to "D",
you must press the brake pedal and the vehicle
must be traveling less than 1 mph (2 km/h) or be
stationary > A.
Z\ WARNING
Read and follow all WARNINGS.
— Before starting to drive, check if the desired
selector lever position is displayed next to
the selector lever.
— The vehicle can roll even if the ignition is
switched off.
— Never select "R" or "P" while driving, be-
cause this increases the risk of an accident.
— Power is still transmitted to the wheels
when the engine is running at idle. To pre-
vent the vehicle from “creeping”, you must
keep your foot on the brake in all selector
lever positions (except “P”) when the engine
is running. Otherwise, this increases the risk
of an accident.
— Do not inadvertently press the accelerator
pedal when the vehicle is stopped if a gear is
engaged. Otherwise the vehicle will start to
move immediately, even if the parking brake
is set. This could result in a crash.
— Do not press the accelerator pedal when
changing the selector lever position while
the vehicle is stationary and the engine is
running.
— Never leave your vehicle with the engine
running while in gear. If you must leave your
vehicle when the engine is running, set the
parking brake and move the selector lever to
the "P" position.
—To decrease the risk of an accident, the se-
lector lever must be in the P position and
Page 65 of 304
8S8012721BA
Driving
the parking brake must be set before open-
ing the hood and working ona running en-
gine. Always read and follow the applicable
warnings > page 227, General information.
@) Note
Never let the vehicle roll downhill with engine
off and the selector lever in the "N" position,
because this could damage the automatic
transmission and catalytic converter.
G) Tips
— Drive select: sporty shifting characteristics
can be selected using the Dynamic driving
mode. The Infotainment display shows S as
the selector lever position instead of D.
— If you accidentally select "N" while driving,
take your foot off the accelerator pedal im-
mediately and wait for the engine to slow
down to idle before selecting "D" or "S".
— If there is a power failure, the selector lever
will not move out of the "P" position. The
emergency release can be used if this hap-
pens. Left-hand drive vehicles > page 68.
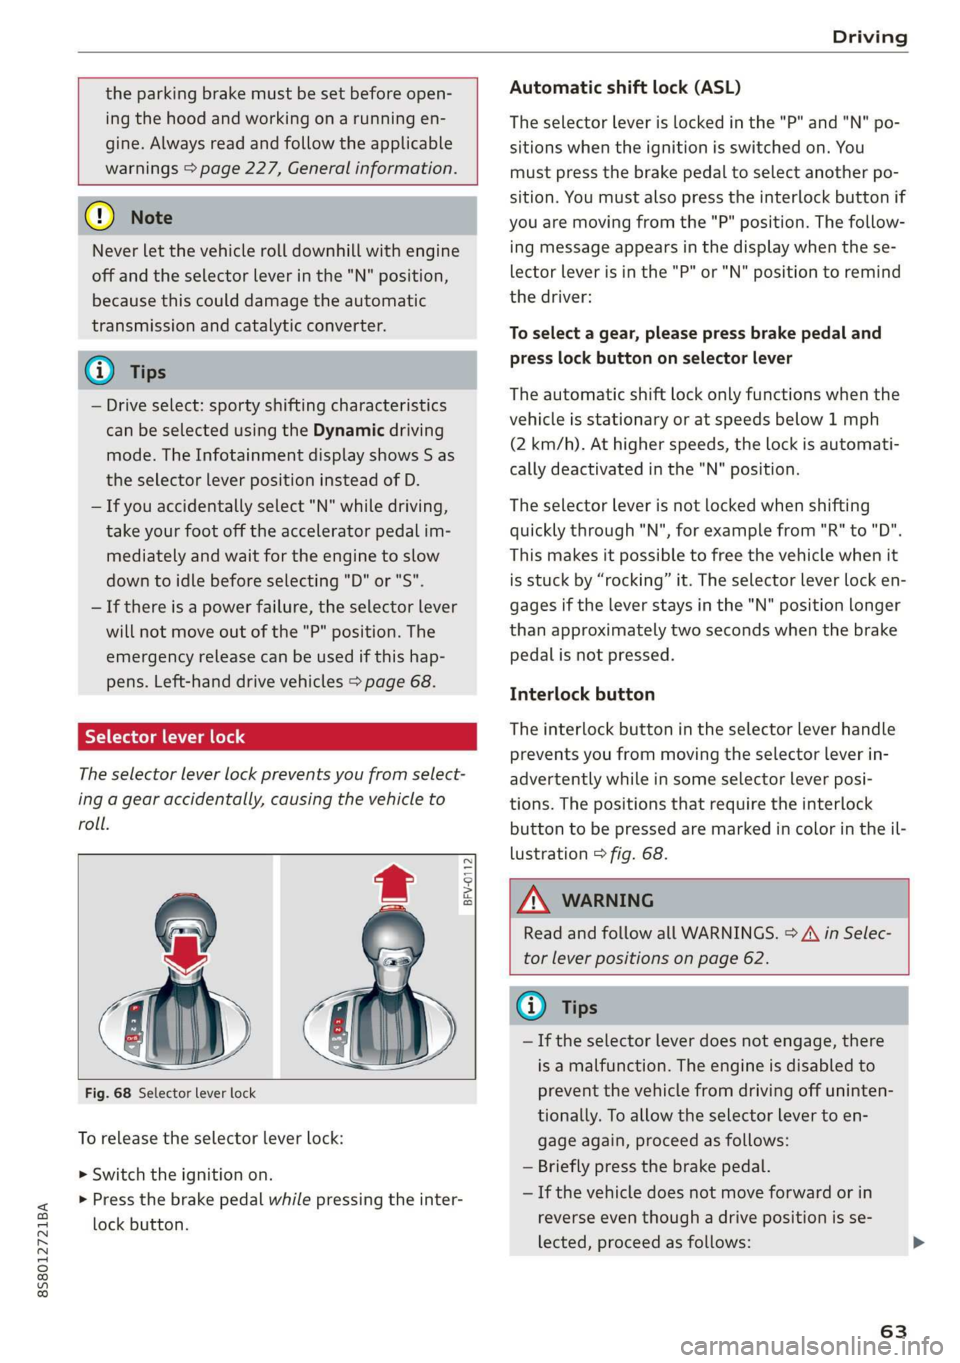
Selector lever lock
The selector lever lock prevents you from select-
ing a gear accidentally, causing the vehicle to
roll.
BFV-0112
Fig. 68 Selector lever lock
To release the selector lever lock:
> Switch the ignition on.
> Press the brake pedal while pressing the inter-
lock button.
Automatic shift lock (ASL)
The selector Lever is locked in the "P" and "N" po-
sitions when the ignition is switched on. You
must press the brake pedal to select another po-
sition. You must also press the interlock button if
you are moving from the "P" position. The follow-
ing message appears in the display when the se-
lector lever is in the "P" or "N" position to remind
the driver:
To select a gear, please press brake pedal and
press lock button on selector lever
The automatic shift lock only functions when the
vehicle is stationary or at speeds below 1 mph
(2 km/h). At higher speeds, the lock is automati-
cally deactivated in the "N" position.
The selector lever is not locked when shifting
quickly through "N", for example from "R" to "D".
This makes it possible to free the vehicle when it
is stuck by “rocking” it. The selector lever lock en-
gages if the lever stays in the "N" position longer
than approximately two seconds when the brake
pedal is not pressed.
Interlock button
The interlock button in the selector lever handle
prevents you from moving the selector lever in-
advertently while in some selector lever posi-
tions. The positions that require the interlock
button to be pressed are marked in color in the il-
lustration > fig. 68.
Z\ WARNING
Read and follow all WARNINGS. > A\ in Selec-
tor lever positions on page 62.
@) Tips
—If the selector lever does not engage, there
is a malfunction. The engine is disabled to
prevent the vehicle from driving off uninten-
tionally. To allow the selector lever to en-
gage again, proceed as follows:
— Briefly press the brake pedal.
— If the vehicle does not move forward or in
reverse even though a drive position is se-
lected, proceed as follows:
63