2019 AUDI TT ROADSTER door lock
[x] Cancel search: door lockPage 29 of 304
8S8012721BA
Opening and closing
> Insert the key into the slot inside and turn it all
the way to the right (right door) or to the left
(left door*).
Once the front passenger's door is closed, it is no
longer possible to open it from the outside. The
door can be opened from the inside by pulling
the door handle.
PV ae Te
If the anti-theft alarm system detects a vehicle
break-in, audio and visual warning signals are
triggered. The anti-theft alarm system is switch-
ed on or off when locking or unlocking your vehi-
cle. If the alarm is triggered, it will shut off auto-
matically after a certain amount of time.
Switching the alarm off manually
> To switch the alarm off, press the G button on
the remote control key or switch the ignition
on.
Break-in security feature
The alarm will sound if there is a break-in at the
doors, hood, and/or luggage compartment lid.
Luggage compartment
lid
Opening and closing the luggage
compartment lid
Opening the luggage compartment lid
> To unlock the luggage compartment lid, press
the < button on the remote control key. Or
> Lift the luggage compartment lid.
Closing the luggage compartment lid
>» Use the inside grip to pull the luggage com-
partment lid down and allow it to close using a
gentle push > A\.
Z\ WARNING
— After closing the luggage compartment lid,
make sure that it is latched. Otherwise the
luggage compartment lid could open sud-
denly when driving, which increases the risk
of an accident.
— Never drive with the luggage compartment
lid ajar or open, because poisonous gases
can enter the vehicle interior and create the
risk of asphyxiation.
— Never leave your vehicle unattended when
the luggage compartment lid is open. A
child could crawl into the luggage compart-
ment. If the luggage compartment lid was
then closed, the child would be trapped in
the vehicle and unable to escape. To reduce
the risk of injury, do not allow children to
play in or around the vehicle. Always keep
the luggage compartment lid and the doors
closed when the vehicle is not in use.
— Always make sure no one is in the luggage
compartment lid's range of motion when it
is closing, especially near the hinges. Fin-
gers or hands could be pinched.
@) Tips
— When the vehicle is locked, the luggage
compartment lid can be unlocked separately
by pressing the << button on the remote
control key. The luggage compartment lid
locks automatically when it is closed again.
— Incase of an emergency or a faulty handle,
the luggage compartment lid can be opened
manually from the inside > page 28.
27
Page 30 of 304
Opening and closing
Mechanically unlocking the luggage
compartment lid
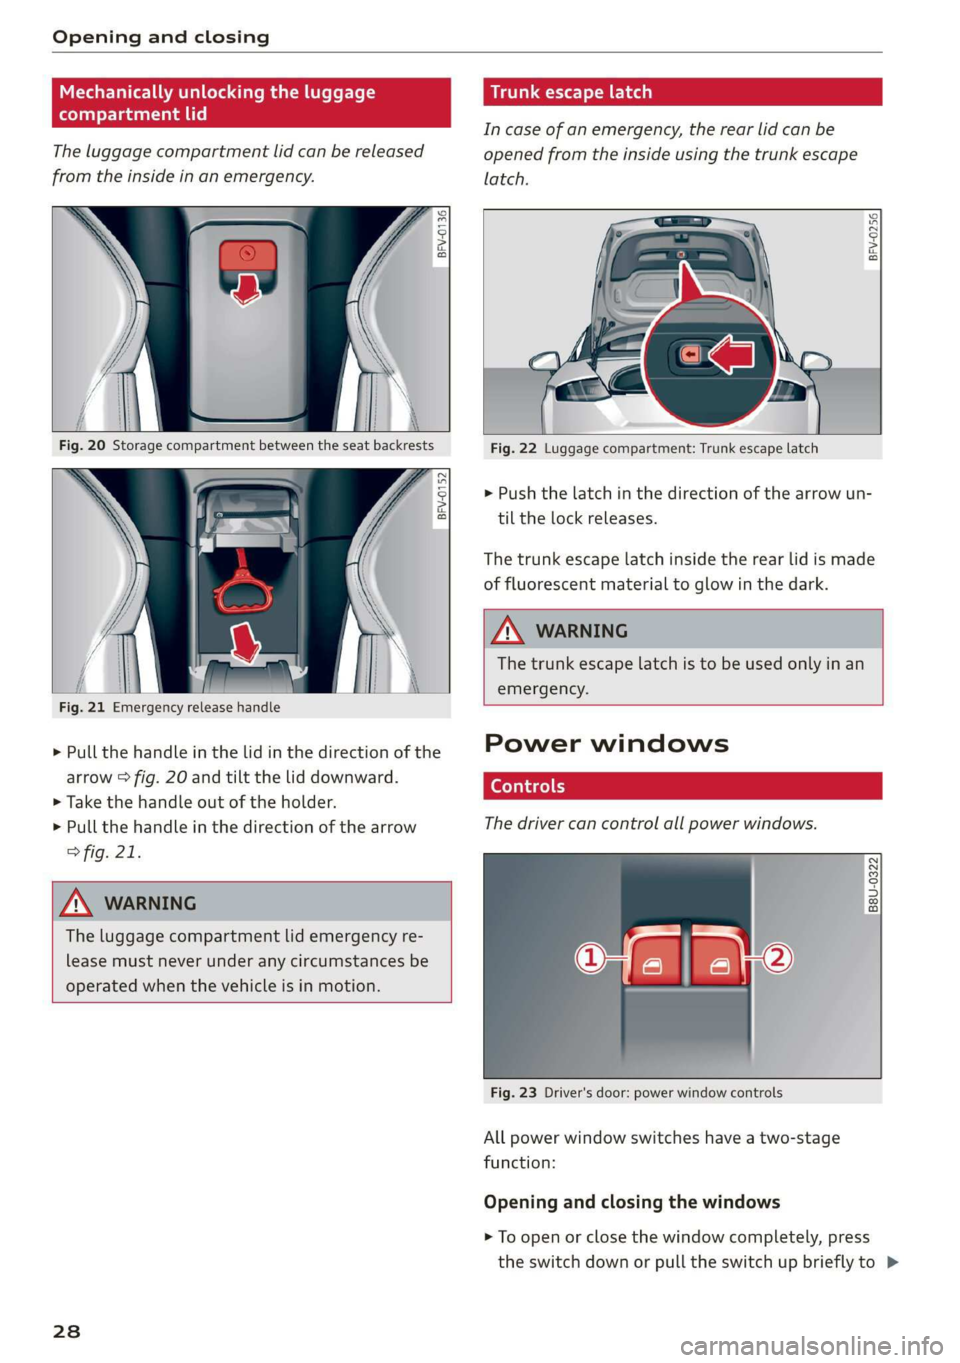
The luggage compartment lid can be released
from the inside in an emergency.
BFV-0136
BFV-0152
Fig. 21 Emergency release handle
> Pull the handle in the lid in the direction of the
arrow > fig. 20 and tilt the lid downward.
> Take the handle out of the holder.
> Pull the handle in the direction of the arrow
> fig. 21.
ZX WARNING
The luggage compartment lid emergency re-
lease must never under any circumstances be
operated when the vehicle is in motion.
238
Trunk escape latch
Incase of an emergency, the rear lid can be
opened from the inside using the trunk escape
latch.
BFV-0256
Fig. 22 Luggage compartment: Trunk escape latch
> Push the latch in the direction of the arrow un-
til the lock releases.
The trunk escape latch inside the rear lid is made
of fluorescent material to glow in the dark.
Z\ WARNING
The trunk escape latch is to be used only in an
emergency.
Power windows
The driver can control all power windows.
q Q
2
id =|
2 a
Fig. 23 Driver's door: power window controls
All power window switches have a two-stage
function:
Opening and closing the windows
> To open or close the window completely, press
the switch down or pull the switch up briefly to >
Page 31 of 304

8S8012721BA
Opening and closing
the second level. The operation will stop if the
switch is pressed or pulled again.
> To select a position in between opened and
closed,
press or pull the switch to the first level
until
the desired window position is reached.
Power window switches
@ Left door
@ Right door
ZA WARNING
— Pay careful attention when closing the win-
dows. Pinching could cause serious injuries.
— When locking the vehicle from outside, the
vehicle must be unoccupied since the win-
dows can no longer be opened in an emer-
gency.
G@) Tips
— You can still open and close the windows for
approximately 10 minutes after turning the
ignition off. The power windows do not
switch off until the driver's door or front
passenger's door has been opened.
— When opening the doors and when open-
ing/closing the power top, the windows au-
tomatically lower approximately 0.4 inches
(10 mm).
Convenience opening and closing
All windows can be opened and closed at the
same time.
For power top* convenience opening/closing, re-
fer to the information in > page 34.
Convenience opening feature
> Press and hold the @ button on the remote con-
trol key until all windows reach the desired po-
sition.
Convenience closing feature
> Press and hold the & button on the remote con-
trol key until all windows are closed > /\.
Convenience closing with the convenience
key*
> Touch the sensor* on the door handle long
enough until all windows are closed. Do not
place your hand in the door handle when doing
this.
Setting convenience opening in the
Infotainment system
The function can be switched on/off in the Info-
tainment system > page 26.
ZA WARNING
— Never close the windows carelessly or in an
uncontrolled manner, because this increases
the risk of injury.
— For security reasons, the windows can only
be opened and closed with the remote con-
trol key at a maximum distance of approxi-
mately 6 ft (2 m) away from the vehicle.
When pressing the ff button, always watch
the windows while they are closing so that
no one is pinched in the window. The closing
process will stop immediately when the f&
button is released.
Correcting power window malfunctions
You can reactivate the one-touch up/down func-
tion if it malfunctions.
> Pull the power window switch up until the win-
dow is completely raised.
> Release the switch and pull it up again for at
least one second.
29
Page 36 of 304
Power top
— Visibility to the rear is limited when operat-
ing the power top. Avoid operating the top
while driving in reverse.
@) Note
—To prevent damage to the power top:
— do not store any objects in the power top
storage compartment.
— make sure there is enough space above
the vehicle when opening or closing the
power top.
0} Tips
— To prevent the vehicle battery from draining
unnecessarily, do not open or close the pow-
er top repeatedly when the engine is switch-
ed off.
— A message will appear in the instrument
cluster if there is a malfunction in the power
top > page 34.
— The power top can also be operated manual-
ly temporarily if there is a malfunction
= page 35, Power top emergency opera-
tion. An authorized Audi dealer or author-
ized Audi Service Facility should diagnose
and correct the cause of the malfunction as
soon as possible.
— If the vehicle is parked with the power top
open, the vehicle interior is not protected
from
damaging weather or unauthorized ac-
cess. Lock any items you leave behind in the
luggage compartment. Close the power top
before leaving the vehicle.
— The side windows automatically lower
slightly when opening or closing the power
top.
34
Power top convenience opening and closing
BFV-0271
Fig. 28 Turning the key to open and close
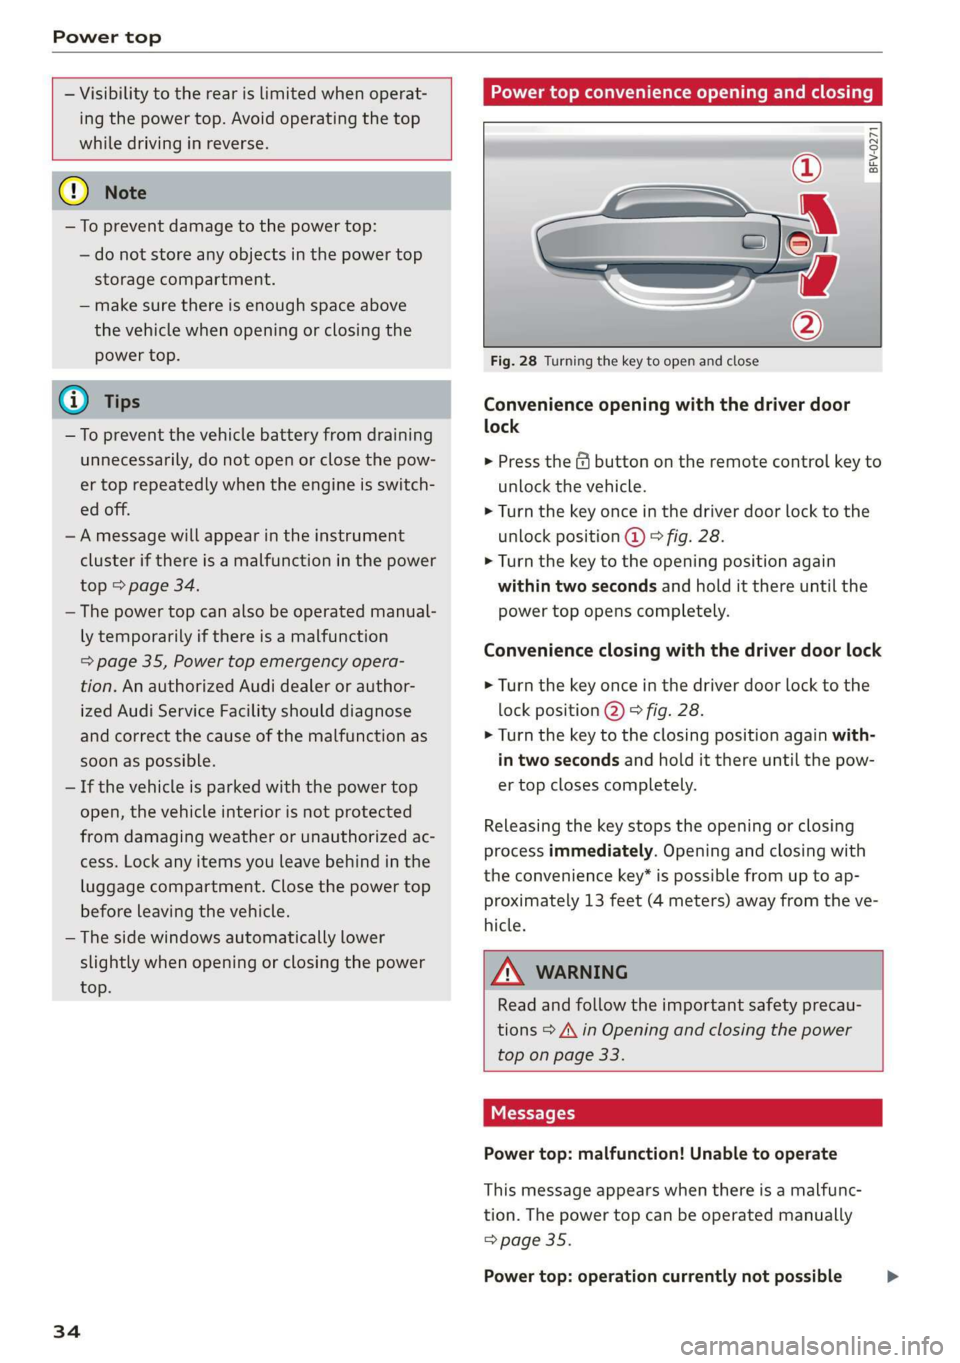
Convenience opening with the driver door
lock
> Press the & button on the remote control key to
unlock the vehicle.
> Turn the key once in the driver door lock to the
unlock position @ © fig. 28.
> Turn the key to the opening position again
within two seconds and hold it there until the
power top opens completely.
Convenience closing with the driver door lock
> Turn the key once in the driver door lock to the
lock position @) © fig. 28.
> Turn the key to the closing position again with-
in two seconds and hold it there until the pow-
er top closes completely.
Releasing the key stops the opening or closing
process immediately. Opening and closing with
the convenience key* is possible from up to ap-
proximately 13 feet (4 meters) away from the ve-
hicle.
ZA WARNING
Read and follow the important safety precau-
tions > A\ in Opening and closing the power
top on page 33.
Messages
Power top: malfunction! Unable to operate
This message appears when there is a malfunc-
tion. The power top can be operated manually
=> page 35.
Power top: operation currently not possible >
Page 42 of 304

Lights and Vision
Automatic headlights
You can adjust the following settings in the Auto-
matic
headlights menu:
Activation time - you can adjust if the headlights
switch on Early, Medium, or Late according to
the sensitivity of the light sensor.
Audi adaptive light* - you can switch adaptive
light On and Off.
Daytime running lights*
USA models: the daytime running lights can be
switched on or off using the MMI. Select On or
Off.
Canada models: this function cannot be switched
off. They activate automatically each time the ig-
nition is switched on. This menu item is shown
with a “gray background”.
Entry/exit lighting
The entry lighting function illuminates the area
outside the vehicle when you unlock the vehicle
when it is dark. To switch on the function, select
Entry/exit lighting.
The exit lighting function illuminates the area
outside the vehicle when you turn the ignition off
and open the driver's door when it is dark. To
switch on the function, select Entry/exit light-
ing.
The entry/exit lighting only works when it is dark
and the light switch is in the AUTO position.
Emergency flashers
1. 3 q 2
> im o
Fig. 39 Center console: emergency flasher button
The emergency flashers makes other drivers
aware of your vehicle in dangerous situations.
40
> Press the A button to switch the emergency
flashers on or off.
You can indicate a lane change or a turn when the
emergency flashers are switched on by using the
turn signal lever. The emergency flashers stop
temporarily.
The emergency flashers also work when the igni-
tion is turned off.
@ tips
You should switch the emergency flashers on
if
—
you are the last car in a traffic jam so that
all other vehicles approaching from behind
can see your vehicle
— your vehicle has broken down or you are
having an emergency
— your vehicle is being towed or if you are tow-
ing another vehicle
Interior lighting
Interior lighting
Fig. 40 Headliner: interior lighting
4 - Door contact switch. The interior lighting is
controlled automatically.
A switch is no longer needed to switch the read-
ing lights on. A swiping movement or a brief tap
on the light is all that is needed to switch the
light on or off. If you hold your finger on the
reading light when switching it on, this can dim
the light down to a certain level.
Interior lighting
There are other optional interior lighting func-
tions that are available. Several functions canbe >
Page 43 of 304

8S58012721BA
Lights and Vision
set in the Infotainment system. Select in the In-
fotainment system: MENU button > Vehicle > left
control button >Vehicle settings > Interior light-
ing.
sda ata t cela
BFV-0015
Fig. 41 Instrument illumination
The brightness of the instrument cluster and the
center console can be adjusted.
> Press the knob to release it.
> Turn the knob toward "-" or "+" to reduce or in-
crease the brightness.
> Press the knob again to return it to its original
position.
Vision
Adjusting the exterior mirrors
5
Ss
z
z o
Fig. 42 Driver's door: knob for the exterior mirrors
Turn the knob to the desired position:
CY/® - Adjusts the left/right exterior mirror.
Move the knob in the desired direction.
GA - Heats the mirror glass depending on the out-
side temperature.
SA - Folds the exterior mirrors*. In the Infotain-
ment system, you can select if the mirrors fold in
automatically when you lock the vehicle
=> page 26.
Front passenger's exterior mirror tilt
function*
To help you see the curb when backing into a
parking space, the surface of the mirror tilts
slightly. For this to happen, the knob must be in
the position for the front passenger's exterior
mirror.
You can adjust the tilted mirror surface by turn-
ing the knob in the desired direction. When you
move out of reverse and into another gear, the
new mirror position is stored and assigned to the
key you are using.
The mirror goes back into its original position
once you drive forward faster than 9 mph
(15 km/h) or turn the ignition off.
Z\ WARNING
Curved mirror surfaces (convex) enlarge the
field of vision. However, they make objects in
the mirror appear smaller and farther away.
You may estimate incorrectly when you use
these mirrors to gauge your distance from the
vehicles behind you when changing lanes,
which increases the risk of an accident.
Qo Note
If the mirror housing was moved by outside
forces (such as an impact when maneuver-
ing), you must use the power folding function
to fold the mirror all the way out. The mirror
housing must not be moved back into place
by hand because this could impair the func-
tion of the mirror mechanism.
G@) Tips
If the power adjusting function malfunctions,
the glass in both mirrors can be adjusted by
pressing on the edge of it by hand.
41
Page 51 of 304

8S58012721BA
Stowing and using
@) Note
— Read the operating manuals for the con-
nected devices.
—To reduce the risk of damage to the vehicle
electrical system, never attempt to charge
the vehicle battery by connecting accesso-
ries that provide power to the power sour-
ces.
— Do not connect any device whose network
class (voltage) does not match the network
class designed for the socket.
— Disconnect the connectors from the power
sources carefully to reduce the risk of dam-
aging them.
Storage
(ety miele (Te
Applies to: vehicles with cup holders
BFV-0075
S Ss
2
= eg a
Fig. 53 Center armrest folded up: cup holder
> To use the cup holder under the center armrest,
fold it upward > page 47.
> Fold the plastic bracket toward the rear, if nec-
essary > fig. 53.
ZX WARNING
Spilled hot liquid can increase the risk of acci-
dents and injuries.
— Never drive with containers that contain hot
liquid such as coffee or tea. The hot liquid
could spill and cause burns during a colli-
sion, sudden braking or other vehicle move-
ment. Spilled hot liquid can also increase
the risk of accidents and injuries.
— Only use soft containers in the cup holders.
Hard cups and glasses can increase the risk
of injury during a collision.
— Never use the cup holder or the adapter as
an ashtray because this is a fire hazard.
C) Note
Beverage containers in the cup holders should
always
have a lid. Otherwise, the liquid inside
could spill and cause damage to vehicle
equipment.
Additional storage
You will find a range of storage compartments
and holders at different locations in the vehicle.
— Compartments in the doors
— Storage area in the glove compartment. The
glove
compartment can be locked using the
mechanical key > page 23.
— Storage compartment under the center arm-
rest*
— Storage compartment between the seat backr-
ests
— Key compartment in the center console
— Storage compartment on the rear side of the
seat*. The compartment can hold a maximum
weight of 2.2 lbs (1 kg).
ZA WARNING
—To reduce the risk of injury, make sure the
covers for all storage compartments are al-
ways closed while driving.
— Only use the storage compartments in the
door trim panels to store small objects that
will not stick out of the compartment and
impair the function of the side airbags.
49
Page 52 of 304
Stowing and using
Luggage compartment
General information
All pieces of luggage or objects must be securely
fastened in the luggage compartment. Note the
following to maintain good vehicle handling:
> Distribute the load evenly in the luggage com-
partment.
> Stow heavy luggage as far forward in the lug-
gage compartment as possible.
» Use non-elastic cords attached to the tie-downs
to secure objects.
Z\ WARNING
— Loose objects can be thrown around the ve-
hicle interior during sudden driving or brak-
ing maneuvers, which increases the risk of
an accident. Always stow objects securely in
the luggage compartment and secure them
at the tie-downs. Use straps suitable for
heavy objects.
— If pieces of luggage or objects are secured
to the tie-downs with unsuitable or dam-
aged straps, this can increase the risk of in-
jury during braking maneuvers or accidents.
— When transporting heavy objects, the vehi-
cle characteristics will change due to the
shift in the center of gravity, which increases
the risk of an accident. You may need to
adapt your driving style and speed to the
current conditions.
— The cargo net is only strong enough to se-
cure light objects. Heavy objects are not ade-
quately secured. Attempting to secure heavy
objects increases the risk of injury.
— Never exceed the permitted axle and load
and vehicle weight > page 286.
— Never secure a child safety seat to the tie-
downs.
— Never leave your vehicle unattended, espe-
cially if the luggage compartment lid is
open. Children could enter the luggage com-
partment and close the luggage compart-
ment lid from the inside. This creates the
risk of fatal injury, since the children would
be locked in and may not be able to escape
by themselves.
sO
— Do not allow children to play in or on the ve-
hicle. Close and lock the luggage compart-
ment lid as well as all other doors when you
leave the vehicle.
— Never transport passengers in the luggage
compartment. Every passenger must be cor-
rectly secured with the safety belts in the
vehicle > page 182.
() Note
Make sure that the heating grid strips for the
rear window defogger are not damaged by
abrasive objects.
G) Tips
— The tire pressure must be adapted to the
load > page 250.
— You can purchase straps at specialty stores.
Pass-through with bag
Applies to: vehicles with pass-through and removable ski bag
BFV-0159
Fig. 55 Luggage compartment: securing the bag
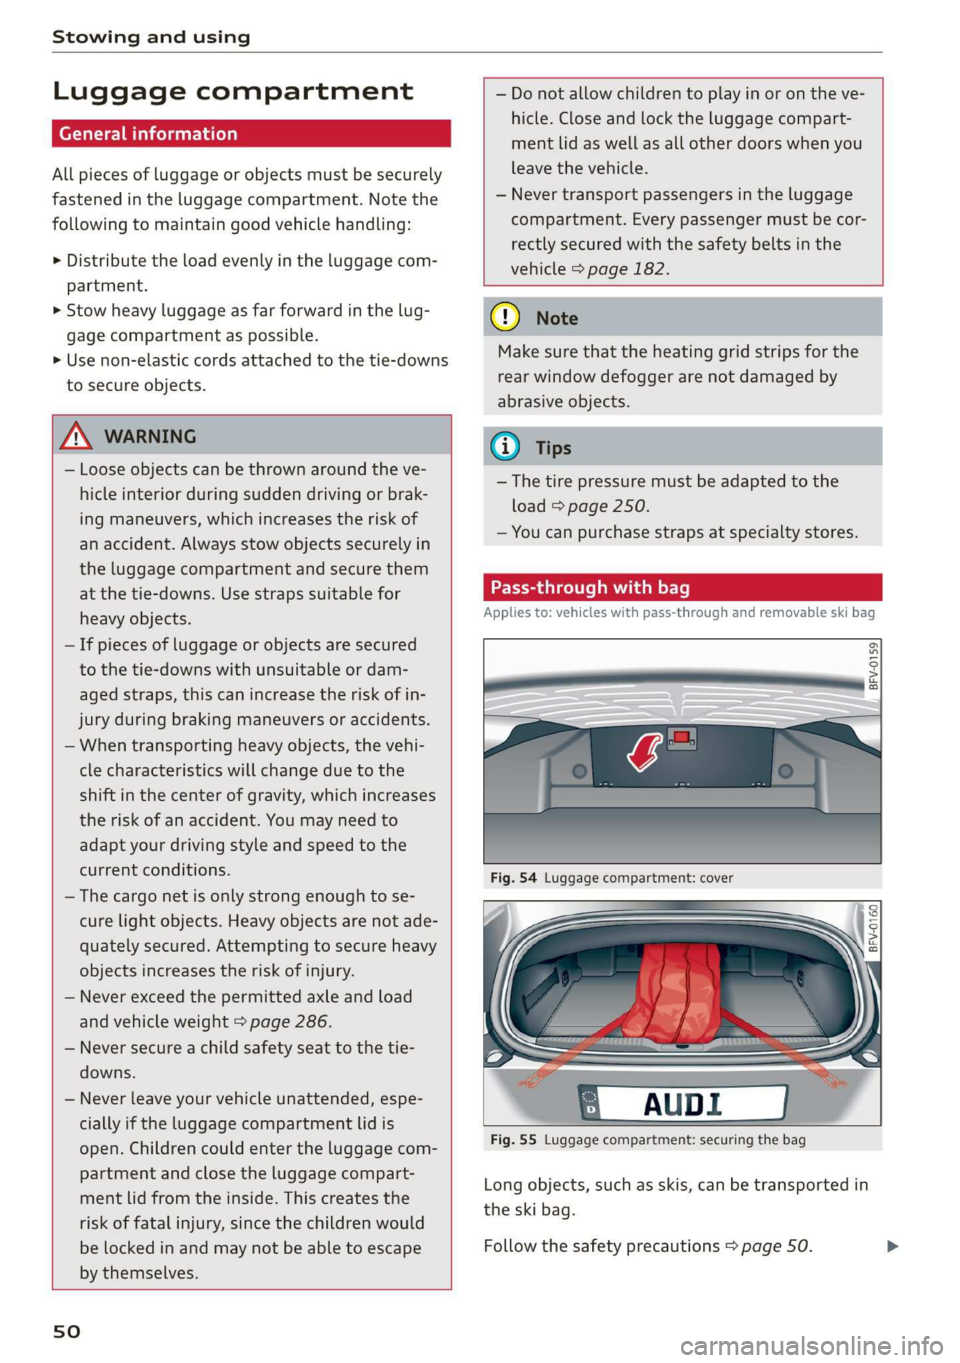
Long objects, such as skis, can be transported in
the ski bag.
Follow the safety precautions > page 50.