2019 AUDI TT ROADSTER bluetooth
[x] Cancel search: bluetoothPage 115 of 304

8S58012721BA
Telephone
Using the Audi phone
box
Applies to: vehicles with Audi phone box
You can charge your mobile device battery using
the Audi phone box. You can make calls through
the exterior antenna* on the vehicle. Using the
external antenna* helps when there is a low sig-
nal and also provides better reception quality.
Fig. 110 Storage compartment in the center armrest: Audi
phone box with connections
Requirement: a cell phone must be connected
through Bluetooth > page 110.
— Connecting to the external vehicle antenna:
lay the cell phone on the center of the cell
phone symbol in the Audi phone box with the
display facing up. Make sure there are no ob-
jects between the Audi phone box and the mo-
bile device > fig. 110.
— Charging a cell phone wirelessly: place a Qi-ca-
pable ) cell phone centered on the symbol in
the Audi phone box with the display facing up
> fig. 110. The cell phone will charge.
— Charging a cell phone using the USB adapter:
connect your cell phone to the Audi music inter-
face using a USB adapter cable @) © fig. 110.
You can charge your mobile device using specific
USB adapters > page 158, fig. 135.
an accident. Store objects securely while
driving.
—The mobile device may become hot during
wireless charging. Pay attention to the tem-
perature of your mobile device and be care-
ful when removing it from the Audi phone
box.
— An alternating magnetic field is used for
wireless charging. Maintain a minimum dis-
tance of approximately 2.4 in (6 cm) to the
Audi phone box charging plate. The thresh-
olds for prolonged exposure at this distance
comply with ICNIRP1998. Therefore, inter-
actions such as irritation of sensory organs,
malfunctions of active implants (such as
pacemakers, infusion pumps, or neurosti-
mulators) or effects on passive implants
(such as prosthetic limbs) is highly unlikely.
If you have an implant, consult a medical
specialist if you have any questions.
ZA WARNING
— Loose objects can be thrown around the ve-
hicle interior during sudden driving or brak-
ing maneuvers, which increases the risk of
D_ The Qi standard makes it possible to charge your mobile
device wirelessly.
oO Note
Applicable to U.S.A.
Operation of the Audi phone box is subject to
the following requirements of the Federal
Communications Commission:
— This is a CONSUMER device.
— BEFORE USE, you MUST REGISTER THIS DE-
VICE with your wireless provider and have
your
provider’s consent. Most wireless pro-
viders consent to the use of signal boosters.
Some providers may not consent to the use
of this device on their network. If you are
unsure, contact your service provider.
— You MUST operate this device with approved
antennas
and cables as specified by the
manufacturer. Antennas MUST be installed
at least 20 cm (8 inches) from any person.
— You MUST cease operating this device im-
mediately if requested by the FCC or a li-
censed wireless service provider.
— WARNING: E911 location information may
not be provided or may be inaccurate for
calls served by using this device.
113
Page 117 of 304
8S8012721BA
Telephone
The device name for your cell phone is displayed
in the Telephone menu, for example text mes-
sage (myPhone) © fig. 111.
Dialing a phone number
Applies to: vehicles with telephone
(eT UME)
Please enter a telephone number.
BA) |e4
O800AUDISERVI
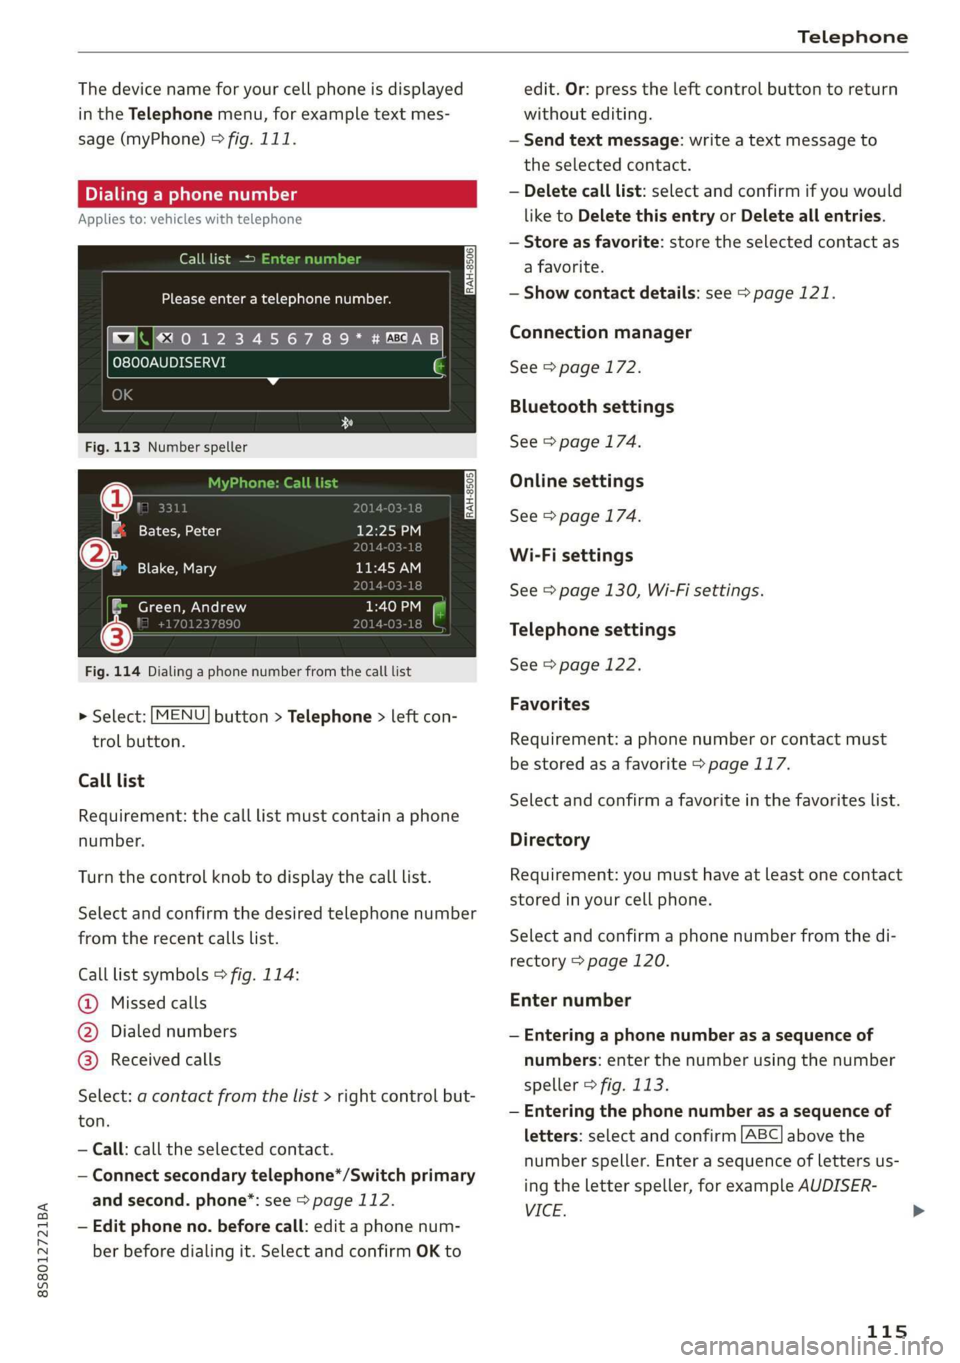
Fig. 113 Number speller
gz eat a lg 12:25 P
01 18
®@ Blake, Mary ne WN
ar)
: Green, Andrew pee Ten |
i! 170123789 2014-03-18
Fig. 114 Dialing a phone number from the call list
> Select: [MENU] button > Telephone > left con-
trol button.
Call list
Requirement: the call list must contain a phone
number.
Turn the control knob to display the call list.
Select and confirm the desired telephone number
from the recent calls list.
Call list symbols > fig. 114:
@ Missed calls
@ Dialed numbers
@ Received calls
Select: a contact from the list > right control but-
ton.
— Call: call the selected contact.
— Connect secondary telephone*/Switch primary
and second. phone”: see > page 112.
— Edit phone no. before call: edit a phone num-
ber before dialing it. Select and confirm OK to
edit. Or: press the left control button to return
without editing.
— Send text message: write a text message to
the selected contact.
— Delete call list: select and confirm if you would
like to Delete this entry or Delete all entries.
— Store as favorite: store the selected contact as
a favorite.
— Show contact details: see > page 121.
Connection manager
See > page 172.
Bluetooth settings
See > page 174.
Online settings
See > page 174.
Wi-Fi settings
See > page 130, Wi-Fi settings.
Telephone settings
See > page 122.
Favorites
Requirement: a phone number or contact must
be stored as a favorite > page 117.
Select and confirm a favorite in the favorites list.
Directory
Requirement: you must have at least one contact
stored in your cell phone.
Select and confirm a phone number from the di-
rectory > page 120.
Enter number
— Entering a phone number as a sequence of
numbers: enter the number using the number
speller > fig. 113.
— Entering the phone number as a sequence of
letters: select and confirm
ABC above the
number speller. Enter a sequence of letters us-
ing
the letter speller, for example AUDISER-
VICE.
115
Page 118 of 304
Telephone
— Dialing a phone number: select and confirm &.
Or: push the control knob down. Select and
confirm OK.
— Deleting individual characters: select and con-
firm &l.
— Deleting all characters entered at once: turn
the control knob with the character selection to
land press and hold the control knob. Or: se-
lect the right control button > Clear input field.
Tone sequences (DTMF) can be entered directly
into the speller during a phone call.
Accepting or ending a call
Applies to: vehicles with telephone
— Accepting a call: select and confirm Answer.
— Declining a call: select and confirm Decline.
— Muting the active call: select and confirm
Mute.
— Ending a phone call/cancel dialing: select and
confirm End call. Or: press the control knob.
Accepting another call: see > page 116, During a
phone call.
Caller information: the name, phone number or
Unknown appears in the Infotainment system
display depending on if the caller has been stored
in the directory and if the phone number has
been transmitted. A picture may also be dis-
played, depending on whether you have assigned
a picture to a contact in your directory and if it
was transferred to your MMI. You can find out if
your mobile device supports this function from
your mobile device network provider, your mobile
device owner's manual, or at www.audiusa.com/
bluetooth.
@) Tips
The radio or media playback is muted during a
phone call.
During a phone call
Applies to: vehicles with telephone
Requirement: there must be a call in progress.
> Press the right control button.
116
The following options may be possible during a
call depending on the mobile device being used
and the type of connection:
— Making an additional call: select: Find contact
> Call list/Directory/Favorites > an entry from
the list.
— Accepting an incoming call when there is an
active call and a call on hold: select Replace.
The active call is replaced with the incoming
call.
— Answering an additional call: if there is an in-
coming call while another call is active, you can
select Answer to put the existing call on hold
and answer the incoming call. If you select De-
cline, the incoming call will be declined.
Additional functions include:
Mute: if you select and confirm this function, the
other person on the phone cannot hear you. You
will still be able to hear the other person.
Hold call/Resume: you can place the existing call
on hold and resume it again. To resume the call,
select and confirm the call you would like to re-
sume.
Transfer call to mobile device*: select and con-
firm
Transfer call to mobile device to transfer
the existing call from the MMI to your cell phone.
Switch to hands-free mode*: Requirement: you
must have a phone call in progress on your cell
phone. Select and confirm Switch to hands-free
mode to transfer the call from your cell phone to
the MMI.
Swap call: alternate between two phone calls
while one of the calls is on hold. Selecting End
call will end the active phone call. A phone call
on hold can be resumed using the right control
button > Resume.
Add to conference: a party on hold and up to five
active parties (depending on the network) can be
added to a conference call. To make an additional
call, put all participants in the current conference
call on hold using the right control button > Hold
conference. Press the left control button. Select
and confirm Call list/Directory/Favorites > an
entry from the list. You can add called contacts
to the conference using the right control button >
Page 119 of 304
8S8012721BA
Telephone
> Add to conference. Resume takes all parties off
hold.
Multi-party calling: select the right control but-
ton > Telephone settings > Call options. When
the function is switched on ¥ you can accept an
additional call using Answer or decline a call us-
ing Decline. When the function is switched off,
you can Replace the call or Decline.
Connection manager: see > page 172.
Telephone settings: see > page 122.
@ Tips
— To be notified of an incoming call during a
phone call, the call waiting function in your
cell phone must be switched on when using
the hands-free profile (Handsfree).
— You can obtain more information from your
mobile device service provider or from your
mobile device user guide.
— When leaving the vehicle, the Bluetooth
connection to the mobile device will auto-
matically disconnect. Depending on your
mobile device, phone calls in progress may
be automatically redirected from the MMI
to your mobile device so that you can con-
tinue the call on your phone.
— The display of an incoming phone callin the
Infotainment system display may still be
visible for a few seconds depending on the
cell phone in use. Using the Replace or De-
cline functions may then end the active
phone call.
Favorites
Applies to: vehicles with telephone
Up to 50 contacts, in addition to the voicemail
number, can be stored in any order in the favor-
ites list.
> Select: [MENU] button > Telephone > left con-
trol button.
— Storing an existing phone number as a favor-
ite: select and confirm Call list/Directory. Se-
lect and confirm a contact or phone number
from the list. Select: right control button >
Store as favorite. Enter a name for the favorite
or select a suggestion. Select and confirm Save.
— Renaming a stored favorite: select and confirm
Favorites > select a favorite from the list. Se-
lect the right control button > Rename favor-
ite.
— Moving a stored favorite: select and confirm
Favorites > select a favorite from the list. Se-
lect the right control button > Move favorite.
Select and confirm the location of the selected
favorite.
— Deleting a stored favorite: select and confirm
Favorites > select a favorite from the list. Se-
lect: right control button > Delete favorite >
Delete this entry or Delete all entries.
Messages
Text messages
Applies to: cell phones with Bluetooth Message Access Profile
(MAP)
Depending on the mobile device being used and
the mobile network contract, you may be able to
receive and send text messages using the MMI.
Requirement
A cell phone must be connected to the MMI via
Bluetooth MAP (Message Access Profile)
=> page 110.
> Select: [MENU] button > Telephone > left con-
trol button > text message (myPhone)/text
message (secondary phone)*.
Inbox
All received text messages are displayed.
Sent
All sent text messages are displayed.
Outbox
All text messages to be sent are displayed.
Drafts
Displays all text messages that have not yet been
sent and stored text messages.
Deleted
Displays all deleted text messages.
117
Page 120 of 304
Telephone
@ Tips
— Please note that you may have to activate
the receiving and sending of text messages
in your cell phone depending on the SIM
card being used (for example, when using a
Multi-SIM). You can obtain more informa-
tion from your mobile device service provid-
er or from your mobile device user guide.
— For more information on supported mobile
devices, visit www.audiusa.com/bluetooth
or contact an authorized Audi dealer or au-
thorized Audi Service Facility.
— You need a mobile device with Message Ac-
cess Profile that also supports the sending
function to be able to send text messages
through the MMI.
Write text message
Applies to: cell phones with Bluetooth Message Access Profile
(MAP)
> Select: [MENU] button > Telephone > left con-
trol button > text message (myPhone)/text
message (secondary phone)*.
Write new text message
Select and confirm the desired template from the
list. Enter a recipient. Select and confirm Send.
Reply*
Select and confirm the desired template from the
list. Select and confirm Send.
Message options
Applies to: cell phones with Bluetooth Message Access Profile
(MAP)
> Select: [MENU] button > Telephone > left con-
trol button > text message (myPhone)/text
message (secondary phone)* > Inbox/Sent/
Outbox > right control button.
The following options may be available depend-
ing on the selected menu.
) Not available in all languages.
118
Reply*
A reply can be sent for the selected message in
the Inbox.
Forward
The selected text message can be forwarded to a
different recipient.
Send again*
The selected text message can be resent.
Delete this text message*
The selected text message can be deleted.
Read out)
You can have the MMI read an open text mes-
sage.
Text messaging settings*
To display when a new text message is received,
enable the Text message notifications. New text
messages are indicated with an envelope & in
the Infotainment system display status line.
Connection manager
See > page 172.
Bluetooth settings
See > page 174.
Online settings
See > page 174.
Wi-Fi settings
See > page 130, Wi-Fi settings.
Telephone settings
See > page 122.
@ Tips
Messages that are deleted in the MMI are also
deleted in the mobile device automatically.
Page 121 of 304
8S8012721BA
Telephone
Applies to: cell phones with Bluetooth Message Access Profile
(MAP)
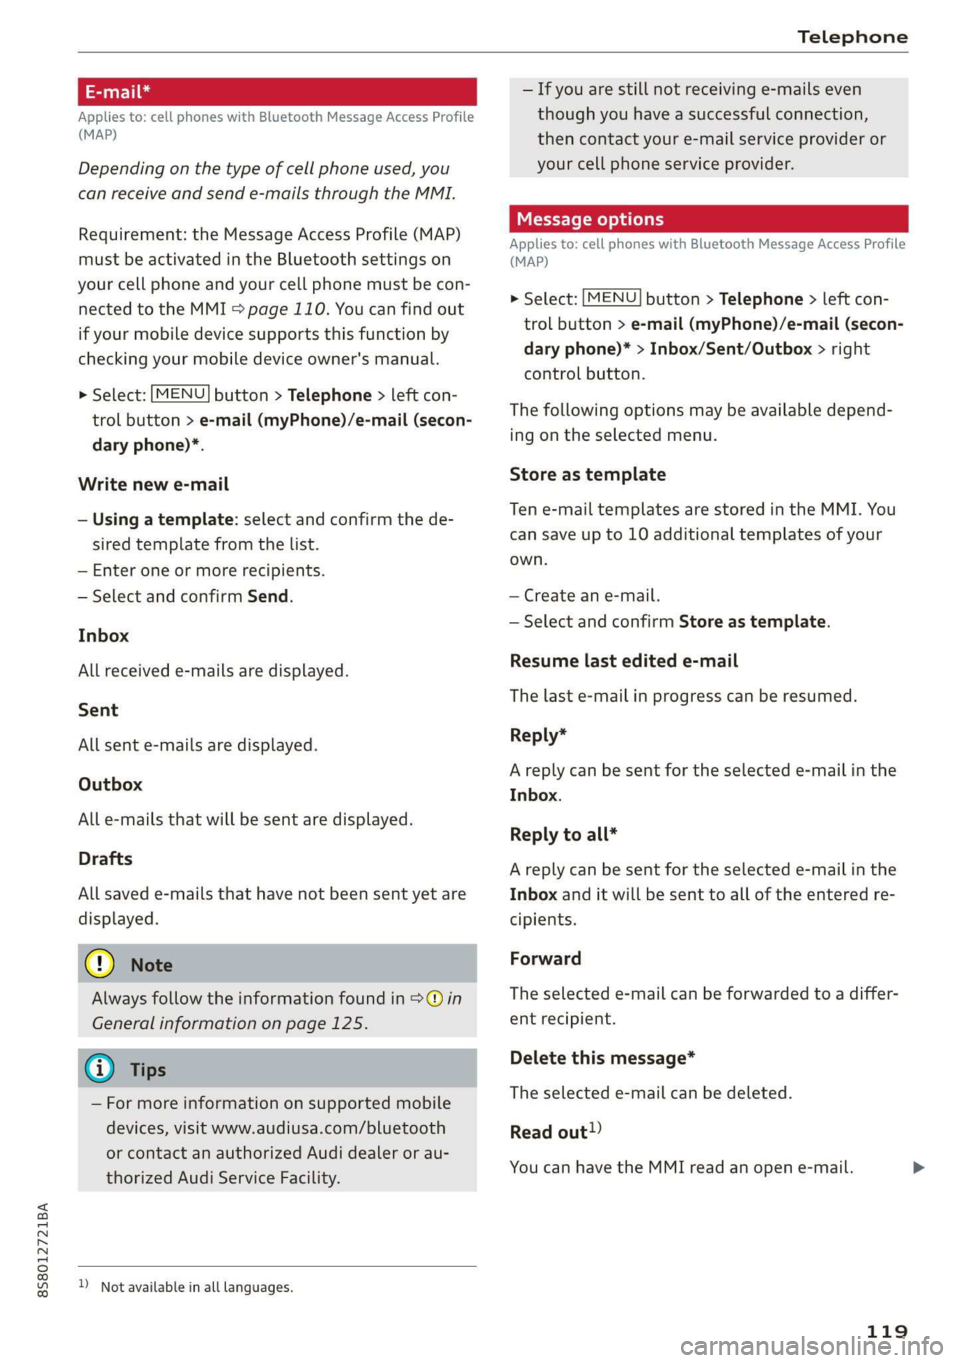
Depending on the type of cell phone used, you
can receive and send e-mails through the MMI.
Requirement: the Message Access Profile (MAP)
must be activated in the Bluetooth settings on
your cell phone and your cell phone must be con-
nected to the MMI > page 110. You can find out
if your mobile device supports this function by
checking your mobile device owner's manual.
> Select: [MENU] button > Telephone > left con-
trol button > e-mail (myPhone)/e-mail (secon-
dary phone)*.
Write new e-mail
— Using a template: select and confirm the de-
sired template from the list.
— Enter one or more recipients.
— Select and confirm Send.
Inbox
All received e-mails are displayed.
Sent
All sent e-mails are displayed.
Outbox
All e-mails that will be sent are displayed.
Drafts
All saved e-mails that have not been sent yet are
displayed.
@) Note
Always follow the information found in >@ in
General information on page 125.
@ Tips
— For more information on supported mobile
devices, visit www.audiusa.com/bluetooth
or contact an authorized Audi dealer or au-
thorized Audi Service Facility.
) Not available in all languages.
— If you are still not receiving e-mails even
though you have a successful connection,
then contact your e-mail service provider or
your cell phone service provider.
Message options
Applies to: cell phones with Bluetooth Message Access Profile
(MAP)
> Select: [MENU] button > Telephone > left con-
trol button > e-mail (myPhone)/e-mail (secon-
dary phone)* > Inbox/Sent/Outbox > right
control button.
The following options may be available depend-
ing on the selected menu.
Store as template
Ten e-mail templates are stored in the MMI. You
can save up to 10 additional templates of your
own.
— Create an e-mail.
— Select and confirm Store as template.
Resume last edited e-mail
The last e-mail in progress can be resumed.
Reply*
A reply can be sent for the selected e-mail in the
Inbox.
Reply to all*
A reply can be sent for the selected e-mail in the
Inbox and it will be sent to all of the entered re-
cipients.
Forward
The selected e-mail can be forwarded to a differ-
ent recipient.
Delete this message*
The selected e-mail can be deleted.
Read out)
You can have the MMI read an open e-mail.
119
Page 122 of 304
Telephone
E-mail settings*
To display when a new e-mail is received, activate
the E-mail notifications. New e-mails are indicat-
ed with an envelope & in the Infotainment sys-
tem display status line.
Connection manager
See > page 172.
Bluetooth settings
See > page 174.
Online settings
See > page 174.
Wi-Fi settings
See > page 130, Wi-Fi settings.
Telephone settings
See > page 122.
G) Tips
Messages that are deleted in the MMI are also
automatically deleted in the connected cell
phone.
Listening to voicemail
Applies to: vehicles with telephone
MENU > Select: button > Telephone > left con-
trol button. Select and confirm Call list/Direc-
tory/Favorites > Voicemail.
— Entering the voicemail number: enter the de-
sired number. Select and confirm OK.
— Dialing the voicemail number: select and con-
firm
Voicemail.
@ Tips
— This service must be set up and activated in
advance by the cell phone service provider.
You can obtain more information from your
cell phone service provider.
— The voicemail number depends on the cell
phone service provider.
120
Emergency call functions
Applies to: vehicles with telephone
MENU > Select: button > Telephone > left con-
trol button > Dial number > Enter emergency
call number (for example, 911) > OK.
ZA WARNING
— Because your phone works with radio sig-
nals, a connection cannot be guaranteed un-
der all circumstances. Do not rely on only
your phone when it comes to essential com-
munication (such as a medical emergency).
— Always follow the instructions given by the
emergency personnel during an emergency
call and only end the call when they instruct
you to do so.
@) Tips
Emergency numbers are not
the same every-
where. Find out which emergency number is
used in your current location.
Directory
Opening the directory
Applies to: vehicles with telephone
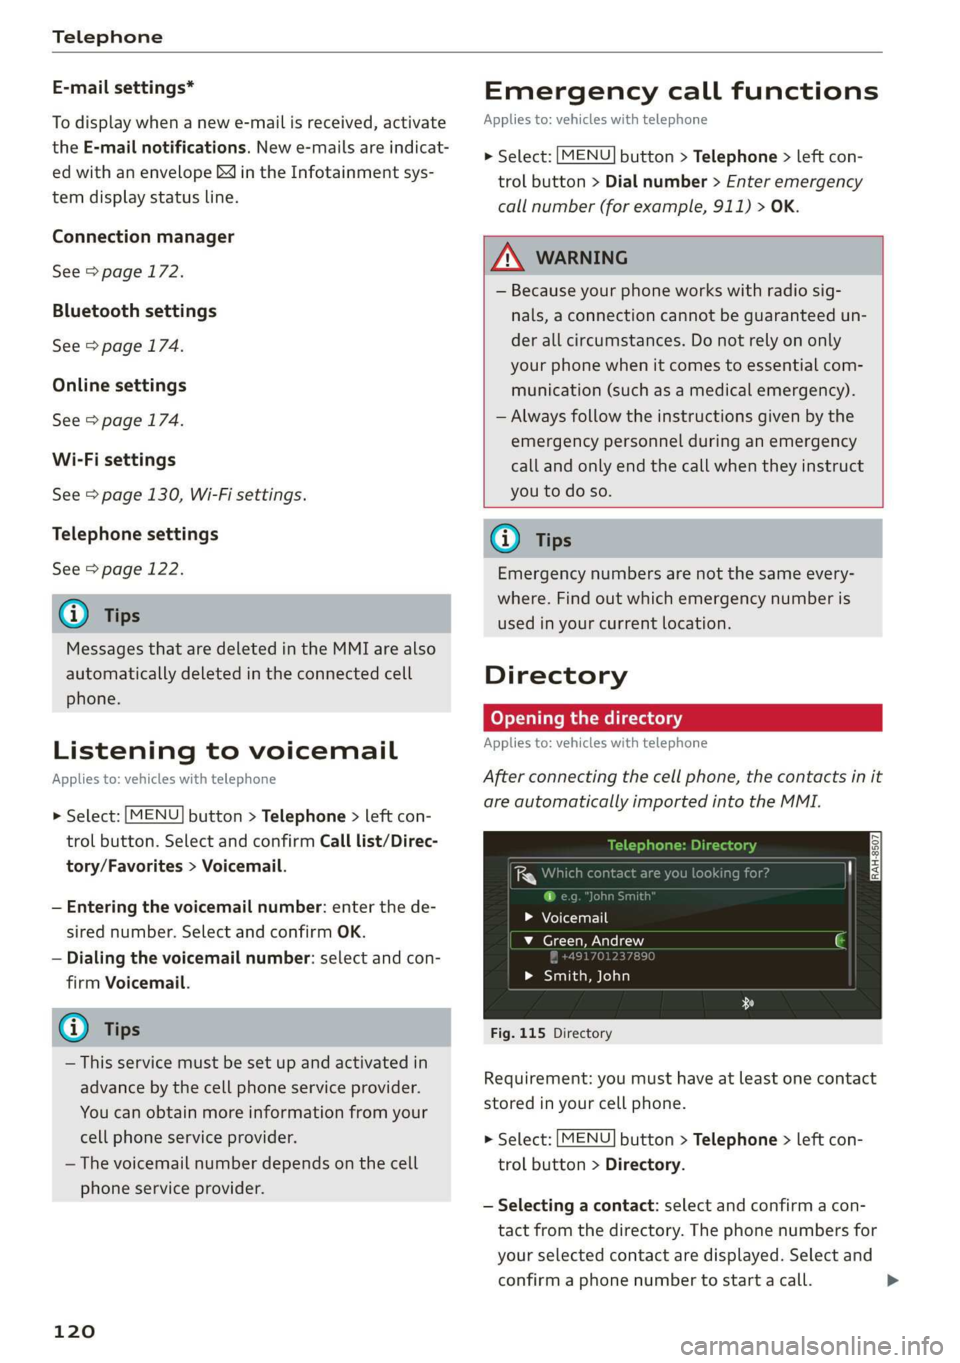
After connecting the cell phone, the contacts in it
are automatically imported into the MMI.
uno
i ce h
> Voicemail
v_ Green, Andrew
> Smith, John
Fig. 115 Directory
Requirement: you must have at least one contact
stored in your cell phone.
> Select: [MENU] button > Telephone > left con-
trol button > Directory.
— Selecting a contact: select and confirm a con-
tact from the directory. The phone numbers for
your selected contact are displayed. Select and
confirm a phone number to start a call. >
Page 123 of 304

8S8012721BA
Telephone
— Free text search for a contact: see > page 100.
Contacts are displayed in alphabetical order and
can be sorted by first or last name > page 123.
The directory can be opened through the Tele-
phone* menu as well as through the Navigation*
menu.
G) Tips
— Check for a possible request to synchronize
on your cell phone. Requests to synchronize
the directory must be confirmed so that
your cell phone contacts can be loaded into
the MMI.
— The contact display in the MMI depends on
the mobile device being used. For more in-
formation on supported mobile devices, vis-
it www.audiusa.com/bluetooth or contact
an authorized Audi dealer or authorized Au-
di Service Facility.
— The directory from the cell phone with the
active connection will always be displayed.
— The contacts from the mobile device may
not be transferred in alphabetical order. If
there are too many entries, contacts with
different first letters may be missing in the
MMI.
— The contacts in the local MMI memory are
always visible and can be accessed by other
users.
Free text search for contacts
Applies to: vehicles with telephone
> Select: [MENU] button > Telephone > left con-
trol button > Directory.
> To limit the search, enter the initials of the con-
tact being searched with each initial separated
by a space. Enter additional letters if necessary.
> Select and confirm a contact from the directory.
The phone numbers for the selected contact are
displayed.
> To make the call, select and confirm a phone
number.
@) Tips
— You can scroll through long lists quickly by
turning the control knob quickly. The scroll-
ing speed depends on the number of list en-
tries.
— Additional information on free text searches
can be found under = page 100.
Showing contact details*
Applies to: vehicles with telephone
aCe yeal ban)
"8 0049841123456
001701239873
{g [email protected]
Fig. 116 Diagram: showing contact details
> Select: [MENU] button > Telephone > left con-
trol button. Select and confirm Directory > a
contact from the directory.
> Select: right control button > Show contact de-
tails.
— Calling: select and confirm the desired tele-
phone number.
— Adding a navigation destination: to start navi-
gation*, select and confirm the desired ad-
dress. Select and confirm Start route guidance.
Press the right control button to open additional
options
for the contact details.
— Read out contact: the MMI automatically cre-
ates a name tag that can be read aloud for each
entry in the directory.
— Store as favorite: see > page 117, Favorites.
— Send text message”: you can send a text mes-
sage to the selected contact > page 118
— Delete contact: the selected contact can be de-
leted.
@) Tips
— Contacts edited in the MMI directory cannot
be automatically updated in the connected
cell phone. Audi recommends editing cell
phone contacts directly in the cell phone.
— Only the contacts in the local MMI memory
can be edited or deleted.
121