Page 89 of 106
Periodic maintenance an d a djustment
6-31
6
EAU84650
Replacin g the fusesThe fuse boxes and individual fuses
are located under the rider seat (see
page 3-27) and behind panel A (see
page 6-9).
To access fuse box 1, the main fuse,
and the ABS motor fuse, remove the
rider seat. (See page 3-27.)
TIPTo access the ABS motor fuse, remove
the starter relay cover by pulling it up-
ward.
To access fuse box 2, fuse box 3, the
brake light fuse, and the cruise control
fuse, remove panel A. (See page 6-9.)
1. ABS motor spare fuse
2. ABS motor fuse
3. Fuse box 1
4. Main fuse
1 2
34
1. Fuel injection system fuse
2. ABS solenoid fuse
3. Electronic throttle valve fuse
4. Backup fuse (for clock and immobilizer sys-tem)
5. Heater fuse
6. Spare fuse
1234
65
1. Starter relay cover
2. ABS motor spare fuse
3. ABS motor fuse
1. Fuse box 2
2. Fuse box 3
3. Cruise control fuse
4. Brake light fuse
2 3
1
2
3
41
UBD5E0E0.book Page 31 Wednesday, April 25, 2018 2:23 PM
Page 90 of 106

Periodic maintenance an d a djustment
6-32
6
If a fuse is blown, replace it as follows.1. Turn the main switch off and turn off the electrical circuit in ques-
tion.
2. Remove the blown fuse, and then install a new fuse of the specified
amperage. WARNING! Do not
use a fuse of a hi gher ampera ge
ratin g than recommen ded to avoi
d causin g extensive d am-
a g e to the electrical system an d
possi bly a fire.
[EWA15132]
3. Turn the main switch on and turn
on the electrical circuit in question
to check if the device operates.
4. If the fuse immediately blows again, have a Yamaha dealer
check the electrical system.
1. Signaling system fuse
2. ABS control unit fuse
3. Accessory fuse
4. Ignition fuse
5. Hazard fuse
6. Terminal fuse 1
7. Terminal fuse 2
8. Headlight fuse
9. Right radiator fan motor fuse
10.Left radiator fan motor fuse
11.Spare fuse
11 1
2
3
11
10 9876 5 4
Specifie
d fuses:
Main fuse: 50.0 A
ABS motor fuse:
30.0 A
Cruise control fuse: 1.0 A
Brake light fuse: 1.0 A
Specifie d fuses (fuse box 1):
Fuel injection system fuse: 25.0 A
ABS solenoid fuse: 20.0 A
Electronic throttle valve fuse:
7.5 A
Backup fuse: 7.5 A
Heater fuse: 10.0 A
Specifie d fuses (fuse box 2):
Signaling system fuse:
7.5 A
ABS control unit fuse:
5.0 A
Accessory fuse: 5.0 A
Ignition fuse: 15.0 A
Specifie d fuses (fuse box 3):
Hazard fuse: 7.5 A
Te r m i n a l f u s e 1 : 2.0 A
Te r m i n a l f u s e 2 :
2.0 A
Radiator fan motor fuse: 10.0 A × 2
Headlight fuse: 10.0 A
UBD5E0E0.book Page 32 Wednesday, April 25, 2018 2:23 PM
Page 91 of 106

Periodic maintenance an d a djustment
6-33
6
EAU72980
Vehicle li ghtsThis model is equipped with full-LED
lighting. There are no user replaceable
bulbs.
If a light does not come on, check the
fuses and then have a Yamaha dealer
check the vehicle.NOTICE
ECA16581
Do not affix any type of tinte d film or
stickers to the head lig ht lens.
EAU84980
Sta bility barThis model is equipped with a stability
bar.NOTICE
ECA26440
The stab ility bar was not d esigne d to
support the wei ght of the vehicle. Do
not use the sta bility bar as a jackin g
point.
EAU25872
Trou bleshootin gAlthough Yamaha motorcycles receive
a thorough inspection before shipment
from the factory, trouble may occur
during operation. Any problem in the
fuel, compression, or ignition systems,
for example, can cause poor starting
and loss of power.
The following troubleshooting charts
represent quick and easy procedures
for checking these vital systems your-
self. However, should your motorcycle
require any repair, take it to a Yamaha
dealer, whose skilled technicians have
the necessary tools, experience, and
know-how to service the motorcycle
properly.
Use only genuine Yamaha replace-
ment parts. Imitation parts may look
like Yamaha parts, but they are often
inferior, have a shorter service life and
can lead to expensive repair bills.
WARNING
EWA15142
When checkin g the fuel system, d o
not smoke, an d make sure there are
no open flames or sparks in the ar-
ea, inclu din g pilot li ghts from water
1. Stability bar
1
UBD5E0E0.book Page 33 Wednesday, April 25, 2018 2:23 PM
Page 92 of 106
Periodic maintenance an d a djustment
6-34
6 heaters or furnaces. Gasoline or
g
asoline vapors can i gnite or ex-
plo de, causin g severe injury or prop-
erty damag e.
UBD5E0E0.book Page 34 Wednesday, April 25, 2018 2:23 PM
Page 93 of 106

Periodic maintenance an d a djustment
6-35
6
EAU42505
Trou bleshootin g chartsStartin g prob lems or poor en gine performance
Check the fuel level in
the fuel tank.1. Fuel
There is enough fuel.
There is no fuel.
Check the battery.
Supply fuel.
The engine does not start.
Check the battery.
Remove the spark plugs
and check the electrodes.3. Ignition
Wipe off with a dry cloth and correct the
spark plug gaps, or replace the spark plugs.
Have a Yamaha dealer check the vehicle.
Operate the electric starter.4. Compression
There is compression.
There is no compression.
The engine does not start.
Have a Yamaha dealer check the vehicle.Have a Yamaha dealer check the vehicle.
The engine does not start.
Check the compression.
Operate the electric starter.2. Battery
The engine turns over
quickly.
The engine turns over
slowly.
The engine does not start.
Check the ignition.
The battery is good.Check the battery lead connections,
and have a Yamaha dealer charge
the battery if necessary.
DryWet
Operate the electric starter.
UBD5E0E0.book Page 35 Wednesday, April 25, 2018 2:23 PM
Page 94 of 106

Periodic maintenance an d a djustment
6-36
6 En
gine overheatin g
WARNING
EWAT1041
Do not remove the ra diator cap when the en gine an d ra diator are hot. Scal din g hot flui d an d steam may be
b lown out un der pressure, which coul d cause serious injury. Be sure to wait until the en gine has coole d.
Place a thick ra g, like a towel, over the ra diator cap, an d then slowly rotate the cap counterclockwise to the
d etent to allow any resi dual pressure to escape. When the hissin g soun d has stoppe d, press d own on the cap
while turnin g it counterclockwise, an d then remove the cap.TIPIf coolant is not available, tap water can be temporarily used instead, provided that it is changed to the recommended cool-
ant as soon as possible.
Wait until the
engine has cooled.
Check the coolant level in the
reservoir and radiator.
The coolant level
is OK.The coolant level is low.
Check the cooling system
for leakage.
Have a Yamaha dealer checkand repair the cooling system.Add coolant. (See TIP.)
Start the engine. If the engine overheats again,
have a
Yamaha dealer check
and repair the cooling system.
There is
leakage.
There is
no leakage.
UBD5E0E0.book Page 36 Wednesday, April 25, 2018 2:23 PM
Page 95 of 106

Motorcycle care and stora ge
7-1
7
EAU37834
Matte color cautionNOTICE
ECA15193
Some mo dels are equipped with
matte colored finished parts. Be
sure to consult a Yamaha dealer for
a d vice on what prod ucts to use be-
fore cleanin g the vehicle. Usin g a
b rush, harsh chemical pro ducts or
cleanin g compoun ds when cleanin g
these parts will scratch or damag e
their surface. Wax also shoul d not
b e applie d to any matte colored fin-
ishe d parts.
EAU83443
CareFrequent, thorough cleaning of the ve-
hicle will not only enhance its appear-
ance but also will improve its general
performance and extend the useful life
of many components. Washing, clean-
ing, and polishing will also give you a
chance to inspect the condition of the
vehicle more frequently. Be sure to
wash the vehicle after riding in the rain
or near the sea, because salt is corro-
sive to metals.TIP The roads of heavy snowfall areas
may be sprayed with salt as a de-
icing method. This salt can stay on
the roads well into spring, so be
sure to wash the underside and
chassis parts after riding in such
areas.
Genuine Yamaha care and main-
tenance products are sold under
the YAMALUBE brand in many
markets worldwide.
See your Yamaha dealer for addi-
tional cleaning tips.
NOTICE
ECA26280
Improper cleanin g can cause cos-
metic an d mechanical damag e. Do
not use: high-pressure washers or
steam-jet cleaners. Excessive
water pressure may cause wa-
ter seepag e and d eterioration of
wheel bearin gs, brakes, trans-
mission seals an d electrical de-
vices. Avoi d hi gh-pressure
d eter gent applications such as
those availa ble in coin-operate d
car washers.
harsh chemicals, inclu din g
stron g aci dic wheel cleaners,
especially on spoke or ma gne-
sium wheels.
harsh chemicals, a brasive
cleanin g compoun ds, or wax on
matte-finishe d parts. Brushes
can scratch an d damag e the
matte-finish, use soft spon ge or
towel only.
towels, spon ges, or brushes
contaminate d with a brasive
cleanin g prod ucts or stron g
UBD5E0E0.book Page 1 Wednesday, April 25, 2018 2:23 PM
Page 96 of 106

Motorcycle care and stora ge
7-2
7 chemicals such as, solvents,
g
asoline, rust removers, brake
flui d, or antifreeze, etc.
Before washin g
1. Park the vehicle out of direct sun- light and allow it to cool. This will
help avoid water spots.
2. Make sure all caps, covers, elec- trical couplers and connectors are
tightly installed.
3. Cover the muffler end with a plas- tic bag and a strong rubber band.
4. Pre-soak stubborn stains like in- sects or bird droppings with a wet
towel for a few minutes.
5. Remove road grime and oil stains with a quality degreasing agent
and a plastic-bristle brush or
sponge. NOTICE: Do not use
d eg reasin g a gent on areas re-
quirin g lu brication such as
seals, gaskets, an d wheel axles.
Follow prod uct instructions.
[ECA26290]
Washing
1. Rinse off any degreaser and spray down the vehicle with a garden
hose. Use only enough pressure
to do the job. Avoid spraying wa-
ter directly into the muffler, instru-
ment panel, air inlet, or other inner
areas such as underseat storage
compartments.
2. Wash the vehicle with a quality au- tomotive-type detergent mixed
with cool water and a soft, clean
towel or sponge. Use an old tooth-
brush or plastic-bristle brush for
for hard-to-reach places.
NOTICE: Use col d water if the
vehicle has b een exposed to
salt. Warm water will increase
salt’s corrosive properties.
[ECA26301]
3. For windshield-equipped vehicles: Clean the windshield with a soft
towel or sponge dampened with
water and a pH neutral detergent.
If necessary, use a high-quality
windshield cleaner or polish for
motorcycles. NOTICE: Never use
any stron g chemicals to clean
the win dshiel d. A dditionally, some cleanin
g compoun ds for
plastic may scratch the win d-
shiel d, so b e sure to test all
cleanin g prod ucts before gen-
eral application.
[ECA26310]
4. Rinse off thoroughly with clean water. Be sure to remove all deter-
gent residues, as they can be
harmful to plastic parts.
After washin g
1. Dry the vehicle with a chamois or absorbent towel, preferably mi-
crofiber terrycloth.
2. For drive chain-equipped models: Dry and then lubricate the drive
chain to prevent rust.
3. Use a chrome polish to shine chrome, aluminum, and stainless
steel parts. Often the thermally in-
duced discoloring of stainless
steel exhaust systems can be re-
moved through polishing.
4. Apply a corrosion protection spray on all metal parts including
chrome or nickel-plated surfaces.
WARNING! Do not apply sili-
cone or oil spray to seats, han d
g rips, ru bber foot peg s or tire
UBD5E0E0.book Page 2 Wednesday, April 25, 2018 2:23 PM
 1
1 2
2 3
3 4
4 5
5 6
6 7
7 8
8 9
9 10
10 11
11 12
12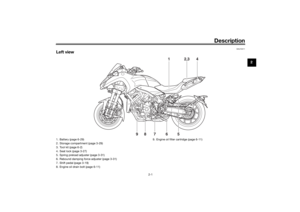 13
13 14
14 15
15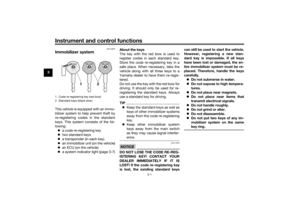 16
16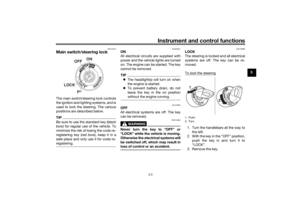 17
17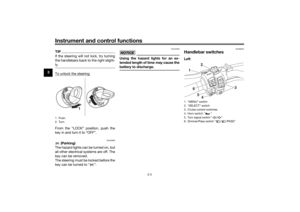 18
18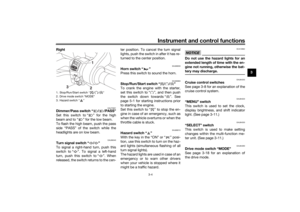 19
19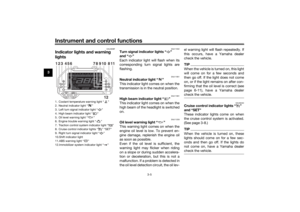 20
20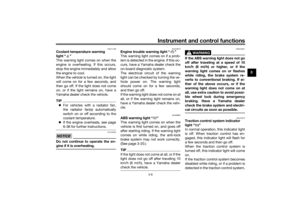 21
21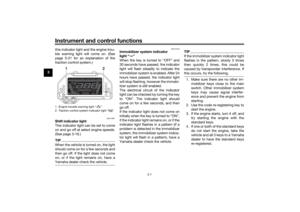 22
22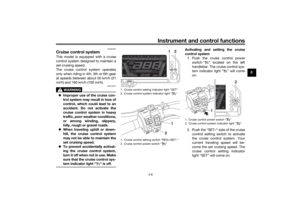 23
23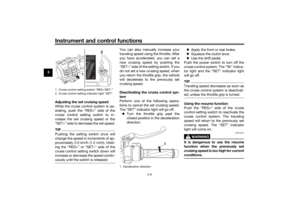 24
24 25
25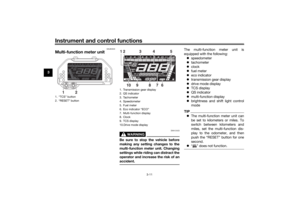 26
26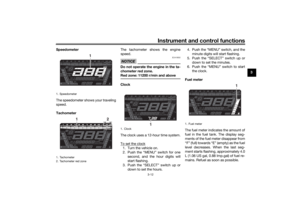 27
27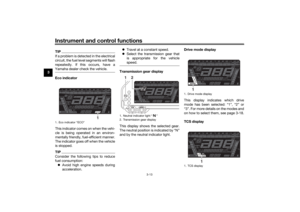 28
28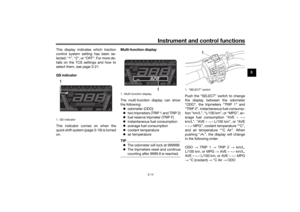 29
29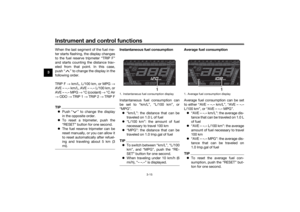 30
30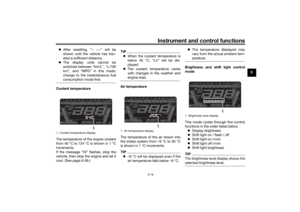 31
31 32
32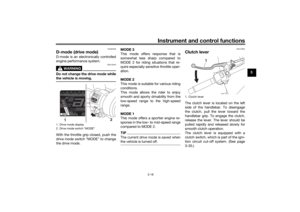 33
33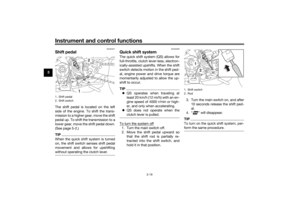 34
34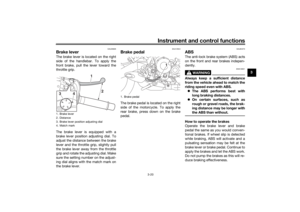 35
35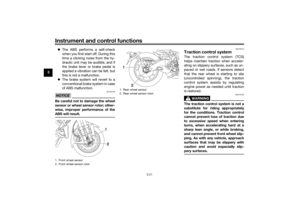 36
36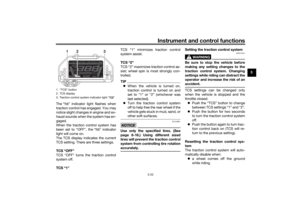 37
37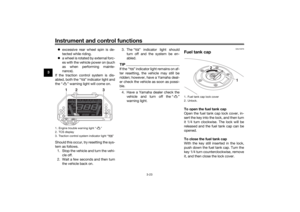 38
38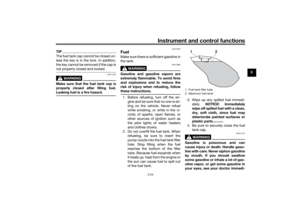 39
39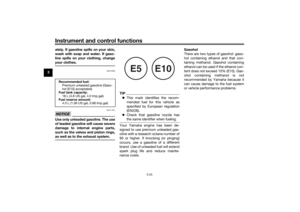 40
40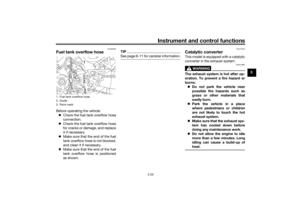 41
41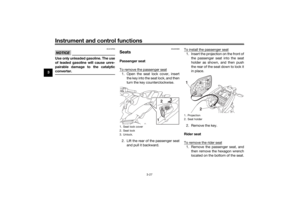 42
42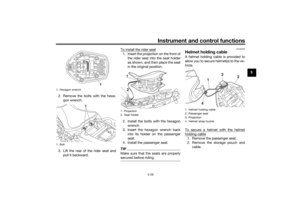 43
43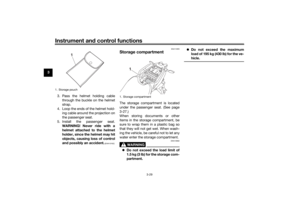 44
44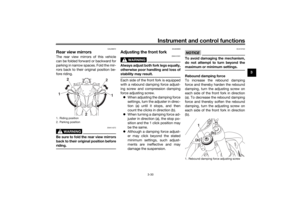 45
45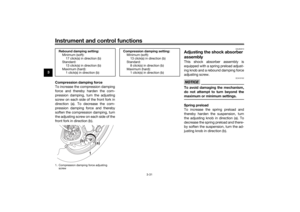 46
46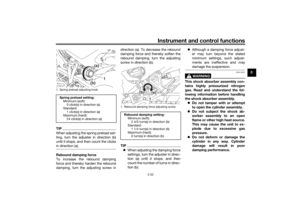 47
47 48
48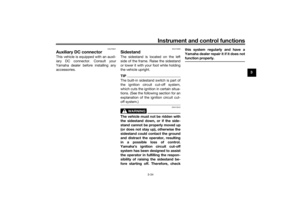 49
49 50
50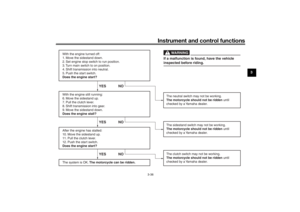 51
51 52
52 53
53 54
54 55
55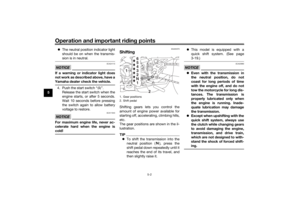 56
56 57
57 58
58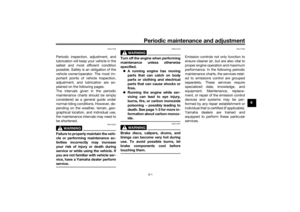 59
59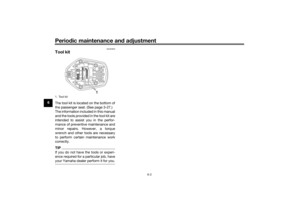 60
60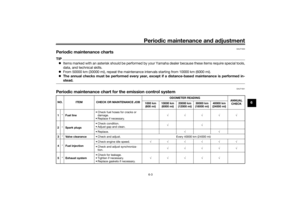 61
61 62
62 63
63 64
64 65
65 66
66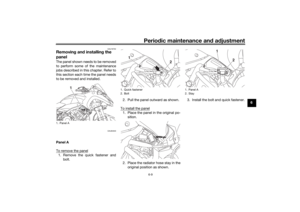 67
67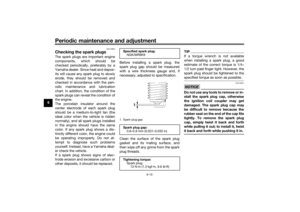 68
68 69
69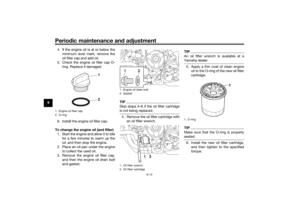 70
70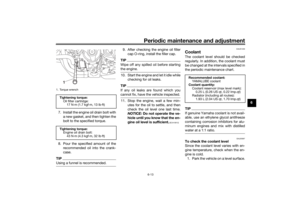 71
71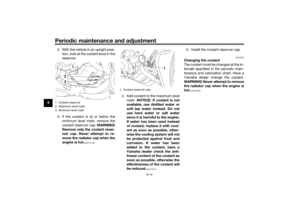 72
72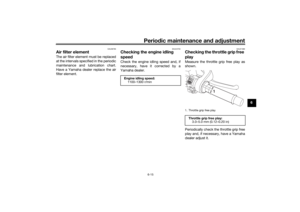 73
73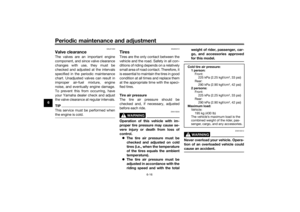 74
74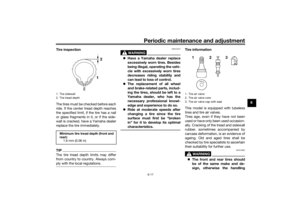 75
75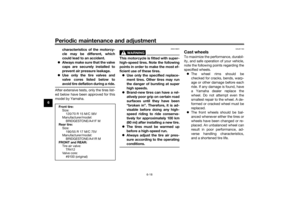 76
76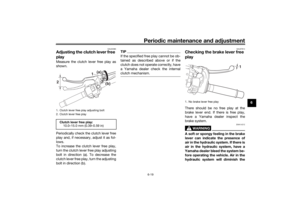 77
77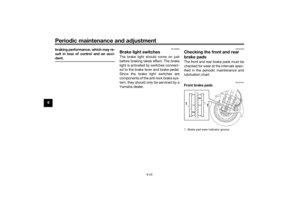 78
78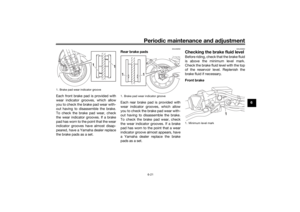 79
79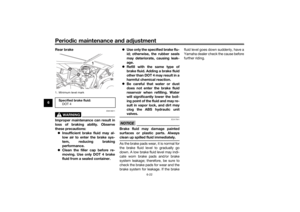 80
80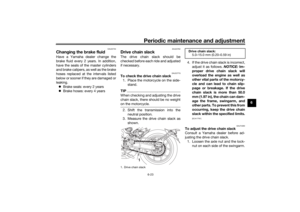 81
81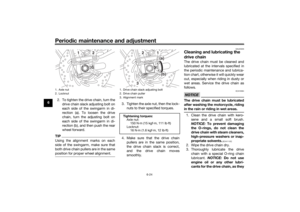 82
82 83
83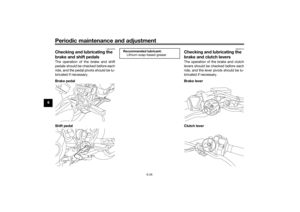 84
84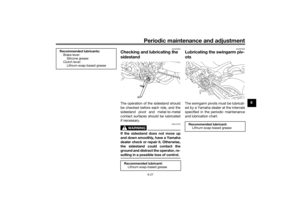 85
85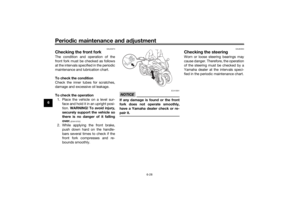 86
86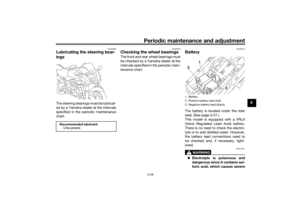 87
87 88
88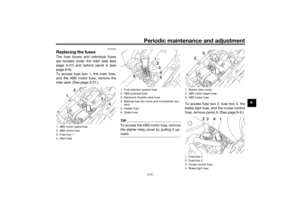 89
89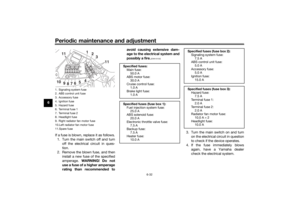 90
90 91
91 92
92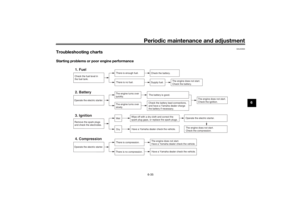 93
93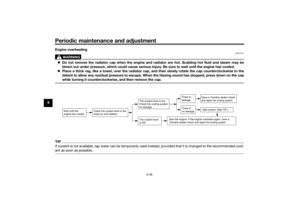 94
94 95
95 96
96 97
97 98
98 99
99 100
100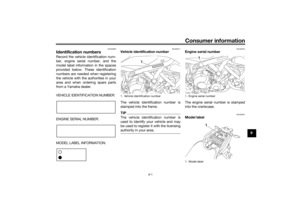 101
101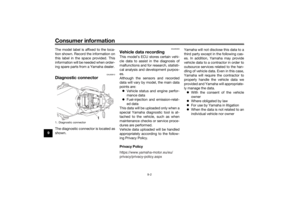 102
102 103
103 104
104 105
105 and behind panel A (see
page 6-9).
To acc")
