Page 57 of 102

Periodic maintenance and adjustment
6-9
6
EAU36112
Canister
This model is equipped with a canister
to prevent the discharging of fuel vapor
into the atmosphere. Before operating
this vehicle, make sure to check the
following:
Check each hose connection.
Check each hose and canister for
cracks or damage. Replace if
damaged.
Make sure that the canister
breather is not blocked, and if
necessary, clean it.
EAU60471
Engine oil and oil filter car-
tridge
The engine oil level should be checked
before each ride. In addition, the oil
must be changed and the oil filter car-
tridge replaced at the intervals speci-
fied in the periodic maintenance and
lubrication chart.
To check the engine oil level
1. Place the vehicle on a level sur-
face and hold it in an upright posi-
tion. A slight tilt to the side can
result in a false reading.
2. Start the engine, warm it up for
several minutes, and then turn it
off.
3. Wait a few minutes until the oil set-
tles, and then check the oil level
through the engine oil level check
window located at the bottom-left
side of the crankcase.
TIP
The engine oil should be between the
minimum and maximum level marks.
ZAUM1386
1. Engine oil filler cap
2. Engine oil level check window
3. Maximum level mark
4. Minimum level mark
1
2 3
4
UBC6E2E0.book Page 9 Tuesday, July 10, 2018 6:26 PM
Page 58 of 102

Periodic maintenance and adjustment
6-10
64. If the engine oil is below the mini-
mum level mark, add sufficient oil
of the recommended type to raise
it to the correct level.
To change the engine oil (with or
without oil filter cartridge replace-
ment)
1. Place the vehicle on a level sur-
face.
2. Start the engine, warm it up for
several minutes, and then turn it
off.
3. Place an oil pan under the engine
to collect the used oil.
4. Remove the engine oil filler cap,
the engine oil drain bolt and its
gasket to drain the oil from the
crankcase.
TIP
Skip steps 5…7 if the oil filter cartridge
is not being replaced.
5. Remove the oil filter cartridge with
an oil filter wrench.
TIP
An oil filter wrench is available at a
Yamaha dealer.
6. Apply a thin coat of clean engine
oil to the O-ring of the new oil filter
cartridge.
TIP
Make sure that the O-ring is properly
seated.
7. Install the new oil filter cartridge
with an oil filter wrench, and then
tighten it to the specified torque
with a torque wrench.
1. Engine oil drain bolt
2. Gasket
21
1. Oil filter wrench
2. Oil filter cartridge
1. O-ring
21
UBC6E2E0.book Page 10 Tuesday, July 10, 2018 6:26 PM
Page 59 of 102

Periodic maintenance and adjustment
6-11
6 8. Install the engine oil drain bolt and
its new gasket, and then tighten
the bolt to the specified torque.
9. Refill with the specified amount of
the recommended engine oil, and
then install and tighten the oil filler
cap.
TIP
Be sure to wipe off spilled oil on any
parts after the engine and exhaust sys-
tem have cooled down.
NOTICE
ECA11621
In order to prevent clutch slip-
page (since the engine oil also
lubricates the clutch), do not
mix any chemical additives. Do
not use oils with a diesel speci-
fication of “CD” or oils of a high-
er quality than specified. In
addition, do not use oils labeled
“ENERGY CONSERVING II” or
higher.
Make sure that no foreign mate-
rial enters the crankcase.
10. Start the engine, and then let it idle
for several minutes while checking
it for oil leakage. If oil is leaking,
immediately turn the engine off
and check for the cause.
TIP
After the engine is started, the engine
oil pressure warning light should go off.
NOTICE
ECA20860
If the oil pressure warning light flick-
ers or remains on even if the oil level
is correct, immediately turn the en-
gine off and have a Yamaha dealer
check the vehicle.
11. Turn the engine off, wait a few
minutes until the oil settles, and
then check the oil level and cor-
rect it if necessary.
1. Torque wrench
Tightening torque:
Oil filter cartridge:
17 N·m (1.7 kgf·m, 12 lb·ft)
Tightening torque:
Engine oil drain bolt:
43 N·m (4.3 kgf·m, 31 lb·ft)
Recommended engine oil:
See page 8-1.
Oil quantity:
Without oil filter cartridge replace-
ment:
2.30 L (2.43 US qt, 2.02 Imp.qt)
With oil filter cartridge replacement:
2.60 L (2.75 US qt, 2.29 Imp.qt)
1
UBC6E2E0.book Page 11 Tuesday, July 10, 2018 6:26 PM
Page 60 of 102

Periodic maintenance and adjustment
6-12
6
EAU20071
Coolant
The coolant level should be checked
before each ride. In addition, the cool-
ant must be changed at the intervals
specified in the periodic maintenance
and lubrication chart.
EAU20095To check the coolant level
1. Place the vehicle on a level sur-
face and hold it in an upright posi-
tion.
TIP
The coolant level must be
checked on a cold engine since
the level varies with engine tem-
perature.
Make sure that the vehicle is posi-
tioned straight up when checking
the coolant level. A slight tilt to the
side can result in a false reading.
2. Check the coolant level in the
coolant reservoir.
TIP
The coolant should be between the
minimum and maximum level marks.
3. If the coolant is at or below the
minimum level mark, remove the
reservoir cap. WARNING! Re-
move only the coolant reservoir
cap. Never attempt to remove
the radiator cap when the en-
gine is hot.
[EWA15162]
4. Add coolant to the maximum level
mark, and then install the reservoir
cap. NOTICE: If coolant is not
available, use distilled water or
soft tap water instead. Do not
use hard water or salt water
since it is harmful to the engine.
If water has been used instead
of coolant, replace it with cool-
ant as soon as possible, other-
wise the cooling system will not
be protected against frost and
corrosion. If water has been
added to the coolant, have a
Yamaha dealer check the anti-
freeze content of the coolant as
soon as possible, otherwise the
effectiveness of the coolant will
be reduced.
[ECA10473]
1. Coolant reservoir
2. Maximum level mark
3. Minimum level mark
1
2
3
1. Coolant reservoir cap
Coolant reservoir capacity (up to
the maximum level mark):
0.25 L (0.26 US qt, 0.22 Imp.qt)
1
UBC6E2E0.book Page 12 Tuesday, July 10, 2018 6:26 PM
Page 61 of 102

Periodic maintenance and adjustment
6-13
6
EAUM3791To change the coolant
1. Place the vehicle on a level sur-
face and let the engine cool if nec-
essary.
2. Remove cowlings A, B, and C.
(See page 6-7.)
3. Place a container under the en-
gine to collect the used coolant.
4. Remove the radiator cap retaining
bolt and radiator cap. WARNING!
Never attempt to remove the ra-
diator cap when the engine is
hot.
[EWA10382]
5. Remove the coolant reservoir cov-
er by removing the bolt and quick
fastener, and then remove the
coolant reservoir.
TIP
The quick fastener is removed by
pushing the center pin in with a screw-
driver, and then pulling the fastener
out.
6. Remove the coolant reservoir cap.
7. Drain the coolant from the coolant
reservoir by turning it upside
down.
8. Install the coolant reservoir and its
cover by placing them in the origi-
nal position, and then installing the
bolt and quick fastener.
TIP
To install the quick fastener, push the
center pin out so that it will protrude
from the fastener head, insert the fas-
tener into the coolant reservoir, and
then push the protruding pin in until it is
flush with the fastener head.
1. Radiator cap
2. Radiator cap retaining bolt
21
ZAUM1415
1. Coolant reservoir cover
2. Bolt
3. Quick fastener
1. Coolant reservoir cap
2. Coolant reservoir
2
1
3
2
1
UBC6E2E0.book Page 13 Tuesday, July 10, 2018 6:26 PM
Page 62 of 102

Periodic maintenance and adjustment
6-14
69. Remove the coolant drain bolt and
its gasket to drain the coolant from
the cooling system.
10. After the coolant is completely
drained, thoroughly flush the cool-
ing system with clean tap water.
11. Install the coolant drain bolt and
its new gasket, and then tighten
the bolt to the specified torque.
12. Pour the specified amount of the
recommended coolant into the ra-
diator and reservoir.13. Install the coolant reservoir cap.
14. Install the radiator cap.
15. Start the engine, let it idle for sev-
eral minutes, and then turn it off.
16. Remove the radiator cap to check
the coolant level in the radiator. If
necessary, add sufficient coolant
until it reaches the top of the radi-
ator, and then install the radiator
cap and radiator cap retaining
bolt.
17. Check the coolant level in the res-
ervoir. If necessary, remove the
coolant reservoir cap, add coolant
to the maximum level mark, and
then install the cap.
18. Install the cowlings.
19. Start the engine, and then check
the vehicle for coolant leakage. If
coolant is leaking, have a Yamaha
dealer check the cooling system.
1. Coolant drain bolt
2. Gasket
Tightening torque:
Coolant drain bolt:
7 N·m (0.7 kgf·m, 5.1 lb·ft)
1
2
Antifreeze/water mixture ratio:
1:1
Recommended antifreeze:
High-quality ethylene glycol anti-
freeze containing corrosion inhibi-
tors for aluminum engines
Coolant quantity:
Radiator (including all routes):
1.60 L (1.69 US qt, 1.41 Imp.qt)
Coolant reservoir (up to the maxi-
mum level mark):
0.25 L (0.26 US qt, 0.22 Imp.qt)
UBC6E2E0.book Page 14 Tuesday, July 10, 2018 6:26 PM
Page 63 of 102
Periodic maintenance and adjustment
6-15
6
EAU60451
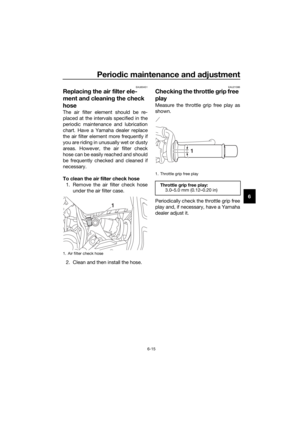
Replacing the air filter ele-
ment and cleaning the check
hose
The air filter element should be re-
placed at the intervals specified in the
periodic maintenance and lubrication
chart. Have a Yamaha dealer replace
the air filter element more frequently if
you are riding in unusually wet or dusty
areas. However, the air filter check
hose can be easily reached and should
be frequently checked and cleaned if
necessary.
To clean the air filter check hose
1. Remove the air filter check hose
under the air filter case.
2. Clean and then install the hose.
EAU21386
Checking the throttle grip free
play
Measure the throttle grip free play as
shown.
Periodically check the throttle grip free
play and, if necessary, have a Yamaha
dealer adjust it.
1. Air filter check hose
1
1. Throttle grip free play
Throttle grip free play:
3.0–5.0 mm (0.12–0.20 in)
1
UBC6E2E0.book Page 15 Tuesday, July 10, 2018 6:26 PM
Page 64 of 102

Periodic maintenance and adjustment
6-16
6
EAU21402
Valve clearance
The valve clearance changes with use,
resulting in improper air-fuel mixture
and/or engine noise. To prevent this
from occurring, the valve clearance
must be adjusted by a Yamaha dealer
at the intervals specified in the periodic
maintenance and lubrication chart.
EAU64662
Tires
Tires are the only contact between the
vehicle and the road. Safety in all con-
ditions of riding depends on a relatively
small area of road contact. Therefore, it
is essential to maintain the tires in good
condition at all times and replace them
at the appropriate time with the speci-
fied tires.
Tire air pressure
The tire air pressure should be
checked and, if necessary, adjusted
before each ride.
WARNING
EWA10504
Operation of this vehicle with im-
proper tire pressure may cause se-
vere injury or death from loss of
control.
The tire air pressure must be
checked and adjusted on cold
tires (i.e., when the temperature
of the tires equals the ambient
temperature).
The tire air pressure must be
adjusted in accordance with the
riding speed and with the total
weight of rider, passenger, car-
go, and accessories approved
for this model.
UBC6E2E0.book Page 16 Tuesday, July 10, 2018 6:26 PM