2018 VOLVO V90 CROSS COUNTRY brake
[x] Cancel search: brakePage 432 of 662
STARTING AND DRIVING
* Option/accessory.
430
Leveling control settings *
Turn off leveling control before lifting the vehicle with a jack to help avoid problems with thepneumatic suspension.
Center display settings
Disable Leveling Control
In certain situations, this function must be turned off, e.g. before the vehicle is raised using a jack *.
The level difference caused by raising the vehicle with a jack could cause problems with the pneu-matic suspension. Turning off the function in the center display:1. Tap
Settings in the Top view.
2. Tap
My CarParking Brake and
Suspension.
3. Select
Disable Leveling Control.
Related information
• Leveling control
* and suspension (p. 428)
• Loading recommendations (p. 561)
Low Speed Control The low-speed function, Low Speed Control (LSC), facilitates and improves control and trac-tion on rough roads and slippery surfaces, e.g.when towing a trailer on grass or up boat ramps. In vehicles equipped with drive mode control
*,
the function is included in the Off Road drive mode.
Low Speed Control is designed for driving on rough roads and when towing trailers at lowspeeds, up to approximately 40 km/h (25 mph). When driving at low speeds, LSC prioritizes low gears and all-wheel drive to help avoid wheel spinand improve traction on all wheels. The accelera-tor pedal will be less responsive to improve trac-tion and speed control at low speeds. The function is activated together with Hill Descent Control (HDC), which makes it possibleto control speed going down steep hills using theaccelerator pedal and reduces the need to usethe brake pedal. The system makes it possible tomaintain a low and uniform speed when drivingdown steep hills.
NOTE
When LSC with HDC is activated, the feel of the accelerator pedal and engine responsewill change.
NOTE
This drive mode is not designed to be used for normal street driving.
NOTE
The function is deactivated when driving at high speeds and must be reactivated at lowerspeeds if so desired.
Related information
• Activating and deactivating Low Speed Con- trol using the function button (p. 431)
• Changing drive mode
* (p. 421)
• Hill Descent Control (p. 431)
• All Wheel Drive (AWD) (p. 419)
Page 433 of 662
STARTING AND DRIVING
}}
* Option/accessory.431
Activating and deactivating LowSpeed Control using the functionbutton
Vehicles that are not equipped with drive mode controls in the tunnel console have a function button for Low Speed Control with
Hill Descent
Control in the center display's Function view.
Selecting Low Speed Control in the center display's Function view
–Tap the Hill Descent Control button to
activate or deactivate the function.
> An indicator light in the button will illumi- nate when the function is activated.
When the engine is switched off, the function will be automatically deactivated.
NOTE
The function is deactivated when driving at high speeds and must be reactivated at lowerspeeds if so desired.
Related information
• Low Speed Control (p. 430)
• Changing drive mode
* (p. 421)
Hill Descent Control The function for assisting when driving downhill, Hill Descent Control (HDC), is a low-speedfunction with increased engine braking. Thefunction makes it possible to increase ordecrease the vehicle's speed on steep downhillgradients by only using the accelerator pedal,without applying the brakes. In vehicles equipped with drive mode control *,
the function is included in the Off Road drive mode.
HDC is designed for driving on rough roads at low speeds and downhill gradients with slipperyor otherwise difficult road surfaces. The driverdoes not need to use the brake pedal but caninstead focus on steering.
WARNING
HDC is only intended to be a supplementary braking aid and it does not function in all sit-uations. The driver is always ultimately responsible for operating the vehicle in a safe manner.
FunctionHill Descent Control allows the vehicle to move forward or backward at very low speeds assistedby the brake system. The driver can increase thespeed by pressing the accelerator pedal. Whenthe accelerator pedal is released, the vehicle will
Page 434 of 662
||
STARTING AND DRIVING
* Option/accessory.
432 return to very low speed regardless of how steep the hill is and without the brakes needing to beapplied. The brake lights will illuminate when thefunction is activated. The driver can brake to stop or slow the vehicle at any time by depressing the brake pedal. HDC is activated along with Low Speed Control (LSC), which facilitates and improves traction andcontrol on rough and slippery surfaces. The sys-tem is intended to be used at low speeds, up toapproximately 40 km/h (25 mph).
To keep in mind when using HDC
•
If the function is switched off while driving ona steep downhill gradient, braking effect willbe gradually reduced.
• HDC can be used in gear positions
D and R,
and in manual gears 1 or 2.
• It is not possible to manually shift to thirdgear or higher when HDC is active.
NOTE
When LSC with HDC is activated, the feel of the accelerator pedal and engine responsewill change.
NOTE
This drive mode is not designed to be used for normal street driving.
NOTE
The function is deactivated when driving at high speeds and must be reactivated at lowerspeeds if so desired.
Related information
• Activating and deactivating Hill Descent Con- trol using the function button (p. 432)
• Changing drive mode
* (p. 421)
• Low Speed Control (p. 430)
• All Wheel Drive (AWD) (p. 419)
Activating and deactivating HillDescent Control using the functionbutton
Vehicles that are not equipped with drive mode controls in the tunnel console have a function button for Hill Descent Control with
Hill
Descent Control in the center display's Func-
tion view.
Selecting Hill Descent Control in the center display's Function view
HDC only works at low speeds.
–Tap the Hill Descent Control button to
activate or deactivate the function.
> An indicator light in the button will illumi- nate when the function is activated.
When the engine is switched off, the function will be automatically deactivated.
NOTE
The function is deactivated when driving at high speeds and must be reactivated at lowerspeeds if so desired.
Page 436 of 662

||
STARTING AND DRIVING
434
Related information
•Drive-E
‒ purer driving pleasure (p. 27)
• ECO drive mode (p. 422)
• Checking tire pressure (p. 531)
Preparing for a long trip
It is important to have the vehicle's systems and equipment checked carefully before driving longdistances.
Check that:
• the engine is running properly and that fuel consumption is normal
• there are no leaks (fuel, oil or other fluid)
• the brake pedal is functioning optimally
• all lights are working
‒
adjust the headlight
height if the vehicle is carrying a heavy load
• tire tread depth and air pressure are at cor-rect levels. Change to snow tires when driv-ing in areas where there is a risk of snowy oricy roads.
• the start battery is sufficiently charged
• the wiper blades are in good condition
Related information
• Checking tire pressure (p. 531)
• Filling washer fluid (p. 629)
• Winter driving (p. 435)
• Economical driving (p. 433)
• Vehicle modem settings (p. 507)
• Loading recommendations (p. 561)
• Driving with a trailer (p. 445)
• Pilot Assist (p. 305)
• Speed limiter (p. 272) •
Tire sealing system (p. 546)
Page 437 of 662

STARTING AND DRIVING
}}
435
Winter driving
It is important to check the vehicle before driving in cold/snowy conditions to make sure it can bedriven safely.
Before the cold season arrives:
• Make sure the engine coolant contains 50% antifreeze. This mixture helps protect theengine from frost erosion down toapprox. -35 °C (-31 °F). Do not mix differenttypes of antifreeze as this could pose ahealth risk.
• Keep the fuel tank well filled to prevent con-densation from forming.
• Check the viscosity of the engine oil. Oil withlow viscosity (thinner oil) improves cold-weather starting and reduces fuel consump-tion when driving with a cold engine.
CAUTION
Low-viscosity oil should not be used with hard driving or in hot weather.
•
Check the condition and charge level of the start battery. Cold weather places greaterdemands on the start battery and reduces itscapacity.
• Use washer fluid containing antifreeze tohelp prevent ice from forming in the washerfluid reservoir.
Slippery driving conditionsFor optimal traction and roadholding, Volvo rec-ommends using snow tires on all wheels when-ever there is a risk of snow or ice on the road.
NOTE
Certain countries require use of winter tires by law. Not all countries permit the use ofstudded tires.
Practice driving on slippery surfaces under con- trolled conditions to learn how the vehicle reacts.
Related information
•Snow tires (p. 545)
• Snow chains (p. 545)
• Braking on salted roads (p. 407)
• Braking on wet roads (p. 406)
• Filling washer fluid (p. 629)
• Start battery (p. 595)
• Replacing windshield wiper blades (p. 627)
• Changing rear window wipers (p. 626)
• Refilling coolant (p. 586)
Driving through standing water
Driving the vehicle through a deep pool of stand- ing water on a water-covered roadway is calledfording. This must be done with great caution.
The vehicle can be driven through water up to a depth of 30 cm (11.8 in) at no more than walkingspeed. Be particularly careful when drivingthrough flowing water. When driving through standing water, drive slowly and do not stop the vehicle. When you havepassed the water, press lightly on the brake pedaland check that the brakes are functioning prop-erly. Water, mud, slush, etc. can make the brakelinings slippery, resulting in delayed brakingeffect.
• If the vehicle is equipped with contacts for anelectric heater or trailer coupling, clean theseafter driving in water or mud.
• Do not allow the vehicle to stand in water upto the sills any longer than absolutely neces-sary. This could result in electrical malfunc-tions.
Page 447 of 662
STARTING AND DRIVING
}}
445
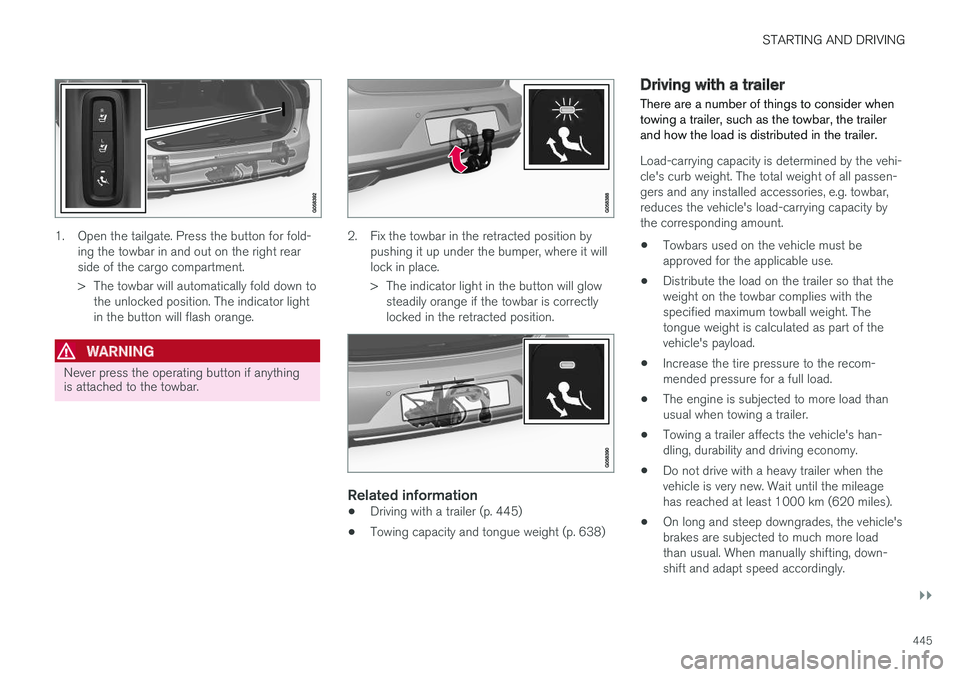
1. Open the tailgate. Press the button for fold-ing the towbar in and out on the right rear side of the cargo compartment.
> The towbar will automatically fold down tothe unlocked position. The indicator light in the button will flash orange.
WARNING
Never press the operating button if anything is attached to the towbar.
2. Fix the towbar in the retracted position by pushing it up under the bumper, where it will lock in place.
> The indicator light in the button will glowsteadily orange if the towbar is correctly locked in the retracted position.
Related information
• Driving with a trailer (p. 445)
• Towing capacity and tongue weight (p. 638)
Driving with a trailer
There are a number of things to consider when towing a trailer, such as the towbar, the trailerand how the load is distributed in the trailer.
Load-carrying capacity is determined by the vehi- cle's curb weight. The total weight of all passen-gers and any installed accessories, e.g. towbar,reduces the vehicle's load-carrying capacity bythe corresponding amount. • Towbars used on the vehicle must be approved for the applicable use.
• Distribute the load on the trailer so that theweight on the towbar complies with thespecified maximum towball weight. Thetongue weight is calculated as part of thevehicle's payload.
• Increase the tire pressure to the recom-mended pressure for a full load.
• The engine is subjected to more load thanusual when towing a trailer.
• Towing a trailer affects the vehicle's han-dling, durability and driving economy.
• Do not drive with a heavy trailer when thevehicle is very new. Wait until the mileagehas reached at least 1000 km (620 miles).
• On long and steep downgrades, the vehicle'sbrakes are subjected to much more loadthan usual. When manually shifting, down-shift and adapt speed accordingly.
Page 448 of 662
||
STARTING AND DRIVING
* Option/accessory.
446 •
Follow applicable regulations regarding per- mitted speed and weight.
• Drive slowly when towing a trailer up a longand steep incline.
• The maximum trailer weights given only applyto altitudes up to 1000 meters (3280 feet)above sea level. At higher altitudes, enginepower (and thus the vehicle's climbing ability)is decreased due to the reduced air density,and the maximum trailer weight must there-fore be reduced. The weight of the vehicleand trailer must be decreased by 10% foreach additional 1000 m (3280 feet) or partthereof.
• Avoid driving with a trailer on inclines of morethan 12%.
• Avoid overloading and other incorrect use.
• The trailer's brakes must be balanced withthe vehicle's brakes to help ensure safestops (follow applicable local regulations).
CAUTION
•Bumper-attached trailer hitches must not be used on Volvos, nor should safetychains be attached to the bumper.
• Trailer hitches attaching to the vehiclerear axle must not be used.
• Never connect a trailer's hydraulic brakesystem directly to the vehicle brake sys-tem, nor a trailer's lighting system directlyto the vehicle lighting system. Consultyour nearest authorized Volvo retailer forcorrect installation.
• When towing a trailer, the trailer's safetychains or wire must be correctly fastenedto the attachment points provided in thetrailer hitch on the vehicle. The safetychain or wire must never be fastened toor wound around the towing ball.
NOTE
The optional detachable trailer hitch may not be available in all markets or on all models.Consult your Volvo retailer.
NOTE
Extreme weather conditions, towing a trailer, driving at high altitudes and fuel quality arefactors that significantly increase a vehicle'sfuel consumption.
Trailer weights
WARNING
Please adhere to the recommendations provi- ded for trailer weight. If the recommendationsare not followed, the vehicle and trailer maybe difficult to control during evasive maneu-vers and braking.
NOTE
The specified maximum trailer weights are those permitted by Volvo. National vehicleregulations may set additional restrictions ontrailer weight and speed. The trailer hitchesmay be certified for higher towing weightsthan the vehicle is permitted to tow.
Self-leveling suspension
*The vehicle's self-leveling system attempts to keep the vehicle at a constant level, regardless ofload (up to the maximum permitted weight).When the vehicle is stationary, the rear end of thevehicle will be slightly lowered, which is normal.
Driving in hilly terrain or hot weatherIn certain conditions, there is a risk of overheat-ing when driving with a trailer. If overheating ofthe engine and drive system is detected, a warn-ing symbol will illuminate in the instrument panelalong with a message.
Page 449 of 662

STARTING AND DRIVING
}}
* Option/accessory.447
The automatic transmission selects the optimal gear for the current load and engine speed.
Steep inclines
Do not lock the automatic transmission into a higher gear than what the engine can handle
‒ it
is not always preferable to drive in high gears at low rpm.
Parking on a hill
1. Depress the brake pedal.
2. Apply the parking brake.3. Put the gear selector in P.
4. Release the brake pedal.Put chocks behind the wheels when the vehicle is parked on a hill with a trailer attached.
Starting on a hill
1. Depress the brake pedal. 2. Put the gear selector in D.
3. Release the parking brake.
4. Release the brake pedal and start driving.
Related information
• Trailer Stability Assist
* (p. 447)
• Checking trailer lights (p. 448)
• Towing capacity and tongue weight (p. 638)
• Overheating of engine and transmission (p. 440)
Trailer Stability Assist
*
Trailer Stability Assist (TSA 10
) is a function
designed to help stabilize a vehicle that is tow- ing a trailer when the vehicle and trailer havebegun to sway. The function is part of the Elec- tronic Stability Control system ESC 11
.
Reasons for swayingA vehicle towing a trailer may begin to sway for various reasons. Normally this only occurs at highspeeds. However, if the trailer is overloaded orunevenly distributed, e.g. too far back, there is arisk of swaying even at low speeds. Swaying may be caused by factors such as:
• The vehicle and trailer are hit by a sudden, strong crosswind.
• The vehicle and trailer are traveling on anuneven road or over a bump.
• Sudden movements of the steering wheel.
Once swaying has begun, it can be difficult orimpossible to stop it. This makes the vehicle andtrailer difficult to control and there is a risk ofswerving into oncoming traffic or driving off theroad.
Trailer Stability Assist functionTrailer Stability Assist continuously monitors thevehicle's movements, particularly lateral move- ments. If swaying is detected, the brakes areapplied individually on the front wheels, which hasa stabilizing effect on the vehicle and trailer. Thisis often enough to enable the driver to regaincontrol of the vehicle. If the Trailer Stability Assist function's first attempt is not adequate to stop the swayingmotion, the brakes are applied on all wheels andengine power is temporarily reduced. As theswaying motion begins to decrease and the vehi-cle and trailer have once again become stable,TSA stops regulating the brakes/engine powerand the driver regains control of the vehicle.
NOTE
Trailer Stability Assist is deactivated if the driver selects the sport mode by deactivating
ESC in the center display's menu system.
Trailer Stability Assist may not intervene if the driver tries to compensate for the swaying motionby moving the steering wheel rapidly, becausethe system will then not be able to determine if itis the trailer or the driver causing the swaying.
10
Trailer Stability Assist
11 Electronic Stability Control