Page 576 of 662
||
MAINTENANCE AND SERVICE
574
Related information
•Vehicle status (p. 576)
• Scheduling service and repairs (p. 576)
• Connecting equipment to the vehicle's data link connector (p. 36)
• Technician certification (p. 37)
• Climate control system service (p. 582)
• Maintenance of the brake system (p. 407)
• Engine compartment overview (p. 583)
Data transfer between vehicle andworkshop over Wi-Fi
Volvo workshops have a designated Wi-Fi net- work for secure data transfer between your vehi-cle and the workshop. Your visit to the workshopwill be easier and more effective when diagnos-tics information and software can be transferredover the workshop's network.
When you arrive at the workshop, your technician can connect your vehicle to the workshop's Wi-Finetwork to perform troubleshooting and down-load software. For this type of communication,the vehicle only connects to the workshop's net-work. The vehicle can only be connected to thedesignated workshop networks, not to any othernetwork, e.g. your home network.
Manual connection to workshop Wi-FiManual connection is usually performed by aservice technician. Because the technician usesthe buttons on your remote key to connect thevehicle, it is important that you bring a key withbuttons when taking the vehicle in to a workshop.Pressing the lock button on the remote key threetimes will connect the vehicle to the workshop'sWi-Fi network. When the car is connected to a Wi-Fi network, the
symbol appears in the center display.
WARNING
The vehicle may not be driven when it is con- nected to the workshop's networks and sys-tems.
Related information
• Handling system updates via Download Cen- ter (p. 575)
• Scheduling service and repairs (p. 576)
Page 585 of 662
MAINTENANCE AND SERVICE
}}
583
Engine compartment overview
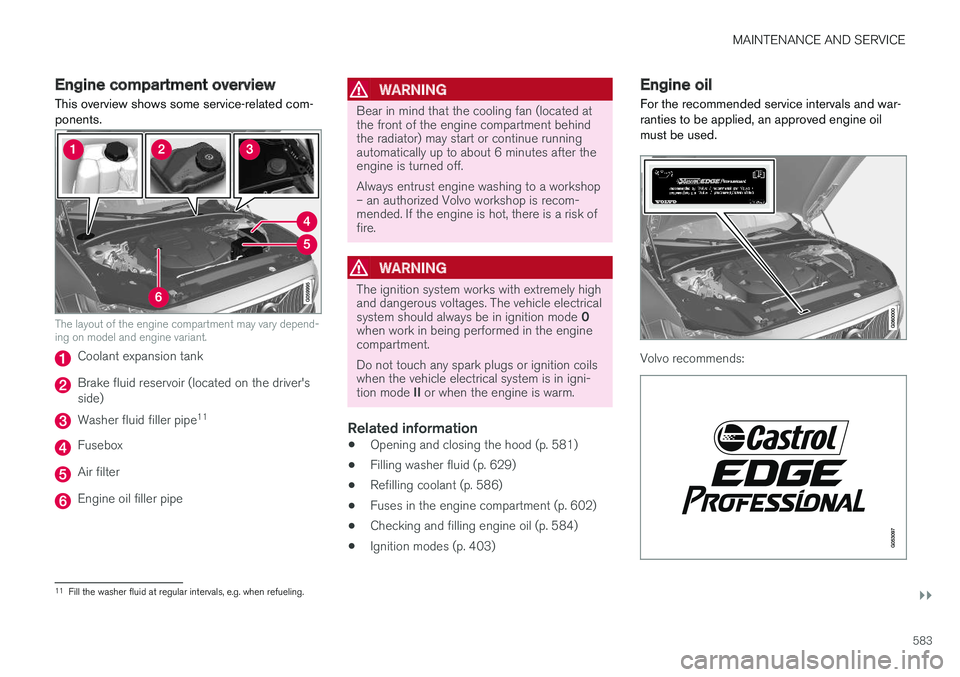
This overview shows some service-related com- ponents.
The layout of the engine compartment may vary depend- ing on model and engine variant.
Coolant expansion tank
Brake fluid reservoir (located on the driver's side)
Washer fluid filler pipe 11
Fusebox
Air filter
Engine oil filler pipe
WARNING
Bear in mind that the cooling fan (located at the front of the engine compartment behindthe radiator) may start or continue runningautomatically up to about 6 minutes after theengine is turned off. Always entrust engine washing to a workshop – an authorized Volvo workshop is recom-mended. If the engine is hot, there is a risk offire.
WARNING
The ignition system works with extremely high and dangerous voltages. The vehicle electrical system should always be in ignition mode
0
when work in being performed in the engine compartment. Do not touch any spark plugs or ignition coils when the vehicle electrical system is in igni- tion mode II or when the engine is warm.
Related information
• Opening and closing the hood (p. 581)
• Filling washer fluid (p. 629)
• Refilling coolant (p. 586)
• Fuses in the engine compartment (p. 602)
• Checking and filling engine oil (p. 584)
• Ignition modes (p. 403)
Engine oil
For the recommended service intervals and war- ranties to be applied, an approved engine oilmust be used.
Volvo recommends:
11 Fill the washer fluid at regular intervals, e.g. when refueling.
Page 591 of 662
MAINTENANCE AND SERVICE
* Option/accessory.589
NOTE
To bear in mind when refitting the covering:
• The pin in the clip must be pressed back completely before the clip is reinstalled inthe covering.
• When the covering is reinstalled, the pinmust be pressed in until the end surfaceis level with the surface of the clip.
Related information
• Replacing bulbs (p. 587)
• Replacing the low beam headlight bulbs (p. 590)
• Replacing the high beam headlight bulbs(p. 590)
• Replacing daytime running lights/front park-ing light bulbs (p. 591)
• Replacing front turn signal bulbs (p. 592)
• Bulb specifications (p. 594)
Location of exterior lights
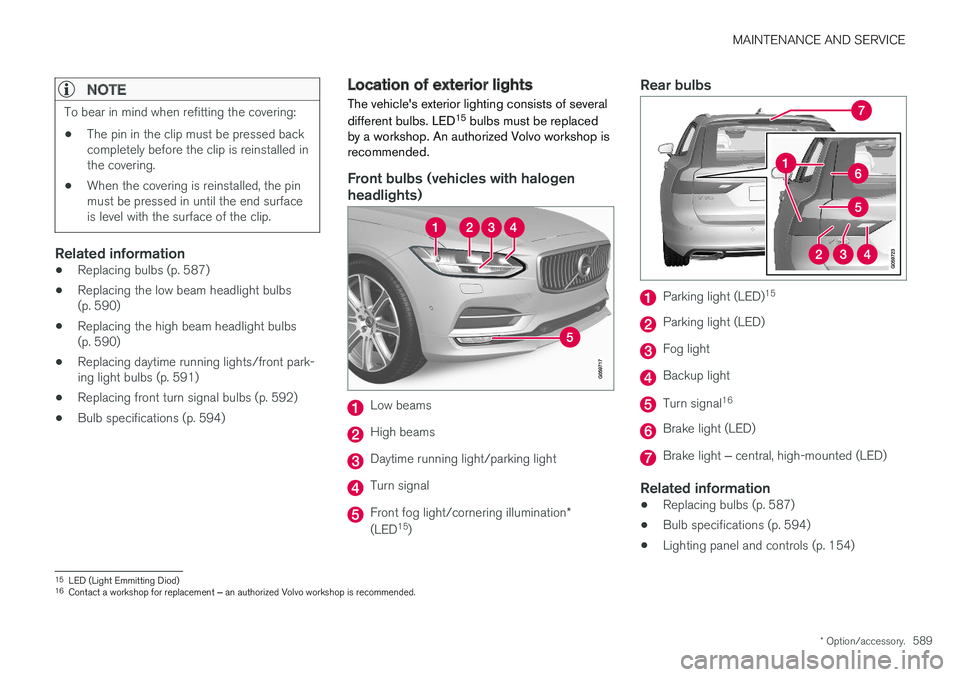
The vehicle's exterior lighting consists of several different bulbs. LED 15
bulbs must be replaced
by a workshop. An authorized Volvo workshop is recommended.
Front bulbs (vehicles with halogen headlights)
Low beams
High beams
Daytime running light/parking light
Turn signal
Front fog light/cornering illumination *
(LED 15
)
Rear bulbs
Parking light (LED) 15
Parking light (LED)
Fog light
Backup light
Turn signal
16
Brake light (LED)
Brake light
‒ central, high-mounted (LED)
Related information
• Replacing bulbs (p. 587)
• Bulb specifications (p. 594)
• Lighting panel and controls (p. 154)
15
LED (Light Emmitting Diod)
16 Contact a workshop for replacement ‒ an authorized Volvo workshop is recommended.
Page 600 of 662
MAINTENANCE AND SERVICE
598
Support battery In addition to the start battery, vehicles equipped with the Start/Stop function also have a supportbattery.
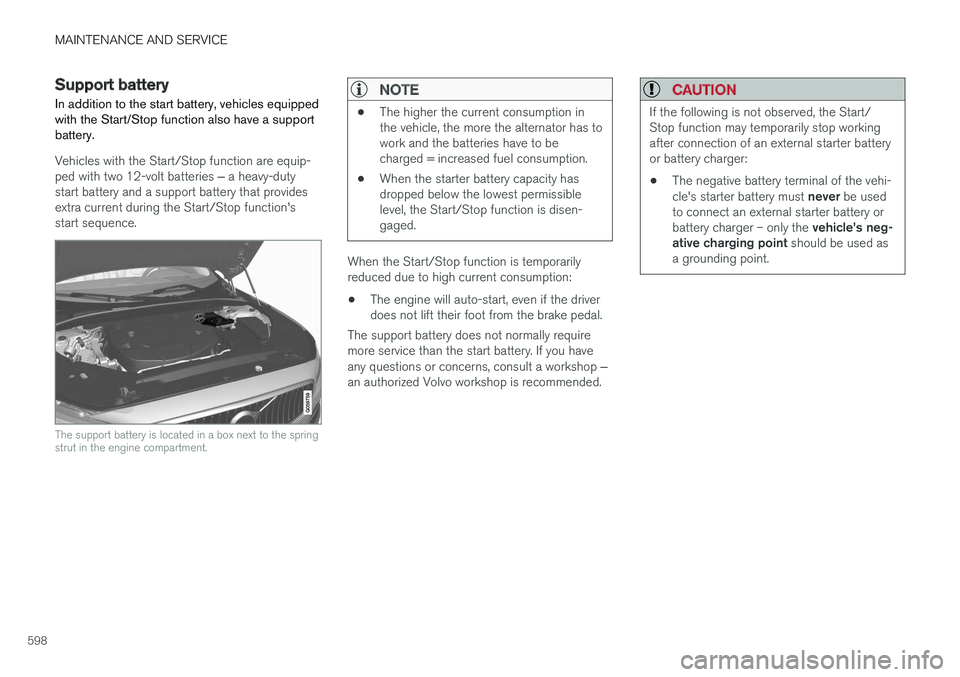
Vehicles with the Start/Stop function are equip- ped with two 12-volt batteries ‒ a heavy-duty
start battery and a support battery that provides extra current during the Start/Stop function'sstart sequence.
The support battery is located in a box next to the spring strut in the engine compartment.
NOTE
• The higher the current consumption in the vehicle, the more the alternator has towork and the batteries have to becharged = increased fuel consumption.
• When the starter battery capacity hasdropped below the lowest permissiblelevel, the Start/Stop function is disen-gaged.
When the Start/Stop function is temporarily reduced due to high current consumption:
• The engine will auto-start, even if the driverdoes not lift their foot from the brake pedal.
The support battery does not normally requiremore service than the start battery. If you have any questions or concerns, consult a workshop ‒
an authorized Volvo workshop is recommended.
CAUTION
If the following is not observed, the Start/ Stop function may temporarily stop workingafter connection of an external starter batteryor battery charger: • The negative battery terminal of the vehi- cle's starter battery must
never be used
to connect an external starter battery orbattery charger – only the vehicle's neg-
ative charging point should be used as
a grounding point.
Page 604 of 662
MAINTENANCE AND SERVICE
602
Fuses in the engine compartment
The fuses in the engine compartment help pro- tect electrical components such as engine andbrake functions.
Page 606 of 662
||
MAINTENANCE AND SERVICE
* Option/accessory.
604
FunctionAA
– –
Heated windshield *, left side Shunt
Heated windshield
*, left side 40
Headlight washers
*25
Windshield washer 25
Transmission control module 15
Horn 20
Alarm siren
* 5
Brake system control module (valves, parking brake) 40
Wipers 30
Rear window washer 25
Heated windshield
*, right side 40
Parking heater
* 20
Brake system control module (ABS pump) 40
– –
Heated windshield
*, right side Shunt
FunctionAA
Fed when ignition is on: engine control module, transmissioncomponents, electrical powersteering, central electrical mod-ule, brake system control mod-ule 5
– –
Right-side headlight 7.5 Right-side headlight, some mod- els with LED
B 15
– –
– –
Battery connection control mod- ule 5
Airbags 5
Left-side headlight 7.5 Left-side headlight, some mod- els with LED
B 15
Accelerator pedal sensor 5
A
Ampere
B LED (Light Emitting Diode)
Related information
• Fuses and fuseboxes (p. 600)
• Replacing fuses (p. 601)
Page 608 of 662

||
MAINTENANCE AND SERVICE
* Option/accessory.
606 Fuse pliers are provided on the inside of the fuse box cover to assist in removing and insertingfuses. There are also spaces for several extra fuses in the
distribution box in the engine compart-
ment .
Positions
•Fuses 1, 3-21, 23-36, 39-53 and 55-59 are "Micro" fuses.
• Fuses 2-22, 37-38 and 54 are "MCase"fuses and should only be replaced by a work- shop 22
.
FunctionAA
– –
Electrical outlet in tunnel console between rear seats * 30
– –
Movement sensor
* 5
Media player 5
Instrument panel 5
Center console buttons 5
Sun sensor 5
FunctionAA
– –
– –
Steering wheel module 5
Module for start knob and parking brake controls 5
Heated steering wheel
* module 15
– –
– –
– –
– –
Climate system control module 10
– –
Data link connector OBD-II 10
Center display 5
Climate system blower module (front) 40
USB HUB 5
FunctionAA
Instrument lighting; Interior lighting; Rearview mirror auto-dim function
*;
Rain and light sensors *; Rear tun-
nel console keypad, rear seat *;
Power front seats *; Rear door con-
trol panels; Climate system blower module left/right 7.5
Control module for driver support functions
5
Panoramic roof with sun curtain
*20
Head-up display
* 5
Passenger compartment lighting 5
– –
Ceiling console display (seat belt reminder/front passenger side air-bag indicator) 5
– –
Humidity sensor 5
Door module in right-side rear door 20
Fuses in the trunk/cargo compart- ment
10
22
An authorized Volvo workshop is recommended.
Page 617 of 662
MAINTENANCE AND SERVICE
}}
* Option/accessory.615
WARNING
•Never use more than one inlay mat at a time on the driver's floor. If any other typeof floor mat is used, remove the originalmat from the driver's seat floor beforedriving. All types of mats must be securelyanchored in the attachment points in thefloor. Make sure the floor mat does notimpede the movement of the brake pedalor accelerator pedal in any way, as thiscould be a serious safety hazard.
• Volvo's floor mats are specially manufac-tured for your vehicle. They must be prop-erly secured in the attachment points inthe floor to help ensure they cannot slideand become trapped under the pedals.
After vacuuming, a specially designed textilecleaning agent should be used to remove stainson floor mats. Floor mats should be cleaned withproducts recommended by Volvo retailers.
Related information
• Cleaning the interior (p. 612)
• Cleaning the center display (p. 612)
• Cleaning fabric upholstery and ceiling liner(p. 614)
• Cleaning the seat belt (p. 614)
• Cleaning leather upholstery (p. 615) •
Cleaning the leather steering wheel(p. 616)
• Cleaning interior plastic, metal and wood sur-faces (p. 617)
Cleaning leather upholstery
Only use cleaning agents and car care products recommended by Volvo. Clean regularly andtreat stains immediately for best results. It isimportant to vacuum before using a cleaningagent.
Leather upholstery *Volvo's leather upholstery is treated to protect its original appearance. Over time, sunlight, grease,dirt, etc. could break down the protective layer.This could result in scratches and cracking. Leather upholstery is a natural product that changes and acquires a beautiful patina overtime. Regular cleaning and treatments arerequired to preserve the qualities and color of theleather. Volvo offers a comprehensive product,Volvo Leather Care Kit/Wipes, for cleaning andtreating leather upholstery that, when used asdirected, preserves the leather's protective coa-ting. For best results, Volvo recommends cleaning and applying protective cream one to four times ayear (or more as needed). Volvo Leather Care Kit951 0251 and Volvo Leather Softener 9437429 are available for purchase at Volvo retailers.