2018 VOLVO S60 INSCRIPTION on call
[x] Cancel search: on callPage 242 of 396
||
DRIVER SUPPORT
240
Ambient lighting conditions
The camera automatically monitors the ambient lighting conditions behind the vehicle and con-stantly adjusts sensitivity to light. This may causethe brightness and quality of the image on thescreen to vary slightly. Sensitivity to light isincreased in dark conditions or in bad weather,which may affect image quality. If the image on the screen seems too dark, brightness can be increased with the thumbwheel on the lighting panel.
NOTE
In order to function properly, the camera lens should always be kept clean. This is particu-larly important in bad weather. Keep the lensfree of dirt, ice or snow.
Related information
•Rear Park Assist Camera (PAC) – introduc- tion (p. 239)
• Rear Park Assist Camera (PAC) – operation(p. 240)
• Rear Park Assist Camera (PAC) – limitations(p. 243)
Rear Park Assist Camera (PAC) – operation
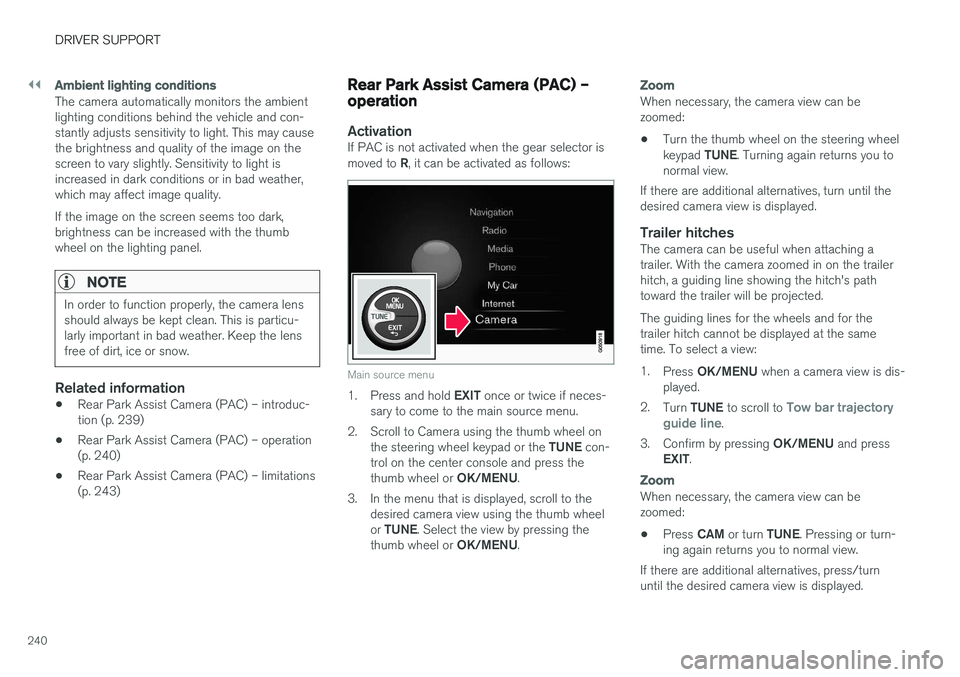
ActivationIf PAC is not activated when the gear selector is moved to
R, it can be activated as follows:
Main source menu
1.
Press and hold EXIT once or twice if neces-
sary to come to the main source menu.
2. Scroll to Camera using the thumb wheel on the steering wheel keypad or the TUNE con-
trol on the center console and press the thumb wheel or OK/MENU.
3. In the menu that is displayed, scroll to the desired camera view using the thumb wheelor TUNE . Select the view by pressing the
thumb wheel or OK/MENU.
Zoom
When necessary, the camera view can be zoomed:
• Turn the thumb wheel on the steering wheel keypad
TUNE. Turning again returns you to
normal view.
If there are additional alternatives, turn until the desired camera view is displayed.
Trailer hitchesThe camera can be useful when attaching atrailer. With the camera zoomed in on the trailerhitch, a guiding line showing the hitch's pathtoward the trailer will be projected. The guiding lines for the wheels and for the trailer hitch cannot be displayed at the sametime. To select a view: 1. Press OK/MENU when a camera view is dis-
played.
2. Turn TUNE to scroll to
Tow bar trajectory
guide line.
3. Confirm by pressing OK/MENU and press
EXIT .
Zoom
When necessary, the camera view can be zoomed:
• Press
CAM or turn TUNE. Pressing or turn-
ing again returns you to normal view.
If there are additional alternatives, press/turnuntil the desired camera view is displayed.
Page 243 of 396
DRIVER SUPPORT
}}
241
Automatic zoom
Automatic zoom is a feature that is available on
models equipped with a trailer hitch and the optional (p. 230)Park assist system. With thisalternative selected, the camera will zoom in onthe trailer hitch automatically if the vehicleapproaches an object/trailer. See also the "Settings" section below.
DeactivationMove the gear selector from R to another gear.
The camera remains active for approx. 5 seconds after the gear selector has been moved from R or
until the vehicle's forward speed exceeds 6 mph/10 km/h (21 mph/35 km/h in reverse).The screen will then revert to the view that was displayed before R was selected.
NOTE
If any button on the center console control panel is pressed, the camera image will disap- pear from the display. Pressing CAM will
return the camera image to the display.
SettingsBy default, PAC is set to activate when the gear selector is moved to R
To change PAC settings when a camera view is displayed: 1.
Press OK/MENU when a camera view is on
the screen. A menu will be displayed.
2. Turn TUNE to scroll to the desired setting.
3. Press OK/MENU to make the setting and
exit the menu by pressing EXIT.
Summary
•Pressing
CAM will activate the camera even
if the gear selector is not in Reverse.
• Toggle between normal view and zoom by pressing
CAM or by turning TUNE.
Related information
•Park assist – introduction (p. 230)
• Park assist – function (p. 230)
• Park assist – troubleshooting (p. 238)
• Park assist – limitations (p. 233)
• Rear Park Assist Camera (PAC) – introduc- tion (p. 239)
Rear Park Assist Camera (PAC) – guiding and marker lines
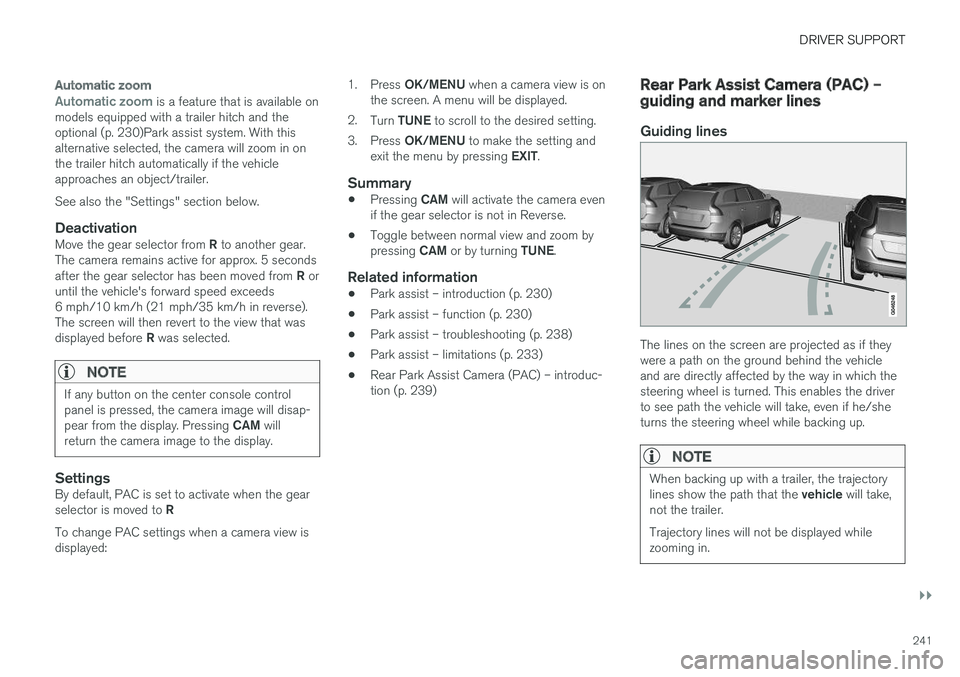
Guiding lines
The lines on the screen are projected as if they were a path on the ground behind the vehicleand are directly affected by the way in which thesteering wheel is turned. This enables the driverto see path the vehicle will take, even if he/sheturns the steering wheel while backing up.
NOTE
When backing up with a trailer, the trajectory lines show the path that the
vehicle will take,
not the trailer. Trajectory lines will not be displayed while zooming in.
Page 248 of 396

DRIVER SUPPORT
* Option/accessory.
246
BLIS * – Cross Traffic Alert (CTA)
Cross Traffic Alert (CTA) is a supplementary BLIS 17
function intended to detect vehicles
crossing behind your vehicle while you are back- ing up.
Park assist/CTA button
On vehicles equipped with the optional Park assist system (p. 230), Cross Traffic Alert (CTA)can be deactivated/reactivated by pressing thePark assist button on the center console. TheBLIS indicator lights on the front doors will flashwhen CTA is reactivated by pressing the button.
WARNING
• BLIS and CTA are information systems, NOT warning or safety systems and donot function in all situations.
• BLIS and CTA do not eliminate the needfor you to visually confirm the conditionsaround you, and the need for you to turnyour head and shoulders to make surethat you can safely change lanes or backup.
• As the driver, you have full responsibilityfor changing lanes/backing up in a safemanner.
When does CTA function
How CTA works
CTA supplements BLIS by warning the driver of crossing traffic behind your vehicle, for example,when backing out of a parking space. It is primarily designed to detect another vehicle but in certain cases may also detect pedestriansor smaller objects such as bicycles. CTA is only activated when the vehicle is backing up and is activated automatically when the gearselector is put in reverse.
• An audible signal indicates that CTA hasdetected something that is approaching fromthe side. The signal will come from either theleft or right audio system speakers, depend-ing on which the side of your vehicle theapproaching vehicle/object has beendetected.
• CTA also provides a warning by illuminatingthe BLIS indicator lights.
• An icon will also illuminate in the Park assistgraphic on the center console display.
LimitationsCTA has limitations in certain situations, forexample, the CTA sensors cannot "see" throughother parked vehicles or obstructions. The following are several examples where CTA's "field of vision" may initially be limited andapproaching vehicles cannot be detected untilthey are too close:
17
Blind Spot Information System
Page 254 of 396
STARTING AND DRIVING
* Option/accessory.
252
Switching off the engine Switch off the engine by pressing the START/
STOP ENGINE button.
If the gear selector is not in the P position or if
the vehicle is moving, press the START/STOP
ENGINE button twice or press and hold it in until
the engine switches off.
Related information
• Ignition modes (p. 74)
Engine Remote Start (ERS)
* –
introduction
ERS is a feature that makes it possible to remotely start the engine using the remote key tocool or heat the passenger compartment beforedriving.
The climate system will start using automatic set- tings. When the engine is started using ERS, it will run for a maximum of 15 minutes before automati-cally switching off again. After 2 ERS starts, theengine must be started in the normal way beforeERS can be used again.
NOTE
• Always adhere to applicable State, Prov- ince and/or Local laws regarding engineidling when using ERS.
• The service life of the remote key's bat-tery is affected by ERS use. If this featureis used frequently, the battery should bereplaced once a year, see Remote key –replacing the battery (p. 151).
WARNING
Keep the following in mind before using ERS:
• The vehicle should be in view.
• The vehicle should be unoccupied.
• The vehicle must not be parked indoors or in an enclosed area. Exhaust fumes areharmful to the health.
Related information
•
Engine Remote Start (ERS)
* – starting the
engine (p. 253)
• Engine Remote Start (ERS)
* – switching off
the engine (p. 253)
Page 257 of 396

STARTING AND DRIVING
}}
255
Transmission – general information The transmission automatically shifts between the various forward gears, based on the level ofacceleration and speed.
G021351
Shiftgate positions
Depress the button on the front of the gear selector knob to move the gear selector between the R, N , D , and P positions.
The gear selector can be moved freely betweenthe Geartronic (manual shifting) and Drive ( D)
positions while driving.
CAUTION
The transmission
Page 258 of 396
||
STARTING AND DRIVING
256
Shiftlock
When P has been selected, the transmission is
mechanically blocked in this position. The brake pedal must be depressed and the ignition must be in at least mode II (see Ignition modes
(p. 74)) before the gear lever can be moved fromthe P position.
WARNING
Always apply the parking brake when the vehicle is parked, particularly when parking on a hill. The transmission's P mode may not be
able to keep the vehicle stationary if it is parked on an incline.
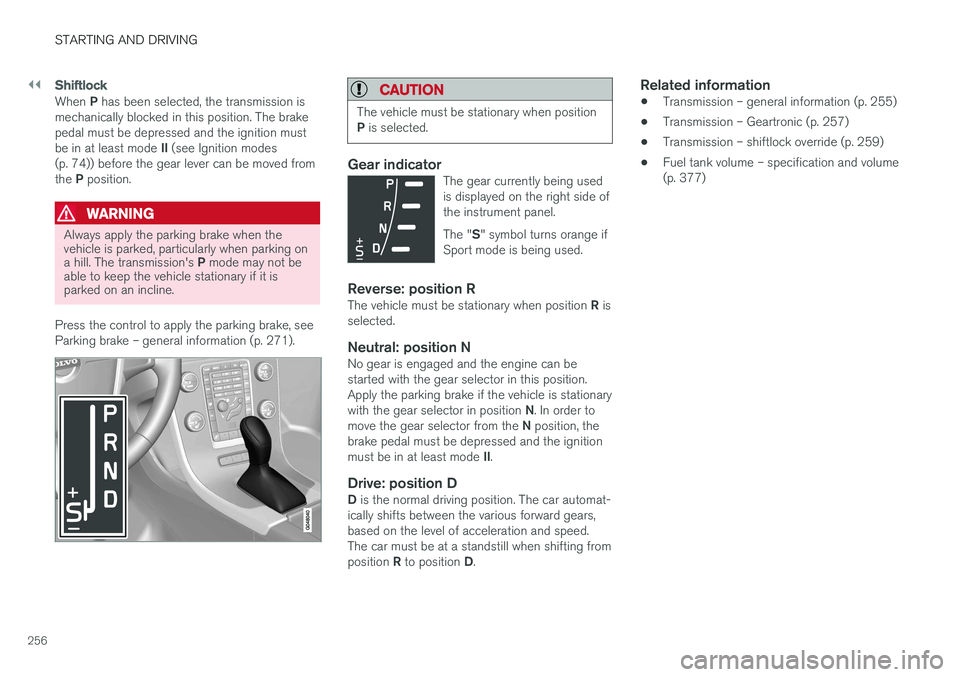
Press the control to apply the parking brake, see Parking brake – general information (p. 271).
CAUTION
The vehicle must be stationary when position P is selected.
Gear indicatorThe gear currently being used is displayed on the right side ofthe instrument panel. The " S" symbol turns orange if
Sport mode is being used.
Reverse: position RThe vehicle must be stationary when position R is
selected.
Neutral: position NNo gear is engaged and the engine can be started with the gear selector in this position.Apply the parking brake if the vehicle is stationary with the gear selector in position N. In order to
move the gear selector from the N position, the
brake pedal must be depressed and the ignitionmust be in at least mode II.
Drive: position DD is the normal driving position. The car automat-
ically shifts between the various forward gears, based on the level of acceleration and speed.The car must be at a standstill when shifting from position R to position D.
Related information
• Transmission – general information (p. 255)
• Transmission – Geartronic (p. 257)
• Transmission – shiftlock override (p. 259)
• Fuel tank volume – specification and volume (p. 377)
Page 259 of 396

STARTING AND DRIVING
}}
* Option/accessory.257
Transmission – Geartronic
Geartronic allows you to manually shift among your vehicle's forward gears. The manual posi-tion ( +S–) can be selected at any time.
Geartronic: manual shifting (+S–)To shift gears manually, move the gear selector to the side from D toward
+S– . The +S– symbol in the instrument
panel will change from white to
orange and the number of the gear currently
being used (
1, 2, 3, etc.) will be displayed (see
the following illustration) 5
.
• To return to automatic shifting mode from +S–
, move the gear selector to the side
toward D.
Gear shift indicator *
Gear shift indicator in a digital instrument panel *6
This option indicates when to shift up or down to help conserve fuel. A white arrow will appearabove or below the number of the current gear toprompt the driver to shift up or down.
While driving
•
If you select the manual shifting position while driving, the gear that was being used inthe Drive position will also initially beselected in the manual shifting position.
• Move the gear selector forward (toward
+) to
shift to a higher gear or rearward (toward –)
to shift to a lower gear.
• If you hold the gear selector toward "
–", the
transmission will downshift one gear at atime and will utilize the braking power of the engine. If the current speed is too high forusing a lower gear, the downshift will notoccur until the speed has decreased enoughto allow the lower gear to be used.
• If you slow to a very low speed, the transmis-sion will automatically shift down.
Shiftlock: Neutral (N)
If the gear selector is in the
N position and the
vehicle has been stationary for at least 3 seconds (irrespective of whether the engine is running)then the gear selector is locked. In order to move the gear selector from N to
another gear position, the brake pedal must be depressed and the ignition must be in at least position II, see Ignition modes (p. 74).
5
If Sport mode is being used, the symbol will change to "S".
6 Analog instrument panel: the gear shift indicator is displayed in the center of the speedometer.
Page 260 of 396
||
STARTING AND DRIVING
* Option/accessory.
258
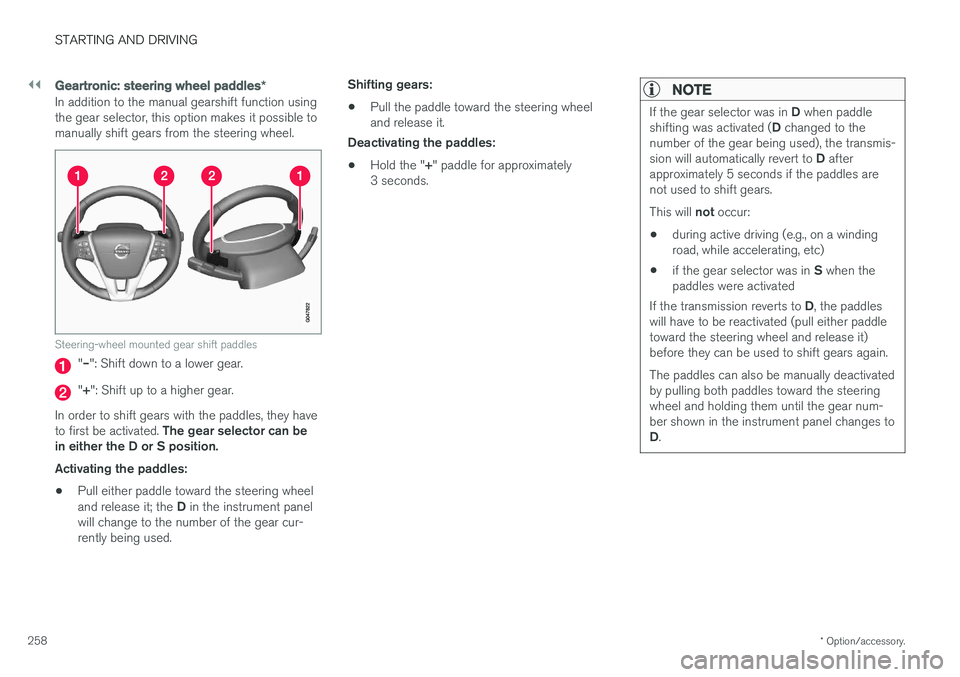
Geartronic : steering wheel paddles *
In addition to the manual gearshift function using the gear selector, this option makes it possible tomanually shift gears from the steering wheel.
Steering-wheel mounted gear shift paddles
"– ": Shift down to a lower gear.
"+ ": Shift up to a higher gear.
In order to shift gears with the paddles, they have to first be activated. The gear selector can be
in either the D or S position. Activating the paddles:
• Pull either paddle toward the steering wheel and release it; the
D in the instrument panel
will change to the number of the gear cur- rently being used. Shifting gears:
• Pull the paddle toward the steering wheeland release it.
Deactivating the paddles:
• Hold the "
+" paddle for approximately
3 seconds.
NOTE
If the gear selector was in D when paddle
shifting was activated ( D changed to the
number of the gear being used), the transmis- sion will automatically revert to D after
approximately 5 seconds if the paddles are not used to shift gears. This will not occur:
• during active driving (e.g., on a winding road, while accelerating, etc)
• if the gear selector was in
S when the
paddles were activated
If the transmission reverts to D, the paddles
will have to be reactivated (pull either paddletoward the steering wheel and release it)before they can be used to shift gears again. The paddles can also be manually deactivated by pulling both paddles toward the steeringwheel and holding them until the gear num-ber shown in the instrument panel changes to D .