2018 VOLVO S60 INSCRIPTION on call
[x] Cancel search: on callPage 303 of 396

WHEELS AND TIRES
301
1.
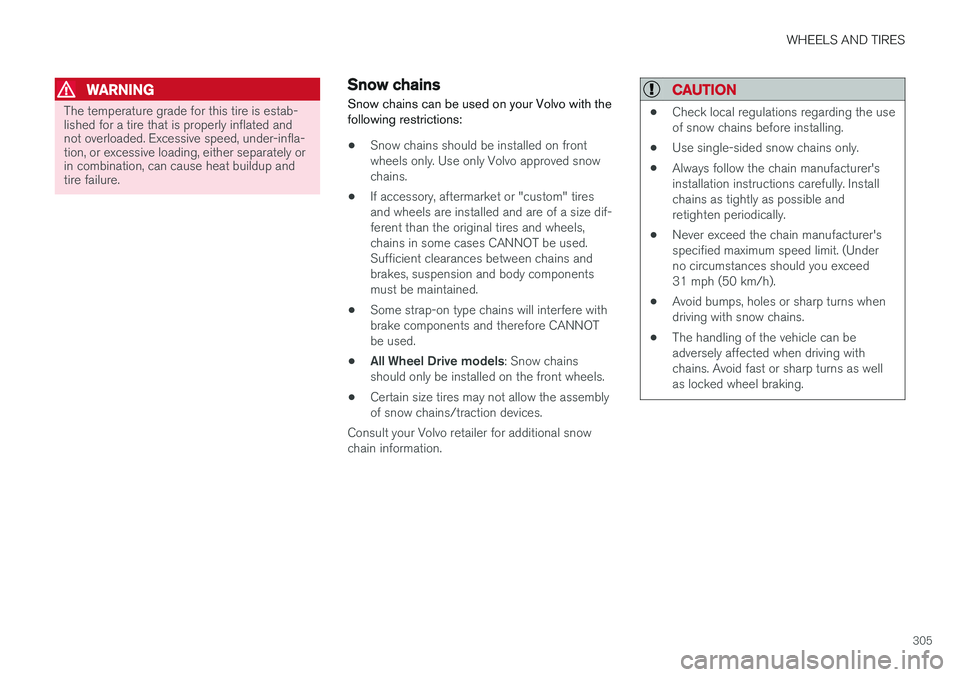
215 : the width of the tire (in millimeters)
from sidewall edge to sidewall edge. The larger the number, the wider the tire.
2. 65: The ratio of the tire's height to its width
in percent.
3. R: Radial tire (the designation RF and the
symbol indicate that the vehicle is
equipped with optional self-supporting run flat tires 4
.
4. 15: The diameter of the wheel rim (in
inches).
5. 95: The tire's load index. In this example, a
load index of 95 equals a maximum load of 1521 lbs (690 kg).
6. H: The tire's speed rating, or the maximum
speed at which the tire is designed to bedriven for extended periods of time, carryinga permissible load for the vehicle, and withcorrect inflation pressure. For example, Hindicates a speed rating of 130 mph(210 km/h).
NOTE
The tire's load index and speed rating may not appear on the sidewall because they arenot required by law.
7. M+S or M/S = Mud and Snow, AT = All Ter-
rain, AS = All Season
8. U.S. DOT Tire Identification Number (TIN) : This begins with the letters "DOT" and
indicates that the tire meets all federalstandards. The next two numbers or lettersare the plant code where it was manufac-tured, the next two are the tire size code andthe last four numbers represent the weekand year the tire was built. For example,1510 means that the tire was manufacturedduring week 15 of 2010. The numbers inbetween are marketing codes used at themanufacturer's discretion. This informationhelps a tire manufacturer identify a tire forsafety recall purposes.
9. Tire Ply Composition and Material Used :
Indicates the number of plies indicates or thenumber of layers of rubber-coated fabric inthe tire tread and sidewall. Tire manufactur-ers also must indicate the ply materials in thetire and the sidewall, which include steel,nylon, polyester, and others.
10. Maximum Load : Indicates the maximum
load in pounds and kilograms that can becarried by the tire. Refer to the vehicle's tireinformation placard located on the B-Pillarfor the correct tire pressure for your vehicle.
11. Treadwear, Traction, and Temperaturegrades : see Tire specifications – Uniform Tire Quality Grading (p. 304) for more infor-mation.
12. Maximum permissible inflation pressure: the greatest amount of air pressure that should ever be put in the tire. This limit is setby the tire manufacturer.
4
Self-supporting run flat tires may not be available on all models
Page 307 of 396

WHEELS AND TIRES
305
WARNING
The temperature grade for this tire is estab- lished for a tire that is properly inflated andnot overloaded. Excessive speed, under-infla-tion, or excessive loading, either separately orin combination, can cause heat buildup andtire failure.
Snow chains
Snow chains can be used on your Volvo with the following restrictions:
• Snow chains should be installed on front wheels only. Use only Volvo approved snowchains.
• If accessory, aftermarket or "custom" tiresand wheels are installed and are of a size dif-ferent than the original tires and wheels,chains in some cases CANNOT be used.Sufficient clearances between chains andbrakes, suspension and body componentsmust be maintained.
• Some strap-on type chains will interfere withbrake components and therefore CANNOTbe used.
• All Wheel Drive models
: Snow chains
should only be installed on the front wheels.
• Certain size tires may not allow the assemblyof snow chains/traction devices.
Consult your Volvo retailer for additional snowchain information.
CAUTION
• Check local regulations regarding the use of snow chains before installing.
• Use single-sided snow chains only.
• Always follow the chain manufacturer'sinstallation instructions carefully. Installchains as tightly as possible andretighten periodically.
• Never exceed the chain manufacturer'sspecified maximum speed limit. (Underno circumstances should you exceed31 mph (50 km/h).
• Avoid bumps, holes or sharp turns whendriving with snow chains.
• The handling of the vehicle can beadversely affected when driving withchains. Avoid fast or sharp turns as wellas locked wheel braking.
Page 308 of 396

WHEELS AND TIRES
306
Snow tires/studded tires5
Owners who live in or regularly commute through areas with sustained periods of snow oricy driving conditions are strongly advised to fitsuitable winter tires to help retain the highestdegree of traction.
Tires for winter use:
• It is important to install winter tires on all four wheels to help retain traction during corner-ing, braking, and accelerating. Failure to doso could reduce traction to an unsafe level oradversely affect handling.
• Do not mix tires of different design as thiscould also negatively affect overall tire roadgrip.
• Winter tires wear more quickly on dry roadsin warm weather. They should be removedwhen the winter driving season has ended.
• Studded tires should be run-in 300 – 600 miles (500 – 1000 km) during whichthe vehicle should be driven as smoothly aspossible to give the studs the opportunity toseat properly in the tires. The tires shouldhave the same rotational direction through-out their entire lifetime.
NOTE
Please consult state or provincial regulations restricting the use of studded winter tiresbefore installing such tires.
Tire pressure monitoring - overview
Volvo provides two different systems to monitor tire pressure: Tire Pressure Monitoring System(TPMS) or Tire Monitor.
Determining which tire monitoring system is in your vehicle
To see which system is installed in your vehicle, press the MY CAR button on the center console.
Go to
SettingsCar settings.
• If your vehicle has a menu called
Tire
monitoring, see Tire Monitor - introduction
(p. 307).
• If your vehicle has a menu called
Tire
pressure, see Tire Pressure Monitoring Sys-
tem (TPMS) – general information (p. 310).
Introduction
Each tire, including the spare 6
(if provided),
should be checked monthly when cold and infla- ted to the inflation pressure recommended by thevehicle manufacturer on the vehicle placard ortire inflation pressure label. (If your vehicle hastires of a different size than the size indicated onthe vehicle placard or tire inflation pressure label,you should determine the proper tire inflationpressure for those tires.) As an added safety feature, your vehicle has been equipped with a tire pressure monitoring
5 Where permitted
6 Available as an accessory
Page 310 of 396

||
WHEELS AND TIRES
308
NOTE
The system indicates low tire pressure but does not replace normal tire maintenance. Forinformation on correct tire pressure, pleaserefer to the tire inflation decal on the driver'sdoor opening or consult your Volvo retailer.
Related information
•Tire pressure monitoring - overview (p. 306)
• Calibrating Tire Monitor (p. 308)
Calibrating Tire Monitor In order for Tire Monitor to work correctly, tire pressure reference values must be set (the sys-tem must be calibrated). This must be doneeach time wheels or tire pressures are changed.
Calibration1. Switch off the engine.
2. Inflate the tires to the desired pressure (con-
sult tire pressure placard located on the driv- er's side B-pillar (the structural member atthe side of the vehicle).
3. Start the engine but keep the vehicle at a standstill.
4. Press the MY CAR button on the center
console control panel and press OK/MENU.
5. Select
Tire monitor.
6. Select
Start calibration and press OK/
MENU .
7. Press OK/MENU again after all of the tires
have been checked and reinflated. 8. Drive away.
> The calibration process will begin whenthe vehicle reaches a speed of approxi- mately 22 mph (35 km/h). Calibration willbe interrupted if the engine is switchedoff but will resume automatically in thebackground when the vehicle is drivenagain. The system will not give any confir-mation when calibration is finished.
When driving with heavy loads or at sustainedhighway speeds, the tire pressure should beadjusted to the recommended inflation pressuresaccording to the tire inflation pressure placardlocated on the driver's side B-pillar (the structuralmember at the side of the vehicle, at the rear ofthe driver's door opening) or to the tire inflationpressure table in the owner's information. After adjusting inflation pressure, repeat steps 1-5 above.
NOTE
Always remember to calibrate Tire Monitor when the wheels have been changed or thetire pressure has been corrected according totire pressure placard or tire pressure table. Ifcorrect reference values have not been set,the system cannot issue low tire pressurealerts correctly.
Page 314 of 396

WHEELS AND TIRES
* Option/accessory.
312
Tire Pressure Monitoring System (TPMS) – recalibrating
The Tire Pressure Monitoring System (TPMS) uses a reference value in order to determine iftire pressure is too low.
Recalibrating TPMS (Canadian models
only) *
In certain cases, it may be necessary to recali- brate TPMS to conform to Volvo's recommendedtire inflation pressures (see the tire inflation decalon the driver's door opening), for example, ifhigher inflation pressure is necessary whentransporting heavy loads. Always inflate the tires to Volvo's recommended tire pressure before recalibrating TPMS. Recalibrating TPMS is done in the vehicle's menu system. To do so:
1. Switch off the engine.
2. Inflate the tires to the desired pressure and
put the ignition in mode I or II (see Ignition
modes (p. 74) for additional information).
3. Press the MY CAR key in the center console
control panel and select
SettingsCar
settings
Tire pressure.
4. Press OK/MENU , select
Calibrate tire
pressure and press OK/MENU again. 5. Drive the vehicle at a speed above 20 mph
(30 km/h) continuously for at least 10 minutes.
> Calibration is done automatically once ini-tiated by the driver and the system does not provide confirmation when calibrationis completed.
After adjusting inflation pressure, repeat steps1-5 above.
Related information
• Tire Pressure Monitoring System (TPMS) –general information (p. 310)
• Tire Pressure Monitoring System (TPMS) –messages (p. 313)
• Tire Pressure Monitoring System (TPMS) –activating/deactivating (p. 312)
• Tire Pressure Monitoring System (TPMS) –changing wheels (p. 311)
• My Car – introduction (p. 71)
Tire Pressure Monitoring System (TPMS) – activating/deactivating
Activating/deactivating TPMS
(Canadian models only)
1. Switch off the engine. 2. Put the ignition in mode I or II (see Ignition
modes (p. 74) for additional information).
3. Press the MY CAR key in the center console
control panel and select
SettingsCar
settings
Tire pressure
4. Select Tire monitoring and press OK/
MENU to turn the system on or off.
Related information
•Tire Pressure Monitoring System (TPMS) – general information (p. 310)
Page 318 of 396

||
WHEELS AND TIRES
* Option/accessory.
316
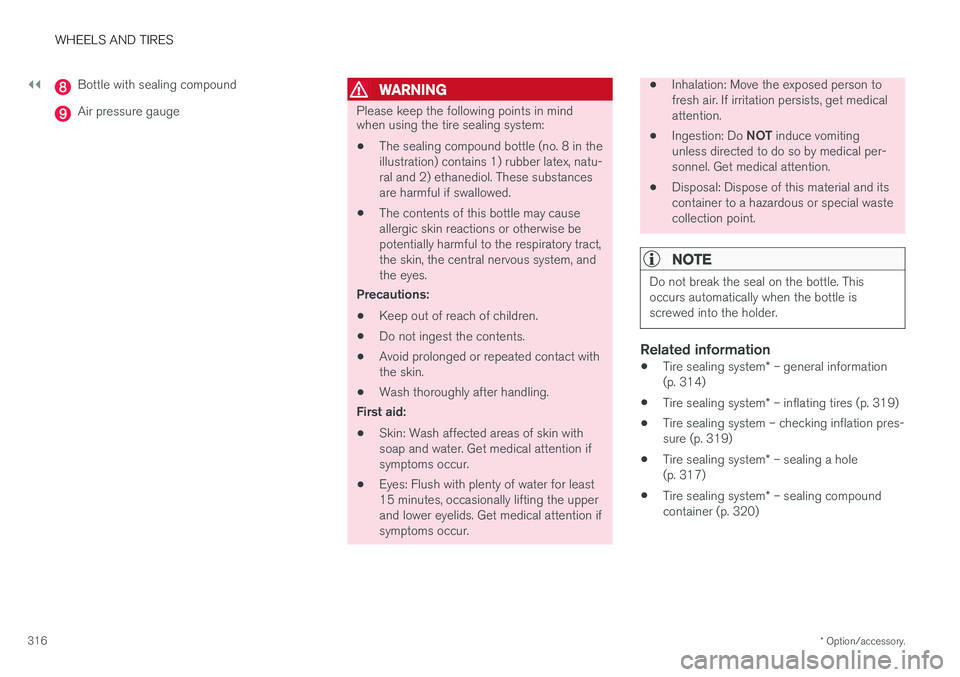
Bottle with sealing compound
Air pressure gauge
WARNING
Please keep the following points in mind when using the tire sealing system:
• The sealing compound bottle (no. 8 in the illustration) contains 1) rubber latex, natu-ral and 2) ethanediol. These substancesare harmful if swallowed.
• The contents of this bottle may causeallergic skin reactions or otherwise bepotentially harmful to the respiratory tract,the skin, the central nervous system, andthe eyes.
Precautions: • Keep out of reach of children.
• Do not ingest the contents.
• Avoid prolonged or repeated contact with the skin.
• Wash thoroughly after handling.
First aid: • Skin: Wash affected areas of skin with soap and water. Get medical attention ifsymptoms occur.
• Eyes: Flush with plenty of water for least15 minutes, occasionally lifting the upperand lower eyelids. Get medical attention ifsymptoms occur.
•Inhalation: Move the exposed person to fresh air. If irritation persists, get medicalattention.
• Ingestion: Do
NOT induce vomiting
unless directed to do so by medical per-sonnel. Get medical attention.
• Disposal: Dispose of this material and itscontainer to a hazardous or special wastecollection point.
NOTE
Do not break the seal on the bottle. This occurs automatically when the bottle isscrewed into the holder.
Related information
•
Tire sealing system
* – general information
(p. 314)
• Tire sealing system
* – inflating tires (p. 319)
• Tire sealing system – checking inflation pres- sure (p. 319)
• Tire sealing system
* – sealing a hole
(p. 317)
• Tire sealing system
* – sealing compound
container (p. 320)
Page 319 of 396

WHEELS AND TIRES
}}
* Option/accessory.317
Tire sealing system * – sealing a
hole The tire sealing system can be used to tempo- rarily seal a hole in the tread surface of a tire.
Stage 1: Sealing the hole1. Peel off the speed limit sticker and affix it to the steering wheel hub where it will be clearly visible to the driver.
2. Ensure that the on/off switch is in position 0
(the 0 side of the switch should be pressed
down).
WARNING
Contact with the sealing compound may cause skin irritation. If contact occurs, washthe affected area immediately with soap andwater.
3. Unscrew the orange cover over the bottle holder on the compressor and unscrew the cap on the bottle of sealing compound.
NOTE
Do not break the seal on the bottle. This occurs automatically when the bottle isscrewed into the holder.
4. Screw the bottle into the bottle holder as faras possible.
WARNING
The bottle is equipped with a catch to keep it securely in place and help prevent sealingcompound leakage. Once in place, the bottlecannot be unscrewed. This must be done by atrained and qualified Volvo service technician.
5. Remove the valve cap from the tire
Page 320 of 396

||
WHEELS AND TIRES
318
WARNING
•Never stand next to the tire being inflated when the compressor is in operation.
• If cracks, bubbles, etc. form on the tire,switch off the compressor immediately.
• If there is visible damage to the sidewall orthe rim, the tire cannot be repaired. Thevehicle should not be driven if this occurs.Contact a towing service, use the Volvo OnCall feature in your vehicle or contact VolvoRoadside Assistance if applicable.
NOTE
The air pressure gauge will temporarily show an increase in pressure to approximately88 psi (6 bar) while the sealing compound isbeing pumped into the tire. The pressureshould return to a normal level after approxi-mately 30 seconds.
9. Within seven minutes, inflate the tire to
between 22—44 psi (1.8—3.0 bar). Switch off the compressor briefly to get a clearreading from the pressure gauge.
CAUTION
The compressor should not be used for more than 10 minutes at a time to avoid overheat-ing.
WARNING
If the pressure remains below 22 psi (1.8 bar) after approximately seven minutes, turn offthe compressor. In this case, the hole is toolarge to be sealed and the vehicle should notbe driven.
10. Switch off the compressor and disconnect the electrical wire from the 12-volt socket.
11. Unscrew the hose from the tire's inflation valve and put the cover on the hose back into place to help prevent seepage of residualsealing compound in the hose. Reinstall thevalve cap.
CAUTION
•After inflating the tires, always reinstall the valve cap to help avoid damage to thevalve from dirt, gravel, etc.
• Use plastic valve caps only. Metal capscould corrode and become difficult toremove.
12. Immediately drive the vehicle for approxi-
mately 2 miles (3 km) at a maximum speed of 50 mph (80 km/h) to distribute the seal-ing compound in the tire.
CAUTION
If your vehicle is equipped with the Tire Pres- sure Monitoring System (TPMS), the use ofthe sealing compound may lead to incorrecttire pressure readings or in rare cases, dam-age to the tire pressure sensor. Use the tiresealing system to check and adjust the dam-aged tire's inflation pressure.
NOTE
• Safely stow the tire sealing system in a convenient place as it will soon be usedagain to check the tire