Page 449 of 672
4496-3. Using the storage features
6
Interior features
Luggage compartment features
Deck hooks are provided for
securing loose items.
Deck hooks
Page 456 of 672

4566-4. Using the other interior features
Garage door opener
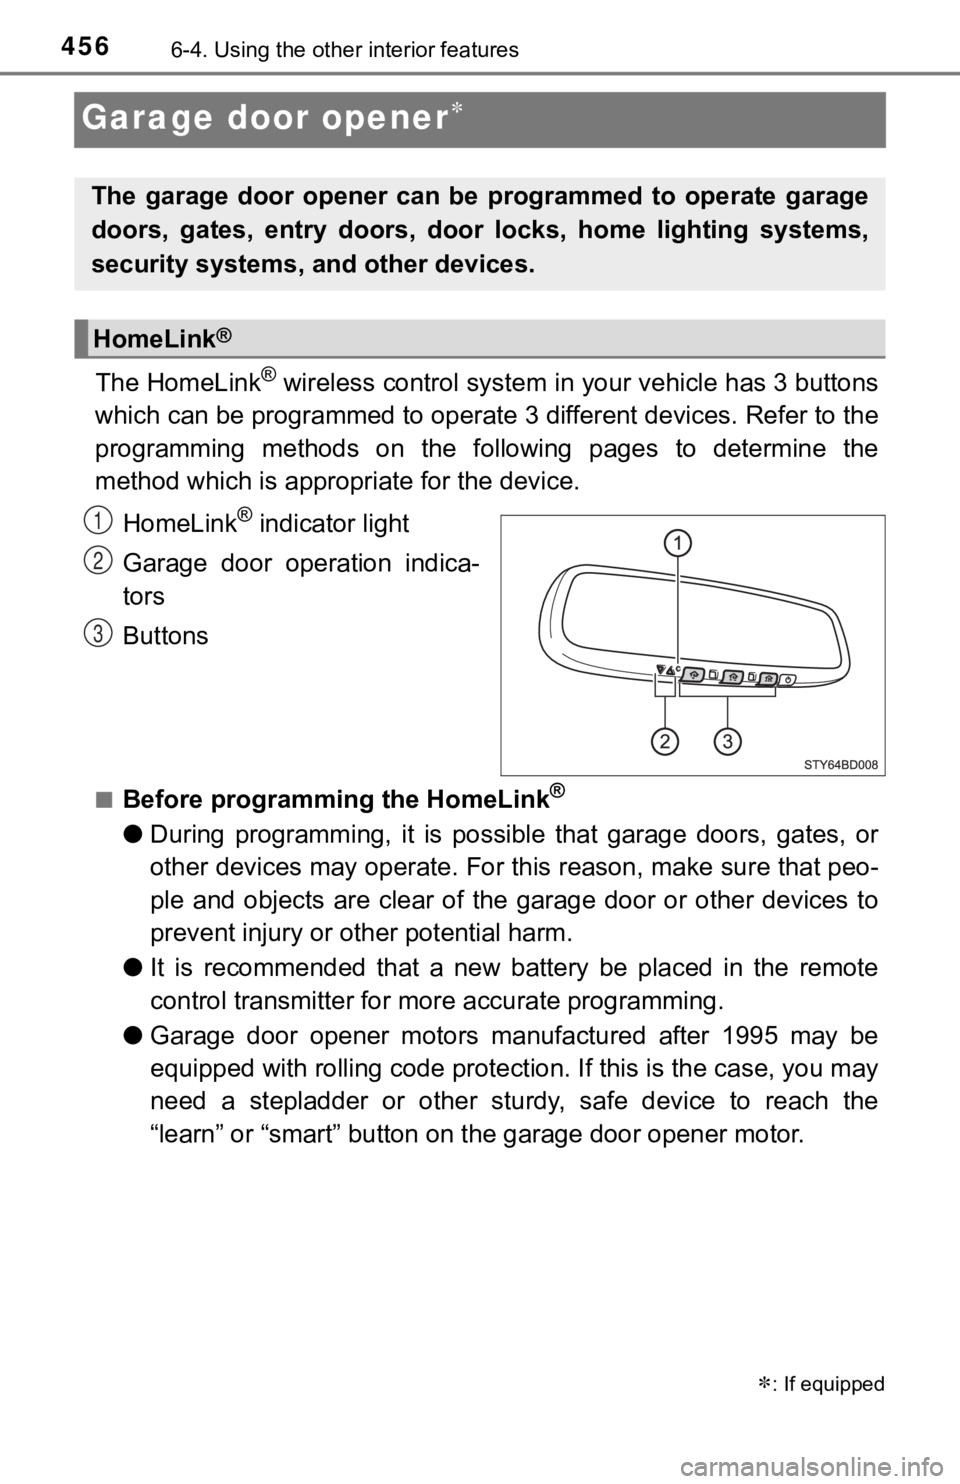
The HomeLink® wireless control system in your vehicle has 3 buttons
which can be programmed to operate 3 different devices. Refer to the
programming methods on the following pages to determine the
method which is approp riate for the device.
HomeLink
® indicator light
Garage door operation indica-
tors
Buttons
■Before programming the HomeLink®
● During programming, it is possible that garage doors, gates, or
other devices may operate. For this reason, make sure that peo-
ple and objects are clear of the garage door or other devices t o
prevent injury or other potential harm.
● It is recommended that a new battery be placed in the remote
control transmitter for mo re accurate programming.
● Garage door opener motors manufactured after 1995 may be
equipped with rolling code pro tection. If this is the case, you may
need a stepladder or other sturdy, safe device to reach the
“learn” or “smart” button on the garage door opener motor.
: If equipped
The garage door opener can be programmed to operate garage
doors, gates, entry doors, door locks, home lighting systems,
security systems, and other devices.
HomeLink®
1
2
3
Page 468 of 672
4686-4. Using the other interior features
WARNING
■When driving the vehicle
Do not adjust the display. Be sure to adjust the display only when the vehi-
cle is stopped.
■ When doing the circling calibration
Be sure to secure a wide space, and watch out for people and ve hicles in
the neighborhood. Do not violate any local traffic rules while performing cir-
cling calibration.
NOTICE
■ To avoid the compass malfunctions
Do not place magnets or any metal objects near the inside rear view mirror.
Doing this may cause a malfunction of the compass sensor.
■ To ensure normal operation of the compass
● Do not perform circling calibration of the compass in a place w here the
earth’s magnetic field is subject to interference by artificial magnetic fields.
● During calibration, do not operate electric systems (moon roof, power win-
dows, etc.) as they may interfere with the calibration.
Page 479 of 672

4797-2. Maintenance
7
Maintenance and care
Vehicle interior
ItemsCheck points
Accelerator pedal• The accelerator pedal should move smoothly(without uneven pedal effort or catching).
Automatic transmission
“Park” mechanism• When parked on a slope and the shift lever isin P, is the vehicle securely stopped?
Brake pedal
• Does the brake pedal move smoothly?
• Does the brake pedal have appropriate clear-ance from the floor? ( P. 607)
• Does the brake pedal have the correct amount of free play? ( P. 607)
Brakes
• The vehicle should not pull to one side when
the brakes are applied.
• The brakes should work effectively.
• The brake pedal should not feel spongy.
• The brake pedal should not get too close to the floor when the brakes are applied.
Head restraints• Do the head restraints move smoothly andlock securely?
Indicators/buzzers• Do the indicators and buzzers function prop-erly?
Parking brake
• Does the parking brake pedal movesmoothly?
• When parked on a slope and the parking brake is on, is the vehicle securely stopped?
Seat belts• Do the seat belts operate smoothly?
• The seat belts should not be damaged.
Seats• Do the seat controls operate properly?
Steering wheel
• Does the steering wheel rotate smoothly?
• Does the steering wheel have the correctamount of free play?
• There should not be any strange sounds com-
ing from the steering wheel.
Page 505 of 672

5057-3. Do-it-yourself maintenance
7
Maintenance and care
NOTE
Operation is subject to the following two conditions: (1) this device may
not cause interference, and (2) this device must accept any int erference,
including interference that may cause undesired operation of th e device.
NOTE
L’utilisation de ce dispositif es t autorisée seulement aux deux conditions
suivantes : (1) il ne doit pas produire de brouillage, et (2) l’utilisateur du
dispositif doit être prêt à a ccepter tout brouillage radioélect rique reçu,
même si ce brouillage est suscept ible de compromettre le fonctionne-
ment du dispositif.
WARNING
■When inspecting or replacing tires
Observe the following precaut ions to prevent accidents.
Failure to do so may cause damage to parts of the drive train as well as
dangerous handling characteristics, which may lead to an accide nt
resulting in death o r serious injury.
●Do not mix tires of different ma kes, models or tread patterns.
Also, do not mix tires of re markably different treadwear.
●Do not use tire sizes other th an those recommended by Toyota.
●Do not mix differently constructed tires (radial, bias-belted o r bias-ply
tires).
●Do not mix summer, all season and snow tires.
●Do not use tires that have b een used on another vehicle.
Do not use tires if you do not kn ow how they were used previous ly.
■When initializing the tire pressure warning system
Do not operate the tire pressure warning reset switch without first
adjusting the tire inflation pressure to the specified level. O therwise, the
tire pressure warning light may not come on even if the tire in flation
pressure is low, or it may come on when the tire inflation pres sure is
actually normal.
Page 535 of 672

5357-3. Do-it-yourself maintenance
7
Maintenance and care
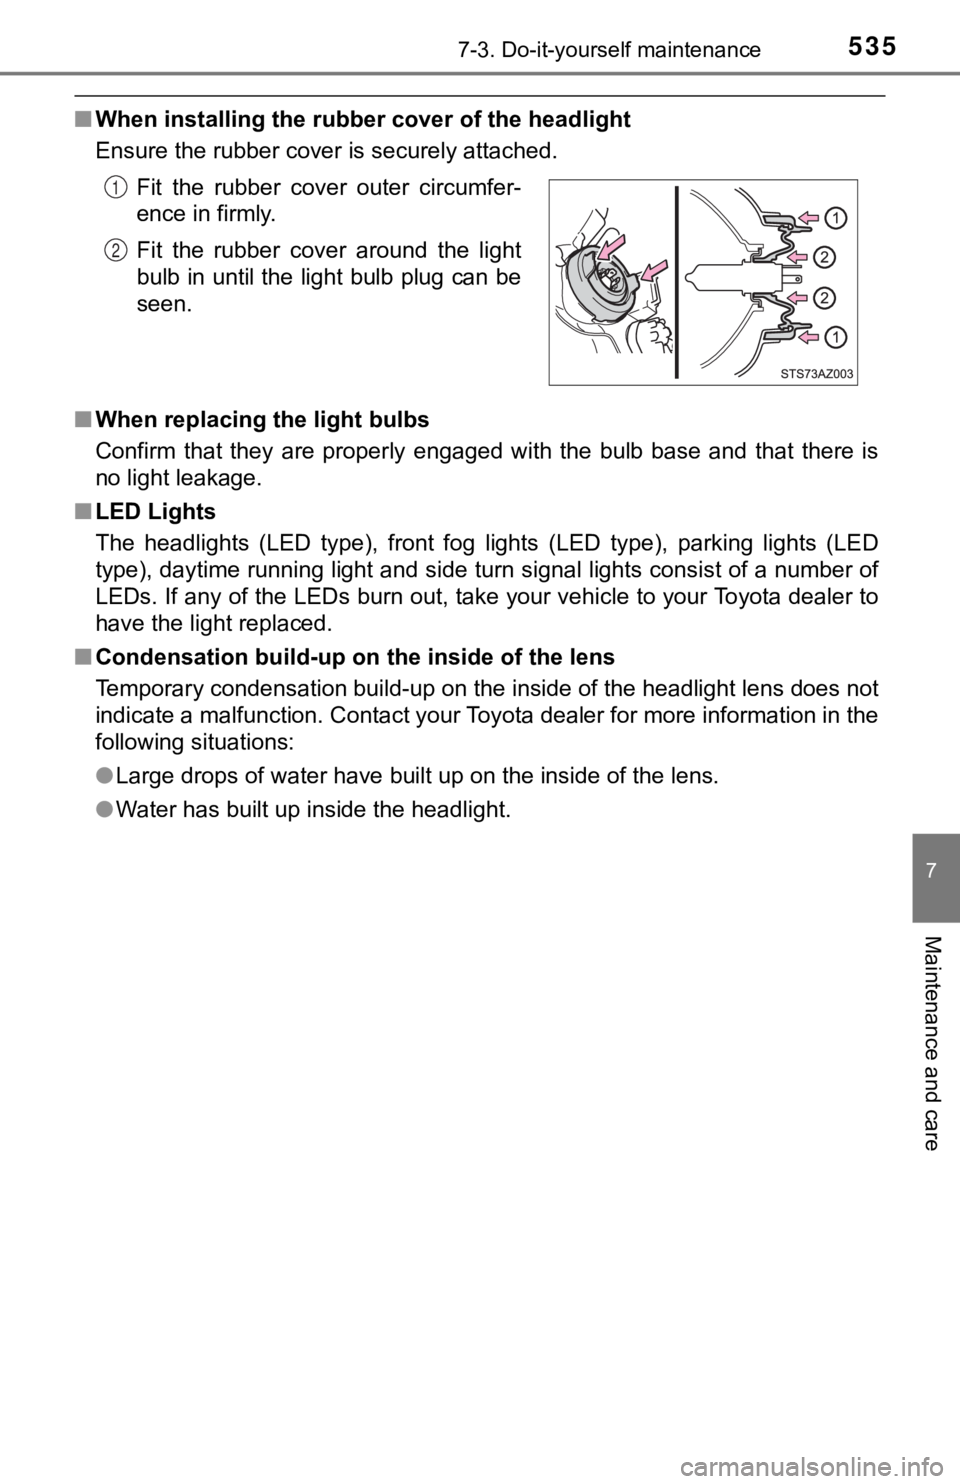
■When installing the rubber cover of the headlight
Ensure the rubber cover is securely attached.
■ When replacing the light bulbs
Confirm that they are properly engaged with the bulb base and that there is
no light leakage.
■ LED Lights
The headlights (LED type), front fog lights (LED type), parking lights (LED
type), daytime running light and side turn signal lights consis t of a number of
LEDs. If any of the LEDs burn out, take your vehicle to your To yota dealer to
have the light replaced.
■ Condensation build-up on the inside of the lens
Temporary condensation build-up on the inside of the headlight lens does not
indicate a malfunction. Contact your Toyota dealer for more information in the
following situations:
● Large drops of water have built up on the inside of the lens.
● Water has built up inside the headlight.Fit the rubber cover outer circumfer-
ence in firmly.
Fit the rubber cover around the light
bulb in until the light bulb plug can be
seen.
1
2
Page 536 of 672

5367-3. Do-it-yourself maintenance
WARNING
■Replacing light bulbs
● Turn off the lights. Do not attempt to replace the bulb immedia tely after
turning off the lights.
The bulbs become very hot and may cause burns.
● Do not touch the glass portion of the light bulb with bare hands. When it is
unavoidable to hold the glass portion, use and hold with a clea n dry cloth
to avoid getting moisture and oils on the bulb.
Also, if the bulb is scratched or dropped, it may blow out or crack.
● Fully install light bulbs and any parts used to secure them. Failure to do so
may result in heat damage, fire, or water entering the headligh t unit. This
may damage the lights or cause condensation to build up on the lens.
● Do not attempt to repair or disassemble the bulb, bulb base, el ectrical wir-
ing, or subcomponents.
Doing so could result in electric shock and serious injury.
■ To prevent damage or fire
● Make sure bulbs are fully seated and locked.
● Check the wattage of the bulb before installing to prevent heat damage.
Page 542 of 672
5428-2. Steps to take in an emergency
If a tow truck is not available in an emergency, your vehicle may be
temporarily towed using cables or chains secured to the emergen cy
towing hooks. This should only be attempted on hard surfaced roads
for at most 50 miles (80 km) at under 18 mph (30km/h).
A driver must be in the vehicle to steer and operate the brakes . The
vehicle’s wheels, drive train, a xles, steering and brakes must be in
good condition.
Securely attach cables or chains to the towing hooks.
Take care not to damage the vehicle body.
Enter the vehicle being towed and start the engine.
If the engine does not start, turn the engine switch to the “ON” posi-
tion.
4WD models: Put the front-wheel dr ive control switch in “2WD”.
Shift the shift lever to N and release the parking brake.
When the shift lever cannot be shifted: (P. 201)
Emergency towing
Emergency towing procedure
1
Ty p e AType B
2
3
4