Page 308 of 672

3084-5. Using the driving support systems
Trailer brake controller
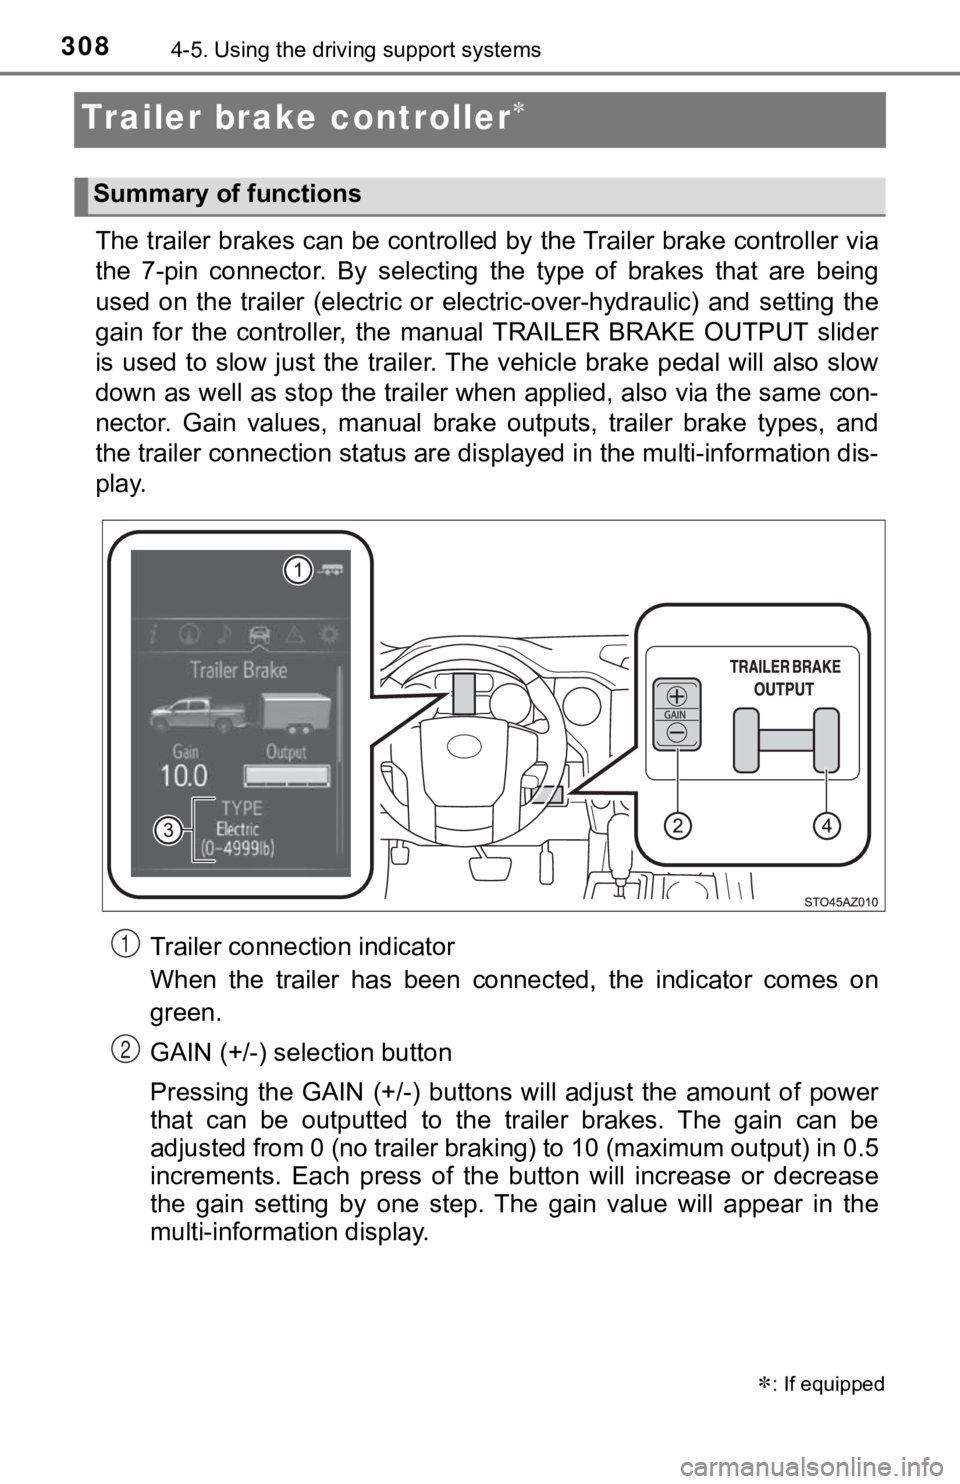
The trailer brakes can be controlled by the Trailer brake contr oller via
the 7-pin connector. By selecting the type of brakes that are being
used on the trailer (electric or electric-over-hydraulic) and s etting the
gain for the controller, the manual TRAILER BRAKE OUTPUT slider
is used to slow just the traile r. The vehicle brake pedal will also slow
down as well as stop the trailer when applied, also via the sam e con-
nector. Gain values, manual brake outputs, trailer brake types, and
the trailer connection status are displayed in the multi-information dis-
play.
Trailer connection indicator
When the trailer has been connected, the indicator comes on
green.
GAIN (+/-) selection button
Pressing the GAIN (+/-) buttons w ill adjust the amount of power
that can be outputted to the trailer brakes. The gain can be
adjusted from 0 (no trailer braking) to 10 (maximum output) in 0.5
increments. Each press of the bu tton will increase or decrease
the gain setting by one step. The gain value will appear in the
multi-information display.
: If equipped
Summary of functions
1
2
Page 309 of 672

3094-5. Using the driving support systems
4
Driving
Trailer brake type
Trailer brake type can be selected by using the multi-information. The
combination meter will show which trailer brake type is selected in the
multi-information display.
Manual TRAILER BRAKE OUTPUT slider
Adjusting this slider position will engage the trailer’s brakes only. If the
manual TRAILER BRAKE OUTPUT slider is used while the vehicle
brake is applied, the greater of the two outputs will be sent to the trailer
brakes.
The trailer brake type can be se lected on the multi-information display
as following:
Press “ ” or “” of meter control sw itches and select .
Press “ ” or “ ” of meter control switches and select “Vehicle Set-
tings”, and press .
Press “ ” or “ ” of meter control switches and select “TBC Trailer
Type”, and press to select the correct type of trailer brakes that
are equipped on the trailer.
Changing trailer brake type will cause the current gain setting to reset
to zero. Make sure to set the gain as described in the followin g sec-
tion.
Gain setting on trailer brake controller should be set for a sp ecific tow-
ing condition. Gain setting should be adjusted each time the ve hicle
load, trailer load, road conditions, or weather changes. Settin g the
gain value to 0 will disable the tra iler brake controller output.
Make sure the trailer brakes are in good working condition and
functioning normally. See trailer dealer if necessary.
Hook up the trailer and make p roper electrical connections.
Select the correct type of trailer brakes that are equipped on the
trailer by using the multi-information display.
Drive vehicle with trailer attached on a level road surface sim ilar to
towing condition and in traffic-free environment. Driving speed
should be approximately 20 - 25 mph [35 - 40 km/h].
Changing settings of the trailer brake type
Setting the Gain
3
4
1
2
3
1
2
3
4
Page 311 of 672

3114-5. Using the driving support systems
4
Driving
WARNING
■Trailer brake type setting
It is the responsibility of the driver to make sure the trailer brakes are func-
tioning normally and adjusted appropriately. Failure to check a nd maintain
trailer brakes may result in loss of vehicle control, crash, or serious injury.
Trailer brake control system will work with most electric and e lectric-over-
hydraulic trailer braking systems up to 3 axles (24A output to trailer brakes).
Please be sure to test compatibility with the system at low spe eds and in a
safe area. If a warning message appears in the multi-information display
( P. 563), have the vehicle inspected by your Toyota dealer immed iately.
Some electric-over-hydraulic trailer brakes will take some mini mum output
to activate. Trailer brake control system will not work with tr ailer hydraulic
surge brakes.
■ When driving on slippery road surfaces
When stopping with ABS activated, output to the trailer might b e reduced in
order to reduce the likelihood of trailer wheels to lock. The trailer is not
equipped with ABS. Drive safely on slippery road surfaces.
Page 320 of 672
320
5-1. Basic OperationsMultimedia system types.....322
Entune Audio ......................324
Steering wheel audio switches .......................... 327
USB Port/AUX Port ........... 328
5-2. Setup Setup menu....................... 329
General settings ................ 330
Audio settings ................... 332
Display settings ................. 333
Voice settings.................... 334
5-3. Using the audio system Basic audio operations...... 335
Selecting the audio source ............................. 336
List screen operation......... 337
Sound settings .................. 339
5-4. Using the radio Radio operation................. 340
5-5. Playing an audio CD and MP3/WMA/AAC discs
CD player operation .......... 342
5Multimedia
Page 321 of 672

321
5Multimedia
5-6. Using an external deviceListening to an iPod .......... 347
Listening to a USB memory device................ 351
Using the AUX port ........... 355
5-7. Connecting Bluetooth
®
Preparations to use wireless
communication ................ 356
Registering a Bluetooth
®
audio player
for the first time ............... 361
Registering a Bluetooth
®
phone for the first time ... 362
Registering a Bluetooth
®
device.............................. 363
Connecting a Bluetooth
®
device.............................. 365
Displaying a Bluetooth
®
device details .................. 367
Detailed Bluetooth
®
system settings ............... 368
5-8. Bluetooth
® audio
Listening to Bluetooth®
audio ............................... 369 5-9. Bluetooth
® phone
Using a Bluetooth®
phone .............................. 370
Making a call ..................... 372
Receiving a call ................. 375
Speaking on the phone ..... 376
Bluetooth
® phone
message function ............ 379
Using the steering wheel switches .......................... 383
Bluetooth
® phone
settings ........................... 384
Contact/Call History Settings ........................... 386
What to do if... (Troubleshooting) ............ 395
5-10. Using the voice command system
Voice command system .... 399
5-11. Bluetooth
®
Bluetooth®......................... 403
5-12. Antenna Antenna............................. 408
Page 324 of 672
3245-1. Basic Operations
Entune Audio
button
Press this button to a ccess the Bluetooth® hands-free system.
( P. 370)
“SETUP” button
Press this button to customi ze the function settings. (P. 329)
“AUDIO” button
Display the “Select Audio Source” screen or audio control
screen. ( P. 3 3 6 )
“TRUCK” button
Press this button to access the fuel consumption information.
( P. 107)
Operations such as listening to audio, using the hands-free
phone, confirming vehicle inform ation and changing multimedia
system settings are started by using the following buttons.
Multimedia system operation buttons
1
2
3
4
Page 325 of 672

3255-1. Basic Operations
5
Multimedia
By touching the screen with your finger, you can control the Audio
system, hands-free system, etc.
■Drag*
Touch the screen with your finger and move the screen to the
desired position.
● Scrolling the lists
● Using scroll bar in lists
■Flick*
Touch the screen with your finger and then quickly move the
screen.
●Scrolling the main screen page
● Returning to the menu screen from the sub-menu screen (screen
one level below)
*: The above operations may not be performed on all screens.
■When using the touch screen
●If the screen is cold, the display may be dark, or the system may seem to be
operating slightly slower than normal.
● The screen may seem dark and hard to see when viewed through su n-
glasses. Change your angle of viewing, adjust the display on th e “Display
Settings” screen ( P. 333) or remove your sunglasses.
■ Using cellular phones
Interference may be heard through the multimedia system's speakers if a cel-
lular phone is being used inside or close to the vehicle while the multimedia
system is operating.
Operating the touch screen
Page 329 of 672
3295-2. Setup
5
Multimedia
Setup menu
Press the “SETUP” button to display the “Setup” screen.
Select to adjust the settings for
operation sounds, screen ani-
mation, etc. ( P. 330)
Select to set the voice settings.
( P. 334)
Select to adjust the settings for
contrast and brightness of the
screen. ( P. 3 3 3 )
Select to adjust the settings for registering, removing, connec ting
and disconnecting Bluetooth
® devices. ( P. 360, 365)
Select to adjust the settings f or phone sound, contact, etc.
( P. 384)
Select to set radio and ex ternal media settings. (P. 332)
Select to turn the screen off.
Select to set the veh icle customization. (P. 6 2 4 )
You can adjust the multimedia system to your desired settings.
Display “Setup” screen
1
2
3
4
5
6
7
8