2018 TOYOTA TUNDRA trailer
[x] Cancel search: trailerPage 3 of 672

3
1
9 8
7 5 4
3
2
10
6
4-1. Before drivingDriving the vehicle ............. 160
Cargo and luggage............ 168
Vehicle load limits ............. 171
Trailer towing..................... 173
Dinghy towing.................... 194
4-2. Driving procedures Engine (ignition) switch ..... 195
Automatic transmission ..... 197
Turn signal lever................ 204
Parking brake .................... 205
4-3. Operating the lights and wipers
Headlight switch ................ 206
Automatic High Beam ....... 211
Fog light switch ................. 216
Windshield wipers and washer ............................ 217
4-4. Refueling Opening the fuel tank cap .................................. 220 4-5. Using the driving support
systems
Toyota Safety Sense P ...... 224
PCS (Pre-Collision System) ........................... 231
LDA (Lane Departure Alert) ................................ 244
Dynamic radar cruise control.............................. 252
Cruise control .................... 266
Intuitive parking assist ....... 270
Rear view monitor system ............................. 277
BSM (Blind Spot Monitor)......... 286
Four-wheel drive system ... 296
AUTO LSD system ............ 299
Driving assist systems ....... 301
Trailer brake controller....... 308
4-6. Driving tips Winter driving tips .............. 312
Off-road precautions .......... 316
4Driving
Page 20 of 672

20Pictorial index
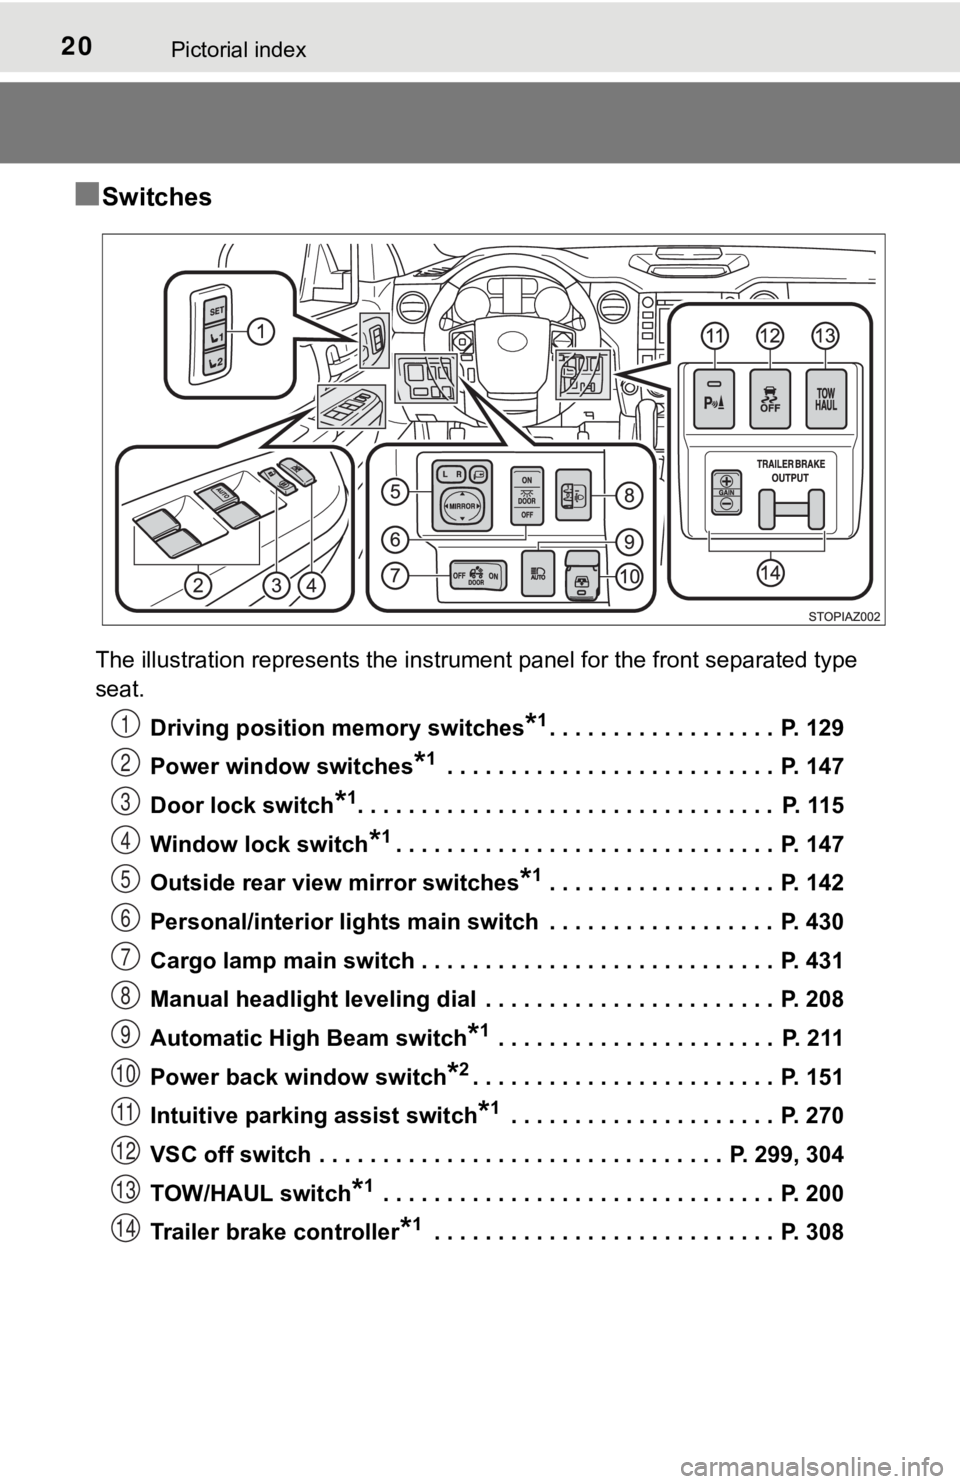
■Switches
The illustration represents the instrument panel for the front separated type
seat.Driving position memory switches
*1. . . . . . . . . . . . . . . . . . P. 129
Power window switches
*1 . . . . . . . . . . . . . . . . . . . . . . . . . . P. 147
Door lock switch
*1. . . . . . . . . . . . . . . . . . . . . . . . . . . . . . . . . P. 115
Window lock switch
*1. . . . . . . . . . . . . . . . . . . . . . . . . . . . . . P. 147
Outside rear view mirror switches
*1 . . . . . . . . . . . . . . . . . . P. 142
Personal/interior lights main switch . . . . . . . . . . . . . . . . . . P. 430
Cargo lamp main switch . . . . . . . . . . . . . . . . . . . . . . . . . . . . P. 431
Manual headlight leveling dial . . . . . . . . . . . . . . . . . . . . . . . P. 208
Automatic High Beam switch
*1 . . . . . . . . . . . . . . . . . . . . . . P. 211
Power back window switch
*2. . . . . . . . . . . . . . . . . . . . . . . . P. 151
Intuitive parking assist switch
*1 . . . . . . . . . . . . . . . . . . . . . P. 270
VSC off switch . . . . . . . . . . . . . . . . . . . . . . . . . . . . . . . . P. 299, 304
TOW/HAUL switch
*1 . . . . . . . . . . . . . . . . . . . . . . . . . . . . . . . P. 200
Trailer brake controller
*1 . . . . . . . . . . . . . . . . . . . . . . . . . . . P. 308
1
2
3
4
5
6
7
8
9
10
11
12
13
14
Page 75 of 672

751-1. For safe use
1
For safety and security
Exhaust gas precautions
Harmful substance to the human body is included in exhaust
gases if inhale.
WARNING
Exhaust gases include harmful carbon monoxide (CO), which is colorless and
odorless. Observe the following precautions.
Failure to do so may cause exhaust gases to enter the vehicle a nd may lead
to an accident caused by light-headedness, or may lead to death or a serious
health hazard.
■ Important points while driving
● Double Cab and CrewMax models: Keep the back window closed.
● Double Cab and CrewMax models: If you smell exhaust gases in th e vehi-
cle even when the back window is closed, open the windows and h ave the
vehicle inspected at your Toyota dealer as soon as possible.
● Toyota does not recommend occupying the rear cargo area when it is fitted
with a slide-in camper, camper shell or other type cover while the engine is
running. This caution applies to both driving and stopped or pa rked situa-
tions with the engine running. Particular care should be taken to prevent
exhaust gases from entering camper bodies, trailers or other enclosures
on or around your vehicle. If exhaust fumes are detected, open all win-
dows and thoroughly ventilate the area.
■ When parking
● If the vehicle is in a poorly ventilated area or a closed area, such as a
garage, stop the engine.
● Do not leave the vehicle with the engine on for a long time.
If such a situation cannot be avoided, park the vehicle in an o pen space
and ensure that exhaust fumes do not enter the vehicle interior .
● Do not leave the engine running in an area with snow build-up, or where it
is snowing. If snowbanks build up around the vehicle while the engine is
running, exhaust gases may collect and enter the vehicle.
■ Exhaust pipe
The exhaust system needs to be checked periodically. If there is a hole or
crack caused by corrosion, damage to a joint or abnormal exhaust noise, be
sure to have the vehicle inspected and repaired by your Toyota dealer.
Page 93 of 672

932. Instrument cluster
2
Instrument cluster
*1: These lights turn on when the engine switch is turned to the “ON” positionto indicate that a system check is being performed. They will turn off after
the engine is started, or after a few seconds. There may be a m alfunction
in a system if the lights do not come on, or if the lights do n ot turn off. Have
the vehicle inspected by your Toyota dealer for details.
*2: The light flashes to indicate that the system is operating. Front fog light indicator
(
P. 216)
*1
“TRAC OFF” indicator
(P. 302)
*1, 5
“AIR BAG ON” and
“AIR BAG OFF”
indicators ( P. 50)
*9
“RCTA” indicator
(P. 286)
Security indicator
( P. 76, 85)
*6, 9
Radar cruise control
indicator ( P. 252)
*1“AUTO LSD” indicator
(P. 299, 302)
*1, 2Slip indicator
( P. 302)*1, 8, 9
PCS warning light
(P. 235)
*1VSC off indicator
(P. 299, 302)
(4WD models)
“4HI” indicator ( P. 296)
“TOW HAUL” indicator
( P. 200)
(4WD models)
“4LO” indicator ( P. 296)
*9“BSM” indicator
(P. 286)*6
(Green)
Trailer connection
indicator ( P. 308)
*3, 4, 9
BSM outside rear view
mirror indicator
(P. 286)
*6, 7
Low outside temperature
indicator
Page 100 of 672

1002. Instrument cluster
Multi-infor mation display
The multi-information display presents the driver with a variety of vehi-
cle data.
● Menu icons
Displays the following informa-
tion when an icon is selected.
Some of the information may be
displayed automatically
depending on the situation.
Drive information
Select to display various drive data. ( P. 101)
Navigation system-linked display*
Select to display the following navigation system-linked information.
• Route guidance
• Compass display (north-up display/heading-up display)
Audio system-linked display
Select to enable selection of an audio source or track on the m eter
using the meter control switches.
Vehicle information
Select to display the operational status of the following syste ms:
• LDA (Lane Departure Alert)
* ( P. 244)
• Dynamic radar cruise control
* ( P. 252)
• Tire inflation pressure ( P. 496)
• Trailer brake controller
* ( P. 308)
Display contents
Page 103 of 672

1032. Instrument cluster
2
Instrument cluster
●BSM (Blind Spot Monitor)*1 (→P. 627)
Select to enable/disable the Blind Spot Monitor function.
● RCTA (Rear Cross Traffic Alert)
*1 (→P. 627)
Select to enable/disable the Rear Cross Traffic Alert function.
● Vehicle Settings
• BSM Brightness*1 (P. 627)
Select to set up the BSM (Blind Spot Monitor) outside rear view mirror
indicators brightness.
•RCTA volume
*1 ( P. 627)
Select to set up the RCTA (Rear Cross Traffic Alert) warning buzzer vol-
ume.
• TBC Trailer Type
*1 ( P. 628)
Select to set up the trailer brake type.
• Maintenance reset
*2 ( P. 477)
Select to reset the message after the required maintenance is p er-
formed.
Page 144 of 672

1443-4. Adjusting the steering wheel and mirrors
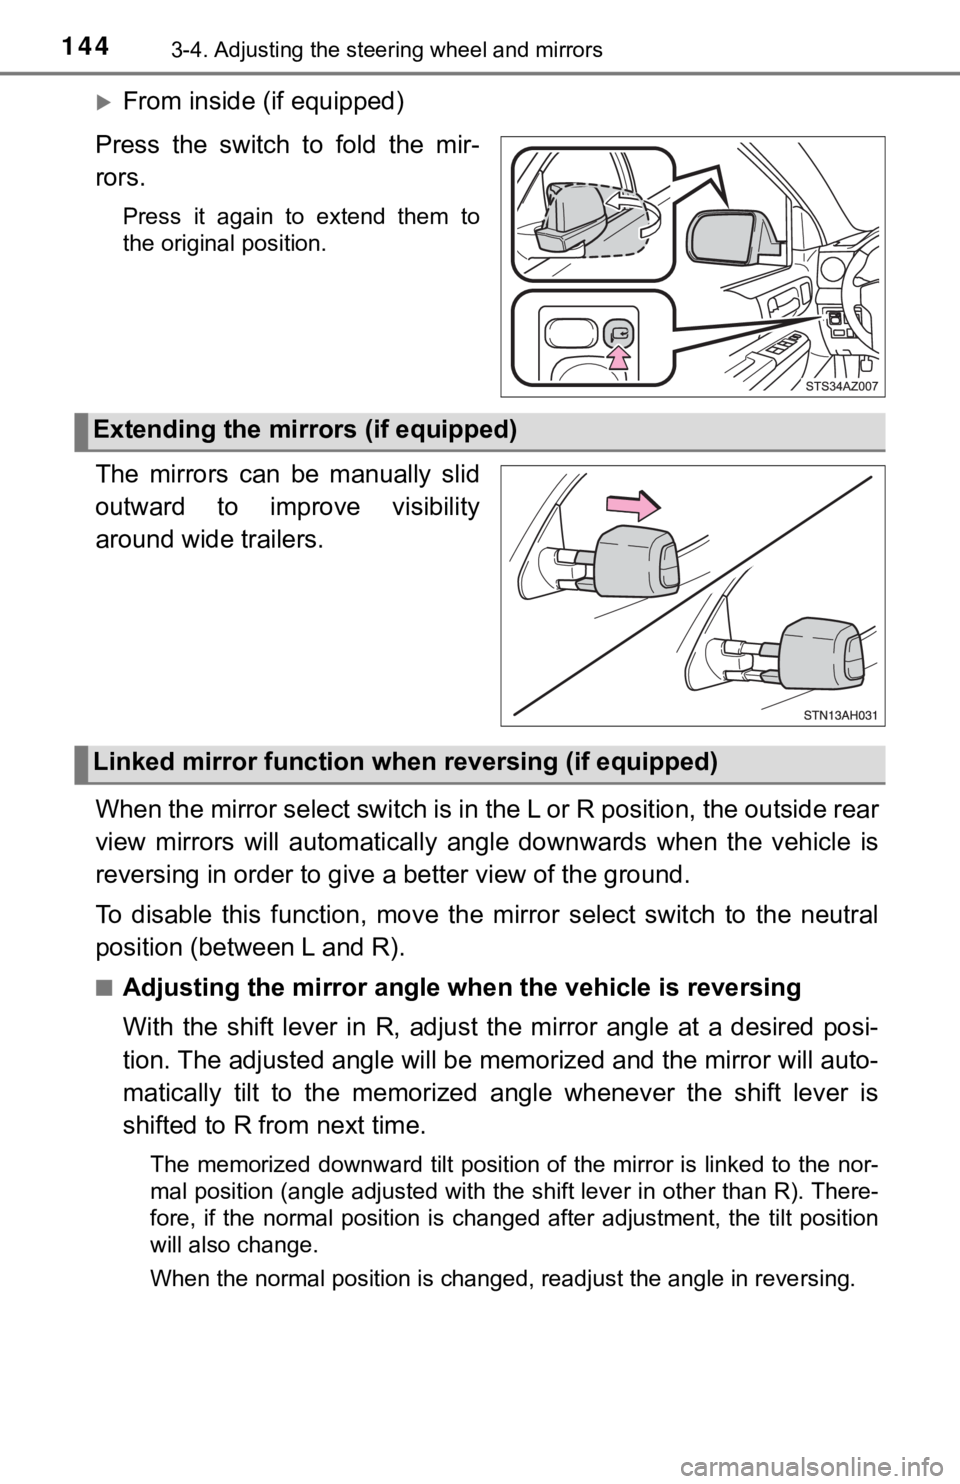
From inside (if equipped)
Press the switch to fold the mir-
rors.
Press it again to extend them to
the original position.
The mirrors can be manually slid
outward to improve visibility
around wide trailers.
When the mirror select switch is in the L or R position, the ou tside rear
view mirrors will automatically a ngle downwards when the vehicl e is
reversing in order to give a better view of the ground.
To disable this function, move the mirror select switch to the neutral
position (between L and R).
■Adjusting the mirror angle when the vehicle is reversing
With the shift lever in R, adjust the mirror angle at a desired posi-
tion. The adjusted angle will be memorized and the mirror will auto-
matically tilt to the memorized angle whenever the shift lever is
shifted to R from next time.
The memorized downward tilt position of the mirror is linked to the nor-
mal position (angle adjusted with the shift lever in other than R). There-
fore, if the normal position is changed after adjustment, the t ilt position
will also change.
When the normal position is changed, readjust the angle in reve rsing.
Extending the mirrors (if equipped)
Linked mirror function when reversing (if equipped)
Page 145 of 672

1453-4. Adjusting the steering wheel and mirrors
3
Operation of each component
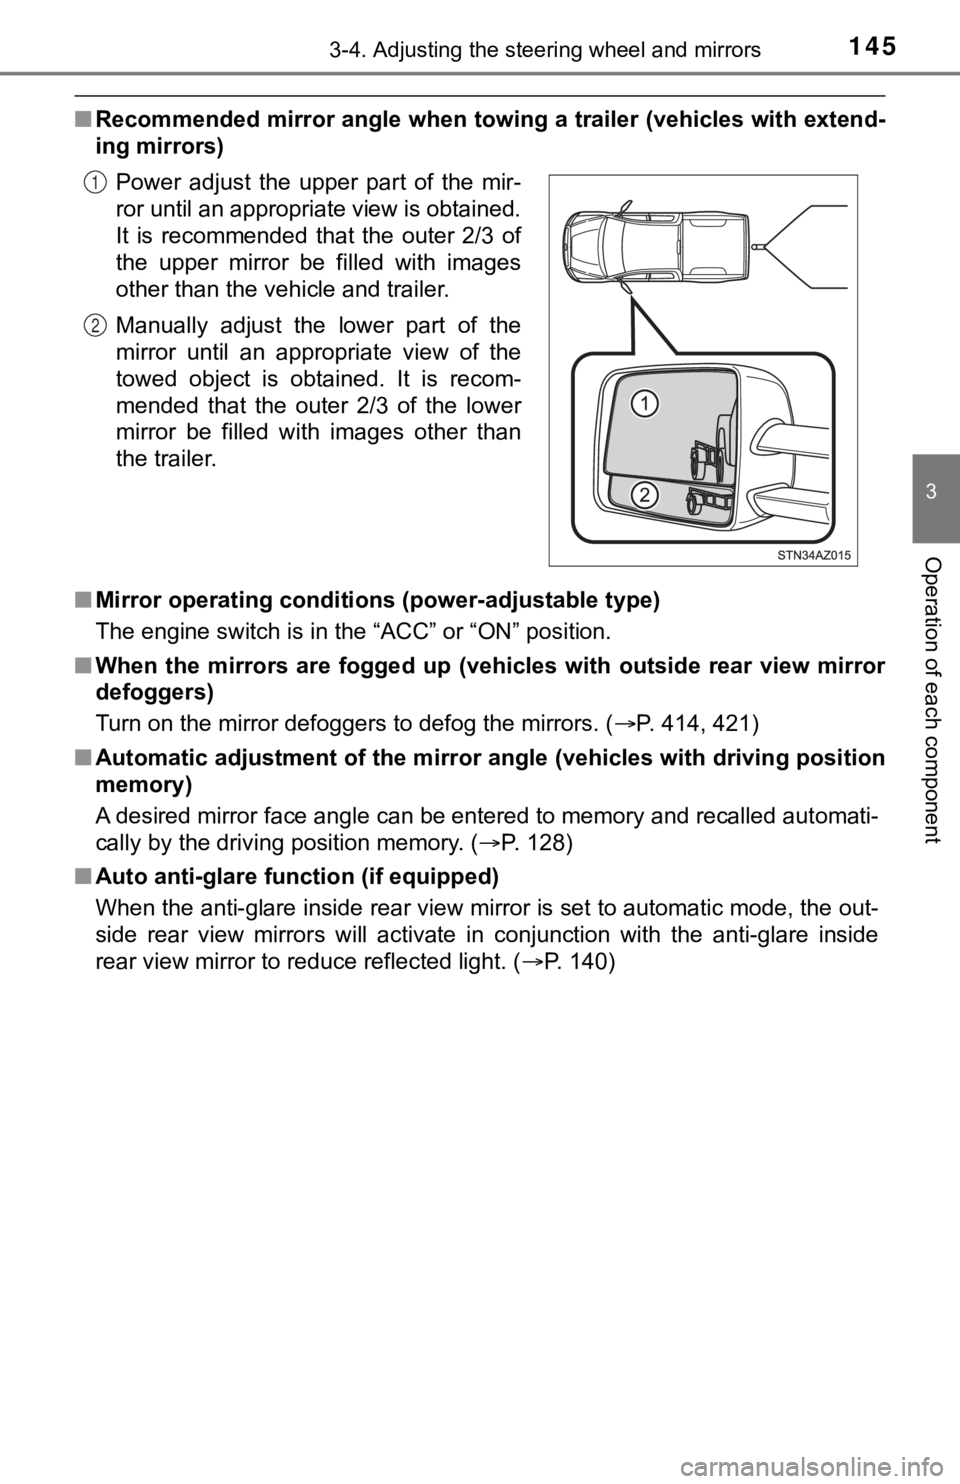
■Recommended mirror angle when to wing a trailer (vehicles with extend-
ing mirrors)
■ Mirror operating conditions (power-adjustable type)
The engine switch is in the “ACC” or “ON” position.
■ When the mirrors are fogged up ( vehicles with outside rear view mirror
defoggers)
Turn on the mirror defoggers to defog the mirrors. ( P. 414, 421)
■ Automatic adjustment of the mirr or angle (vehicles with driving position
memory)
A desired mirror face angle can be entered to memory and recall ed automati-
cally by the driving position memory. ( P. 128)
■ Auto anti-glare function (if equipped)
When the anti-glare inside rear view mirror is set to automatic mode, the out-
side rear view mirrors will activate in conjunction with the an ti-glare inside
rear view mirror to reduce reflected light. ( P. 140)
Power adjust the upper part of the mir-
ror until an appropriate view is obtained.
It is recommended that the outer 2/3 of
the upper mirror be filled with images
other than the vehicle and trailer.
Manually adjust the lower part of the
mirror until an appropriate view of the
towed object is obtained. It is recom-
mended that the outer 2/3 of the lower
mirror be filled with images other than
the trailer.
1
2