Page 271 of 504

271
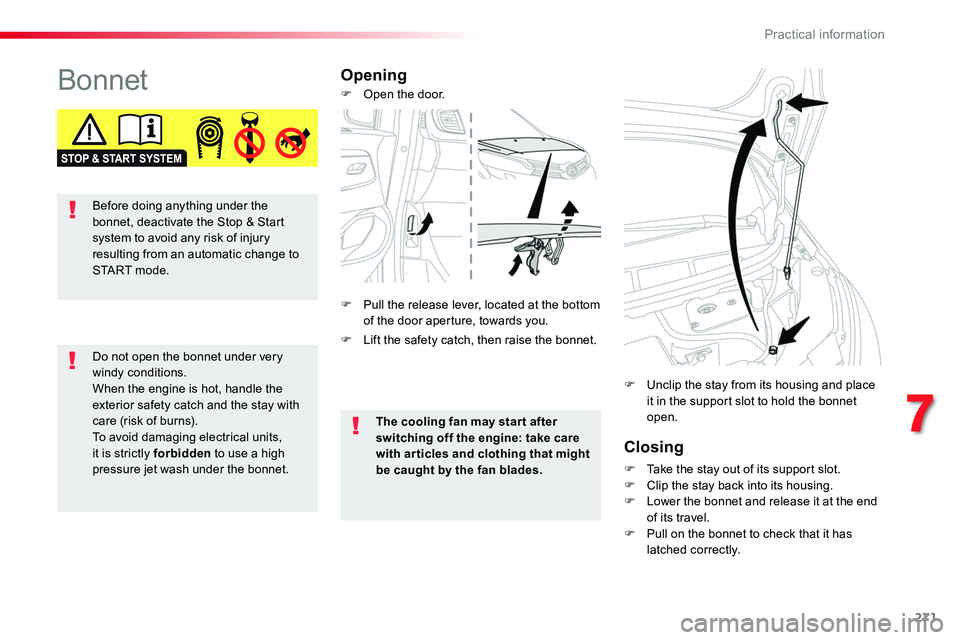
BonnetOpening
Closing
F Take the stay out of its support slot.F Clip the stay back into its housing.F Lower the bonnet and release it at the end of its travel.F Pull on the bonnet to check that it has latched correctly.
F Unclip the stay from its housing and place it in the support slot to hold the bonnet open.
Do not open the bonnet under very windy conditions.When the engine is hot, handle the exterior safety catch and the stay with care (risk of burns).To avoid damaging electrical units, it is strictly forbidden to use a high pressure jet wash under the bonnet.
The cooling fan may star t after switching off the engine: take care with articles and clothing that might be caught by the fan blades.
F Lift the safety catch, then raise the bonnet.
F Open the door.
F Pull the release lever, located at the bottom of the door aperture, towards you.
Before doing anything under the bonnet, deactivate the Stop & Start
system to avoid any risk of injury resulting from an automatic change to S TA R T m o d e .
7
Practical information
Page 285 of 504

285
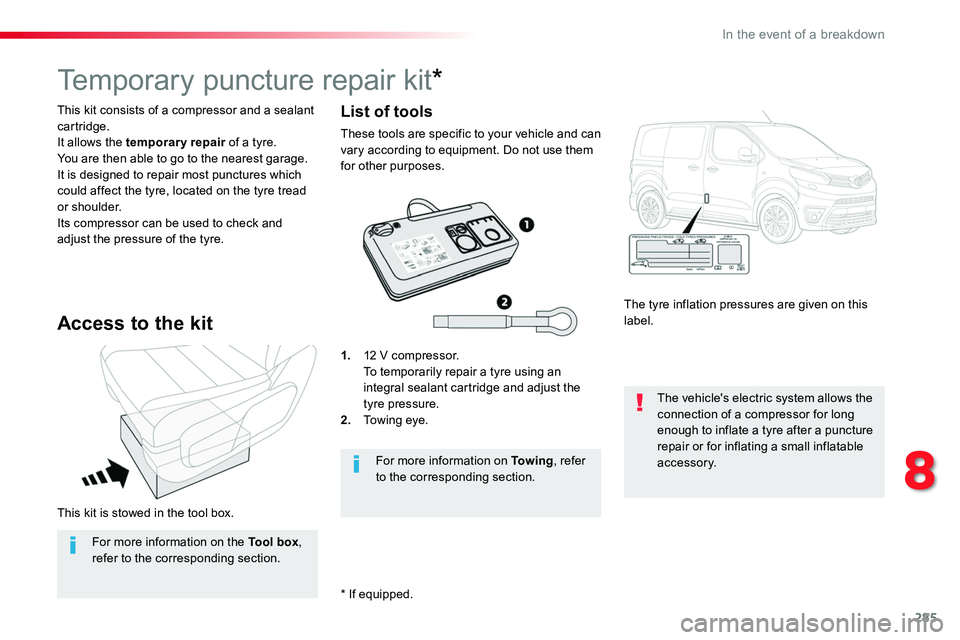
This kit is stowed in the tool box.
This kit consists of a compressor and a sealant cartridge.It allows the temporary repair of a tyre.You are then able to go to the nearest garage.It is designed to repair most punctures which could affect the tyre, located on the tyre tread or shoulder.Its compressor can be used to check and adjust the pressure of the tyre.
Temporary puncture repair kit*
Access to the kit
1. 12 V compressor. To temporarily repair a tyre using an integral sealant cartridge and adjust the tyre pressure.2. Towing eye.
The tyre inflation pressures are given on this label.
The vehicle's electric system allows the connection of a compressor for long
enough to inflate a tyre after a puncture repair or for inflating a small inflatable accessory.For more information on To w i n g, refer to the corresponding section.
List of tools
These tools are specific to your vehicle and can vary according to equipment. Do not use them for other purposes.
For more information on the Tool box, refer to the corresponding section.
* If equipped.
8
In the event of a breakdown
Page 287 of 504
287
Repair procedure
1. Sealing
F Uncoil the white pipe G fully.F Unscrew the cap from the white pipe.F Connect the white pipe to the valve of the tyre to be repaired.
F Connect the compressor's electric plug to the vehicle's 12 V socket.F Start the vehicle and leave the engine running.
Take care, this product is harmful if swallowed and causes irritation to the eyes.Keep this product out of the reach of children.
Avoid removing any foreign bodies which have penetrated into the tyre.
Do not start the compressor before connecting the white pipe to the tyre valve: the sealant product would be expelled through the pipe.
F Switch off the ignition.
F Turn the selector A to the "sealant" position.
F Check that the switch B is in position "O".
8
In the event of a breakdown
Page 289 of 504

289
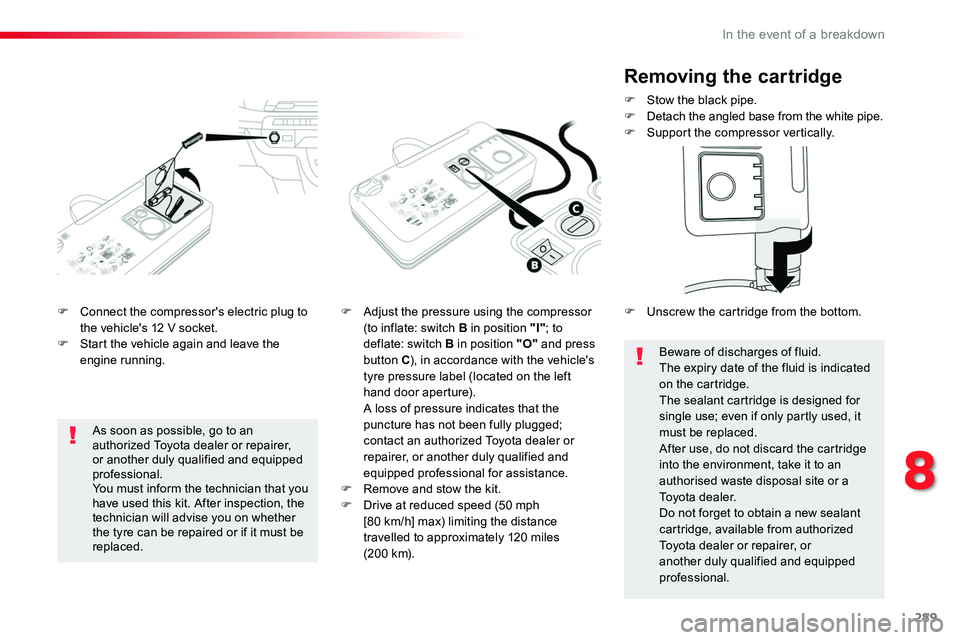
F Connect the compressor's electric plug to the vehicle's 12 V socket.F Start the vehicle again and leave the engine running.
F Adjust the pressure using the compressor (to inflate: switch B in position "I"; to deflate: switch B in position "O" and press button C), in accordance with the vehicle's tyre pressure label (located on the left hand door aperture). A loss of pressure indicates that the puncture has not been fully plugged;
contact an authorized Toyota dealer or repairer, or another duly qualified and equipped professional for assistance.F Remove and stow the kit.F Drive at reduced speed (50 mph [80 km/h] max) limiting the distance travelled to approximately 120 miles (200 km).
As soon as possible, go to an authorized Toyota dealer or repairer, or another duly qualified and equipped professional.You must inform the technician that you have used this kit. After inspection, the technician will advise you on whether the tyre can be repaired or if it must be replaced.
Removing the cartridge
F Stow the black pipe.F Detach the angled base from the white pipe.F Support the compressor vertically.
Beware of discharges of fluid.The expiry date of the fluid is indicated on the cartridge.The sealant cartridge is designed for single use; even if only partly used, it must be replaced.After use, do not discard the cartridge into the environment, take it to an authorised waste disposal site or a Toyota dealer.Do not forget to obtain a new sealant cartridge, available from authorized Toyota dealer or repairer, or another duly qualified and equipped professional.
F Unscrew the cartridge from the bottom.
8
In the event of a breakdown
Page 290 of 504
290
Checking /adjusting tyre
pressures
You can also use the compressor without injecting any product, to check and if necessary adjust your tyre pressures.
F Turn the selector A to the "Air" position.
F Connect the compressor's electrical connector to the vehicle's 12 V socket.F Start the vehicle and let the engine run.F Adjust the pressure using the compressor (to inflate: switch B in position "I"; to deflate: switch B in position "O" and press button C), according to the vehicle's tyre pressure label.F Remove the kit then stow it.
Should the pressure of one or more tyres be adjusted, it is necessary to reinitialise the tyre pressure warning system.For more information on Tyre Pressure Warning System, refer to the corresponding section.
F Uncoil the black pipe H fully.F Connect the black pipe to the tyre valve.
In the event of a breakdown
Page 292 of 504
292
F Access to the spare wheel is from the rear.F Open the rear wing doors with glass windows or the rear tailgate, according to the configuration of your vehicle.
F Access the carrier bolt, located on the rear door sill.
F Turn the bolt anti-clockwise using the wheelbrace (about 14 turns) until the carrier is low enough to allow the carrier hook to be disengaged.
Access to the spare wheel
F If your vehicle is fitted with a towbar, raise the rear of the vehicle using the jack (must be at jacking point B) to allow sufficient space to remove the spare wheel.
Removing
To avoid any unwanted opening of the electric side door(s), deactivate the "Hands-Free Access" function in the vehicle configuration menu.For more information on the Kick-activated side doors opening and
locking, refer to the corresponding section.
In the event of a breakdown
Page 301 of 504
301
When refitting the connector and bulb in the lamp, push the assembly into its housing until it clicks into place.
Dipped beam headlamps
(halogen headamps)
Ty p e C, H7-55W
Daytime running lamps / sidelamps (halogen headlamps)
Ty p e A, P21-5W
F Pull out the cover. F Press the lower clip on the electrical connector and remove the assembly of connector and bulb.F Pull the bulb out and change it.To refit, carry out these operations in reverse o r d e r.
F Turn the bulb holder a quarter turn clockwise.F Remove the bulb holder.F Change the failed bulb. To refit, carry out these operations in reverse o r d e r.
8
In the event of a breakdown
Page 302 of 504
302
Be aware that the area behind the right-hand headlamp (facing for wards) may be hot, with the risk of burns (over flow p i p e).
Faster flashing of a direction indicator
warning lamp (left or right) indicates a failed bulb on that side.
Direction indicators
(halogen headlamps)
Ty p e B, PY21W-21W (amber)
Main beam headlamps
(halogen headlamps)
Ty p e C, H1-55W
F Pull out the cover. F Press the lower clip on the electrical connector and remove the assembly of connector and bulb.F Pull the bulb out and change it.To refit, carry out these operations in reverse o r d e r.
F Turn the bulb holder a quarter turn clockwise.F Remove the bulb holder.F Change the failed bulb.To refit, carry out these operations in reverse o r d e r.
In the event of a breakdown