Page 303 of 504

303
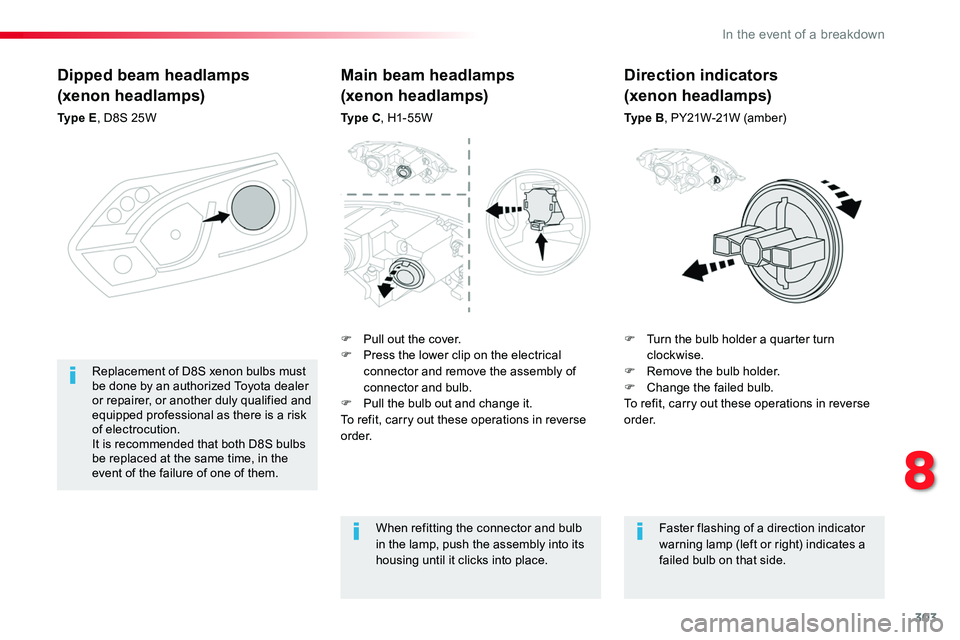
Dipped beam headlamps
(xenon headlamps)
Ty p e E, D8S 25W
F Turn the bulb holder a quarter turn clockwise.F Remove the bulb holder.F Change the failed bulb.To refit, carry out these operations in reverse o r d e r.
Replacement of D8S xenon bulbs must be done by an authorized Toyota dealer or repairer, or another duly qualified and equipped professional as there is a risk of electrocution.It is recommended that both D8S bulbs be replaced at the same time, in the event of the failure of one of them.
Main beam headlamps
(xenon headlamps)
Ty p e C, H1-55W
When refitting the connector and bulb in the lamp, push the assembly into its housing until it clicks into place.
Faster flashing of a direction indicator warning lamp (left or right) indicates a failed bulb on that side.
Direction indicators
(xenon headlamps)
Ty p e B, PY21W-21W (amber)
F Pull out the cover. F Press the lower clip on the electrical connector and remove the assembly of connector and bulb.F Pull the bulb out and change it.To refit, carry out these operations in reverse
o r d e r.
8
In the event of a breakdown
Page 305 of 504

305
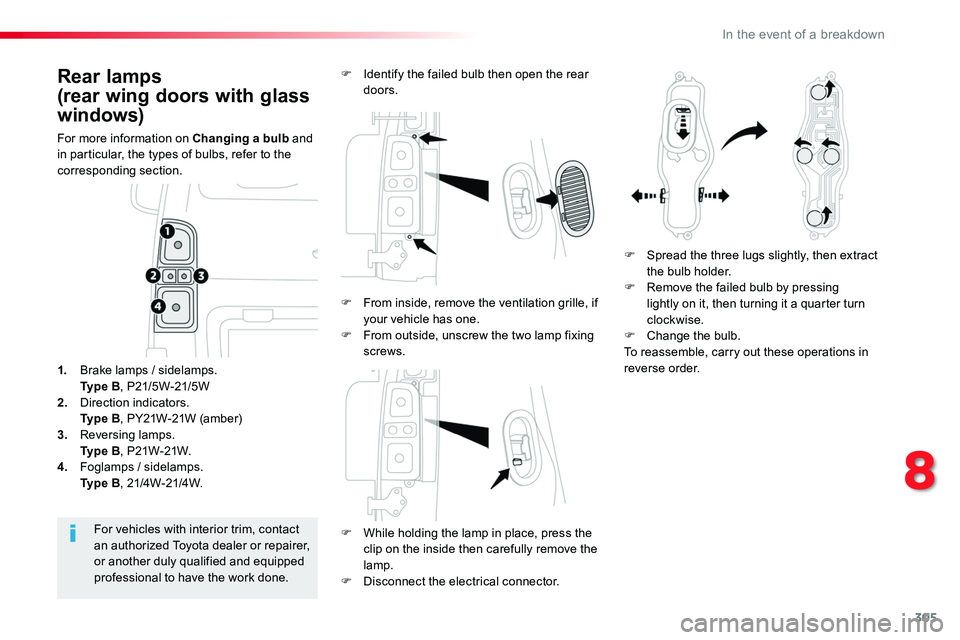
Rear lamps
(rear wing doors with glass
windows)
For more information on Changing a bulb and in particular, the types of bulbs, refer to the corresponding section.
F While holding the lamp in place, press the clip on the inside then carefully remove the lamp.F Disconnect the electrical connector.
For vehicles with interior trim, contact an authorized Toyota dealer or repairer, or another duly qualified and equipped professional to have the work done.
1. Brake lamps / sidelamps. Ty p e B, P21/5W-21/5W2. Direction indicators. Ty p e B, PY21W-21W (amber)3. Reversing lamps. Ty p e B, P21W-21W.4. Foglamps / sidelamps. Ty p e B, 21/4W-21/4W.
F Identify the failed bulb then open the rear doors.
F Spread the three lugs slightly, then extract the bulb holder.F Remove the failed bulb by pressing lightly on it, then turning it a quarter turn clockwise.F Change the bulb.To reassemble, carry out these operations in reverse order.
F From inside, remove the ventilation grille, if your vehicle has one.F From outside, unscrew the two lamp fixing screws.
8
In the event of a breakdown
Page 306 of 504
306
Number plate lamps(rear wing doors with glass windows)Ty p e A, W5W-5W
F Remove the plastic cover using a small screwdriver.F Using a screwdriver through the aperture, push the lamp towards the outside.F Disconnect the electrical connector.F Remove the lamp.F Turn the bulb holder a quarter turn anti-clockwise.F Change the failed bulb.To refit, press on the lamp to clip it in place.
Third brake lamp(rear wing doors with glass windows)Ty p e A, W5W-5W
To refit, press on the lens to clip it in place.
F Open the left hand rear door.F Insert a thin screwdriver into one of the cut-outs in the lens.F Push it outwards to unclip it.F Remove the lens.F Change the failed bulb.
In the event of a breakdown
Page 308 of 504

308
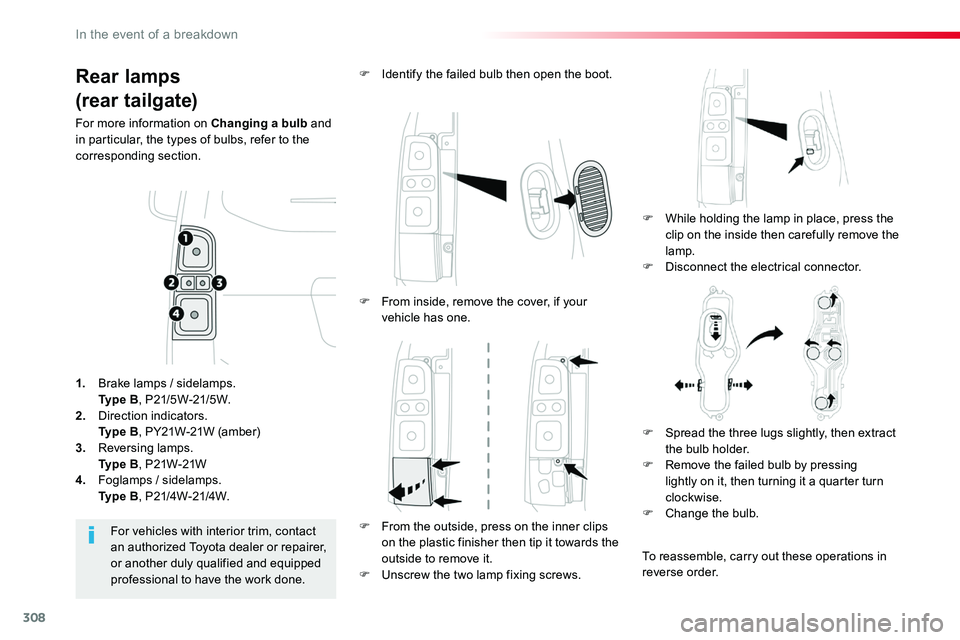
Rear lamps
(rear tailgate)
For more information on Changing a bulb and in particular, the types of bulbs, refer to the corresponding section.
F While holding the lamp in place, press the clip on the inside then carefully remove the lamp.F Disconnect the electrical connector.
F Identify the failed bulb then open the boot.
For vehicles with interior trim, contact an authorized Toyota dealer or repairer, or another duly qualified and equipped professional to have the work done.
1. Brake lamps / sidelamps. Ty p e B, P21/5W-21/5W.2. Direction indicators. Ty p e B, PY21W-21W (amber)3. Reversing lamps. Ty p e B, P21W-21W4. Foglamps / sidelamps. Ty p e B, P21/4W-21/4W.
F From inside, remove the cover, if your vehicle has one.
F From the outside, press on the inner clips on the plastic finisher then tip it towards the outside to remove it.F Unscrew the two lamp fixing screws.
F Spread the three lugs slightly, then extract the bulb holder.F Remove the failed bulb by pressing lightly on it, then turning it a quarter turn clockwise.F Change the bulb.
To reassemble, carry out these operations in reverse order.
In the event of a breakdown
Page 309 of 504
309
To refit, press on the lens to clip it in place.
F Unclip the trim at each end by turning it upwards.F Pull on the trim to disengage the central clips, then remove it.F Using a screwdriver through the aperture, push the lamp towards the outside.F Disconnect the electrical connector.F Remove the lamp.F Turn the bulb holder a quarter turn anti-clockwise.F Change the failed bulb.
To refit, carry out these operations in reverse o r d e r.To refit the lamp and trim, press on them to clip them in place.
Third brake lamp
(rear tailgate)
Ty p e A, W5W-5W
Number plate lamps
(rear tailgate)
Ty p e A, W5W-5W
F Open the rear tailgate.F Insert a thin screwdriver into one of the cut-outs in the lens.F Push it outwards to unclip it.F Remove the lens.F Change the failed bulb.
8
In the event of a breakdown
Page 311 of 504

311
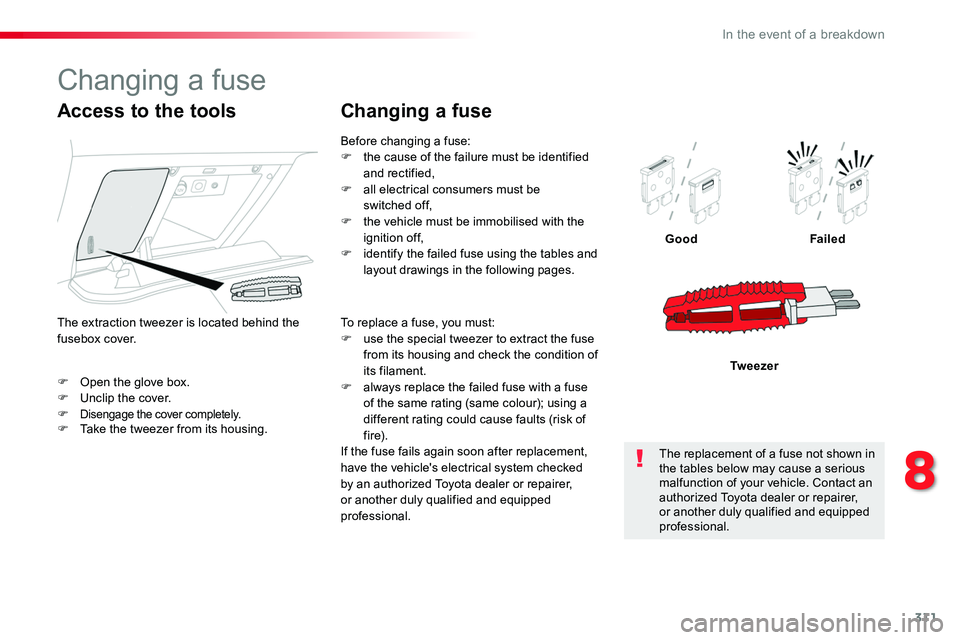
F Open the glove box.F Unclip the cover.F Disengage the cover completely.
GoodFailed
Tw e e z e r
Access to the tools
F Take the tweezer from its housing.
The extraction tweezer is located behind thefusebox cover.
Before changing a fuse:F the cause of the failure must be identified and rectified,F all electrical consumers must be switched off,F the vehicle must be immobilised with the ignition off,F identify the failed fuse using the tables and layout drawings in the following pages.
Changing a fuse
To replace a fuse, you must:F use the special tweezer to extract the fuse from its housing and check the condition of its filament.F always replace the failed fuse with a fuse of the same rating (same colour); using a different rating could cause faults (risk of f i r e).If the fuse fails again soon after replacement, have the vehicle's electrical system checked by an authorized Toyota dealer or repairer, or another duly qualified and equipped professional.
The replacement of a fuse not shown in the tables below may cause a serious malfunction of your vehicle. Contact an authorized Toyota dealer or repairer, or another duly qualified and equipped professional.
Changing a fuse
8
In the event of a breakdown
Page 312 of 504
312
Toyota will not accept responsibility for the cost incurred in repairing your vehicle or for rectifying malfunctions resulting from the installation of accessories not supplied and not recommended by Toyota and not installed in accordance with its instructions, in particular when the combined consumption of all of the additional equipment connected exceeds 10 milliamperes.
Installing electrical accessories
Your vehicle's electrical system is designed to operate with standard or optional equipment.Before installing other electrical equipment or accessories on your vehicle, contact an authorized Toyota dealer or repairer, or another duly qualified and equipped professional.
For more information on installing a towbar or equipment of the TA XI type, contact a Toyota dealer.
Dashboard fuses
The fusebox is located in the left-hand part of the glove box.
Access to the fuses
F Unclip the cover by pulling at top left, then right.
In the event of a breakdown
Page 313 of 504

313
FuseN°Rating(A)Functions
F110Electric power steering, clutch switch
F415Horn.
F520Front/rear screenwash pump.
F620Front/rear screenwash pump.
F710Rear 12 V accessory socket.
F820Single or double rear wipers.
F10/F1130Front and rear, exterior, interior locks.
F1310Front air conditioning controls, radio controls, gear lever, head-up display.
F145Alarm, ER A-GLONASS emergency call system.
F175Instrument panel.
F193Steering mounted controls.
F213Smart Entry & Start System or ignition switch.
F223Rain and sunshine sensor, multifunction detection camera.
F235Seat belt unfastened or not fastened display screen.
F245Touch screen, reversing camera and parking sensors.
F255Airbags.
F2920Audio system, touch screen, CD player, navigation.
F3115Audio system (battery +).
F3215Front 12 V accessory socket.
F345Blind spot monitoring system, door mirror electric controls.
F355Heated washer jets, headlamp beam height control.
F365Torch charger, rear courtesy lamp.
Version 1 (Eco)
The fuses described hereafter vary according to the equipment in your vehicle.
8
In the event of a breakdown