2018 SUZUKI JIMNY tow
[x] Cancel search: towPage 74 of 421

BEFORE DRIVING
Central door locking system
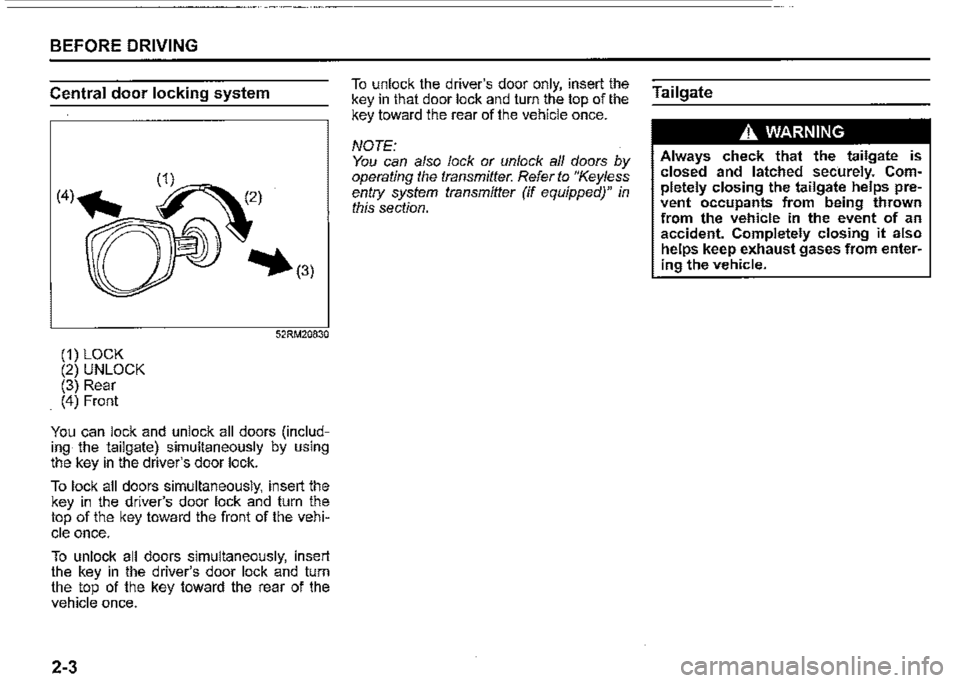
(1) LOCK (2) UNLOCK (3) Rear (4) Front
52RM20830
You can lock and unlock all doors (including the tailgate) simultaneously by using the key in the driver's door lock.
To lock all doors simultaneously, insert the key in the driver's door lock and turn the top of the key toward the front of the vehi
cle once.
To unlock all doors simultaneously, insert the key in the driver's door lock and turn the top of the key toward the rear of the vehicle once.
2-3
To unlock the driver's door only, insert the key in that door lock and turn the top of the key toward the rear of the vehicle once.
NOTE: You can also lock or unlock all doors by operating the transmitter. Refer to "Keyless entry system transmitter (if equipped)" in this section.
Tailgate
A WARNING
Always check that the tailgate is closed and latched sec·urely. Completely closing the tailgate helps prevent occupants from being thrown from the vehicle in the event of an accident. Completely closing it also helps keep exhaust gases from entering the vehicle.
Page 77 of 421

Keyless entry system
transmitter (if equipped)
(2)
79MH0237
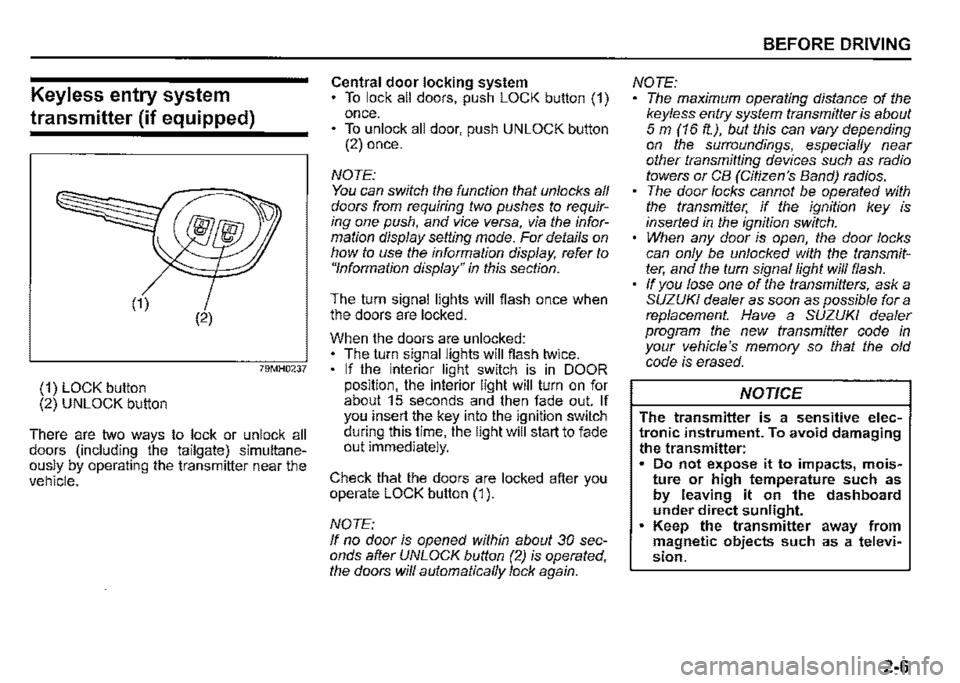
(1) LOCK button (2) UNLOCK button
There are two ways to lock or unlock all doors (including the tailgate) simultaneously by operating the transmitter near the vehicle.
Central door locking system To lock all doors, push LOCK button (1) once. • To unlock all door, push UNLOCK button (2) once.
NOTE: You can switch the function that unlocks all doors from requiring two pushes to requiring one push, and vice versa, via the information display setting mode. For details on how to use the information display, refer to "Information display" in this section.
The turn signal lights will flash once when the doors are locked.
When the doors are unlocked: The turn signal lights will flash twice. If the interior light switch is in DOOR position, the interior light will turn on for about 15 seconds and then fade out. If you insert the key into the ignition switch during this time, the light will start to fade out immediately.
Check that the doors are locked after you operate LOCK button (1 ).
NOTE: If no door is opened within about 30 seconds after UNLOCK button (2) is operated, the doors will automatically lock again.
BEFORE DRIVING
NOTE: The maximum operating distance of the keyless entry system transmitter is about 5 m (16 ft.), but this can vary depending on the surroundings, especially near other transmitting devices such as radio towers or CB (Citizen's Band) radios. The door locks cannot be operated with the transmitter, if the ignition key is inserted in the ignition switch. When any door is open, the door locks can only be unlocked with the transmitter, and the turn signal light will flash. If you lose one of the transmitters, ask a SUZUKI dealer as soon as possible for a replacement. Have a SUZUKI dealer program the new transmitter code in your vehicle's memory so that the old code is erased.
NOTICE
The transmitter is a sensitive electronic instrument. To avoid damaging the transmitter: Do not expose it to impacts, moisture or high temperature such as by leaving it on the dashboard under direct sunlight. Keep the transmitter away from magnetic objects such as a television.
2-6
Page 112 of 421

BEFORE DRIVING
Brake system warning light
(CD)
82K170
Three different types of operations exist depending on the vehicle's specification.
• The light comes on briefiy when the ignition switch is turned "ON". The light comes on when the parking brake is engaged with the ignition switch "ON". The light comes on under either or both of above two conditions.
The light also comes on when the fiuid in the brake fiuid reservoir falls below the specified level.
The light should go out after starting the engine and fully releasing the parking brake, if the fluid level in the brake fiuid reservoir is adequate.
The light also comes on together with the ABS warning light when the rear brake force control function (proportioning valve function) of the ABS system fails. If the brake system warning light comes on while you are driving the vehicle, it may mean that there is something wrong with
2-41
the vehicle's brake system. If this happens:
1) Pull off the road and stop carefully.
A WARNING
Remember that stopping distance may be longer, you may have to push harder on the pedal, and the pedal may go down farther than normal.
2) Test the brakes by carefully starting and stopping the vehicle on the shoulder of the road. 3) If you determine that it is safe, drive the vehicle cautiously at low speed to the nearest a SUZUKI dealer for repairs or tow the vehicle to the nearest a SUZUKI dealer for repairs.
A WARNING
If any of the following conditions occur, you should immediately ask a SUZUKI dealer to inspect the brake system. If the brake system warning light does not go out after the engine has been started and the parking brake has been fully released. If the brake system warning light does not come on when the ignition switch is turned "ON". If the brake system warning light comes on at any time during vehicle operation.
NOTE: Because the brake system is self-adjusting, the fluid level will drop as the brake pads become worn. Replenishing the brake fluid reservoir is considered normal periodic maintenance.
NOTE: Parking brake reminder buzzer A buzzer sounds intermittently to remind you to release the parking brake if you start the vehicle without releasing the parking brake. Check that the parking brake is fully released and the brake system warning light turns off.
Page 128 of 421

BEFORE DRIVING
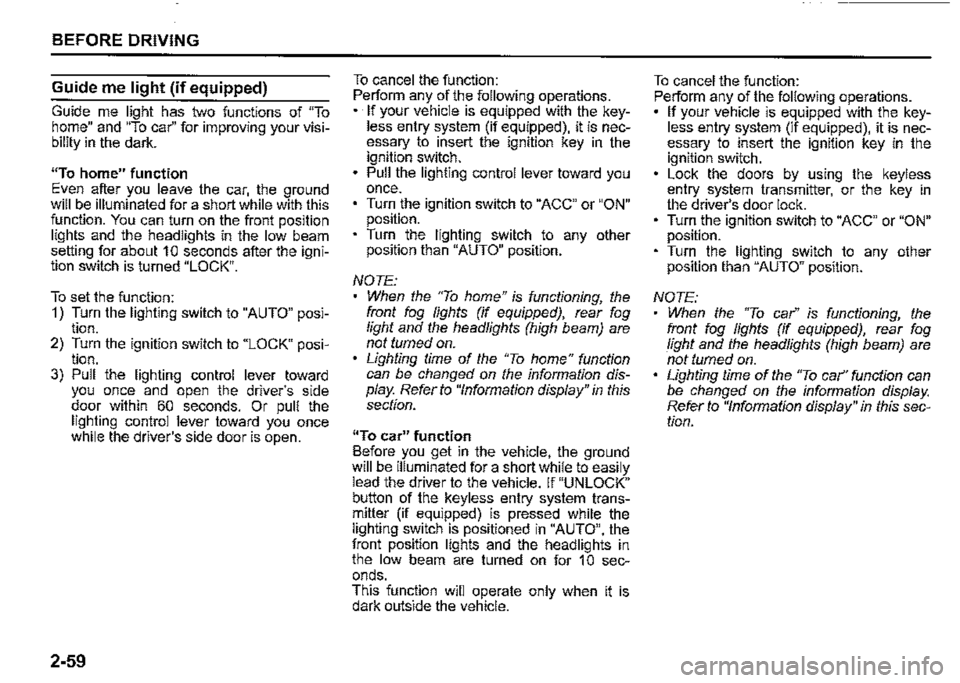
To turn the lights on or off, twist the knob on the end of the lever. There are four positions:
OFF (1) All lights are off.
AUTO (2) This function works when the ignition switch is turned "ON". The headlights and position lights are turned on and off automatically according to the amount of outside light detected by the sensor. They go out automatically when you turn the ignition switch to "ACC" or "LOCK" position.
The light sensor (5) for sensing the amount of outside light is installed on the passenger's seat side instrument panel.
When headlights are turned on and the lighting control lever is in "AUTO" position, you can use the high beam assist (if equipped). For details, refer to "High beam assist" in "OPERATING YOUR VEHICLE" section.
2-57
A CAUTION
If the light sensor area of the windshield is covered with mud, ice1 or other similar substances, the headlights and position lights may be turned on even when it is still light outside.
NOTE: Avoid covering the light sensor area of the windshield with a sticker. The sticker may impair the performance of the sensor and make the system unable to control operation of the lights correctly. If you turned the ignition switch to "ON" position and "AUTO" position remains selected, the headlights and position lights come on automatically as it gets dark outside, even with the engine not running. Leaving the lights lit for a long time may lead to a completely discharged battery.
oOO~ (3) Front position lights, tail lights, license plate lights and instrument lights are on, but headlights are off.
~D (4) Front position lights, tail lights, license plate lights, instrument lights and headlights are on.
= IO · OFF 01
f,
68PM00230
With the headlights on, push the lever forward to switch to the high beams (main beams) or pull the lever toward you to switch to the low beams. When the high beams (main beams) are on, a light on the instrument cluster will come on. To momentarily activate the high beams (main beams) as a passing signal, pull the lever slightly toward you and release it when you have completed the signal.
Page 130 of 421

BEFORE DRIVING
Guide me light (if equipped)
Guide me light has two functions of "To home" and "To car" for improving your visibility in the dark.
"To home" function Even after you leave the car, the ground will be illuminated for a short while with this function. You can turn on the front position lights and the headlights in the low beam setting for about 1 O seconds after the ignition switch is turned "LOCK".
To set the function: 1) Turn the lighting switch to "AUTO" position. 2) Turn the ignition switch to "LOCK" position. 3) Pull the lighting control lever toward you once and open the driver's side door within 60 seconds. Or pull the lighting control lever toward you once while the driver's side door is open.
2-59
To cancel the function: Perform any of the following operations. · If your vehicle is equipped with the keyless entry system (if equipped), it is necessary to insert the ignition key in the ignition switch. Pull the lighting control lever toward you once. Turn the ignition switch to "ACC" or "ON" position. Turn the lighting switch to any other position than "AUTO" position.
NOTE: When the "To home" is functioning, the front fog lights (if equipped), rear fog light and the headlights (high beam) are not turned on. Lighting time of the "To home" function can be changed on the information display. Refer to "Information display" in this section.
"To car" function Before you get in the vehicle, the ground will be illuminated for a short while to easily lead the driver to the vehicle. If "UNLOCK" button of the keyless entry system transmitter (if equipped) is pressed while the lighting switch is positioned in "AUTO", the front position lights and the headlights in the low beam are turned on for 1 O seconds. This function will operate only when it is dark outside the vehicle.
To cancel the function: Perform any of the following operations. If your vehicle is equipped with the keyless entry system (if equipped), it is necessary to insert the ignition key in the ignition switch. Lock the doors by using the keyless entry system transmitter, or the key in the driver's door lock. Turn the ignition switch to "ACC" or "ON" position. Turn the lighting switch to any other position than "AUTO" position.
NOTE: When the ''To car'' is functioning, the front fog lights (if equipped), rear fog fight and the headlights (high beam) are not turned on. Lighting time of the "To car'' function can be changed on the information display. Refer to "Information display" in this section.
Page 139 of 421

Wiper and washer operation
When the ignition switch is in "ON" position, you can use the wiper/washer lever.
When the wipers are under heavy load such as covered by snow, the breaker will be activated and the wipers will stop operating to protect the wiper motor from overheating. If the wiper stops during operation, do the following methods.
1) Stop the vehicle in a safe place, and turn the engine off. 2) Move the wiper lever and switch to "OFF" position. 3) Remove obstacles such as snow on the wipers. 4) After a while, when the temperature of the wiper motor becomes low enough, the breaker will be reset automatically and the wipers will be able to use.
If you cannot use the wipers after a while, there may be another problem. Ask a SUZUKI dealer to have the wipers inspected.
Windshield wipers
MIST
OFF
INT
LO
HI
78RB02059
To turn the windshield wipers on, move the lever down to one of the three operating positions. In "INT" position, the wipers operate intermittently. The "INT" position is very convenient for driving in mist or light rain. In "LO" position, the wipers operate at a steady low speed. In "HI" position, the wipers operate at a steady high speed. To turn off the wipers, move the lever back to "OFF" position.
Move the lever up and hold it to "MIST" position, the windshield wipers will turn on continuously at low speed.
BEFORE DRIVING
Windshield washer
78RB02060
To spray windshield washer fluid, pull the lever toward you. The windshield wipers will automatically turn on at low speed if they are not already on and your vehicle is equipped with "INT" position.
.A, WARNING
To prevent windshield icing in cold weather, turn on the defroster to heat the windshield before and during windshield washer use. Do not use radiator antifreeze in the windshield washer reservoir. It can severely impair visibility when sprayed on the windshield, and can also damage your vehicle's paint.
2-68
Page 143 of 421

Vehicle loading
Your vehicle is designed for specific weight capacities. The weight capacities of your vehicle are indicated by the Gross Vehicle Weight Rating (GVWR) and the Permissible maximum Axle Weight (PAW, front and rear). The GVWR and PAW (front and_ rear) are listed in "SPECIFICATIONS" section.
GVWR -Maximum permissible overall weight of the fully loaded vehicle (including all the occupants, accessories and cargo plus the trailer nose weight if towing a trailer). PAW (front and rear) -Maximum permissible weight on an individual axle.
Actual weight of the loaded vehicle and actual loads at the front and rear axles can only be determined by weighing the vehicle. Compare these weights to the GVWR and PAW (front and rear). If the g_ross vehicle weight or the load on either axle exceeds these ratings, you must remove enough weight to bring the load down to the rated capacity.
A_ WARNING
Never overload your vehicle. The gross vehicle weight (sum of the weights of the vehicle, all the occupants, accessories, cargo p~us trailer nose weight if towing a trailer) must never exceed the Gross Vehicle Weight Rating (GVWR). In addition, never distribute a load so that the weight on either the front or rear axle exceeds the Permissible maximum Axle Weight (PAW).
A_ WARNING
Always distribute cargo evenly. To avoid personal injury or damage to
your vehicle, always_ se~ure carg'? to prevent it from sh1ftmg 1f the vehicle moves suddenly. Place heavier objects on the floor and as far _forward in the cargo area as possible. Never pile cargo higher than the top of the seat backs.
BEFORE DRIVING
Trailer towing
Observe any country-specific regulations when towing a trailer and using a tow bar.
60A185
Your vehicle is primarily designed for transporting passengers and luggage. Towing a trailer can adversely affect vehicle handling, durability and fuel economy. Nevertheless, if suitably equipped, your vehicle can be used to tow a trailer which does not exceed the towing capacity specified below:
2-72
Page 144 of 421

BEFORE DRIVING
Maximum towing capacity (gross trailer weight; trailer with integrated drawbar, and cargo)
Braked trailer: 1300 kg (2866 lbs) Unbraked trailer: 350 kg (772 lbs)
To load your vehicle and trailer properly, you must know how to measure gross trailer weight and trailer nose weight.
78RB02083
(1) Gross trailer weight Gross trailer weight is the weight of the trailer with integrated drawbar plus all the cargo in it. You can measure gross trailer weight by putting the fully loaded trailer on a vehicle scale.
2-73
(2) Permissible nose weight Nose weight is the downward force applied on the towing hitch ball by the trailer coupler, with the trailer fully loaded and the coupler at its normal towing height. This weight can also be measured using a bathroom scale.
The maximum towing capacity listed above(1300kg) is only applicable up to 1 000m above sea level. In high altitude regions above 1 000m, combined weight of the maximum towing capacity (gross trailer weight) and permissible gross vehicle weight (GVWR) must be reduced by 10% for every extra 1 000m.
A WARNING
For vehicles equipped with the dual sensor brake support, if your vehicle is used to tow a trailer, press the dual sensor brake support OFF switch to turn off the dual sensor brake support. If not, accidents related to the system being turned on may occur.
A CAUTION
When towing by your vehicle equipped with automatic transmission on a long steep uphill, try to take some rest on the way at a safe place to prevent overheat or damage of the engine or transmission.
NOTICE
Trailer towing puts additional stress on the engine, transmission and brakes of your vehicle. Never tow a trailer during the first 1000 km (600 miles) of vehicle operation.