2018 SUZUKI JIMNY tow
[x] Cancel search: towPage 12 of 421

ILLUSTRATED TABLE OF CONTENTS
EXTERIOR, FRONT
1. Engine hood (P.5-2) 2. Windshield wipers (P.2-67) 3. Dual sensor (if equipped) (P.3-27) 4. Headlight washer (if equipped) (P.2-65, 6-46) 5. Headlights (P.2-55, 6-47) 6. Frame (towing) hook (P.5-14) 7. Front fog lights (if equipped) (P.2-60, 6-50)/ Daytime running lights (D.R.L.) (if equipped) (P.2-55, 2-58) 8. Outside rearview mirrors (P.2-13) 9. Door locks (P.2-2) 10. Front turn signal (P.2-66, 6-48) 11. Side turn signal (P.2-66, 6-49)
1 2 3
I
5 4 6 7 10 11 8 9
78RB01002
Page 34 of 421

FOR SAFE DRIVING
A WARNING
To minimize risk of severe injury or death in the event of a collision, always fasten seat belt with both latches buckled.
1-13
Unlatching and latching detachable connector
Unlatching To unlatch the connector: 1) Insert a key into the slot (1) on the connector and allow the belt to retract. 2) Once the belt has completely retracted. stow the belt in the holder. Refer to "Stowing rear lap-shoulder belt"" for
details in this section.
Latching To latch the connector: 1) Pull the belt out from the holder.
78RB02017
2) Insert the connector latch plate (2) into the connector (3).
A WARNING
Check that the detachable connector is securely latched and the webbing is not twisted.
Page 35 of 421

Stowing rear lap-shoulder belt Stow the belt after it is retracted com
pletely.
(
(5) (4)
78RB02018
Bind the seat belt (4) with band (5).
FOR SAFE DRIVING
1-14
Page 49 of 421

Approval mark to meet child
restraint system regulation for UN
R44 / R129 regulation
The following mark is shown on the child restraint system to meet the regulation of UN R44 / R129 for the child restraint system.
ECE R44/04 (1) ECE R129
Universal (2) i-Size
(3) -18kg Y (5) 40cm • 70cm I:!. 24kg (4)
@ (6) @
******** (7) ********
78RB01010
(1) Regulation number (2) Suitability for child restraint system category (3) Weight range of the applicable child who is applicable for this approval mark as shown in the mark (4) Height range and weight range of the applicable child who is applicable for this approval mark in the mark (5) Specification of appliance (6) Country code which approved child restraint system
(7) Approval number of child restraint seat
This approval mark is a representative example.
NOTE: UN R44 I R129 means the international regulation for the child restraint system. "EGE" is shown on the mark in the illustration for the child restraint system. This "EGE" mark is the same as "UN".
FOR SAFE DRIVING
Installation with lap-shoulder seat belts
A CAUTION
If your vehicle is equipped with the head restraint, adjust the height of the head restraint or remove it for fitting the child restraint, as necessary. However, if a booster cushion not equipped with the head restraint is fitted, the head restraint should not be removed. If the head restraint is removed for fitting the child restraint, you need to install it again after removing the child restraint. If the child restraint is fitted improperly, a child sitting in it could be injured in a collision.
NOTE: Stow the removed head restraint in the luggage compartment so it will not cause inconvenience to the occupants.
1-28
Page 51 of 421

Install the ISOFIX type child restraint system according to the instructions provided by the child restraint system manufacturer. After installation, try moving the child restraint system in all directions especially forward to check that connecting bars are securely latched to the anchorages.
84MM00252
Your vehicle is equipped with the top tether anchorages. Use the top tether strap of the child restraint according to the instructions provided by the child restraint system manufacturer.
Here is a general instruction:
A CAUTION
If your vehicle is equipped with the head restraint, adjust the height of the rear head restraint or remove it for fitting the child restraint, as necessary. However, if a booster cushion not equipped with the head restraint is fitted, the head restraint should not be removed. If the head restraint is removed for fitting the child restraint, you need to install it again after removing the child restraint. If the child restraint is fitted improperly, a child sitting in it could be injured in a collision.
NOTE: Stow the removed head restraint in the luggage comparlment so it will not cause inconvenience to the occupants.
FOR SAFE DRIVING
it'---►
78F114
1) Place the child restraint in the rear seat, inserting the connecting bars to the anchorages between the seat cushion and the seatback.
1-30
Page 52 of 421

FOR SAFE DRIVING
68LM268
2) Use your hands to carefully align the connecting bar tips with the anchorages. Take care not to pinch your fingers.
1-31
54G184
3) Push the child restraint toward the anchorages so that the connecting bar tips are partially hooked to the anchorages. Use your hands to confirm the position.
54G185
4) Grasp the front of the child restraint and push the child restraint forcefully to latch the connecting bars. Check that they are securely latched by trying to move the child restraint system in all directions, especially forward. 5) Attach the top tether strap referring to "Installation of child restraint with top tether" section. When you put your child in the child restraint system, appropriately slide the front seat forward not to touch a part of your child's body.
NOTICE
When installing a child restraint system to the rear seat, adjust the front seat position so that the front seat does not interfere with the child restraint system.
Page 71 of 421

BEFORE DRIVING
BEFORE DRIVING
Brightness control .............................................................. 2-17
Information display ............................................................. 2-18 -
Instrument cluster (Type B) (if equipped) ......................... 2-25
Speedometer ....................................................................... 2-26
Tachometer .......................................................................... 2-26
Fuel gauge ........................................................................... 2-26
Brightness control .............................................................. 2-26
Information switch
(if equipped) ......................................................................... 2-27
Information display ............................................................. 2-28
Warning and indicator lights .............................................. 2-39
Lighting control lever ......................................................... 2-55
Headlight leveling switch
(if equipped) ......................................................................... 2-65
Headlight washer switch
(if equipped) ........................................................................ 2-65
60G404 Turn signal control lever .................................................... 2-66
Keys ...................................................................................... 2-1 Hazard warning switch ....................................................... 2-67
Door locks ............................................................................ 2-2 Windshield wiper and washer lever .................................. 2-67
Keyless entry system transmitter (if equipped) ................ 2-6 Tilt steering lock lever ........................................................ 2-70
Theft deterrent alarm system (if equipped) ....................... 2-8 Horn ...................................................................................... 2-70
Theft deterrent light Heated rear window switch /
(if equipped) ........................................................................ 2-10 heated outside rearview mirror switch (if equipped) ...... 2-71
Windows ............................................................................... 2-1 o Vehicle loading .................................................................... 2-72
Mirrors .................................................................................. 2-13 Trailer towing ....................................................................... 2-72
Instrument cluster (Type A) (if equipped) ......................... 2-15
Speedometer ........................................................................ 2-16
Tachometer .......................................................................... 2-16
Fuel gauge ............................................................................ 2-16
Page 73 of 421

NOTE: If you lose your immobilizer ignition key, ask a SUZUKI dealer as soon as possible to deactivate the lost one, and to make a new key. If you own other vehicles with immobilizer keys, keep those keys away from the ignition switch when using your SUZUKI vehicle. Otherwise, the engine may not be started because they may interfere with your SUZUKI vehicle's immobilizer system. If you attach any metal objects to the immobilizer key, it may not start the engine.
NOTICE
The immobilizer key is sensitive electronic instruments. To avoid damaging them: Do not expose them to impacts, moisture or high temperature such as on the dashboard under direct sunlight. Keep them away from magnetic objects.
Ignition key reminder
A buzzer sounds intermittently to remind you to remove the ignition key if it is in the ignition keyhole when the driver's door is opened.
Door locks
Side door locks
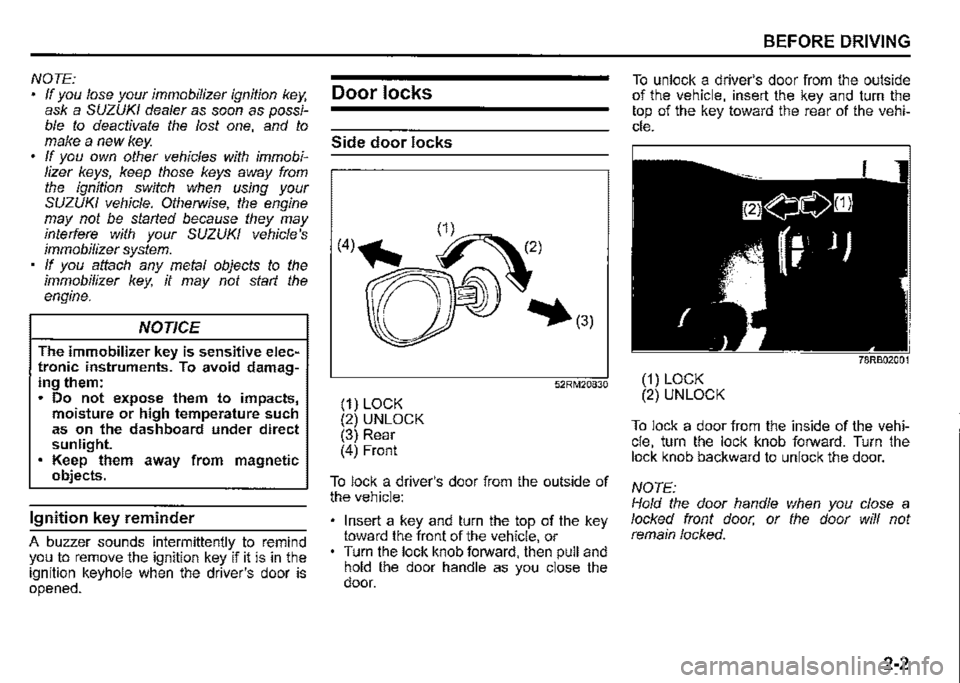
(1) LOCK (2) UNLOCK (3) Rear (4) Front
52RM20830
To lock a driver's door from the outside of the vehicle:
Insert a key and turn the top of the key toward the front of the vehicle, or Turn the lock knob forward, then pull and hold the door handle as you close the door.
BEFORE DRIVING
To unlock a driver's door from the outside of the vehicle, insert the key and turn the top of the key toward the rear of the vehicle.
78RB02001
(1) LOCK (2) UNLOCK
To lock a door from the inside of the vehicle, turn the lock knob forward. Turn the lock knob backward to unlock the door.
NOTE: Hold the door handle when you close a locked front door, or the door will not remain locked.
2-2