2018 SUBARU WRX brake light
[x] Cancel search: brake lightPage 472 of 578

(491,1)
北米Model "A1700BE-B" EDITED: 2017/ 10/ 11
CAUTION
.Be careful not to damage brake
hoses, sensor harnesses, and
other parts when washing sus-
pension components.
.Be careful not to flush the engine
bottom for a long time. It may
cause damage of some electrical
parts.
!Using a warm water washer
.Keep a good distance of 12 in (30 cm)
or more between the washer nozzle and
the vehicle.
.Do not wash the same area continu-
ously.
.If a stain will not come out easily, wash
by hand. Some warm water washers are of
the high temperature, high pressure type,
and they can damage or deform the resin
parts such as moldings, or cause water to
leak into the vehicle.!Precautions for TYPE RA
!Precautions when cleaning the
carbon roof and rear wing
CAUTION
.When cleaning, take care that you
do not apply strong force to a
single point. Depending on the
degree of force and the location,
there is the risk of denting the
carbon roof or rear wing.
.After acid rain falls, it is recom-
mended that the vehicle be
washed before the water on the
paint evaporates.
.Promptly wash off any bird drop-
pings, insects, pollen, tree sap, or
similar substance that adheres to
the paint. If it is not promptly
washed off, it may penetrate the
paint.
.Remove any dirt using a neutral deter-
gent. Do not use hard brushes or abrasive
cleaners. Do not use strong or harsh
chemical cleaners.
.As the CFRP parts may change color if
they are exposed to ultraviolet rays for
extended periods of time, we recommend
that your vehicle be stored in a placewhere it will not be exposed to direct
sunlight.
.Do not use wax that contains abrasives.
NOTEDue to the characteristics of the carbon
roof, white cloudy areas may occur in
spots on the roof, however these do not
affect performance in any way.
!Precautions when cleaning
around the rear bumper cherry
red stripeRear bumper cherry red stripePrecautions when using a high-pres-
sure washer:
.Keep a distance of 12 in (30 cm) or
more between the washer nozzle and the
stripe.
–CONTINUED–
Appearance care/Exterior care
10-3
10
Page 479 of 578

(500,1)
北米Model "A1700BE-B" EDITED: 2017/ 10/ 11
Parking brake stroke (models without
electronic parking brake system)................... 11-30
Tires and wheels................................................. 11-30
Types of tires...................................................... 11-30
Tire pressure monitoring system (TPMS)
(if equipped)..................................................... 11-30
Tire inspection.................................................... 11-32
Tire pressures and wear...................................... 11-32
Wheel balance.................................................... 11-34
Wear indicators................................................... 11-35
Rotational direction of tires................................. 11-35
Tire rotation........................................................ 11-36
Tire replacement................................................. 11-36
Wheel replacement............................................. 11-37
Alloy wheels........................................................ 11-38
Windshield washer fluid..................................... 11-38
Replacement of wiper blades............................ 11-39
Windshield wiper blade assembly........................ 11-40
Windshield wiper blade rubber............................ 11-40
Battery................................................................. 11-41Fuses....................................................................11-42
Installation of accessories..................................11-44
Replacing bulbs...................................................11-44
Headlights (models with LED headlights)............ 11-44
High beam headlight
(models without LED headlights)..................... 11-44
Low beam headlight*, front side marker light,
parking light* and front turn signal light*......... 11-46
Front turn signal light
(models with LED headlights).......................... 11-48
Front fog light
(models with the LED front fog light)............... 11-48
Front fog light (models without the LED front
fog light) (if equipped)..................................... 11-49
Rear combination lights...................................... 11-49
License plate light.............................................. 11-50
Other bulbs........................................................ 11-51
Replacing battery................................................11-51
Safety precautions.............................................. 11-51
Replacing battery of access key fob................... 11-52
Replacing transmitter battery.............................. 11-53
Maintenance and service
Page 503 of 578

(524,1)
北米Model "A1700BE-B" EDITED: 2017/ 10/ 11
Check the fluid level on the outside of the
reservoir. Because this reservoir is used
for both the brake and clutch systems and
has chambers for each system, be sure to
check the fluid level for the clutch system
at theinboard side of the reservoir
(shaded area in the illustration). If the fluid
level is below“MIN”, add the recom-
mended clutch fluid to“MAX”.
Use only clutch fluid from a sealed contain-
er.&Recommended clutch fluidRefer to“Fluids”F12-7.
CAUTION
Never use different brands of clutch
fluid together. Also, avoid mixing
DOT 3 and DOT 4 brake fluids even if
they are the same brand.
Brake boosterIf the brake booster does not operate as
described in the following, have it checked
by your SUBARU dealer.
1. With the engine off, depress the brake
pedal several times, applying the same
pedal force each time. The distance the
pedal travels should not vary.
2. With the brake pedal depressed, start
the engine. The pedal should move slightly
down to the floor.
3. With the brake pedal depressed, stop
the engine and keep the pedal depressed
for 30 seconds. The pedal height should
not change.
4. Start the engine again and run for
approximately one minute then turn it off.
Depress the brake pedal several times to
check the brake booster. The brake
booster operates properly if the pedal
stroke decreases with each depression.NOTEWhen you depress the brake pedal
strongly or suddenly, you might feel
that lighter depression of the brake
pedal generates a greater braking
force. However, even though these
occur, they do not indicate any mal-
functions, and the brake assist systemis operating properly.
Brake assist is not a system that brings
more braking ability to the vehicle
beyond its breaking capability.
Maintenance and service/Brake booster
11-26
Page 504 of 578
(525,1)
北米Model "A1700BE-B" EDITED: 2017/ 10/ 11
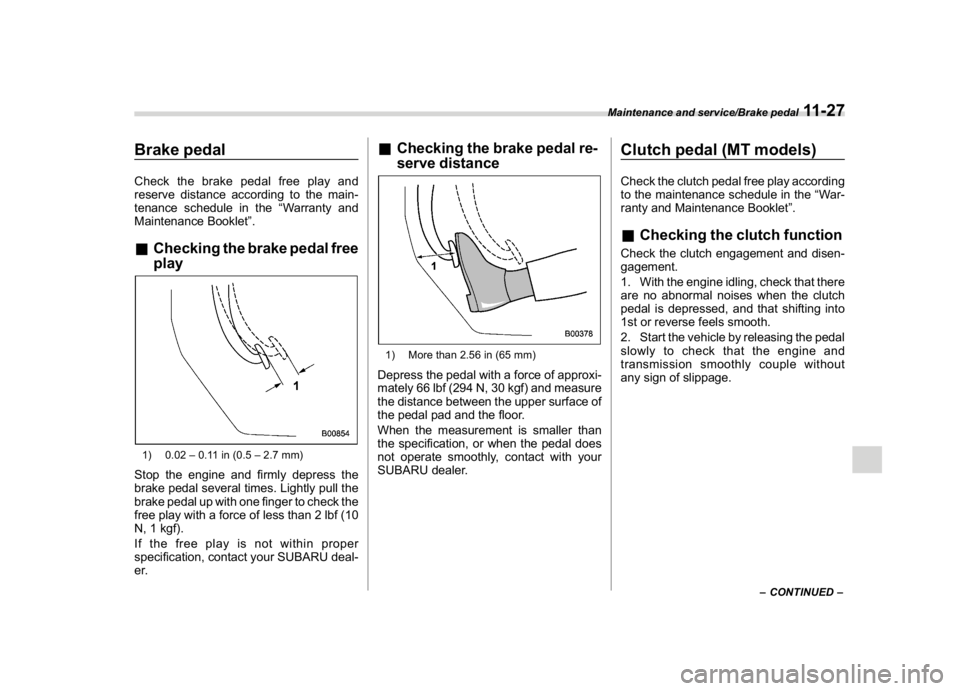
Brake pedalCheck the brake pedal free play and
reserve distance according to the main-
tenance schedule in the“Warranty and
Maintenance Booklet”.&Checking the brake pedal free
play1) 0.02–0.11 in (0.5–2.7 mm)Stop the engine and firmly depress the
brake pedal several times. Lightly pull the
brake pedal up with one finger to check the
free play with a force of less than 2 lbf (10
N, 1 kgf).
If the free play is not within proper
specification, contact your SUBARU deal-
er.
&Checking the brake pedal re-
serve distance1) More than 2.56 in (65 mm)Depress the pedal with a force of approxi-
mately 66 lbf (294 N, 30 kgf) and measure
the distance between the upper surface of
the pedal pad and the floor.
When the measurement is smaller than
the specification, or when the pedal does
not operate smoothly, contact with your
SUBARU dealer.
Clutch pedal (MT models)Check the clutch pedal free play according
to the maintenance schedule in the“War-
ranty and Maintenance Booklet”.&Checking the clutch functionCheck the clutch engagement and disen-
gagement.
1. With the engine idling, check that there
are no abnormal noises when the clutch
pedal is depressed, and that shifting into
1st or reverse feels smooth.
2. Start the vehicle by releasing the pedal
slowly to check that the engine and
transmission smoothly couple without
any sign of slippage.
–CONTINUED–
Maintenance and service/Brake pedal
11-27
11
Page 505 of 578

(526,1)
北米Model "A1700BE-B" EDITED: 2017/ 10/ 11
&Checking the clutch pedal
free play1) 0.16–0.43 in (4.0–11.0 mm)Lightly depress the clutch pedal down with
your finger until you feel resistance, and
check the free play.
If the free play is not within proper
specification, contact your SUBARU deal-
er.
Hill start assist systemEnsure that the Hill start assist system
operates properly under the following
circumstances.
1. Stop the vehicle on an uphill grade by
depressing the brake pedal (all models)
and clutch pedal (MT models only), with
the engine running.
2. Make sure that the vehicle does not
move backward for several seconds after
the brake pedal is released.
3. Then make sure the vehicle starts
climbing the grade by following the normal
starting procedures.
If the Hill start assist system does not
operate as described above, contact your
SUBARU dealer.
Replacement of brake pad
and liningThe disc brakes have audible wear in-
dicators on the brake pads. If the brake
pads wear close to their service limit, the
wear indicator makes a very audible
scraping noise when the brake pedal is
applied.
If you hear this scraping noise each time
you apply the brake pedal, have the brake
pads serviced by your SUBARU dealer as
soon as possible.
Maintenance and service/Hill start assist system
11-28
Page 506 of 578
(527,1)
北米Model "A1700BE-B" EDITED: 2017/ 10/ 11
CAUTION
.It is recommended that you dis-
connect the vehicle battery be-
fore replacing the brake pad.
However, it is dangerous to dis-
connect the vehicle battery. We
recommend that you have your
SUBARU dealer replace the brake
pad.
.If you continue to drive despite
the scraping noise from the audi-
ble brake pad wear indicator, it
will result in the need for costly
brake rotor repair or replace-
ment.&Breaking-in of new brake
pads (models with electronic
parking brake system)When replacing the brake pad, use only
genuine SUBARU parts. After replace-
ment, break in the new parts as follows.
!Brake pad
While maintaining a speed of 30 to 40 mph
(50 to 65 km/h), step on the brake pedal
lightly. Repeat this five or more times. Also,
apply and release the electronic parking
brake five or more times.
&Breaking-in of new brake
pads and linings (models
without electronic parking
brake system)When replacing the brake pad or lining,
use only genuine SUBARU parts. After
replacement, break in the new parts as
follows.
!Brake pad and lining
While maintaining a speed of 30 to 40 mph
(50 to 65 km/h), step on the brake pedal
lightly. Repeat this five or more times.
!Parking brake lining
1. Drive the vehicle at a speed of approxi-
mately 22 mph (35 km/h).
2. With the parking brake release button
pushed in, pull the parking brake lever
SLOWLY and GENTLY (pulling with a
force of approximately 33.7 lbf [150 N,
15.3 kgf]).
3. Drive the vehicle for approximately 220
yards (200 meters) in this condition.
4. Wait 5 to 10 minutes for the parking
brake to cool down. Repeat this proce-
dure.
5. Check the parking brake stroke. If the
parking brake stroke is out of the specified
range, adjust it by turning the adjusting nut
located on the parking brake lever.
Parking brake stroke:
7–8 notches / 45 lbf (200 N, 20.4 kgf)
WARNING
Select a safe location and situation
for break-in driving.
CAUTION
Pulling the parking brake lever too
forcefully may cause the rear wheels
to lock. To avoid this, be certain to
pull the lever up slowly and gently.
Maintenance and service/Replacement of brake pad and lining
11-29
11
Page 509 of 578

(530,1)
北米Model "A1700BE-B" EDITED: 2017/ 10/ 11
WARNING
If the low tire pressure warning light
does not illuminate briefly after the
ignition switch is turned ON or the
light illuminates steadily after blink-
ing for approximately one minute,
you should have your Tire Pressure
Monitoring System checked at a
SUBARU dealer as soon as possi-
ble.
If this light illuminates while driving,
never brake suddenly. Instead, per-
form the following procedure. Other-
wise an accident involving serious
vehicle damage and serious perso-
nal injury could occur.
1) Keep driving straight ahead while
gradually reducing speed.
2) Slowly pull off the road to a safe
place.
If this light still illuminates while
driving after adjusting the tire pres-
sure, a tire may have significant
damage and a fast leak that causes
the tire to lose air rapidly. If you have
a flat tire, refer to“Flat tires”F9-5.
When a spare tire is mounted or a
wheel rim is replaced without the
original pressure sensor/transmitter
being transferred, the low tire pres-sure warning light will illuminate
steadily after blinking for approxi-
mately one minute. This indicates
the TPMS is unable to monitor all
four road wheels. Contact your
SUBARU dealer as soon as possible
for tire and sensor replacement and/
or system resetting. If the light
illuminates steadily after blinking
for approximately one minute,
promptly contact a SUBARU dealer
to have the system inspected.
&Tire inspectionCheck on a daily basis that the tires are
free from serious damage, nails, and
stones. At the same time, check the tires
for abnormal wear.
Contact your SUBARU dealer immediately
if you find any problem.NOTE.When the wheels and tires strike
curbs or are subjected to harsh treat-
ment as when the vehicle is driven on a
rough surface, they can suffer damage
that cannot be seen with the naked eye.
This type of damage does not become
evident until time has passed. Try not to
drive over curbs, potholes or on other
rough surfaces. If doing so is unavoid-able, keep the vehicle’s speed down to
a walking pace or less, and approach
the curbs as squarely as possible. Also,
make sure the tires are not pressed
against the curb when you park the
vehicle.
.If you feel unusual vibration while
driving or find it difficult to steer the
vehicle in a straight line, one of the tires
and/or wheels may be damaged. Drive
slowly to the nearest authorized
SUBARU dealer and have the vehicle
inspected.
&Tire pressures and wearMaintaining the correct tire pressures
helps to maximize the tires’service lives
and is essential for good running perfor-
mance. Check and, if necessary, adjust
the pressure of each tire (including the
spare) at least once a month (for example,
during a fuel stop) and before any long
journey.
Maintenance and service/Tires and wheels
11-32
Page 538 of 578

(561,1)
北米Model "A1700BE-B" EDITED: 2017/ 10/ 11
&Fluids
Fluid
Fluid type*
1
Fluid capacity*
2
Remarks*
3
Continuously variable transmission
fluid (CVT models)Consult your SUBARU dealer. 13.1 US qt (12.4 liters, 10.9 Imp qt)“
Continuously variable transmis-
sion fluid”F11-22
Brake fluidFMVSS No. 116, DOT 3 or DOT 4 brake
fluid—“
Brake fluid”F11-24
Clutch fluid (MT models)FMVSS No. 116, DOT 3 or DOT 4 brake
fluid—“
Clutch fluid (MT models)”F11-25
Power steering fluid (STI)· SUBARU ATF
·“Dexron III”Type Automatic Transmis-
sion Fluid
· IDEMITSU ATF HP0.7 US qt (0.7 liter, 0.6 Imp qt)“
Power steering fluid (STI)”F11 -
23
*1: Use one of the indicated types of fluid.
*2: The indicated fluid quantity is only a guideline. The necessary quantity for replacement may differ slightly depending on the temperature and other
factors.
*3: For more details about maintenance and service, refer to the indicated section.&Engine coolant
Vehicle model Coolant capacity Coolant type
STI 8.2 US qt (7.7 liters, 6.8 Imp qt)
SUBARU Super Coolant
Except STIMT models 8.6 US qt (8.1 liters, 7.2 Imp qt)
CVT models8.8 US qt (8.3 liters, 7.3 Imp qt)
The indicated coolant quantity is only a guideline. The necessary quantity for replacement may differ slightly depending on the temperature and other
factors. For more details about maintenance and service, refer to“
Cooling system”F11-16.
–CONTINUED–
Specifications/Specifications
12-7
12