2018 SUBARU WRX remove seats
[x] Cancel search: remove seatsPage 36 of 578

(37,1)
北米Model "A1700BE-B" EDITED: 2017/ 10/ 11
&Power seat (driver’s seat–if
equipped)1)Seat position forward/backward con-
trol switch
To adjust the seat forward or backward,
move the control switch forward or
backward. During forward/backward ad-justment of the seat, you cannot adjust
the seat cushion angle or seat cushion
height.
2)Seat cushion angle control switch
To adjust the seat cushion angle, pull up
or push down the front end of the control
switch.
3)Seat height control switch
To adjust the seat height, pull up or push
down the rear end of the control switch.
4)Seatback angle (reclining) control
switch
To adjust the angle of the seatback, move
the control switch.
5)Lumbar support control switch (dri-
ver’s seat only)
To increase lower back support, push the
front side of the switch. To decrease
lower back support, push the rear side of
the switch.
&Head restraint adjustment
WARNING
.Never drive the vehicle with the
head restraints removed because
they are designed to reduce the
risk of serious neck injury in the
event that the vehicle is struck
from the rear. Also, never install
the head restraints the opposite
way round. Doing so will prevent
the head restraints from function-ing as intended. Therefore, when
you remove the head restraints,
you must reinstall all head re-
straints correctly to protect vehi-
cle occupants.
.All occupants, including the dri-
ver, should not operate a vehicle
or sit in a vehicle’s seat until the
head restraints are placed in their
proper positions in order to mini-
mize the risk of neck injury in the
event of a crash.
.The front seat head restraints are
designed to be installed into the
front seats only. The rear seat
head restraints are designed to
be installed into the rear seats
only. Do not attempt to install the
front seat head restraints into the
rear seats, or the rear seat head
restraints into the front seats.
NOTEIt is possible to adjust the angle of the
front seat head restraints only. When
installing the front seat head restraints,
make sure that the angle of the head
restraints can be adjusted.
Both the driver’s seat and front passen-
ger’s seat are equipped with head re-
straints. Both head restraints are adjusta-
–CONTINUED–
Seat, seatbelt and SRS airbags/Front seats
1-5
1
Page 37 of 578

(38,1)
北米Model "A1700BE-B" EDITED: 2017/ 10/ 11
ble in the following ways.
!Head restraint height adjustment1) Head restraint
2) Release buttonTo raise:
Pull the head restraint up.
To lower:
Push the head restraint down while press-
ing the release button on the top of the
seatback.
To remove:
While pressing the release button, pull out
the head restraint.
To install:
Install the head restraint into the holes that
are located on the top of the seatback until
the head restraint locks. Press and holdthe release button to lower the head
restraint.
Adjust each head restraint so that the
center of the head restraint is closest to the
top of the occupant’s ears.NOTEWhen the head restraint will not move
in or out due to insufficient clearance
between the head restraint and the roof,
tilt the seat and then perform the
installation and removal tasks.!Head restraint angle adjustment
It is possible to adjust the angle of the head
restraint in several steps. While maintain-
ing a suitable driving posture, adjust the
head restraint to a position where the back
of your head is as close to the head
restraint as possible.
To tilt:
Tilt the head restraint by hand to the
preferred position. A click will be audible
when the head restraint is locked.
To return:
Tilt the head restraint once as far forward
as it can go. The head restraint will
automatically return to the fully upright
position. Then, adjust the head restraint
again to the preferred angle.
Seat, seatbelt and SRS airbags/Front seats
1-6
Page 39 of 578

(40,1)
北米Model "A1700BE-B" EDITED: 2017/ 10/ 11
Rear seats
WARNING
Seatbelts provide maximum re-
straint when the occupant sits well
back and upright in the seat. Do not
put cushions or any other materials
between occupants and seatbacks
or seat cushions. If you do so, the
risk of sliding under the lap belt and
of the lap belt sliding up over the
abdomen will increase, and both can
result in serious internal injury or
death.
WARNING
Never stack luggage or other cargo
higher than the top of the seatback
because it could tumble forward and
injure passengers in the event of a
sudden stop or accident.
&Head restraint adjustmentBoth the rear window side seats and the
rear center seat are equipped with head
restraints.
WARNING
.Never drive the vehicle with the
head restraints removed because
they are designed to reduce the
risk of serious neck injury in the
event that the vehicle is struck
from the rear. Therefore, when
you have removed the head re-
straints, you must reinstall all
head restraints to protect vehicle
occupants.
.All occupants, including the dri-
ver, should not operate a vehicle
or sit in a vehicle’s seat until the
head restraints are placed in their
proper positions in order to mini-
mize the risk of neck injury in the
event of a crash.
Seat, seatbelt and SRS airbags/Rear seats
1-8
Page 40 of 578

(41,1)
北米Model "A1700BE-B" EDITED: 2017/ 10/ 11
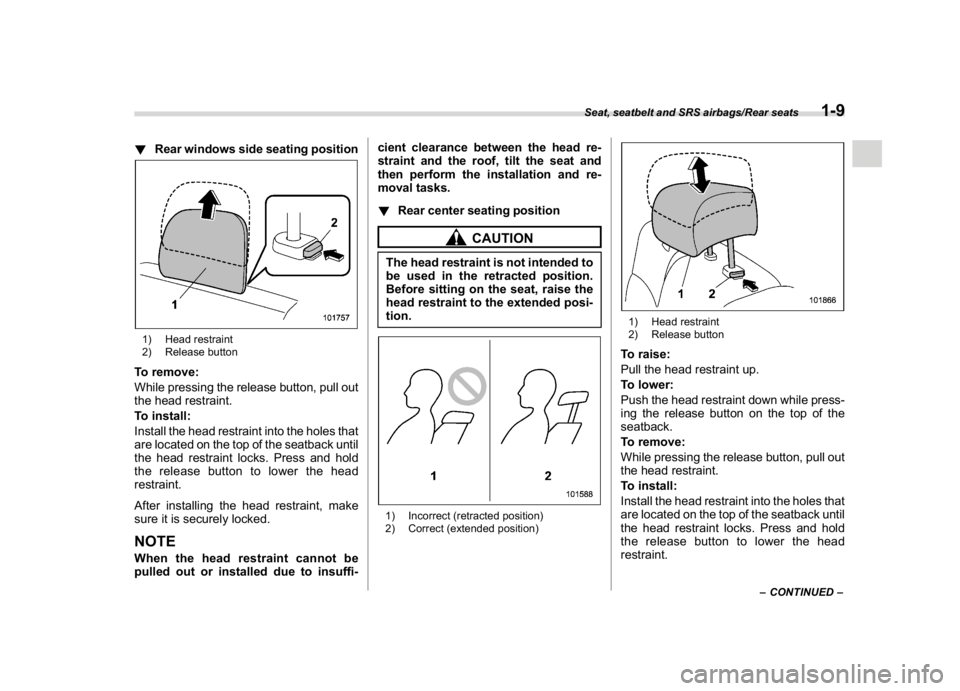
!Rear windows side seating position1) Head restraint
2) Release buttonTo remove:
While pressing the release button, pull out
the head restraint.
To install:
Install the head restraint into the holes that
are located on the top of the seatback until
the head restraint locks. Press and hold
the release button to lower the head
restraint.
After installing the head restraint, make
sure it is securely locked.NOTEWhen the head restraint cannot be
pulled out or installed due to insuffi-cient clearance between the head re-
straint and the roof, tilt the seat and
then perform the installation and re-
moval tasks.
!Rear center seating position
CAUTION
The head restraint is not intended to
be used in the retracted position.
Before sitting on the seat, raise the
head restraint to the extended posi-
tion.1) Incorrect (retracted position)
2) Correct (extended position)
1) Head restraint
2) Release buttonTo raise:
Pull the head restraint up.
To lower:
Push the head restraint down while press-
ing the release button on the top of the
seatback.
To remove:
While pressing the release button, pull out
the head restraint.
To install:
Install the head restraint into the holes that
are located on the top of the seatback until
the head restraint locks. Press and hold
the release button to lower the head
restraint.
–CONTINUED–
Seat, seatbelt and SRS airbags/Rear seats
1-9
1
Page 75 of 578

(76,1)
北米Model "A1700BE-B" EDITED: 2017/ 10/ 11
monitors the physique and posture of the
front passenger. Using this information,
the occupant detection system determines
whether the front passenger’s SRS frontal
airbag should be deployed or not.
The occupant detection system may not
inflate the front passenger’s SRS frontal
airbag even when the driver’s SRS frontal
airbag deploys. This is normal. In this
case, although the front passenger’s SRS
frontal airbag does not operate, the front
passenger’s seatbelt pretensioner oper-
ates with the driver’s seatbelt preten-
sioner. For details about the seatbelt
pretensioner, refer to“Front seatbelt pre-
tensioners”F1-17.
CAUTION
Observe the following precautions.
Failure to do so may prevent the
SUBARU advanced frontal airbag
system from functioning correctly
or cause the system to fail.
.Do not apply any strong impact to
the front passenger’s seat such
as by kicking.
.Do not let rear passengers rest
their feet between the front seat-
back and seat cushion.
.Do not spill liquid on the front
passenger’s seat. If liquid isspilled, wipe it off immediately.
.Do not remove or disassemble
the front passenger’s seat.
.Do not install any accessory
(such as an audio amplifier) other
than a genuine SUBARU acces-
sory under the front passenger’s
seat.
.Do not place anything (shoes,
umbrella, etc.) under the front
passenger’s seat.
.Do not use the front passenger’s
seat with the head restraint re-
moved.
.Do not leave any articles on the
front passenger’s seat or the
seatbelt tongue and buckle en-
gaged when you leave your vehi-
cle.
.Do not put sharp object(s) on the
seat or pierce the seat uphols-
tery.
.Do not place a magnet near the
seatbelt buckle and the seatbelt
retractor.
.Do not use front seats with their
backward-forward position and
seatback not being locked into
place securely. If any of them are
not locked securely, adjust themagain. For adjusting procedure,
refer to“Manual seat”F1-4
(models equipped with manual
seats only).
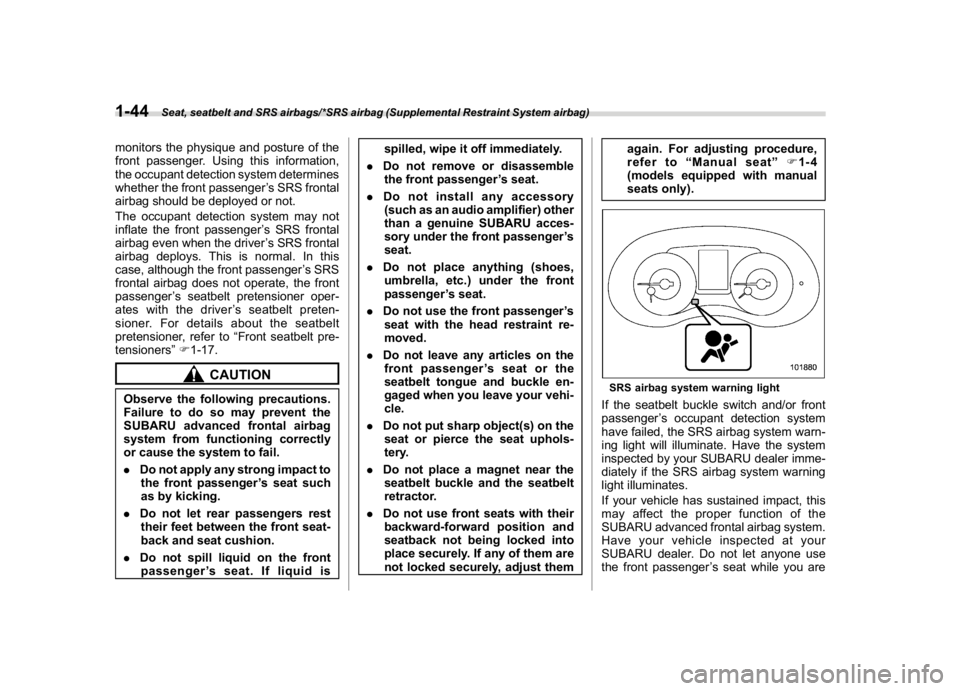
SRS airbag system warning lightIf the seatbelt buckle switch and/or front
passenger’s occupant detection system
have failed, the SRS airbag system warn-
ing light will illuminate. Have the system
inspected by your SUBARU dealer imme-
diately if the SRS airbag system warning
light illuminates.
If your vehicle has sustained impact, this
may affect the proper function of the
SUBARU advanced frontal airbag system.
Have your vehicle inspected at your
SUBARU dealer. Do not let anyone use
the front passenger’s seat while you are
Seat, seatbelt and SRS airbags/*SRS airbag (Supplemental Restraint System airbag)
1-44
Page 475 of 578

(494,1)
北米Model "A1700BE-B" EDITED: 2017/ 10/ 11
Cleaning the interiorUse a soft, damp cloth to clean the climate
control panel, audio equipment, instru-
ment panel, center console, combination
meter panel, and switches. (Do not use
organic solvents.)&Seat fabricRemove loose dirt, dust or debris with a
vacuum cleaner. If the dirt is caked on the
fabric or hard to remove with a vacuum
cleaner, use a soft brush then vacuum it.
Wipe the fabric surface with a tightly wrung
cloth and dry the seat fabric thoroughly. If
the fabric is still dirty, wipe using a solution
of mild soap and lukewarm water then dry
thoroughly.
If the stain does not come out, try a
commercially-available fabric cleaner.
Use the cleaner on a hidden place and
make sure it does not affect the fabric
adversely. Use the cleaner according to its
instructions.
CAUTION
When cleaning the seat, do not use
benzine, paint thinner, or any similar
materials. Doing so could damage
the surface and cause the color todeteriorate.
&Leather seat materialsThe leather used by SUBARU is a high
quality natural product which will retain its
distinctive appearance and feel for many
years with proper care.
Allowing dust or road dirt to build up on the
surface can cause the material to become
brittle and to wear prematurely. Regular
cleaning with a soft, moist, natural fiber
cloth should be performed monthly, taking
care not to soak the leather or allow water
to penetrate the stitched seams.
A mild detergent suitable for cleaning
woolen fabrics may be used to remove
difficult dirt spots, rubbing with a soft, dry
cloth afterwards to restore the luster. If
your SUBARU is to be parked for a long
time in bright sunlight, it is recommended
that the seats and head restraints be
covered, or the windows shaded, to pre-
vent fading or shrinkage. Make sure to
remove any seat covers and head restraint
covers when operating the vehicle.
Minor surface blemishes or bald patches
may be treated with a commercial leather
spray lacquer. You will discover that each
leather seat section will develop soft folds
or wrinkles, which is characteristic of
genuine leather.
&Synthetic leather upholsteryThe synthetic leather material used on the
SUBARU may be cleaned using mild soap
or detergent and water, after first vacuum-
ing or brushing away loose dirt. Allow the
soap to soak in for a few minutes and wipe
off with a clean, damp cloth. Commercial
foam-type cleaners suitable for synthetic
leather materials may be used when
necessary.
CAUTION
Strong cleaning agents such as
solvents, paint thinners, window
cleaner or fuel must never be used
on leather or synthetic interior ma-
terials. Doing so could damage the
surface and cause the color to
deteriorate.
Appearance care/Cleaning the interior
10-6