2018 SUBARU WRX change wheel
[x] Cancel search: change wheelPage 369 of 578

(382,1)
北米Model "A1700BE-B" EDITED: 2017/ 10/ 11
&Auto modeIn the auto mode, the system estimates the
driving and road conditions using signals
from the wheel speed sensor, throttle
position sensor, steering angle sensor
and brake switch, etc. According to the
result, it electronically and automatically
controls the degree of limitation of the
differential action (LSD torque) to optimize
the differential action of the center differ-
ential. When you turn the ignition switch
ON, the“AUTO”indicator on the combina-
tion meter appears.The auto mode has 3 modes as follows.
Mode Operation
AUTO [+] This mode emphasizes traction
control and strengthens the lim-
itation of differential action that
is suitable for driving on slippery
roads for vehicle stability.
AUTO This mode is suitable for most
driving situations.
AUTO [�] This mode is suitable when you
seek quick response from the
steering wheel and smooth
driving.
!Mode setting method
In most situations, it is recommended that
the“AUTO”mode is selected.Push the control switch forward to select
the“AUTO [+]”mode. After setting themode,“AUTO [+]”appears.
Pull the control switch rearward to select
the“AUTO [�]”mode. After setting the
mode,“AUTO [�]”appears.
When the“AUTO [+]”mode is selected,
pull the control switch rearward to change
to the“AUTO”mode. When the“AUTO [�]”
mode is set, push the control switch
forward to change to the“AUTO”mode.
Starting and operating/Driver’s Control Center Differential (C.DIFF/DCCD) (STI)
7-20
Page 375 of 578

(388,1)
北米Model "A1700BE-B" EDITED: 2017/ 10/ 11
1) Upshift indicator
2) Downshift indicator
3) Gear position indicatorWhen the manual mode is selected, the
gear position indicator and upshift indica-
tor and/or downshift indicator on the
combination meter appear.
The gear position indicator shows the
currently selected gear in the following
range.
.1st-to-8th-gear range (when the Sport
Sharp (S#) mode is selected)
.1st-to-6th-gear range (in other situa-
tions)
The upshift and downshift indicators show
when a gear shift is possible. When the
upshift indicator“
”appears, upshifting is
possible. When the downshift indicator“
”appears, downshifting is possible.
When both indicators appear, upshifting
and downshifting are both possible. When
the vehicle stops (for example, at traffic
signals), the downshift indicator turns off.
Gearshifts can be performed using the
shift paddle behind the steering wheel.
To upshift to the next higher gear position,
pull the shift paddle that has“+”indicated
on it. To downshift to the next lower gear
position, pull the shift paddle that has“–”
indicated on it.
CAUTION
Do not place or hang anything on the
shift paddles. Doing so may result in
accidental gear shifting.
NOTEPlease read the following points care-
fully and bear them in mind when using
the manual mode.
.If you attempt to shift down when the
engine speed is too high, i.e., when a
downshift would push the tachometer
needle beyond the red zone, beeps will
be emitted to warn you that the down-
shift is not possible.
.If you attempt to shift up when the
vehicle speed is too low, the transmis-
sion will not respond.
.You can perform a skip-shift (for
example, from 4th to 2nd) by operating
the shift paddle twice in rapid succes-
sion.
.The transmission automatically se-
lects 1st gear when the vehicle stops
moving.
.If the temperature of the transmis-
sion fluid becomes too high, the“AT
OIL TEMP”warning light on the combi-
nation meter will illuminate. Immedi-
ately stop the vehicle in a safe location
and let the engine idle until the warning
light turns off.
.By selecting the Sport Sharp (S#)
mode, upshifting will not occur auto-
matically. According to the road condi-
tions, shift change manually so that the
tachometer needle does not enter the
Starting and operating/Continuously variable transmission
7-26
Page 391 of 578

(404,1)
北米Model "A1700BE-B" EDITED: 2017/ 10/ 11
NOTEThis device complies with part 15 of the
FCC Rules. Operation is subject to the
following two conditions: (1) This de-
vice may not cause harmful interfer-
ence, and (2) this device must accept
any interference received, including
interference that may cause undesired
operation.
FCC CAUTION
Changes or modifications not ex-
pressly approved by the party respon-
sible for compliance could void the
user’s authority to operate the equip-
ment.
Parking your vehicle
WARNING
.Never leave unattended children
or pets in the vehicle. They could
accidentally injure themselves or
others through inadvertent op-
eration of the vehicle. Also, on
hot or sunny days, the tempera-
ture in a closed vehicle could
quickly become high enough to
cause severe or possibly fatal
injuries to them.
.Do not park the vehicle over
flammable materials such as dry
grass, waste paper or rags, as
they may burn easily if they come
near hot engine or exhaust sys-
tem parts.
.Be sure to stop the engine if you
take a nap in the vehicle. If engine
exhaust gas enters the passen-
ger compartment, occupants in
the vehicle could die from carbon
monoxide (CO) contained in the
exhaust gas.
CAUTION
TYPE RA: When parking the vehicle,
be careful not to contact a wheel
stop, etc. Doing so may damage the
bumpers, underside of the vehicle,
etc.&Parking brake (models with-
out electronic parking brake
system)To set the parking brake, depress the
brake pedal firmly and hold it down until
the parking brake lever is fully pulled up.To release the parking brake, perform the
following procedure.
1. Pull the lever up slightly.
Starting and operating/Parking your vehicle
7-42
Page 446 of 578

(463,1)
北米Model "A1700BE-B" EDITED: 2017/ 10/ 11
1) Wheel nut wrench
2) Screwdriver
3) Jack
4) Towing hook (eye bolt)A jack handle is stored under the floor of
the trunk. A jack and a towing hook are
stored in the tool bucket that is located in
the recess of the spare tire wheel. A
screwdriver and a wheel nut wrench are
stored in the vinyl bag. You can also store
these tools in the tool bucket.NOTEFor how to use the jack, refer to“Flat
tires”F9-5.
Flat tiresIf you have a flat tire while driving, never
brake suddenly; keep driving straight
ahead while gradually reducing speed.
Then slowly pull off the road to a safe
place.&Changing a flat tire!Models with flat tire repair kit
It may be difficult to change a flat tire.
However, it may be possible to seal the
tire. For details, refer to“Sealing flat tire
(models with flat tire repair kit)”F9-8.
!Models without flat tire repair kit
WARNING
.Do not jack up the vehicle on an
incline or a loose road surface.
The jack can come out of the
jacking point or sink into the
ground and this can result in a
severe accident.
.Use only the jack provided with
your vehicle. The jack supplied
with the vehicle is designed only
for changing a tire. Never get
under the vehicle while support-
ing the vehicle with this jack..Before using the jack, be sure
that there are no occupants or
cargo in the vehicle.
.Always turn off the engine before
raising the flat tire off the ground
using the jack. Never swing or
push the vehicle supported with
the jack. The jack can come out of
the jacking point due to a jolt and
this can result in a severe acci-
dent.
1. Park on a hard, level surface, when-
ever possible, then stop the engine.
2. Set the parking brake securely and
shift the shift lever in reverse (MT models)
or the select lever to the“P”(Park) position
(CVT models).
3. Turn on the hazard warning flasher and
have everyone get out of the vehicle.
–CONTINUED–
In case of emergency/Flat tires
9-5
9
Page 450 of 578

(467,1)
北米Model "A1700BE-B" EDITED: 2017/ 10/ 11
some tires can only be partially sealed or
not sealed at all, and this condition may
cause a loss of tire pressure. A loss of tire
pressure can affect vehicle handling,
leading to the loss of vehicle control.
After sealing the flat tire temporarily,
change the tires with new ones as soon
as possible. We recommend that you have
the sealed tire changed by your nearest
SUBARU dealer. You may reuse the wheel
if the attached sealant is wiped off, but the
valve of the wheel must be replaced with a
new one. If you reuse the wheel without
replacing the valve, air may leak from the
valve.
For tire replacement, refer to“Tire replace-
ment”F11-36.!Safety precautions when sealing flat
tire
Observe the following rules when sealing a
flat tire.
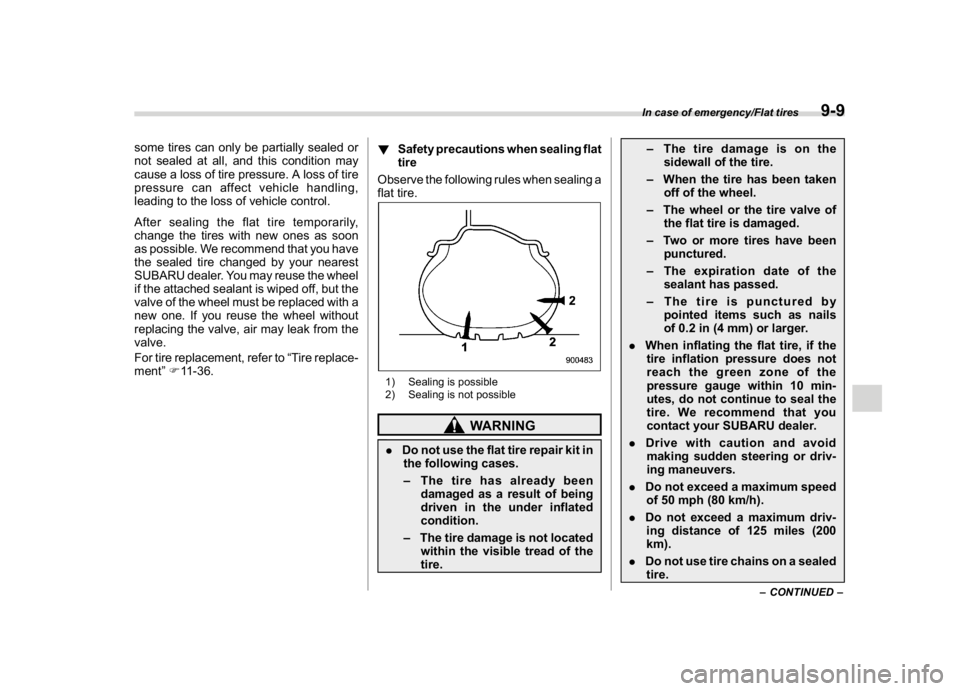
1) Sealing is possible
2) Sealing is not possible
WARNING
.Do not use the flat tire repair kit in
the following cases.
–The tire has already been
damaged as a result of being
driven in the under inflated
condition.
–The tire damage is not located
within the visible tread of the
tire.–The tire damage is on the
sidewall of the tire.
–When the tire has been taken
off of the wheel.
–The wheel or the tire valve of
the flat tire is damaged.
–Two or more tires have been
punctured.
–The expiration date of the
sealant has passed.
–The tire is punctured by
pointed items such as nails
of 0.2 in (4 mm) or larger.
.When inflating the flat tire, if the
tire inflation pressure does not
reach the green zone of the
pressure gauge within 10 min-
utes, do not continue to seal the
tire. We recommend that you
contact your SUBARU dealer.
.Drive with caution and avoid
making sudden steering or driv-
ing maneuvers.
.Do not exceed a maximum speed
of 50 mph (80 km/h).
.Do not exceed a maximum driv-
ing distance of 125 miles (200
km).
.Do not use tire chains on a sealed
tire.
–CONTINUED–
In case of emergency/Flat tires
9-9
9
Page 508 of 578

(529,1)
北米Model "A1700BE-B" EDITED: 2017/ 10/ 11
Low tire pressure warning lightIf you adjust the tire pressures in a warm
garage and will then drive the vehicle in
cold outside air, the resulting drop in tire
pressures may cause the low tire pressure
warning light to illuminate. To avoid this
problem when adjusting the tire pressures
in a warm garage, inflate the tires to
pressures higher than those shown on
the tire placard. Specifically, inflate them
by an extra 1 psi (6.9 kPa, 0.07 kgf/cm
2) for
every difference of 108F (5.68C) between
the temperature in the garage and the
temperature outside. By way of example,
the following table shows the required tire
pressures that correspond to various out-
side temperatures when the temperature
in the garage is 608F (15.68C).Example:
Tire size: 245/40R18 97W
Standard tire pressures:
Front: 33 psi (230 kPa, 2.3 kgf/cm
2)
Rear: 32 psi (220 kPa, 2.2 kgf/cm2)
Garage temperature: 608F (15.68C)
Outside
temperatureAdjusted pressure
[psi (kPa, kgf/cm
2)]
Front Rear
308F(�18C) 36 (250, 2.5) 35 (240, 2.4)
108F(�128C) 38 (260, 2.6) 37 (255, 2.55)
�108F(�238C) 40 (275, 2.75)39 (270, 2.7)
If the low tire pressure warning light
illuminates when you drive the vehicle in
cold outside air after adjusting the tire
pressures in a warm garage, re-adjust the
tire pressures using the method described
above. Then, increase the vehicle speed
to at least 20 mph (32 km/h) and check to
see that the low tire pressure warning light
turns off a few minutes later. If the low tire
pressure warning light does not turn off,
the tire pressure monitoring system may
not be functioning normally. In this event,
go to a SUBARU dealer to have the
system inspected as soon as possible.
While the vehicle is driven, friction be-
tween tires and the road surface causes
the tires to warm up. After illumination ofthe low tire pressure warning light, any
increase in the tire pressures caused by an
increase in the outside air temperature or
by an increase in the temperature in the
tires can cause the low tire pressure
warning light to turn off.
System resetting is necessary when the
wheels are changed (for example, a switch
to snow tires) and new TPMS valves are
installed on the newly fitted wheels. Have
this work performed by a SUBARU dealer
following wheel replacement.
It may not be possible to install TPMS
valves on certain wheels that are on the
market. Therefore, if you change the
wheels (for example, a switch to snow
tires), use wheels that have the same part
number as the standard-equipment
wheels. Without four operational TPMS
valve/sensors on the wheels, the TPMS
will not fully function and the warning light
on the combination meter will illuminate
steadily after blinking for approximately
one minute.
When a tire is replaced, adjustments are
necessary to ensure continued normal
operation of the tire pressure monitoring
system. As with wheel replacement, there-
fore, you should have the work performed
by a SUBARU dealer.
–CONTINUED–
Maintenance and service/Tires and wheels
11-31
11
Page 513 of 578

(534,1)
北米Model "A1700BE-B" EDITED: 2017/ 10/ 11
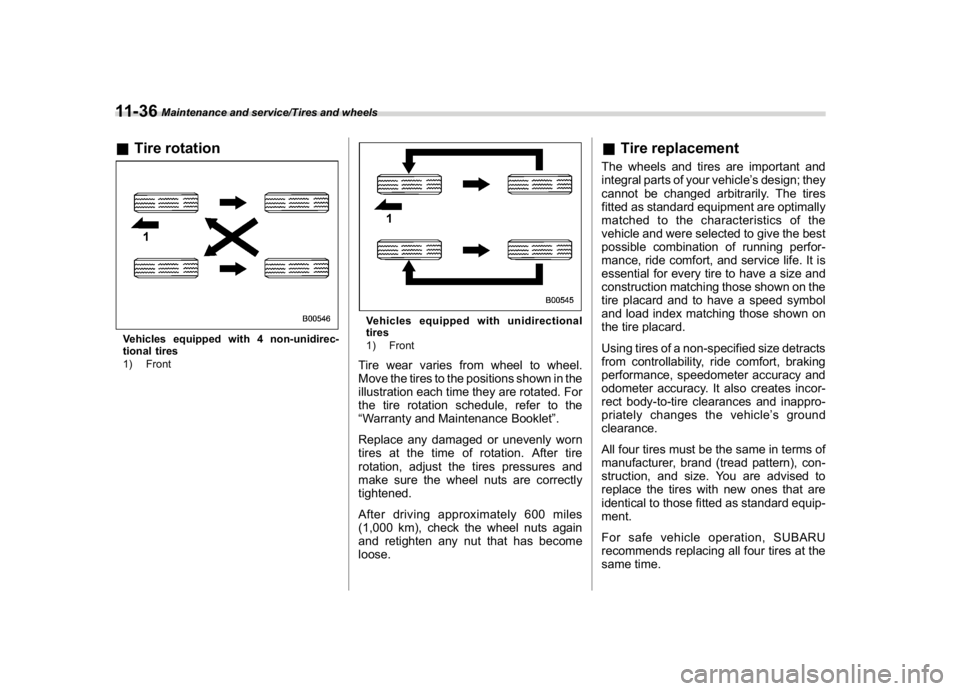
&Tire rotationVehicles equipped with 4 non-unidirec-
tional tires
1) Front
Vehicles equipped with unidirectional
tires
1) FrontTire wear varies from wheel to wheel.
Move the tires to the positions shown in the
illustration each time they are rotated. For
the tire rotation schedule, refer to the
“Warranty and Maintenance Booklet”.
Replace any damaged or unevenly worn
tires at the time of rotation. After tire
rotation, adjust the tires pressures and
make sure the wheel nuts are correctly
tightened.
After driving approximately 600 miles
(1,000 km), check the wheel nuts again
and retighten any nut that has become
loose.
&Tire replacementThe wheels and tires are important and
integral parts of your vehicle’s design; they
cannot be changed arbitrarily. The tires
fitted as standard equipment are optimally
matched to the characteristics of the
vehicle and were selected to give the best
possible combination of running perfor-
mance, ride comfort, and service life. It is
essential for every tire to have a size and
construction matching those shown on the
tire placard and to have a speed symbol
and load index matching those shown on
the tire placard.
Using tires of a non-specified size detracts
from controllability, ride comfort, braking
performance, speedometer accuracy and
odometer accuracy. It also creates incor-
rect body-to-tire clearances and inappro-
priately changes the vehicle’s ground
clearance.
All four tires must be the same in terms of
manufacturer, brand (tread pattern), con-
struction, and size. You are advised to
replace the tires with new ones that are
identical to those fitted as standard equip-
ment.
For safe vehicle operation, SUBARU
recommends replacing all four tires at the
same time.
Maintenance and service/Tires and wheels
11-36
Page 514 of 578

(535,1)
北米Model "A1700BE-B" EDITED: 2017/ 10/ 11
WARNING
.When replacing or installing
tire(s), all four tires must be the
same for the following items.
(a) Size
(b) Circumference
(c) Speed symbol
(d) Load index
(e) Construction
(f) Manufacturer
(g) Brand (tread pattern)
(h) Degrees of wear
For items (a) to (d), you must
obey the specification that is
printed on the tire placard. The
tire placard is located on the
driver’s door pillar.
If all four tires are not the same in
items (a) to (h), there is a possi-
bility that it may lead to serious
mechanical damage to the drive
train of your car and affect the
following factors.
—Ride
—Handling
—Braking—Speedometer/Odometer
calibration
—Clearance between the body
and the tires
It also may be dangerous and
lead to loss of vehicle control,
and it can lead to an accident.
.Use only radial tires. Do not use
radial tires together with belted
bias tires and/or bias-ply tires.
Doing so can dangerously re-
duce controllability, resulting in
an accident.
&Wheel replacementWhen replacing wheels due, for example,
to damage, make sure the replacement
wheels match the specifications of the
wheels that are fitted as standard equip-
ment. Replacement wheels are available
from SUBARU dealers.
WARNING
Use only those wheels that are
specified for your vehicle. Wheels
not meeting specifications could
interfere with brake caliper opera-
tion and may cause the tires to rub
against the wheel well housing dur-ing turns. The resulting loss of
vehicle control could lead to an
accident.
NOTEWhen any of the wheels are removed
and replaced for tire rotation or to
change a flat tire, always check the
tightness of the wheel nuts after driving
approximately 600 miles (1,000 km). If
any nut is loose, tighten it to the
specified torque.
Maintenance and service/Tires and wheels
11-37
11