2018 SUBARU CROSSTREK jump start
[x] Cancel search: jump startPage 153 of 474

(158,1)
北米Model "A1320BE-C" EDITED: 2017/ 10/ 10
the TPMS is unable to monitor all
four road wheels. Contact your
SUBARU dealer as soon as possible
for tire and sensor replacement and/
or system resetting.
If the light illuminates steadily after
blinking for approximately one min-
ute, promptly contact a SUBARU
dealer to have the system inspected.
CAUTION
The tire pressure monitoring system
is NOT a substitute for manually
checking tire pressure. The tire
pressure should be checked peri-
odically (at least monthly) using a
tire gauge. After any change to tire
pressure(s), the tire pressure mon-
itoring system will not re-check tire
inflation pressures until the vehicle
is first driven more than 20 mph (32
km/h). After adjusting the tire pres-
sures, increase the vehicle speed to
at least 20 mph (32 km/h) to start the
TPMS re-checking of the tire infla-
tion pressures. If the tire pressures
are now above the severe low pres-
sure threshold, the low tire pressure
warning light should turn off a few
minutes later. Therefore, be sure to
install the specified size for the frontand rear tires.
&ABS warning light
CAUTION
.If any of the following conditions
occur, we recommend that you
have the ABS repaired at the first
available opportunity by your
SUBARU dealer.
–The warning light does not
illuminate when the ignition
switch is turned to the“ON”
position.
–The warning light illuminates
when the ignition switch is
turned to the“ON”position,
but it does not turn off even
after the vehicle is started.
–The warning light illuminates
during driving.
.When the warning light is on (and
the brake system warning light is
off), the ABS function shuts
down. However, the conventional
brake system continues to oper-
ate normally.
The ABS warning light, Vehicle Dynamics
Control warning light, and brake systemwarning light illuminate simultaneously if
the EBD system malfunctions. For further
details of the EBD system malfunction
warning, refer to“Electronic Brake Force
Distribution (EBD) system warning”F3-
21.
NOTEIf the warning light behavior is as
described in the following conditions,
the ABS may be considered normal.
.The warning light illuminates when
the ignition switch is turned to the“ON”
position and turns off approximately 2
seconds after the engine has started.
.The warning light illuminates right
after the engine is started but turns off
immediately, remaining off.
.The warning light remains illumi-
nated after the engine has been started,
but it turns off while driving.
.The warning light illuminates during
driving, but it turns off immediately and
remains off.
When driving with an insufficient battery
voltage such as when the engine is jump
started, the ABS warning light may illumi-
nate. This is due to the low battery voltage
and does not indicate a malfunction. When
the battery becomes fully charged, the
light will turn off.
Instruments and controls/Warning and indicator
3-20
Page 281 of 474

(290,1)
北米Model "A1320BE-C" EDITED: 2017/ 10/ 10
Continuously variable trans-
mission
WARNING
Do not shift from the“P”or“N”
position into the“D”or“R”position
while depressing the accelerator
pedal. This may cause the vehicle
to jump forward or backward.
CAUTION
.Shift into the“P”or“R”position
only after the vehicle is comple-
tely stopped. Shifting while the
vehicle is moving may cause
damage to the transmission.
.Do not race the engine for more
than 5 seconds in any position
except the“N”or“P”position
when the brake is applied or
when chocks are used in the
wheels. This may cause the
transmission fluid to overheat.
.Never move the vehicle rearward
by inertia with the select lever set
in a forward driving position or
move the vehicle forward by
inertia with the select lever setin the“R”position. Doing so may
result in an unexpected accident
or malfunction.
.Do not shift from the“D”position
into the“R”position or vice versa
until the vehicle has completely
stopped. Such shifting may
cause damage to the transmis-
sion.
.When parking the vehicle, first
securely apply the parking brake
and then place the select lever in
the“P”position. Do not park for a
long time with the select lever in
any other position as doing so
could result in a dead battery.
&Continuously variable trans-
mission featuresThe continuously variable transmission is
electronically controlled and provides an
infinite number of forward speeds and 1
reverse speed. For some models, it also
has a manual mode or an“L”position.NOTE.When the engine coolant tempera-
ture is still low, the transmission will
upshift or downshift at higher engine
speeds than when the coolant tempera-
ture is sufficiently high in order toshorten the warm-up time and improve
driveability. The gearshift timing will
automatically shift to the normal timing
after the engine has warmed up.
.Immediately after transmission fluid
is replaced, you may feel that the
transmission operation is somewhat
unusual. This results from invalidation
of data which the on-board computer
has collected and stored in memory to
allow the transmission to shift at the
most appropriate times for the current
condition of your vehicle. Optimized
shifting will be restored as the vehicle
continues to be driven for a while.
.When driving a CVT model under
continuous heavy load conditions such
as when towing a camper or climbing a
long, steep hill, the engine speed or the
vehicle speed may automatically be
reduced. This is not a malfunction. This
phenomenon results from the engine
control function maintaining the cool-
ing performance of the vehicle. The
engine and vehicle speed will return to
a normal speed when the engine is able
to maintain the optimum cooling per-
formance after the heavy load de-
creases. Driving under a heavy load
must be performed with extreme care.
Do not try to pass a vehicle in front
when driving on an uphill slope while
towing.
Starting and operating/Continuously variable transmission
7-24
Page 334 of 474

(345,1)
北米Model "A1320BE-C" EDITED: 2017/ 10/ 10
stops. This could create a fire hazard.
Precautions when driving under espe-
cially dangerous situations:
.If driving through water, such as when
crossing shallow streams, first check the
depth of the water and the bottom of the
stream bed for firmness and ensure that
the bed of the stream is flat. Drive slowly
and cross the stream without stopping.
The water should be shallow enough that it
does not reach the vehicle’s undercar-
riage. Water entering the engine air intake
or the exhaust pipe or water splashing onto
electrical parts may damage your vehicle
and may cause it to stall. Never attempt to
drive through rushing water; regardless of
its depth, it can wash away the ground
from under your tires, resulting in possible
loss of traction and even vehicle rollover.
.If you must rock the vehicle to free it
from sand or mud, depress the accelerator
pedal slightly and move the shift lever/
select lever back and forth between“1”/“D”
and“R”repeatedly. Do not race the
engine. For the best possible traction,
avoid spinning the wheels when trying to
free the vehicle.
.When the road surface is extremely
slippery, you can obtain better traction by
starting the vehicle with the transmission in
2nd than 1st (both for MT and CVT). For
CVT models, refer to“Selection of manualmode”F7-26.
&After driving.Always check your brakes for effective-
ness immediately after driving in sand,
mud or water. Do this by driving slowly and
stepping on the brake pedal. Repeat that
process several times to dry out the brake
discs and brake pads.
.After driving through tall grass, mud,
rocks, sand, rivers, etc., check that there is
no grass, bush, paper, rags, stones, sand,
etc. adhering to or trapped on the under-
body. Clear off any such matter from the
underbody. If the vehicle is used with these
materials trapped or adhering to the
underbody, a mechanical breakdown or
fire could occur.
.Wash the vehicle’s underbody after off-
road driving. Suspension components are
particularly prone to dirt buildup, so they
need to be washed thoroughly.
Winter driving&Operation during cold weath-
er!Maintenance
Carry some emergency equipment, such
as a window scraper, a bag of sand, flares,
a small shovel and jumper cables.
Check the battery and cables. Cold tem-
peratures reduce battery capacity. The
battery must be in good condition to
provide enough power for cold winter
starts.
It normally takes longer to start the engine
in very cold weather conditions. Use an
engine oil of a proper grade and viscosity
for cold weather. Using heavy summer oil
will make it harder to start the engine.
Keep the door locks from freezing by
squirting them with deicer or glycerin.
Forcing a frozen door open may damage
or separate the rubber weather strips
around the door. If the door is frozen, use
hot water to melt the ice, and afterwards
thoroughly wipe the water away.
Use a windshield washer fluid that con-
tains an antifreeze solution. Do not use
engine antifreeze or other substitutes
because they may damage the paint of
–CONTINUED–
Driving tips/Winter driving
8-7
8
Page 354 of 474

(365,1)
北米Model "A1320BE-C" EDITED: 2017/ 10/ 10
If you park your vehicle in case of an
emergency............................................................9-2
Temporary sparetire..............................................9-2
Maintenance tools...................................................9-3
Tool locations........................................................ 9-4
Using the jack........................................................ 9-4
Flat tires...................................................................9-5
Changing a flat tire................................................ 9-5
Tire pressure monitoring system (TPMS)
(U.S.-spec. models).............................................. 9-8
Jump starting..........................................................9-9
How to jump start.................................................9-10
Engine overheating...............................................9-12
If steam is coming from the engine
compartment......................................................9-12If no steam is coming from the engine
compartment.....................................................9-12
Towing...................................................................9-13
Towing hooks and tie-down hooks/holes...............9-13
Using a flat-bed truck...........................................9-15
Towing with all wheels on the ground...................9-16
Access key fob–if access key fob does not
operate properly................................................9-17
Locking and unlocking.........................................9-17
Switching power status........................................9-17
Starting engine.....................................................9-18
Rear gate–if the rear gate cannot be opened .. 9-19
Moonroof (if equipped)–if the moonroof
does not close...................................................9-19
If your vehicle is involvedin an accident...........9-20
In case of emergency
9
Page 362 of 474

(373,1)
北米Model "A1320BE-C" EDITED: 2017/ 10/ 10
If you have a flat tire, replace it
with a spare tire as soon as
possible.
.When a spare tire is mounted or a
wheel rim is replaced without the
original pressure sensor/trans-
mitter being transferred, the low
tire pressure warning light will
illuminate steadily after blinking
for approximately one minute.
This indicates the TPMS is unable
to monitor all four road wheels.
Contact your SUBARU dealer as
soon as possible for tire and
sensor replacement and/or sys-
tem resetting.
.When a tire is repaired with liquid
sealant, the tire pressure warning
valve and transmitter may not
operate properly. If a liquid sea-
lant is used, contact your nearest
SUBARU dealer or other qualified
service shop as soon as possi-
ble. Make sure to replace the tire
pressure warning valve and
transmitter when replacing the
tire. You may reuse the wheel if
there is no damage to it and if the
sealant residue is properly
cleaned off.
If the light illuminates steadily
after blinking for approximatelyone minute, promptly contact a
SUBARU dealer to have the sys-
tem inspected.
Jump starting
WARNING
.Battery fluid is SULFURIC ACID.
Do not let it come in contact with
the eyes, skin, clothing or the
vehicle.
If battery fluid gets on you, thor-
oughly flush the exposed area
with water immediately. Get med-
ical help if the fluid has entered
your eyes.
If battery fluid is accidentally
swallowed, immediately drink a
large amount of milk or water,
and obtain immediate medical
help.
Keep everyone including chil-
dren away from the battery.
.The gas generated by a battery
explodes if a flame or spark is
brought near it. Do not smoke or
light a match while jump starting.
.Never attempt jump starting if the
discharged battery is frozen. It
could cause the battery to burst
or explode.
.Whenever working on or around a
battery, always wear suitable eye
–CONTINUED–
In case of emergency/Jump starting
9-9
9
Page 363 of 474

(374,1)
北米Model "A1320BE-C" EDITED: 2017/ 10/ 10
protectors, and remove metal
objects such as rings, bands or
other metal jewelry.
.Be sure the jumper cables and
clamps on them do not have
loose or missing insulation.
Do not jump start unless cables
in suitable condition are avail-
able.
.A running engine can be danger-
ous. Keep your fingers, hands,
clothing, hair and tools away
from the cooling fan, belts and
any other moving engine parts.
Removing rings, watches and
ties is advisable.
.Jump starting is dangerous if it
done incorrectly. If you are un-
sure about the proper procedure
for jump starting, consult a com-
petent mechanic.
When your vehicle does not start due to a
run down (discharged) battery, the vehicle
may be jump started by connecting your
battery to another battery (called the
booster battery) with jumper cables.
&How to jump start1. Make sure the booster battery is 12
volts and the negative terminal is
grounded.
2. If the booster battery is in another
vehicle, do not let the two vehicles touch.
3. Turn off all unnecessary lights and
accessories.
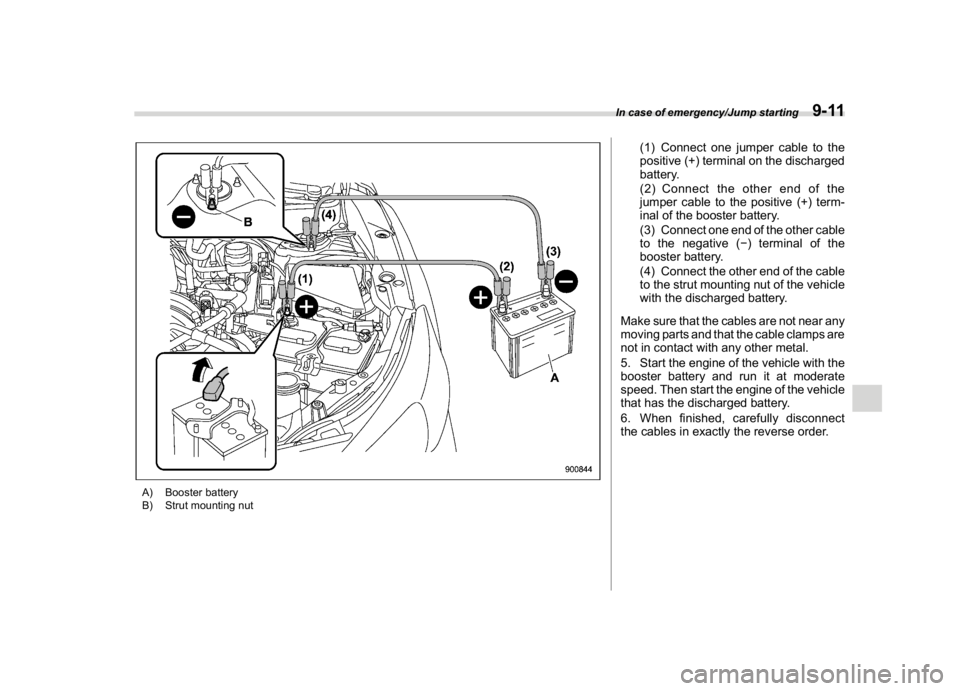
4. Connect the jumper cables exactly in
the sequence illustrated.
In case of emergency/Jump starting
9-10
Page 364 of 474

(375,1)
北米Model "A1320BE-C" EDITED: 2017/ 10/ 10
A) Booster battery
B) Strut mounting nut
(1) Connect one jumper cable to the
positive (+) terminal on the discharged
battery.
(2) Connect the other end of the
jumper cable to the positive (+) term-
inal of the booster battery.
(3) Connect one end of the other cable
to the negative (�) terminal of the
booster battery.
(4) Connect the other end of the cable
to the strut mounting nut of the vehicle
with the discharged battery.
Make sure that the cables are not near any
moving parts and that the cable clamps are
not in contact with any other metal.
5. Start the engine of the vehicle with the
booster battery and run it at moderate
speed. Then start the engine of the vehicle
that has the discharged battery.
6. When finished, carefully disconnect
the cables in exactly the reverse order.
In case of emergency/Jump starting
9-11
9