2018 SUBARU CROSSTREK ESP
[x] Cancel search: ESPPage 338 of 474
(349,1)
北米Model "A1320BE-C" EDITED: 2017/ 10/ 10
&Tire chains
CAUTION
Tire chains cannot be used on your
vehicle because of the lack of clear-
ance between the tires and vehicle
body.NOTEWhen tire chains cannot be used, use of
another type of traction device (such as
spring chains) may be acceptable if use
on your vehicle is recommended by the
device manufacturer, taking into ac-
count tire size and road conditions.
Follow the device manufacturer’s in-
structions, especially regarding max-
imum vehicle speed.
To help avoid damage to your vehicle,
drive slowly, readjust or remove the
device if it is contacting your vehicle,
and do not spin your wheels. Damage
caused to your vehicle by use of a
traction device is not covered under
warranty.
Make certain that any traction device
you use is an SAE class S device, and
use it on the front wheels only. Always
use the utmost care when driving with a
traction device. Overconfidence be-cause you are using a traction device
could easily lead to a serious accident.
&Rocking the vehicleIf you must rock the vehicle to free it from
snow, sand, or mud, depress the accel-
erator pedal slightly and move the shift
lever/select lever back and forth between
“1”/“D”and“R”repeatedly. Do not race the
engine. For the best possible traction,
avoid spinning the wheels when trying to
free the vehicle.
When the road surface is extremely
slippery, you can obtain better traction by
starting the vehicle with the transmission in
2nd than 1st (both for MT and CVT
models).
If your vehicle is a CVT model, for
information about holding the transmission
in the 2nd position, refer to“Selection of
manual mode”F7-26.
Loading your vehicle
WARNING
.Never allow passengers to ride
on a folded rear seatback in the
cargo area. Doing so may result
in serious injury.
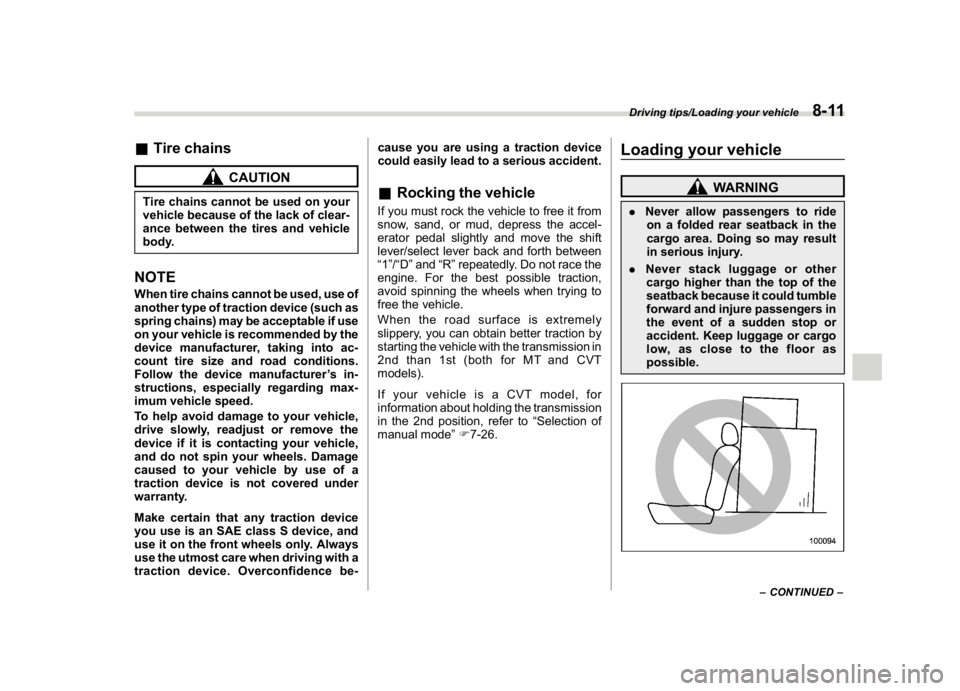
.Never stack luggage or other
cargo higher than the top of the
seatback because it could tumble
forward and injure passengers in
the event of a sudden stop or
accident. Keep luggage or cargo
low, as close to the floor as
possible.
–CONTINUED–
Driving tips/Loading your vehicle
8-11
8
Page 343 of 474
(354,1)
北米Model "A1320BE-C" EDITED: 2017/ 10/ 10
maximum gross weight. The chains should
cross under the trailer tongue to prevent
the tongue from dropping onto the ground
in case it should disconnect from the hitch
ball. Allow sufficient slack in the chains
taking tight turn situations into account;
however, be careful not to let them drag on
the ground.
WARNING
Do not connect safety chains to any
part of the vehicle other than the
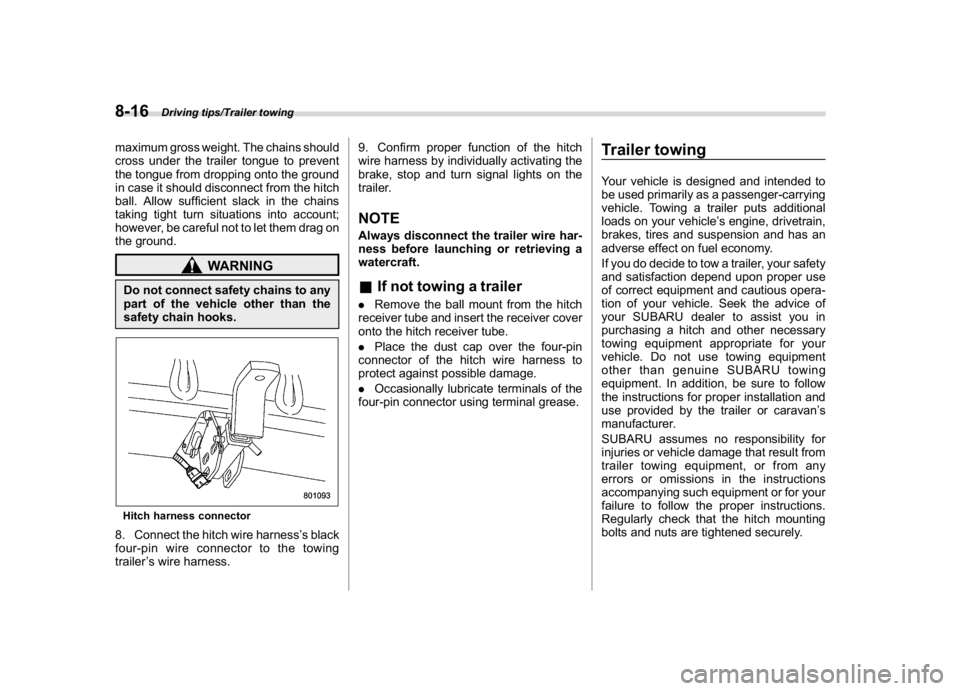
safety chain hooks.Hitch harness connector8. Connect the hitch wire harness’s black
four-pin wire connector to the towing
trailer’s wire harness.9. Confirm proper function of the hitch
wire harness by individually activating the
brake, stop and turn signal lights on the
trailer.
NOTEAlways disconnect the trailer wire har-
ness before launching or retrieving a
watercraft.&If not towing a trailer.Remove the ball mount from the hitch
receiver tube and insert the receiver cover
onto the hitch receiver tube.
.Place the dust cap over the four-pin
connector of the hitch wire harness to
protect against possible damage.
.Occasionally lubricate terminals of the
four-pin connector using terminal grease.
Trailer towingYour vehicle is designed and intended to
be used primarily as a passenger-carrying
vehicle. Towing a trailer puts additional
loads on your vehicle’s engine, drivetrain,
brakes, tires and suspension and has an
adverse effect on fuel economy.
If you do decide to tow a trailer, your safety
and satisfaction depend upon proper use
of correct equipment and cautious opera-
tion of your vehicle. Seek the advice of
your SUBARU dealer to assist you in
purchasing a hitch and other necessary
towing equipment appropriate for your
vehicle. Do not use towing equipment
other than genuine SUBARU towing
equipment. In addition, be sure to follow
the instructions for proper installation and
use provided by the trailer or caravan’s
manufacturer.
SUBARU assumes no responsibility for
injuries or vehicle damage that result from
trailer towing equipment, or from any
errors or omissions in the instructions
accompanying such equipment or for your
failure to follow the proper instructions.
Regularly check that the hitch mounting
bolts and nuts are tightened securely.
Driving tips/Trailer towing
8-16
Page 347 of 474
(358,1)
北米Model "A1320BE-C" EDITED: 2017/ 10/ 10
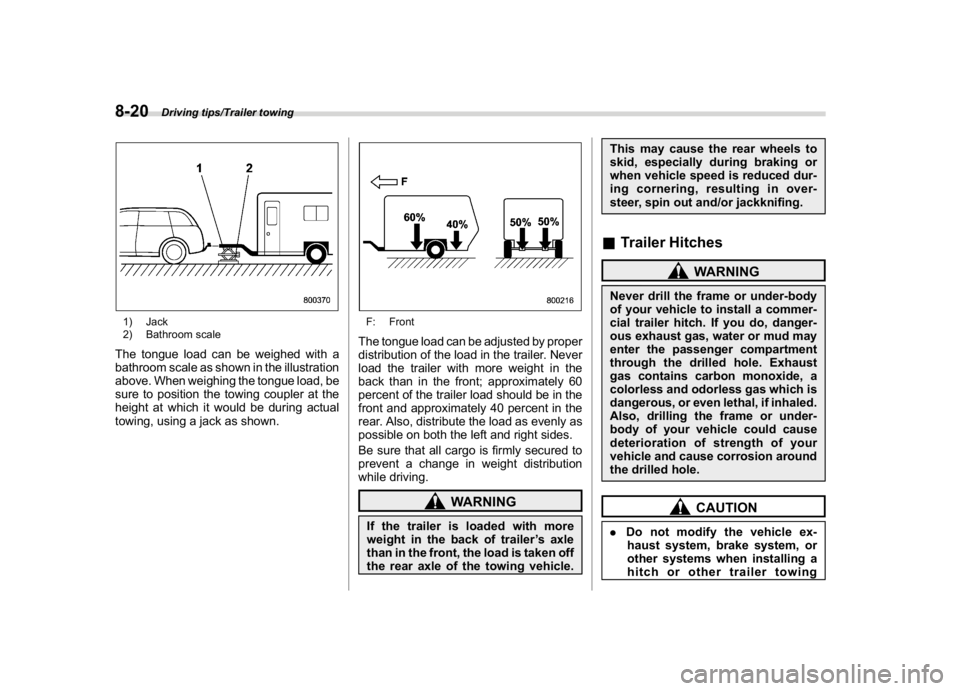
1) Jack
2) Bathroom scaleThe tongue load can be weighed with a
bathroom scale as shown in the illustration
above. When weighing the tongue load, be
sure to position the towing coupler at the
height at which it would be during actual
towing, using a jack as shown.
F: FrontThe tongue load can be adjusted by proper
distribution of the load in the trailer. Never
load the trailer with more weight in the
back than in the front; approximately 60
percent of the trailer load should be in the
front and approximately 40 percent in the
rear. Also, distribute the load as evenly as
possible on both the left and right sides.
Be sure that all cargo is firmly secured to
prevent a change in weight distribution
while driving.
WARNING
If the trailer is loaded with more
weight in the back of trailer’s axle
than in the front, the load is taken off
the rear axle of the towing vehicle.This may cause the rear wheels to
skid, especially during braking or
when vehicle speed is reduced dur-
ing cornering, resulting in over-
steer, spin out and/or jackknifing.
&Trailer Hitches
WARNING
Never drill the frame or under-body
of your vehicle to install a commer-
cial trailer hitch. If you do, danger-
ous exhaust gas, water or mud may
enter the passenger compartment
through the drilled hole. Exhaust
gas contains carbon monoxide, a
colorless and odorless gas which is
dangerous, or even lethal, if inhaled.
Also, drilling the frame or under-
body of your vehicle could cause
deterioration of strength of your
vehicle and cause corrosion around
the drilled hole.
CAUTION
.Do not modify the vehicle ex-
haust system, brake system, or
other systems when installing a
hitch or other trailer towing
Driving tips/Trailer towing
8-20
Page 377 of 474
(390,1)
北米Model "A1320BE-C" EDITED: 2017/ 10/ 10
coat. When in doubt, it is always best to
contact your SUBARU dealer or an auto
paint specialist.
CAUTION
Do not use any agents with organic
solvents on the surface of the bulb
assembly cover. However, if a polish
or wax with organic solvents is
applied to the cover surface, com-
pletely wipe off the polish or wax.
Otherwise, the cover surface may be
damaged.NOTE.Be careful not to block the wind-
shield washer nozzles with wax when
waxing the vehicle.
.Do not wipe the rear view camera
with alcohol, benzine or paint thinner.
Otherwise, discoloration may occur. To
remove contamination, wipe the cam-
era with a cloth moistened with diluted
neutral detergent and then wipe it with a
soft, dry cloth.
.When waxing the vehicle, be careful
not to apply the wax to the rear view
camera. If it comes in contact with the
camera, moisten a clean cloth with
diluted neutral detergent to remove
the wax.
&Cleaning alloy wheels.Promptly wipe the alloy wheels clean of
any kind of grime or agent. If dirt is left on
too long, it may be difficult to clean off.
.Do not use soap containing grit to clean
the wheels. Be sure to use a neutral
cleaning agent, and later rinse thoroughly
with water. Do not clean the wheels with a
stiff brush or expose them to a high-speed
washing device.
.Clean the vehicle (including the alloy
wheels) with water as soon as possible
when it has been splashed with sea water,
exposed to sea breezes, or driven on
roads treated with salt or other agents.
Corrosion protectionYour SUBARU has been designed and
built to resist corrosion. Special materials
and protective finishes have been used on
most parts of the vehicle to help maintain
fine appearance, strength, and reliable
operation.&Most common causes of cor-
rosionThe most common causes of corrosion
are:
.The accumulation of moisture retaining
dirt and debris in body panel sections,
cavities, and other areas.
.Damage to paint and other protective
coatings caused by gravel and stone chips
or minor accidents.
Corrosion is accelerated on the vehicle
when:
.It is exposed to road salt or dust control
chemicals, or used in coastal areas where
there is more salt in the air, or in areas
where there is considerable industrial
pollution.
.It is driven in areas of high humidity,
especially when temperatures range just
above freezing.
.Dampness in certain parts of the
Appearance care/Corrosion protection
10-4
Page 400 of 474

(413,1)
北米Model "A1320BE-C" EDITED: 2017/ 10/ 10
&Checking the clutch pedal
free play1) 0.16–0.43 in (4.0–11.0 mm)Lightly depress the clutch pedal down with
your finger until you feel resistance, and
check the free play.
If the free play is not within proper
specification, contact your SUBARU deal-
er.
Hill start assist systemEnsure that the Hill start assist system
operates properly under the following
circumstances.
1. Stop the vehicle on an uphill grade by
depressing the brake pedal (all models)
and clutch pedal (MT models only), with
the engine running.
2. Make sure that the vehicle does not
move backward for several seconds after
the brake pedal is released.
3. Then make sure the vehicle starts
climbing the grade by following the normal
starting procedures.
If the Hill start assist system does not
operate as described above, contact your
SUBARU dealer.
Replacement of brake pad
and liningThe disc brakes have audible wear in-
dicators on the brake pads. If the brake
pads wear close to their service limit, the
wear indicator makes a very audible
scraping noise when the brake pedal is
applied.
If you hear this scraping noise each time
you apply the brake pedal, have the brake
pads serviced by your SUBARU dealer as
soon as possible.
CAUTION
If you continue to drive despite the
scraping noise from the audible
brake pad wear indicator, it will
–CONTINUED–
Maintenance and service/Hill start assist system
11-19
11
Page 402 of 474

(415,1)
北米Model "A1320BE-C" EDITED: 2017/ 10/ 10
Tires and wheels&Types of tiresYou should be familiar with type of tires
present on your vehicle.
!All season tires
All season tires are designed to provide an
adequate measure of traction, handling
and braking performance in year-round
driving including snowy and icy road
conditions. However all season tires do
not offer as much traction performance as
winter (snow) tires in heavy or loose snow
or on icy roads.
All season tires are identified by“ALL
SEASON”and/or“M+S”(Mud & Snow) on
the tire sidewall.
!Summer tires
Summer tires are high-speed capability
tires best suited for highway driving under
dry conditions.
Summer tires are inadequate for driving on
slippery roads such as on snow-covered or
icy roads.
If you drive your vehicle on snow-covered
or icy roads, we strongly recommend the
use of winter (snow) tires.
When installing winter tires, be sure to
replace all four tires.!Winter (snow) tires
Winter tires are best suited for driving on
snow-covered and icy roads. However
winter tires do not perform as well as
summer tires and all season tires on roads
other than snow-covered and icy roads.
&Tire pressure monitoring
system (TPMS) (if equipped)The tire pressure monitoring system pro-
vides the driver with a warning message by
sending a signal from a sensor that is
installed in each wheel when tire pressure
is severely low. The tire pressure monitor-
ing system will activate only when the
vehicle is driven. Also, this system may not
react immediately to a sudden drop in tire
pressure (for example, a blow-out caused
by running over a sharp object).
If you adjust the tire pressures in a warm
garage and will then drive the vehicle in
cold outside air, the resulting drop in tire
pressures may cause the low tire pressure
warning light to illuminate. To avoid this
problem when adjusting the tire pressures
in a warm garage, inflate the tires to
pressures higher than those shown on
the tire placard. Specifically, inflate them
by an extra 1 psi (6.9 kPa, 0.07 kgf/cm
2) for
every difference of 108F (5.68C) between
the temperature in the garage and thetemperature outside. By way of example,
the following table shows the required tire
pressures that correspond to various out-
side temperatures when the temperature
in the garage is 608F (15.68C).
Example:
Tire size: P225/60R17 98H and
P225/55R18 97H
Standard tire pressures:
Front: 33 psi (230 kPa, 2.3 kgf/cm
2)
Rear: 32 psi (220 kPa, 2.2 kgf/cm2)
Garage temperature: 608F (15.68C)
Outside
temperatureAdjusted pressure
[psi (kPa, kgf/cm
2)]
Front Rear
308F(�18C) 36 (250, 2.5) 35 (240, 2.4)
108F(�128C)38
(265, 2.65)37
(255, 2.55)
�108F(�238C) 40 (280, 2.8)39 (270, 2.7)
If the low tire pressure warning light
illuminates when you drive the vehicle in
cold outside air after adjusting the tire
pressures in a warm garage, re-adjust the
tire pressures using the method described
above. Then, increase the vehicle speed
to at least 20 mph (32 km/h) and check to
see that the low tire pressure warning light
turns off a few minutes later. If the low tire
pressure warning light does not turn off,
–CONTINUED–
Maintenance and service/Tires and wheels
11-21
11
Page 405 of 474

(418,1)
北米Model "A1320BE-C" EDITED: 2017/ 10/ 10
1) Correct tire pressure (tread worn evenly)
Roadholding is good, and steering is
responsive. Rolling resistance is low, so
fuel consumption is also lower.
2) Under inflated tire (tread worn on
shoulders)
Rolling resistance is high, so fuel con-
sumption is also higher.3) Over inflated (tread worn in the center)
Ride comfort is poor. Also, the tire
magnifies the effects of road-surface
bumps and dips, possibly resulting in
vehicle damage.
If the tire placard shows tire pressures for
the vehicle when fully loaded, adjust the
tire pressures to the values that match the
loading conditions.
WARNING
Driving at high speeds with exces-
sively low tire pressures can cause
the tires to deform severely and to
rapidly heat up. A sharp increase in
temperature could cause tread se-
paration, and destruction of the
tires. The resulting loss of vehicle
control could lead to an accident.&Wheel balanceEach wheel was correctly balanced when
your vehicle was new, but the wheels will
become unbalanced as the tires become
worn during use. Wheel imbalance causes
the steering wheel to vibrate slightly at
certain vehicle speeds and detracts from
the vehicle’s straight-line stability. It can
also cause steering and suspension sys-
tem problems and abnormal tire wear. If
you suspect that the wheels are notcorrectly balanced, have them checked
and adjusted by your SUBARU dealer.
Also have them adjusted after tire repairs
and after tire rotation.
CAUTION
Loss of correct wheel alignment
causes the tires to wear on one side
and reduces the vehicle’s running
stability. Contact your SUBARU
dealer if you notice abnormal tire
wear.NOTEThe suspension system is designed to
hold each wheel at a certain alignment
(relative to the other wheels and to the
road) for optimum straight-line stability
and cornering performance.
Maintenance and service/Tires and wheels
11-24
Page 441 of 474
(456,1)
北米Model "A1320BE-C" EDITED: 2017/ 10/ 10
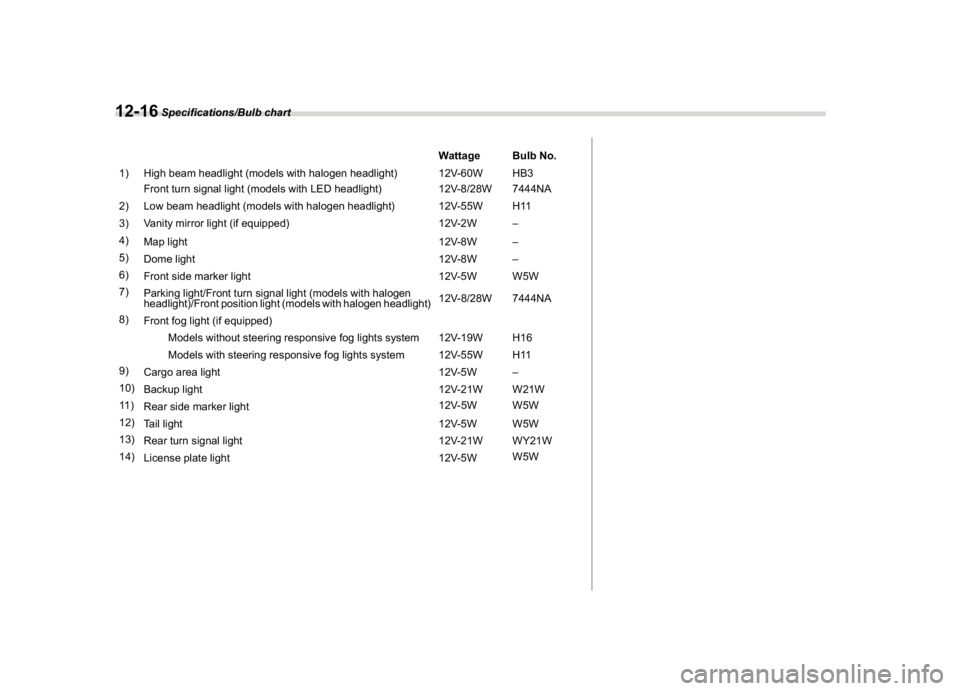
Wattage Bulb No.
1) High beam headlight (models with halogen headlight) 12V-60W HB3
Front turn signal light (models with LED headlight) 12V-8/28W 7444NA
2) Low beam headlight (models with halogen headlight) 12V-55W H11
3) Vanity mirror light (if equipped) 12V-2W–
4)
Map light 12V-8W–
5)
Dome light 12V-8W–
6)
Front side marker light 12V-5W W5W
7)
Parking light/Front turn signal light (models with halogen
headlight)/Front position light (models with halogen headlight)12V-8/28W 7444NA
8)
Front fog light (if equipped)
Models without steering responsive fog lights system 12V-19W H16
Models with steering responsive fog lights system 12V-55W H11
9)
Cargo area light 12V-5W–
10)
Backup light 12V-21W W21W
11 )
Rear side marker light12V-5W W5W
12)
Tail light 12V-5W W5W
13)
Rear turn signal light 12V-21W WY21W
14)
License plate light 12V-5WW5W
Specifications/Bulb chart
12-16