2018 SUBARU CROSSTREK ECU
[x] Cancel search: ECUPage 215 of 474
(220,1)
北米Model "A1320BE-C" EDITED: 2017/ 10/ 10
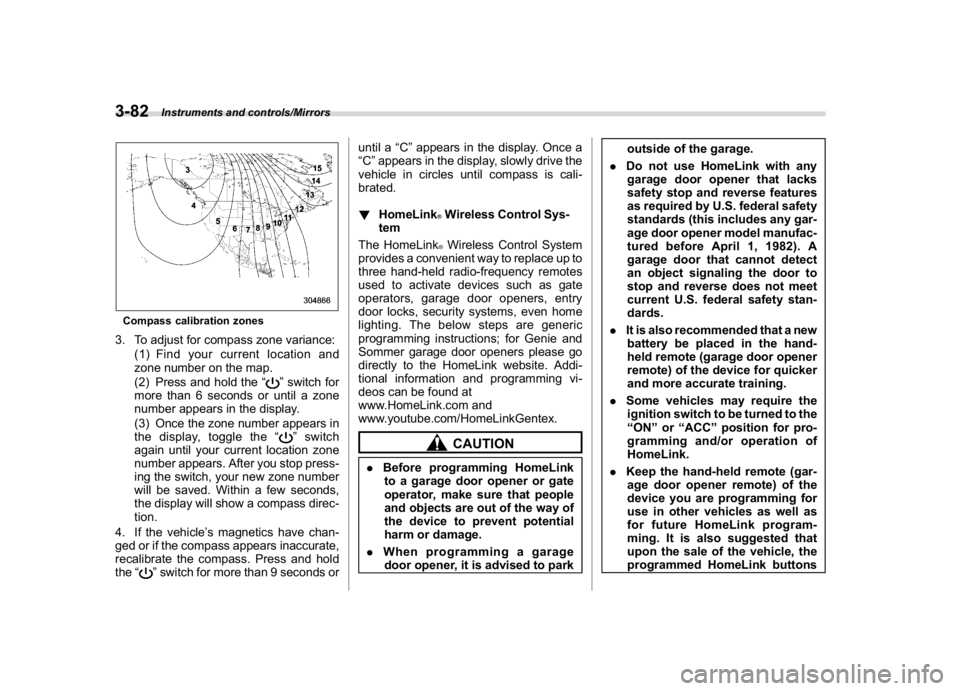
Compass calibration zones3. To adjust for compass zone variance:
(1) Find your current location and
zone number on the map.
(2) Press and hold the“
”switch for
more than 6 seconds or until a zone
number appears in the display.
(3) Once the zone number appears in
the display, toggle the“”switch
again until your current location zone
number appears. After you stop press-
ing the switch, your new zone number
will be saved. Within a few seconds,
the display will show a compass direc-
tion.
4. If the vehicle’s magnetics have chan-
ged or if the compass appears inaccurate,
recalibrate the compass. Press and hold
the“
”switch for more than 9 seconds oruntil a“C”appears in the display. Once a
“C”appears in the display, slowly drive the
vehicle in circles until compass is cali-
brated.
!HomeLink
®Wireless Control Sys-
tem
The HomeLink®Wireless Control System
provides a convenient way to replace up to
three hand-held radio-frequency remotes
used to activate devices such as gate
operators, garage door openers, entry
door locks, security systems, even home
lighting. The below steps are generic
programming instructions; for Genie and
Sommer garage door openers please go
directly to the HomeLink website. Addi-
tional information and programming vi-
deos can be found at
www.HomeLink.com and
www.youtube.com/HomeLinkGentex.CAUTION
.Before programming HomeLink
to a garage door opener or gate
operator, make sure that people
and objects are out of the way of
the device to prevent potential
harm or damage.
.When programming a garage
door opener, it is advised to parkoutside of the garage.
.Do not use HomeLink with any
garage door opener that lacks
safety stop and reverse features
as required by U.S. federal safety
standards (this includes any gar-
age door opener model manufac-
tured before April 1, 1982). A
garage door that cannot detect
an object signaling the door to
stop and reverse does not meet
current U.S. federal safety stan-
dards.
.It is also recommended that a new
battery be placed in the hand-
held remote (garage door opener
remote) of the device for quicker
and more accurate training.
.Some vehicles may require the
ignition switch to be turned to the
“ON”or“ACC”position for pro-
gramming and/or operation of
HomeLink.
.Keep the hand-held remote (gar-
age door opener remote) of the
device you are programming for
use in other vehicles as well as
for future HomeLink program-
ming. It is also suggested that
upon the sale of the vehicle, the
programmed HomeLink buttons
Instruments and controls/Mirrors
3-82
Page 216 of 474
(221,1)
北米Model "A1320BE-C" EDITED: 2017/ 10/ 10
be erased for security purposes.
Refer to“Erasing HomeLink But-
tons”F3-85.
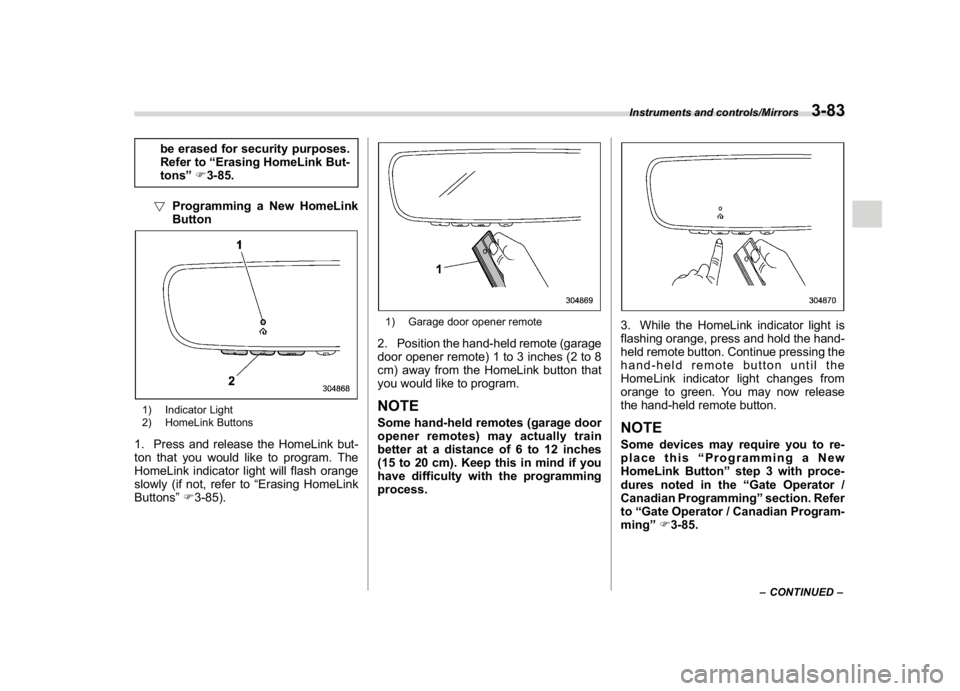
!Programming a New HomeLink
Button
1) Indicator Light
2) HomeLink Buttons1. Press and release the HomeLink but-
ton that you would like to program. The
HomeLink indicator light will flash orange
slowly (if not, refer to“Erasing HomeLink
Buttons”F3-85).
1) Garage door opener remote2. Position the hand-held remote (garage
door opener remote) 1 to 3 inches (2 to 8
cm) away from the HomeLink button that
you would like to program.NOTESome hand-held remotes (garage door
opener remotes) may actually train
better at a distance of 6 to 12 inches
(15 to 20 cm). Keep this in mind if you
have difficulty with the programming
process.
3. While the HomeLink indicator light is
flashing orange, press and hold the hand-
held remote button. Continue pressing the
hand-held remote button until the
HomeLink indicator light changes from
orange to green. You may now release
the hand-held remote button.NOTESome devices may require you to re-
place this“Programming a New
HomeLink Button”step 3 with proce-
dures noted in the“Gate Operator /
Canadian Programming”section. Refer
to“Gate Operator / Canadian Program-
ming”F3-85.
–CONTINUED–
Instruments and controls/Mirrors
3-83
3
Page 217 of 474
(222,1)
北米Model "A1320BE-C" EDITED: 2017/ 10/ 10
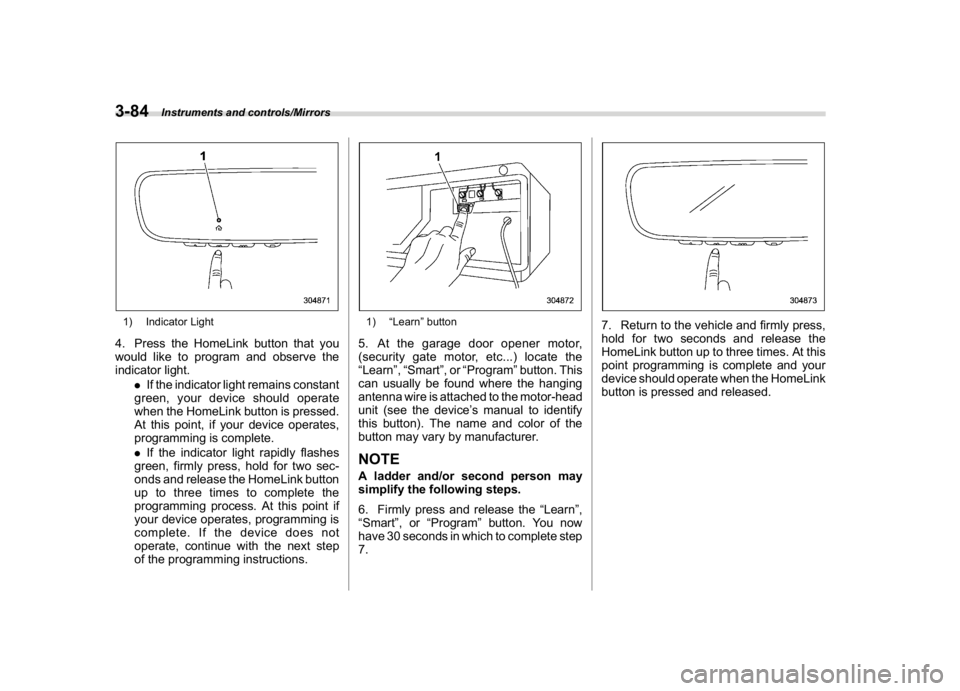
1) Indicator Light4. Press the HomeLink button that you
would like to program and observe the
indicator light.
.If the indicator light remains constant
green, your device should operate
when the HomeLink button is pressed.
At this point, if your device operates,
programming is complete.
.If the indicator light rapidly flashes
green, firmly press, hold for two sec-
onds and release the HomeLink button
up to three times to complete the
programming process. At this point if
your device operates, programming is
complete. If the device does not
operate, continue with the next step
of the programming instructions.
1)“Learn”button5. At the garage door opener motor,
(security gate motor, etc...) locate the
“Learn”,“Smart”,or“Program”button. This
can usually be found where the hanging
antenna wire is attached to the motor-head
unit (see the device’s manual to identify
this button). The name and color of the
button may vary by manufacturer.NOTEA ladder and/or second person may
simplify the following steps.
6. Firmly press and release the“Learn”,
“Smart”,or“Program”button. You now
have 30 seconds in which to complete step
7.
7. Return to the vehicle and firmly press,
hold for two seconds and release the
HomeLink button up to three times. At this
point programming is complete and your
device should operate when the HomeLink
button is pressed and released.
Instruments and controls/Mirrors
3-84
Page 218 of 474
(223,1)
北米Model "A1320BE-C" EDITED: 2017/ 10/ 10
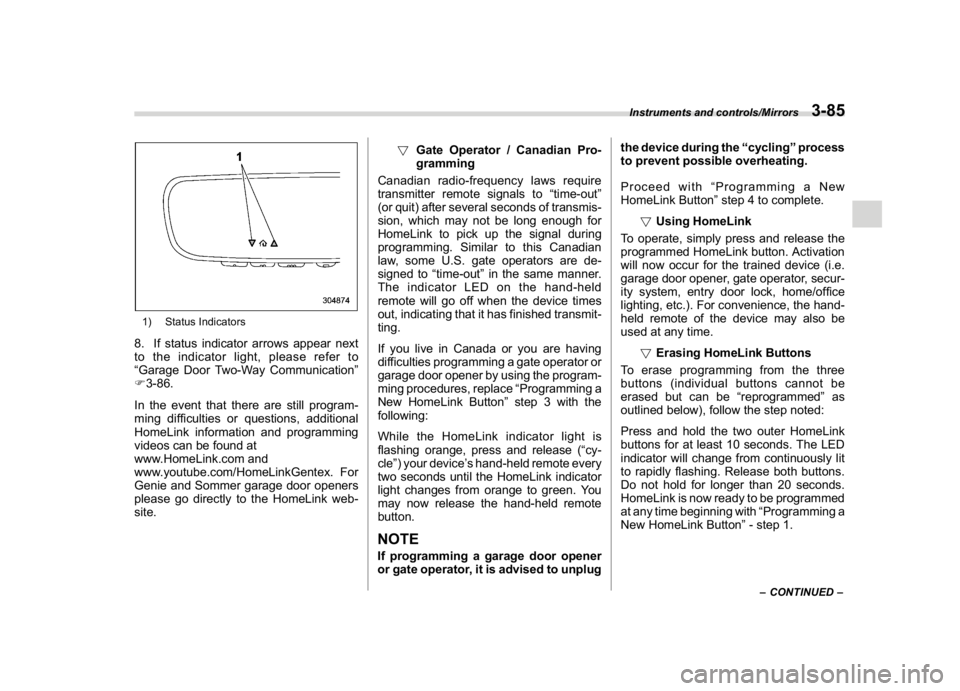
1) Status Indicators8. If status indicator arrows appear next
to the indicator light, please refer to
“Garage Door Two-Way Communication”
F3-86.
In the event that there are still program-
ming difficulties or questions, additional
HomeLink information and programming
videos can be found at
www.HomeLink.com and
www.youtube.com/HomeLinkGentex. For
Genie and Sommer garage door openers
please go directly to the HomeLink web-
site.!Gate Operator / Canadian Pro-
gramming
Canadian radio-frequency laws require
transmitter remote signals to“time-out”
(or quit) after several seconds of transmis-
sion, which may not be long enough for
HomeLink to pick up the signal during
programming. Similar to this Canadian
law, some U.S. gate operators are de-
signed to“time-out”in the same manner.
The indicator LED on the hand-held
remote will go off when the device times
out, indicating that it has finished transmit-
ting.
If you live in Canada or you are having
difficulties programming a gate operator or
garage door opener by using the program-
ming procedures, replace“Programming a
New HomeLink Button”step 3 with the
following:
While the HomeLink indicator light is
flashing orange, press and release (“cy-
cle”) your device’s hand-held remote every
two seconds until the HomeLink indicator
light changes from orange to green. You
may now release the hand-held remote
button.
NOTEIf programming a garage door opener
or gate operator, it is advised to unplugthe device during the“cycling”process
to prevent possible overheating.
Proceed with“Programming a New
HomeLink Button”step 4 to complete.
!Using HomeLink
To operate, simply press and release the
programmed HomeLink button. Activation
will now occur for the trained device (i.e.
garage door opener, gate operator, secur-
ity system, entry door lock, home/office
lighting, etc.). For convenience, the hand-
held remote of the device may also be
used at any time.
!Erasing HomeLink Buttons
To erase programming from the three
buttons (individual buttons cannot be
erased but can be“reprogrammed”as
outlined below), follow the step noted:
Press and hold the two outer HomeLink
buttons for at least 10 seconds. The LED
indicator will change from continuously lit
to rapidly flashing. Release both buttons.
Do not hold for longer than 20 seconds.
HomeLink is now ready to be programmed
at any time beginning with“Programming a
New HomeLink Button”- step 1.
–CONTINUED–
Instruments and controls/Mirrors
3-85
3
Page 224 of 474
(229,1)
北米Model "A1320BE-C" EDITED: 2017/ 10/ 10
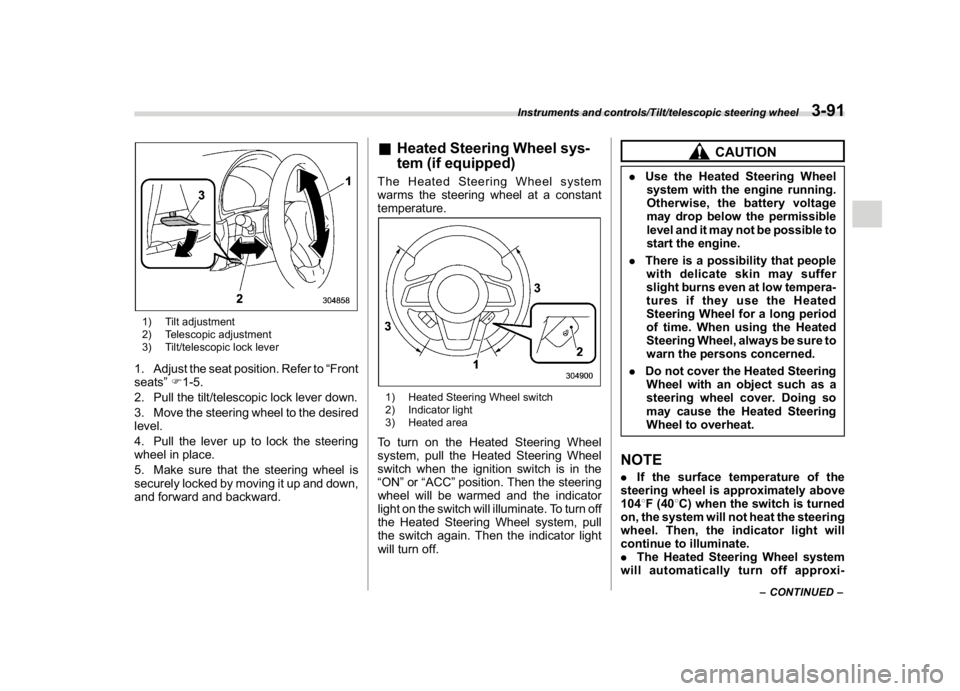
1) Tilt adjustment
2) Telescopic adjustment
3) Tilt/telescopic lock lever1. Adjust the seat position. Refer to“Front
seats”F1-5.
2. Pull the tilt/telescopic lock lever down.
3. Move the steering wheel to the desired
level.
4. Pull the lever up to lock the steering
wheel in place.
5. Make sure that the steering wheel is
securely locked by moving it up and down,
and forward and backward.
&Heated Steering Wheel sys-
tem (if equipped)The Heated Steering Wheel system
warms the steering wheel at a constant
temperature.1) Heated Steering Wheel switch
2) Indicator light
3) Heated areaTo turn on the Heated Steering Wheel
system, pull the Heated Steering Wheel
switch when the ignition switch is in the
“ON”or“ACC”position. Then the steering
wheel will be warmed and the indicator
light on the switch will illuminate. To turn off
the Heated Steering Wheel system, pull
the switch again. Then the indicator light
will turn off.
CAUTION
.Use the Heated Steering Wheel
system with the engine running.
Otherwise, the battery voltage
may drop below the permissible
level and it may not be possible to
start the engine.
.There is a possibility that people
with delicate skin may suffer
slight burns even at low tempera-
tures if they use the Heated
Steering Wheel for a long period
of time. When using the Heated
Steering Wheel, always be sure to
warn the persons concerned.
.Do not cover the Heated Steering
Wheel with an object such as a
steering wheel cover. Doing so
may cause the Heated Steering
Wheel to overheat.NOTE.If the surface temperature of the
steering wheel is approximately above
1048F (408C) when the switch is turned
on, the system will not heat the steering
wheel. Then, the indicator light will
continue to illuminate.
.The Heated Steering Wheel system
will automatically turn off approxi-
–CONTINUED–
Instruments and controls/Tilt/telescopic steering wheel
3-91
3
Page 252 of 474

(259,1)
北米Model "A1320BE-C" EDITED: 2017/ 10/ 10
cigarette lighter plug in the sock-
et. Doing so may cause a short-
circuit and overheating, resulting
in a fire.
.If the socket is ever used for a
plug-in accessory such as a cell
phone, that may damage the
portion of the socket’s internal
mechanism that causes a cigar-
ette lighter plug to“pop out”after
its lighter element is heated.
Therefore, do not place a cigar-
ette lighter plug in a socket that
has been used, even once, to
power a plug-in accessory. Doing
so may cause the plug to stick
and overheat, creating a potential
fire hazard.
Ashtray (dealer option)
CAUTION
.Do not use ashtrays as waste
receptacles or leave a lighted
cigarette in an ashtray. This could
cause a fire.
.Always extinguish matches and
cigarettes before putting them
into the ashtray, and then close
the ashtray securely. If you keep
the ashtray open, the fire of the
cigarette may spread to another
cigarette butt and start a fire.
.Do not put flammable material in
the ashtray.
.Do not leave a lot of cigarette
butts in the ashtray.NOTEParticles of ash and tobacco will accu-
mulate around the hinges of the ash-
tray’s inner lid. Clean them off using a
toothbrush or a similar narrow-ended
implement.
The portable ashtray can be installed in
each cup holder or bottle holder. For the
locations of the cup holders, refer to“Cup
holders”F6-6. For the locations of the
bottle holders, refer to“Bottle holders”F6-
6.
When using the ashtray, open the lid of the
ashtray. Fully close the lid after using the
ashtray to help reduce residual smoke.
Interior equipment/Ashtray (dealer option)
6-9
6
Page 253 of 474
(260,1)
北米Model "A1320BE-C" EDITED: 2017/ 10/ 10
Floor mat
CAUTION
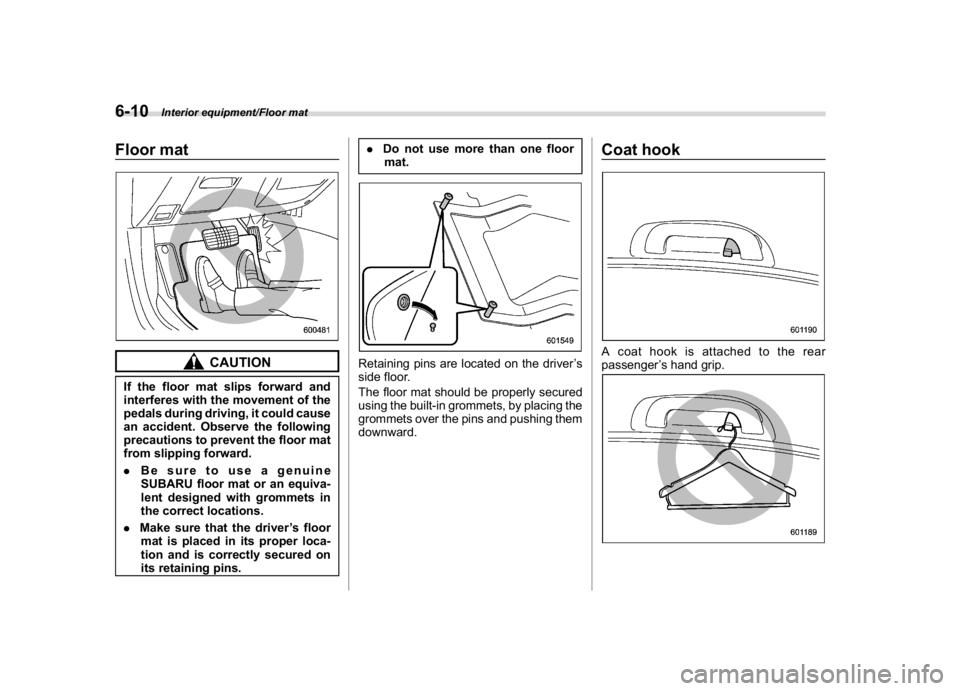
If the floor mat slips forward and
interferes with the movement of the
pedals during driving, it could cause
an accident. Observe the following
precautions to prevent the floor mat
from slipping forward.
.Be sure to use a genuine
SUBARU floor mat or an equiva-
lent designed with grommets in
the correct locations.
.Make sure that the driver’s floor
mat is placed in its proper loca-
tion and is correctly secured on
its retaining pins..Do not use more than one floor
mat.
Retaining pins are located on the driver’s
side floor.
The floor mat should be properly secured
using the built-in grommets, by placing the
grommets over the pins and pushing them
downward.
Coat hookA coat hook is attached to the rear
passenger’s hand grip.
Interior equipment/Floor mat
6-10
Page 256 of 474
(263,1)
北米Model "A1320BE-C" EDITED: 2017/ 10/ 10
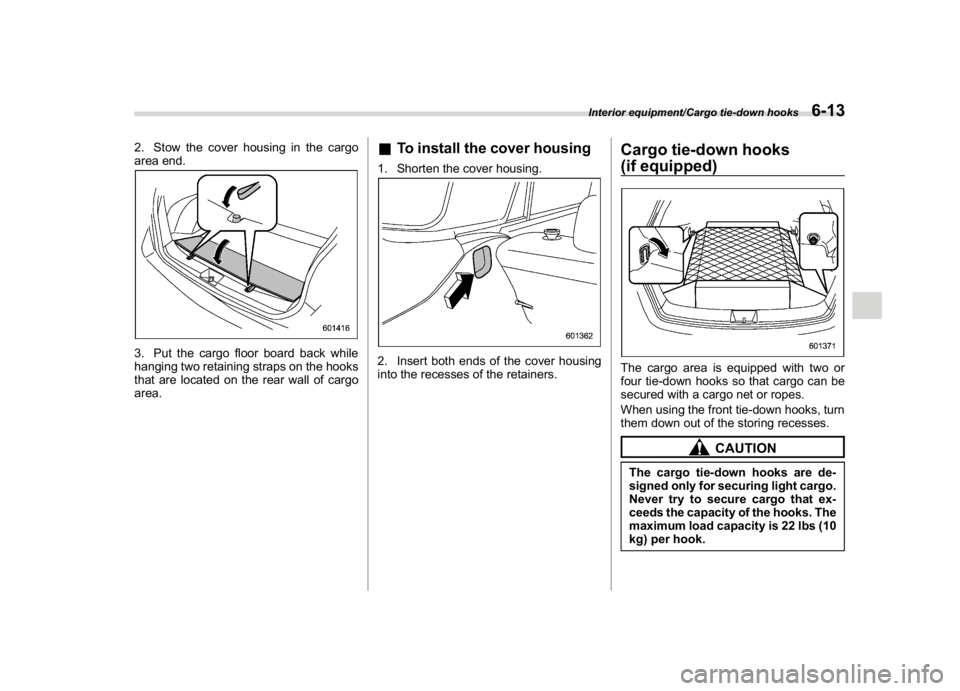
2. Stow the cover housing in the cargo
area end.3. Put the cargo floor board back while
hanging two retaining straps on the hooks
that are located on the rear wall of cargo
area.
&To install the cover housing1. Shorten the cover housing.2. Insert both ends of the cover housing
into the recesses of the retainers.
Cargo tie-down hooks
(if equipped)The cargo area is equipped with two or
four tie-down hooks so that cargo can be
secured with a cargo net or ropes.
When using the front tie-down hooks, turn
them down out of the storing recesses.
CAUTION
The cargo tie-down hooks are de-
signed only for securing light cargo.
Never try to secure cargo that ex-
ceeds the capacity of the hooks. The
maximum load capacity is 22 lbs (10
kg) per hook.
Interior equipment/Cargo tie-down hooks
6-13
6