Page 359 of 474

(370,1)
北米Model "A1320BE-C" EDITED: 2017/ 10/ 10
dent.
1. Park on a hard, level surface, when-
ever possible, then stop the engine.
2. Apply the parking brake securely and
shift the shift lever in reverse (MT models)
or the select lever to the“P”(Park) position
(CVT models).
3. Turn on the hazard warning flasher and
have everyone get out of the vehicle.
4. Put wheel blocks at the front and rear
of the tire diagonally opposite the flat tire.
5. Take out the jack, jack handle and
wheel nut wrench.
The tools and the spare tire are stored
under the cargo area. Refer to“Mainte-
nance tools”F9-3.
NOTEMake sure that the jack is well lubri-
cated before using it.6. Take out the tool bucket and turn the
attaching bolt counterclockwise, then take
the spare tire out.NOTEIf the spare tire provided in your vehicle
is a temporary spare tire, carefully read
“Temporary spare tire”F9-2 and
strictly follow the instructions.
7. Loosen the wheel nuts using the wheel
nut wrench but do not remove the nuts.Jack-up points8. Place the jack under the side sill at the
front or rear jack-up point closest to the flat
tire.
In case of emergency/Flat tires
9-6
Page 360 of 474

(371,1)
北米Model "A1320BE-C" EDITED: 2017/ 10/ 10
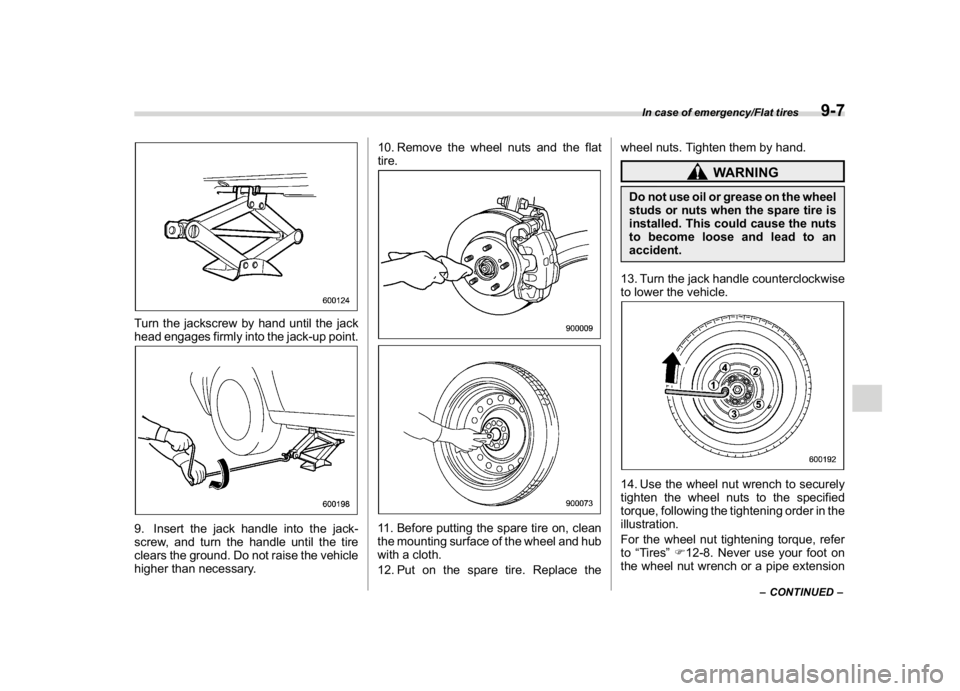
Turn the jackscrew by hand until the jack
head engages firmly into the jack-up point.9. Insert the jack handle into the jack-
screw, and turn the handle until the tire
clears the ground. Do not raise the vehicle
higher than necessary.10. Remove the wheel nuts and the flat
tire.
11. Before putting the spare tire on, clean
the mounting surface of the wheel and hub
with a cloth.
12. Put on the spare tire. Replace thewheel nuts. Tighten them by hand.
WARNING
Do not use oil or grease on the wheel
studs or nuts when the spare tire is
installed. This could cause the nuts
to become loose and lead to an
accident.
13. Turn the jack handle counterclockwise
to lower the vehicle.14. Use the wheel nut wrench to securely
tighten the wheel nuts to the specified
torque, following the tightening order in the
illustration.
For the wheel nut tightening torque, refer
to“Tires”F12-8. Never use your foot on
the wheel nut wrench or a pipe extension
–CONTINUED–
In case of emergency/Flat tires
9-7
9
Page 361 of 474

(372,1)
北米Model "A1320BE-C" EDITED: 2017/ 10/ 10
on the wrench because you may exceed
the specified torque. Have the wheel nut
torque checked at the nearest automotive
service facility.1) Support holder15. Store the flat tire in the spare tire
compartment. Install with the support
holder facing upward and secure the flat
tire by firmly tightening the attaching bolt.NOTEIf you cannot fix the flat tire firmly, try
turning the support holder upside
down.
16. Store the jack, jack handle and wheel
nut wrench in their storage locations.
WARNING
Never place a tire or tire changing
tools in the passenger compartment
after changing wheels. In a sudden
stop or collision, loose equipment
could strike occupants and cause
injury. Store the tire and all tools in
the proper place.&Tire pressure monitoring
system (TPMS) (U.S.-spec.
models)The tire pressure monitoring system pro-
vides the driver with the warning message
indicated by sending a signal from a
sensor that is installed in each wheel when
tire pressure is severely low.The tire pressure monitoring system will
activate only when the vehicle is driven.
Also, this system may not react immedi-
ately to a sudden drop in tire pressure (for
example, a blow-out caused running over
a sharp object).
WARNING
.If the low tire pressure warning
light illuminates while driving,
never brake suddenly. Instead,
perform the following procedure.
(1) Keep driving straight ahead
while gradually reducing
speed.
(2) Slowly pull off the road to a
safe place. Otherwise an acci-
dent involving serious vehicle
damage and serious personal
injury could occur.
(3) Check the pressure for all four
tires and adjust the pressure
to the COLD tire pressure
shown on the vehicle placard
on the door pillar on the
driver’s side.
If this light still illuminates while
driving after adjusting the tire
pressure, a tire may have signifi-
cant damage and a fast leak that
causes the tire to lose air rapidly.
In case of emergency/Flat tires
9-8
Page 367 of 474

(378,1)
北米Model "A1320BE-C" EDITED: 2017/ 10/ 10
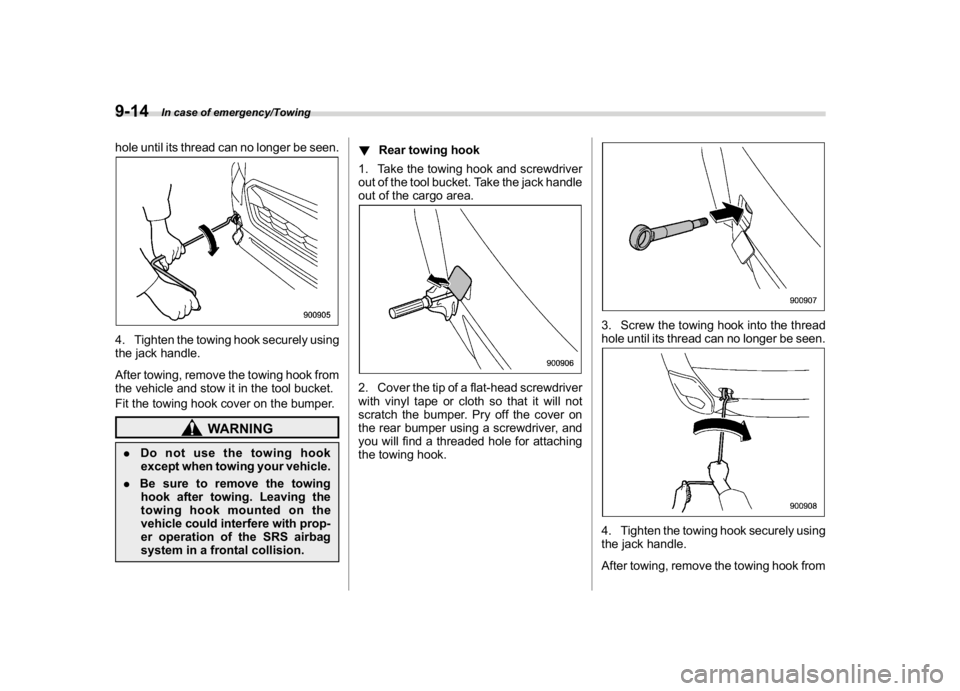
hole until its thread can no longer be seen.4. Tighten the towing hook securely using
the jack handle.
After towing, remove the towing hook from
the vehicle and stow it in the tool bucket.
Fit the towing hook cover on the bumper.
WARNING
.Do not use the towing hook
except when towing your vehicle.
.Be sure to remove the towing
hook after towing. Leaving the
towing hook mounted on the
vehicle could interfere with prop-
er operation of the SRS airbag
system in a frontal collision.!Rear towing hook
1. Take the towing hook and screwdriver
out of the tool bucket. Take the jack handle
out of the cargo area.
2. Cover the tip of a flat-head screwdriver
with vinyl tape or cloth so that it will not
scratch the bumper. Pry off the cover on
the rear bumper using a screwdriver, and
you will find a threaded hole for attaching
the towing hook.
3. Screw the towing hook into the thread
hole until its thread can no longer be seen.4. Tighten the towing hook securely using
the jack handle.
After towing, remove the towing hook from
In case of emergency/Towing
9-14
Page 369 of 474

(380,1)
北米Model "A1320BE-C" EDITED: 2017/ 10/ 10
2. Pull up the parking brake lever firmly.
3. Secure the vehicle onto the carrier
properly with safety chains. Each safety
chain should be equally tightened and care
must be taken not to pull the chains so
tightly that the suspension bottoms out.
CAUTION
If your vehicle has a bumper under
guard (optional), be careful not to
scrape it when placing the vehicle
on the carrier and when removing
the vehicle from the carrier.
&Towing with all wheels on the
ground1. Release the parking brake and put the
transmission in the neutral position (CVT
and MT).
2. The ignition switch should be in the
“ON”position while the vehicle is being
towed.
3. Take up slack in the towline slowly to
prevent damage to the vehicle.
WARNING
.Never turn the ignition switch to
the“LOCK”/“OFF”position while
the vehicle is being towed be-
cause the steering wheel and the
direction of the wheels will belocked.
.Remember that the brake booster
and power steering do not func-
tion when the engine is not run-
ning. Because the engine is
turned off, it will take greater
effort to operate the brake pedal
and steering wheel.
CAUTION
.If transmission failure occurs,
transport your vehicle on a flat-
bed truck.
.For CVT models, the traveling
speed must be limited to less
than 20 mph (30 km/h) and the
traveling distance to less than 31
miles (50 km). For greater speeds
and distances, transport your
vehicle on a flat-bed truck.
In case of emergency/Towing
9-16
Page 387 of 474
(400,1)
北米Model "A1320BE-C" EDITED: 2017/ 10/ 10
3. Release the secondary hood release
by moving the lever between the front grille
and the hood toward the left.4. Lift up the hood, release the hood prop
from its retainer and put the end of the
hood prop into the slot in the hood.
To close the hood:
1. Lift the hood slightly and remove the
hood prop from the slot in the hood and
return the prop to its retainer.
2. Lower the hood to a height of approxi-
mately 5.9 in (15 cm) above its closed
position and then let it drop.
3. After closing the hood, be sure the
hood is securely locked.
If this does not close the hood, release it
from a slightly higher position.
WARNING
Always check that the hood is
properly locked before you start
driving. If it is not, it might fly open
while the vehicle is moving and
block your view, which may cause
an accident and serious bodily in-
jury.
Maintenance and service/Engine hood
11-6
Page 413 of 474
(426,1)
北米Model "A1320BE-C" EDITED: 2017/ 10/ 10
&Rear window wiper blade
rubber1. Pull out the end of the blade rubber
assembly to unlock it from the plastic
support.
2. Pull the blade rubber assembly out of
the plastic support.1) Metal spines3. If the new blade rubber is not provided
with two metal spines, remove the metal
spines from the old blade rubber and install
them in the new blade rubber.
4. Align the claws of the plastic support
with the grooves in the blade rubber
assembly, then slide the blade rubber
assembly into place.Securely retain both ends of the rubber
with the stoppers on the plastic support
Maintenance and service/Replacement of wiper blades
11-32
Page 418 of 474
(431,1)
北米Model "A1320BE-C" EDITED: 2017/ 10/ 10
Right-hand side1. Use a screwdriver to undo the clips on
the air intake duct, then remove the air
intake duct.
Left-hand side2. Use a screwdriver to remove the
secured clip of the washer tank. To make
it easy to access the bulb, turn the neck of
the washer fluid filler pipe as illustrated.
1) Low beam bulb
2) High beam bulb3. Disconnect the electrical connector
from the bulb and remove the bulb from
the headlight assembly by turning it
counterclockwise.
4. Replace the bulb with new one. At this
time, use care not to touch the bulb
surface.
5. To install the bulb to the headlight
assembly, turn it clockwise until it clicks.
6. Reconnect the electrical connector.
7. Install the air intake duct with clips
(right-hand side).
8. Set the washer fluid filler pipe to the
original place and secure it by clip (left-
hand side).
–CONTINUED–
Maintenance and service/Replacing bulbs
11-37
11