Page 257 of 316

Towing bracket device
Hitching and connecting the trailer Fig. 233
Schematic diagram: assignment of
the pins of the trailer's electrical socket.
Key of the Schematic diagram ››› Fig. 233:
PinMeaning
1Left turn signal
2Rear fog light
3Earth, pins 1, 2, 4 to 8
4Right turn signal
5Rear light, right
6Brake lights
7Rear light, left
8Reverse lights
9Permanent live
10Cable without positive charge
11Earth, pin 10
Key of the Schematic diagram ››› Fig. 233:
PinMeaning
12Unassigned
13Earth, pin 9 Electrical socket for trailer
The v
ehic
le is fitted with a 13-pole power
socket for the electrical connection between
the trailer and the vehicle. If the system de-
tects that a trailer has been connected elec-
trically, the electrical equipment on the trailer
will receive voltage through this connection.
Pin 9 has a permanent live. This powers, for
example, the trailer's interior lighting. Pin 10
is only powered when the engine is running.
The charge wire (pin 10) charges, for exam-
ple, a caravan battery.
Pin 9 and 10 should not be connected to
each other to avoid discharging or damaging
the vehicle's battery.
The earth wires, pin 3, pin 11 and pin 13,
should never be connected to each other to
avoid overloading the electrical system.
If the trailer has a 7-contact connector , you
will need to use an adapter cable. In this case
the function corresponding to pin 10 will not
be available. Trailer maximum electricity consumption
Brake lights (total)84 Watts
Turn signal, on each side42 Watts
Side lights (total)100 Watts
Rear lights (total)42 Watts
Rear fog light42 Watts
Never exceed the values indicated!
Note
● If the r e
ar lights of the trailer are not cor-
rectly connected, the vehicle electronics may
be damaged.
● If the trailer absorbs excessive electric cur-
rent, the v
ehicle electronics may be dam-
aged.
● Never connect the trailer's electric system
directly t
o the electrical connections of the
tail lights or any other power sources. Only
use the connections intended for providing
electric current to the trailer. Ball coupling of towing bracket de-
v
ic
e* The ball coupling is provided with instruc-
tion
s
on fittin
g and removing the ball cou-
pling of the towing bracket. »
255
Technical data
Advice
Operation
Emergencies
Safety
Page 258 of 316

Operation
WARNING
The towing bracket ball coupling must be
st or
ed securely in the luggage compartment
to prevent them being flung through the vehi-
cle and causing injury. Note
● By l
aw, the ball coupling must be removed
if a trailer is not being towed if it obscures
the number plate. Driving with a trailer
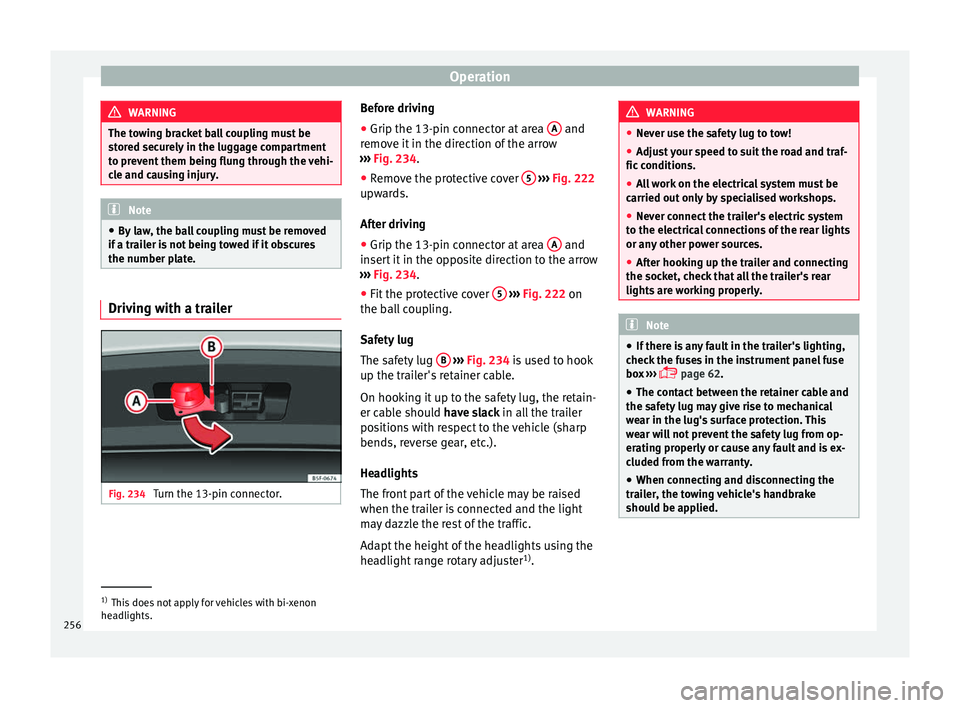
Fig. 234
Turn the 13-pin connector. Before driving
●
Grip the 13-pin connector at area A and
r emo
v
e it in the direction of the arrow
››› Fig. 234.
● Remove the protective cover 5
› ››
Fig. 222
up w
ards.
After driving
● Grip the 13-pin connector at area A and
in ser
t
it in the opposite direction to the arrow
››› Fig. 234.
● Fit the protective cover 5
› ›
› Fig. 222
on
the ball coupling.
Safety lug
The safety lug B
› ›
› Fig. 234
is used to hook
up the trailer's retainer cable.
On hooking it up to the safety lug, the retain-
er cable should have slack in all the trailer
positions with respect to the vehicle (sharp
bends, reverse gear, etc.).
Headlights
The front part of the vehicle may be raised
when the trailer is connected and the light
may dazzle the rest of the traffic.
Adapt the height of the headlights using the
headlight range rotary adjuster 1)
. WARNING
● Never u se the s
afety lug to tow!
● Adjust your speed to suit the road and traf-
fic condition
s.
● All work on the electrical system must be
carried out on
ly by specialised workshops.
● Never connect the trailer's electric system
to the electric
al connections of the rear lights
or any other power sources.
● After hooking up the trailer and connecting
the socket, c
heck that all the trailer's rear
lights are working properly. Note
● If ther e i
s any fault in the trailer's lighting,
check the fuses in the instrument panel fuse
box ›››
page 62.
● The contact between the retainer cable and
the safety
lug may give rise to mechanical
wear in the lug's surface protection. This
wear will not prevent the safety lug from op-
erating properly or cause any fault and is ex-
cluded from the warranty.
● When connecting and disconnecting the
trail
er, the towing vehicle's handbrake
should be applied. 1)
This does not apply for vehicles with bi-xenon
hea dlights.
256
Page 259 of 316

Towing bracket device
Anti-theft alarm When the vehicle is locked, the alarm is trig-
ger
ed when the el
ectrical connection be-
tween vehicle and trailer is interrupted.
Always turn off the anti-theft alarm system
before connecting or disconnecting a trailer
››› page 138.
Conditions for the integration of a trailer in
the anti-theft alarm system.
● The vehicle is factory-equipped with an an-
ti-theft al
arm system and a towing bracket
device.
● The trailer is connected electrically to the
tow
ing vehicle by the trailer connector.
● The electrical system of the vehicle and the
trail
er are prepared for operation.
● The vehicle is locked with the ignition key
and the anti-theft al
arm system is activated.CAUTION
For technical reasons, trailers fitted with rear
LED lights ar
e not integrated in the anti-theft
alarm system. Driving tips
Driving with a trailer always requires extra
c
ar e. W
eight distribution
The weight di
stribution of a loaded trailer
with an unladen vehicle is very unfavourable.
However, if this cannot be avoided, drive ex-
tra slowly to allow for the unbalanced weight
distribution.
Speed
The stability of the vehicle and trailer is re-
duced with increasing speed. For this reason,
it is advisable not to drive at the maximum
permissible speed in an unfavourable road,
weather or wind conditions. This applies es-
pecially when driving downhill.
You should always reduce speed immediately
if the trailer shows the slightest sign of snak-
ing. Never try to stop the “snaking” by in-
creasing speed.
Always brake in due course. If the trailer has
an overrun brake, apply the brakes gently at
first and then, firmly. This will prevent the
jerking that can be caused by locking of trail-
er wheels. Select a low gear in due course
before going down a steep downhill. This en-
ables you to use the engine braking to slow
down the vehicle.
Reheating
At very high temperatures and during pro-
longed slopes, driving in a low gear and high
engine speed, always monitor the coolant
temperature gauge ››› page 120. Electronic stability control*
The ESC* sys
tem helps to stabilise the trailer
in case of skidding or rocking.
Retrofitting a towing bracket* Fig. 235
Attachment points for towing brack-
et . » 257
Technical data
Advice
Operation
Emergencies
Safety
Page 260 of 316

Operation
If a towing bracket is to be fitted after the ve-
hic l
e i
s purchased, this must be completed
according to the instructions of the towing
bracket manufacturer.
The attachment points for the towing bracket A are on the lower part of the vehicle.
The di s
t
ance between the centre of the ball
coupling and the ground should never be
lower than the indicated value, even with a
fully loaded vehicle and including the maxi-
mum drawbar load.
Elevation values for securing the towing
bracket:
Elevation values for securing the towing bracket:
B65 mm (minimum)
C350 mm to 420 mm (fully laden vehicle)
D1,033 mm
E322 mm
F338 mm Fitting a towing bracket
●
Driving with a trailer involves an extra effort
f or the
v
ehicle. Therefore, before fitting a
towing bracket, please contact a Technical
Service to check whether your cooling system
needs modification.
● The legal requirements in your country
must
be observed (e.g. the fitting of a sepa-
rate control lamp). ●
Cert
ain vehicle components, e.g. the rear
bumper, must be removed and reinstalled.
The towing bracket securing bolts must be
tightened using a torque wrench, and a pow-
er socket must be connected to the vehicle
electrical system. This requires specialised
knowledge and tools.
● Figures in the illustration show the eleva-
tion value and the att
achment points which
must be considered if you are retrofitting a
towing bracket. WARNING
The towing brackets should be fitted at a spe-
ci a
lised workshop.
● If the towing bracket is incorrectly instal-
led, there i
s a serious danger of accident.
● For your own safety, please observe the tow
brack
et manufacturer's instructions. CAUTION
● If the po w
er socket is incorrectly installed,
this could cause damage to the vehicle elec-
trical system. Note
● SEA T r
ecommends that the towing hooks
be fitted at a specialised workshop. Consult
your SEAT dealer in case additional modifica-
tions to your vehicle are necessary.
● Due to the specific design of the exhaust,
the fitting of a c
onventional towing hook is not recommended for some sportier versions.
Ple
a
se consult your Technical Service.258
Page 261 of 316

Care and maintenance
Advice
C ar
e and m
aintenance
Accessories and modifications to the vehicle
Accessories, replacement of parts and
modifications Your vehicle is designed to offer a high
s
t
and
ard of active and passive safety.
Before purchasing accessories and parts,
and before making technical changes to your
vehicle, we recommend that you consult your
Technical Service.
SEAT dealerships will be happy to provide
you with the latest information about the
use, legal requirements and recommenda-
tions from the manufacturer regarding acces-
sories and spare parts.
We recommend you use only SEAT Approved
Accessories ®
and SEAT Approved Spare
Parts ®
. This way, SEAT can guarantee that
the product in question is suitable, reliable
and safe. SEAT Technical Services have the
necessary experience and facilities to ensure
that parts are correctly and professionally in-
stalled. Despite a continuous observation of the mar-
ket, S
EAT is not able to assess the reliability,
safety and suitability of parts that SEAT has
not approved . For this reason, SEAT cannot
assume responsibility for any non-genuine
parts used, even if these parts have been ap-
proved by an official testing agency or are
covered by an official approval certificate.
Any retro-fitted equipment which has a direct
impact on the driver's control of the vehicle,
such as a cruise control system or electroni-
cally-controlled suspension, must be ap-
proved by SEAT for use in your vehicle and
bear the e mark (the European Union's au-
thorisation symbol).
If any additional electrical devices are fitted
which do not serve to control the vehicle it-
self, such as refrigerator boxes, laptops or
ventilator fans, they must bear the CE mark
(European Union manufacturer conformity
declaration). WARNING
Accessories, for example telephone holders
or cup ho l
ders, should never be fitted on the
covers, or within the working range, of the
airbags. Otherwise, there is a danger of in-
jury if the airbag is triggered in an accident. Technical modifications
Modifications must always be carried out ac-
cor
din
g to our specifications. Unauthorised
modifications to the electronic components
or software in the vehicle may cause malfunc-
tions. Due to the way the electronic compo-
nents are linked together in networks, other
indirect systems may be affected by the
faults. This can seriously impair safety, lead
to excessive wear of components, and also
invalidate your vehicle registration docu-
ments.
SEAT Technical Services cannot be held liable
for any damage caused by modifications
and/or work incorrectly performed. For this
reason, we recommend having all work per-
formed by a SEAT Technical Service using
SEAT ®
Original Spare Parts. WARNING
Any type of work or modification performed
incorr ectly
on your vehicle can lead to mal-
functions and can cause accidents. Radio transmitters and office equip-
ment
Radio transmitters (fixed installation)
An
y
r
etrofit installations of radio transmitters
in the vehicle require prior approval. SEAT
generally authorises in-vehicle installations »
259
Technical data
Advice
Operation
Emergencies
Safety
Page 262 of 316

Advice
of approved types of radio transmitters provi-
ded th at:
● The aeri al
is installed correctly.
● The aerial is installed on the exterior of the
vehicl
e (and shielded cables are used togeth-
er with non-reflective aerial trimming).
● The effective transmitting power does not
exc
eed 10 Watts at the aerial base.
A SEAT Official Service and specialised work-
shop will be able to inform you about options
for installing and operating radio transmitters
with a higher transmitting power.
Mobile radio transmitters
Commercial mobile telephones or radio
equipment might interfere with the electron-
ics of your vehicle and cause malfunctions.
This may be due to:
● No external aerial.
● External aerial incorrectly installed.
● Transmitting power more than 10 W.
You mus
t, therefore, do not operate portable
mobile telephones or radio equipment inside
the vehicle without a properly installed exter-
nal aerial ››› .
Pl e
a
se note also that the maximum range of
the equipment can only be achieved with an
external aerial. Business equipment
Retrofit
installation of business or private
equipment in the vehicle is permitted, provi-
ded the equipment cannot interfere with the
driver's immediate control of the vehicle and
that any such equipment carries the mark.
Any retrofit equipment that could influence
the driver's control of the vehicle must have a
type approval for your vehicle and must carry
the e mark. WARNING
Mobile telephones or radio equipment which
is oper
ated inside the vehicle without a prop-
erly installed external aerial can create exces-
sive magnetic fields that could cause a health
hazard. Note
● The pos t
erior fitting of electric and elec-
tronic equipment in this vehicle affects its li-
cence and could lead to the withdrawal of the
vehicle registration document under certain
circumstances.
● Please use the mobile telephone/radio op-
erating in
structions. Care and cleaning
Gener a
l
notes Vehicle maintenance
Re
gu
lar care and washing help to maintain
the value of the vehicle. This may also be one
of the requirements for acknowledging war-
ranty claims in the event of bodywork corro-
sion or paint defects.
The best way to protect your vehicle against
the harmful effects of the environment is
through correct maintenance and frequent
washing. The longer substances such as in-
sect remains, bird droppings, resinous tree
sap, road dirt, industrial deposits, tar, soot or
road salt and other aggressive materials re-
main on the vehicle, the more damage they
do to the paintwork. High temperatures, for
instance in strong sunlight, further intensify
the corrosive effect.
After winter, a period when salt is put on the
roads, it is important to have the underside
of the vehicle washed thoroughly.
Products for vehicle maintenance
Car-care products are available in your Tech-
nical Services. Keep the product instructions
until you have used them up.
260
Page 263 of 316

Care and maintenance
WARNING
● Car -c
are products can be toxic. Because of
this, they must always be kept closed in their
original container. Keep them out of the reach
of children. Failure to comply could result in
poisoning.
● Always read and observe the instructions
and warning
s on the package before using
car-care products. Improper use could cause
health problems or damage the vehicle. The
use of certain products may produce noxious
vapours; they should be used in well ventila-
ted areas.
● Never use fuel, turpentine, engine oil, nail
varnish r
emover or other volatile fluids.
These are toxic and highly flammable. Risk of
fire and explosion.
● Before washing your vehicle, or carrying
out any
maintenance, switch the engine off,
apply the handbrake firmly and remove the
key from the ignition. CAUTION
Never attempt to remove dirt, mud or dust if
the sur f
ace of the vehicle is dry. Never use a
dry cloth or sponge for cleaning purposes.
This could damage the paintwork or the win-
dows of your vehicle. Soak dirt, mud or dust
with plenty of water. For the sake of the environment
● When pur c
hasing car care products, try to
select ones that are not harmful to the envi-
ronment.
● The waste from car-care products should
not be dis
posed of with ordinary household
waste. Observe the disposal information on
the package. Care of the vehicle exterior
Autom atic
car wash tunnel The vehicle paintwork is so durable that the
v
ehic
l
e can normally be washed without
problems in an automatic car wash tunnel.
However, the paintwork wear depends to a
large extent on the kind of the car wash tun-
nel, the brushes used, its water filtering and
the type of cleaning and preservative prod-
ucts.
Before going through a car wash, be sure to
take the usual precautions (close the win-
dows and rear-view mirrors). There is nothing
to note apart from that.
If the vehicle has special accessories such as
spoilers or a roof rack or two-way radio aerial,
etc., it is advisable to consult the car wash
tunnel operator first. After washing, the brake
s could take some
time to respond as the brake discs and pads
could be wet, or even frozen in winter. “Dry”
the brakes by braking several times. WARNING
Water, ice and salt on the brake system can
reduc e br
aking effectiveness. Risk of acci-
dent. Hand-washing
Vehicle washing
– First soften the dirt and rinse it off with wa-
ter
.
– C
lean your vehicle from top to bottom with
a soft s
ponge, a glove or a brush. Use very
light pressure.
– Rinse the sponge or glove often with clean
water
.
– Special car shampoo should only be used
for v
ery stubborn dirt.
– Leave the wheels, sill panels etc. until last,
usin
g a different sponge or glove.
– Rinse the vehicle thoroughly with water.
– Dry the vehicle surface gently with a cha-
mois l
eather.
– In cold temperature, dry the rubber seals
and their sur
faces to prevent them from »
261
Technical data
Advice
Operation
Emergencies
Safety
Page 264 of 316

Advice
freezing. Apply silicone spray to the rubber
se al
s.
Af
ter washing the vehicle
– After washing, avoid sudden and sharp
brakin
g. “Dry” the brakes by braking sever-
al times. WARNING
● Wa sh
your vehicle with the ignition switch-
ed off.
● Protect your hands and arms from cuts on
sharp meta
l edges when cleaning the under-
body, the inside of the wheel housings etc.
Risk of injury.
● Water, ice and salt on the brake system can
reduce br
aking effectiveness. Risk of acci-
dent. CAUTION
● Never r emo
ve dirt, mud or dust if the vehi-
cle surface is dry. Never use a dry cloth or
sponge for cleaning purposes. This could
scratch the paintwork or glass on your vehi-
cle.
● Washing the vehicle in low temperatures:
when washin
g the vehicle with a hose, do not
direct water into the lock cylinders or the
gaps around the doors. Risk of freezing. For the sake of the environment
To protect the environment, the vehicle
shoul d be w
ashed only in specially provided
wash bays, to prevent toxic, oil-laden waste
water from entering the sewer system. In
some places, washing vehicles outside wash
bays is prohibited. Note
Do not wash the vehicle in direct sunlight. Washing the vehicle with a high pres-
s
ur
e c
leaner Be particularly careful when using a high
pr
e
s
sure cleaner!
– Always observe the instructions for the
high-pres
sure cleaner, particularly those
concerning the pressure and the spraying
distance.
– Increase the spraying distance for soft ma-
terial
s and painted bumpers.
– Do not use a high pressure cleaner to re-
move ic
e or snow from windows
››› page 263.
– Never use concentrated jet nozzles (“rotat-
ing jets”) ›
›› .–
Af t
er w
ashing, avoid sudden and sharp
braking. “Dry” the brakes by braking sever-
al times ››› page 179. WARNING
● Never w a
sh tyres with a concentrated jet
(“rotating nozzle”). Even at large spraying
distances and short cleaning times, damage
can occur to the tyres. This may cause an ac-
cident.
● Water, ice and salt on the brake system can
reduce br
aking effectiveness. Risk of acci-
dent. CAUTION
● Do not u se w
ater hotter than +60°C
(+140°F). This could damage the vehicle.
● To avoid damage to the vehicle, keep a suf-
ficient di
stance from sensitive materials such
as flexible hoses, plastic, soundproofing ma-
terial, etc. This also applies to bumpers pain-
ted in the colour of the bodywork. The closer
the nozzle is to the surface, the greater the
wear on the material. Factory-fitted adhesive sheets
The following indications should be taken in-
t
o ac
c
ount to avoid damaging adhesive
sheets:
● Do not use high pressure cleaners.
262