Page 42 of 290
1.36
CHILD SAFETY: choosing a child, baby seat mounting (1/2)
There are two ways of attaching child
seats: via the seat belt or using the
ISOFIX system.
Attachment via the seat belt
The seat belt must be adjusted to
ensure that it is effective in the event of
harsh braking or an impact.
Ensure that the strap paths indicated
by the child seat manufacturer are re-
spected.
Always check that the seat belt is cor-
rectly fastened by pulling it up, then
pulling it out fully whilst pressing on the
child seat.
Check that the seat is correctly held by
moving it from side to side and back
to front: the seat should remain firmly
fixed.Attachment using the ISOFIX
system
Authorised ISOFIX child seats are ap-
proved in accordance with regulation
ECE-R44 in one of the three following
scenarios:
– universal ISOFIX 3-point forward-
facing seat;
– semi-universal ISOFIX 2-point seat;
– specific.
For the latter two, check that your child
seat can be installed by consulting the
list of compatible vehicles.
Attach the child seat with the ISOFIX
locks, if these are provided. The ISOFIX
system allows quick, easy, safe fitting.
The ISOFIX system consists of 2 rings
and, in some cases, a third ring.
Before using an ISOFIX
child seat that you pur-
chased for another vehicle,
check that its installation is
authorised. Consult the list of ve-
hicles which can be fitted with the
seat from the equipment manufac-
turer.
No modifications may be
made to the component
parts of the restraint system
(ISOFIX seat belts, seats
and their mountings) originally fitted.
The seat belt must never
be twisted or the tension
relieved. Never pass the
shoulder strap under the
arm or behind the back.
Check that the seat belt has not
been damaged by sharp edges.
If the seat belt does not operate nor-
mally, it will not protect the child.
Consult an approved dealer. Do not
use this seat until the seat belt has
been repaired.
Do not use the child seat
if it may unfasten the seat
belt restraining it: the base
of the seat must not rest on
the buckle and/or catch of the seat
belt.
Check that the child seat has not been
installed at an angle and that it is not
resting against a window.
Page 79 of 290
1.73
REAR-VIEW MIRRORS
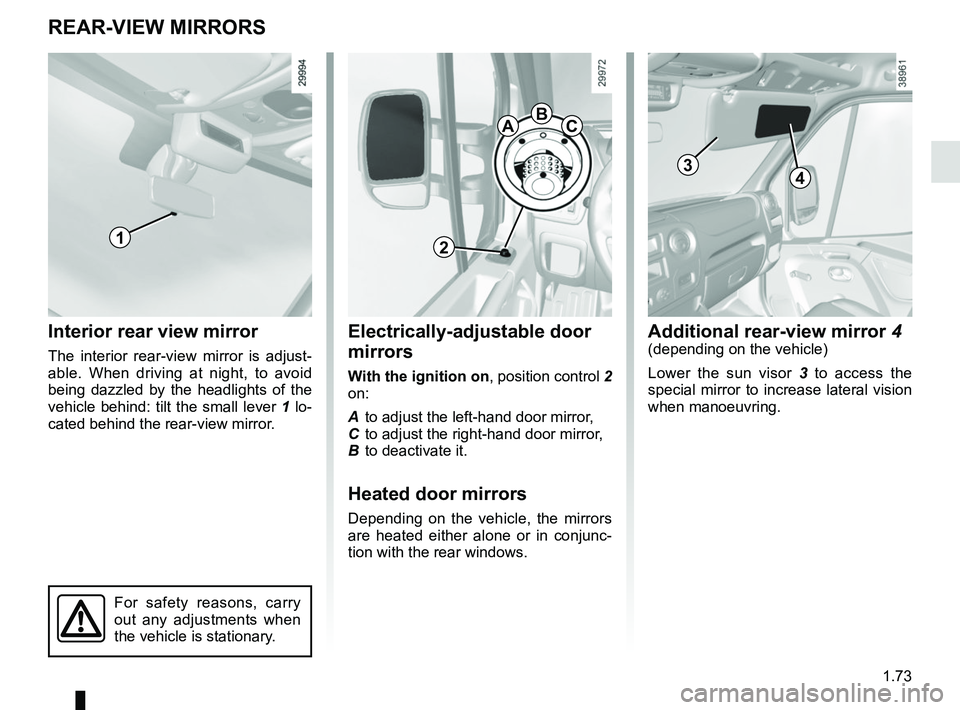
Interior rear view mirror
The interior rear-view mirror is adjust-
able. When driving at night, to avoid
being dazzled by the headlights of the
vehicle behind: tilt the small lever 1 lo-
cated behind the rear-view mirror.
Electrically-adjustable door
mirrors
With the ignition on , position control 2
on:
A to adjust the left-hand door mirror,
C to adjust the right-hand door mirror,
B to deactivate it.
Heated door mirrors
Depending on the vehicle, the mirrors
are heated either alone or in conjunc-
tion with the rear windows.
12
ABC
For safety reasons, carry
out any adjustments when
the vehicle is stationary.
Additional rear-view mirror 4(depending on the vehicle)
Lower the sun visor 3 to access the
special mirror to increase lateral vision
when manoeuvring.
43
Page 81 of 290

1.75
DRIVER’S POSITION: LEFT-HAND DRIVE (2/2)
The equipment fitted, described below, DEPENDS ON THE VERSION AND COUNTRY.
1 Side window demister outlet.
2 Side air vent.
3 Stalk for:
– direction indicator lights;
– exterior lights;
– front fog lights;
– rear fog lights.
4 Instrument panel.
5 Location for driver’s air bag.
6 – Windscreen wiper/washer stalk.
– Information readout control.
7 Accessories socket.
8 Centre air vent.
9 Location for:
– radio;
– storage compartment.
10 Heating and ventilation controls.
11 Centre air vent.
12 Passenger airbag location.
13 Side air vent.
14 Side window demister.
15 Storage compartments.
16 Location for:
– storage compartment;
– audio connection socket;
– front passenger air bag deacti-vation warning light.
17 Cigar lighter or accessories socket.
18 Switches:
– cruise control/speed limiter;
– activation/deactivation of the Stop and Start function;
– activation/deactivation of ECO mode;
– fast idle speed;
– power take-off.
19 Steering wheel height adjustment
control.
20 Bonnet release.
21 Fuse box.
22 Controls for:
– electric beam height adjust-ment;
– activation/deactivation of the parking distance control;
– activating/deactivating the load position;
– activation/deactivation of the traction control.
Page 83 of 290

1.77
DRIVER’S POSITION, RIGHT-HAND DRIVE (2/2)
The equipment fitted, described below, DEPENDS ON THE VERSION AND COUNTRY.
1 Side window demister outlet.
2 Side air vent.
3 Location for passenger air bag.
4 Centre air vent.
5 Heating and ventilation controls.
6 Location for:
– radio;
– storage compartment.
7 Centre air vent.
8 Accessories socket.
9 Stalk for:
– direction indicator lights;
– exterior lights;
– front fog lights;
– rear fog lights.
10 Instrument panel.
11 Driver airbag location.
12 – Windscreen wiper/washer stalk;
– Information readout control.
13 Side air vent.
14 Side window demister.
15 Controls for:
– electric beam height adjust-ment;
– activation/deactivation of the parking distance control;
– activating/deactivating the load position;
– activation/deactivation of the traction control.
16 Steering wheel height adjustment
control.
17 Switches:
– cruise control/speed limiter;
– activation/deactivation of the Stop and Start function;
– activation/deactivation of ECO mode;
– fast idle speed;
– power take-off.
18 Cigar lighter or accessories socket.
19 Location for:
– storage compartment;
– audio connection socket;
– front passenger air bag deacti-vation warning light.
20 Storage compartment.
21 Bonnet release.
22 Fuse box.
Page 119 of 290

2.3
STARTING, STOPPING THE ENGINE
Starting the engine
Turn the ignition key to the “Ignition on”
position M and hold this position until
the engine preheating warning light
É goes out.
Stopping the engine
With the engine idling, turn the key to
the “Stop” position St.
Starting the vehicle
For rear-wheel drive versions on
level ground, with the vehicle un-
laden, we recommend that you start
in second gear.
Never switch off the igni-
tion before the vehicle has
stopped completely. Once
the engine has stopped, the
brake servo, power-assisted steer-
ing, etc. and the passive safety de-
vices such as air bags and preten-
sioners will no longer operate.
Driver’s responsibility
when parking or stopping
the vehicle
Never leave an animal,
child or adult who is not self-suffi-
cient alone in your vehicle, even for
a short time.
They may pose a risk to themselves
or to others by starting the engine,
activating equipment such as the
electric windows or locking the
doors, for example.
Also, in hot and/or sunny weather,
please remember that the tempera-
ture inside the passenger compart-
ment increases very quickly.
RISK OF DEATH OR SERIOUS
INJURY.
Never start your vehicle
while freewheeling on a
gradient. Risk of non-acti-
vation of power-assisted
steering.
There is a risk of accidents.
Depending on the vehicle, if a gear is
engaged, the message “Depress clutch
+ start” is displayed on the instrument
panel. Press the clutch pedal.
Turn the key to starter position D with-
out depressing the accelerator
pedal.
Release the key as soon as the engine
starts.
Page 127 of 290
2.11
DRIVING ADVICE, ECO-DRIVING (4/4)
Advice on use
– Favour ECO mode.
– Electricity is fuel; switch off all the electrical components which are
not really needed. However (safety
first), keep your lights on when the
visibility is bad (“see and be seen”).
– Use the air vents. Driving with the windows open at 60 mph (100 km/h)
will increase fuel consumption by
4%.
– Never fill the fuel tank right to the brim to avoid overflow.
– In vehicles fitted with air condi-
tioning, it is normal to observe an
increase in fuel consumption (es-
pecially in urban conditions) when
it is used. For vehicles fitted with
manual air conditioning, switch off
the system when it is not required.
Advice for reducing consumption
and therefore helping to preserve
the environment:
If the vehicle has been parked in the
sun, open the doors for a few mo-
ments to let the hot air escape before
starting the engine.
– Do not leave an empty roof rack fitted to the vehicle.
– When towing a caravan, fit a wind deflector and adjust it carefully.
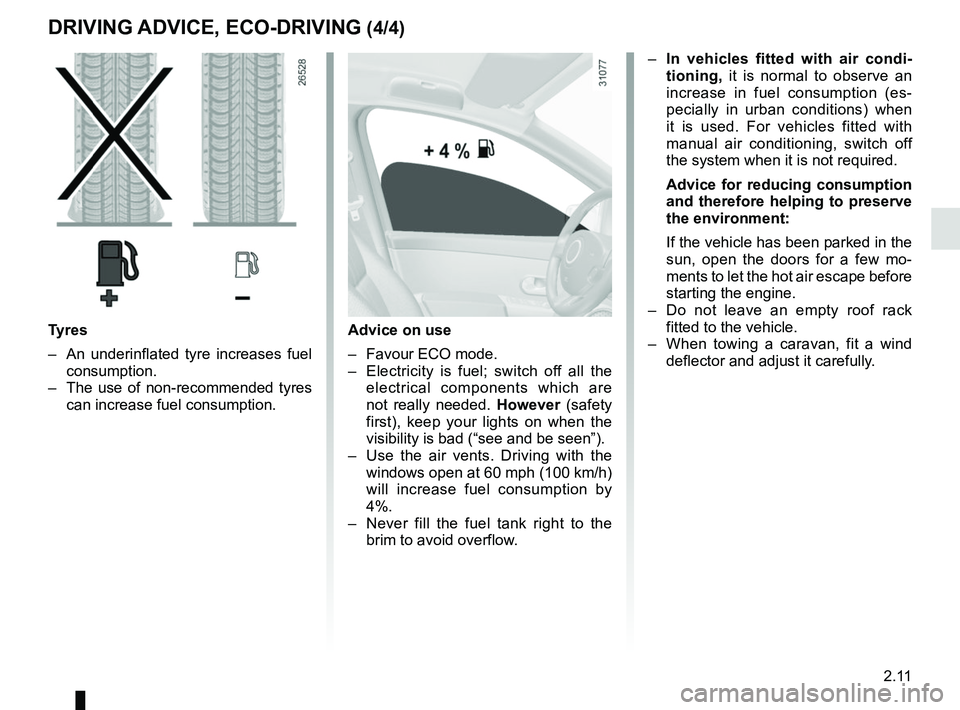
Tyres
– An underinflated tyre increases fuel consumption.
– The use of non-recommended tyres can increase fuel consumption.
Page 167 of 290

3.1
Section 3: Your comfort
Air vents. . . . . . . . . . . . . . . . . . . . . . . . . . . . . . . .\
. . . . . . . . . . . . . . . . . . . . . . . . . . . . . . . . . . . . . . . 3.2
Manual air conditioning/heating system . . . . . . . . . . . . . . . . . . . . . . . . . . . . . . . . . . . .\
. . . . . . . . . . 3.4
Automatic climate control . . . . . . . . . . . . . . . . . . . . . . . . . . . . . . . . . . . .\
. . . . . . . . . . . . . . . . . . . . . 3.7
Air conditioning: information and advice on use . . . . . . . . . . . . . . . . . . . . . . . . . . . . . . . . . . . .\
. . . . 3.13
Windows . . . . . . . . . . . . . . . . . . . . . . . . . . . . . . . . . . . .\
. . . . . . . . . . . . . . . . . . . . . . . . . . . . . . . . . . 3.15
Interior lighting . . . . . . . . . . . . . . . . . . . . . . . . . . . . . . . . . . . . \
. . . . . . . . . . . . . . . . . . . . . . . . . . . . . . 3.17
Sun visor, grab handle . . . . . . . . . . . . . . . . . . . . . . . . . . . . . . . . . . . . \
. . . . . . . . . . . . . . . . . . . . . . . . 3.18
Ashtrays, cigarette lighter, accessories socket . . . . . . . . . . . . . . . . . . . . . . . . . . . . . . . . . . . .\
. . . . . 3.19
Passenger compartment storage, fittings . . . . . . . . . . . . . . . . . . . . . . . . . . . . . . . . . . . .\
. . . . . . . . . 3.20
Rear bench seats . . . . . . . . . . . . . . . . . . . . . . . . . . . . . . . . . . . .\
. . . . . . . . . . . . . . . . . . . . . . . . . . . 3.26
Multimedia equipment . . . . . . . . . . . . . . . . . . . . . . . . . . . . . . . . . . . . \
. . . . . . . . . . . . . . . . . . . . . . . . 3.28
Transporting objects . . . . . . . . . . . . . . . . . . . . . . . . . . . . . . . . . . . .\
. . . . . . . . . . . . . . . . . . . . . . . . . 3.29
Page 168 of 290
3.2
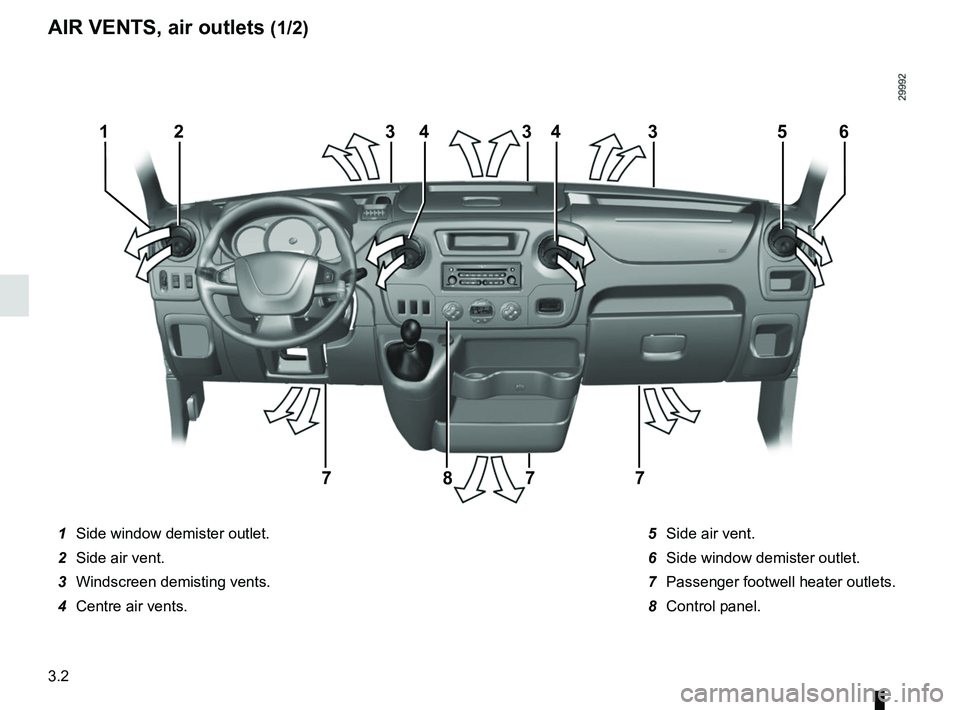
1 Side window demister outlet.
2 Side air vent.
3 Windscreen demisting vents.
4 Centre air vents. 5 Side air vent.
6 Side window demister outlet.
7 Passenger footwell heater outlets.
8 Control panel.
233354
7778
164
AIR VENTS, air outlets (1/2)