2018 RENAULT MASTER spare tyre
[x] Cancel search: spare tyrePage 140 of 290

2.24
TYRE PRESSURE LOSS WARNING (1/3)
1
When fitted to the vehicle, this system
notifies the driver if one or more tyres
lose pressure.
Operating principle
Each wheel (except for the emergency
spare wheel) has a sensor in the infla-
tion valve which periodically measures
the tyre pressure while driving.
Warning light
1 comes on to
alert the driver in the event of insuffi-
cient pressure (deflated wheel, punc-
tured tyre, etc.).
This function is an addi-
tional driving aid.
However, the function does
not take the place of the
driver. It cannot, therefore, under
any circumstances replace the vig-
ilance or the responsibility of the
driver.
Check the tyre pressures, including
the emergency spare wheel, once a
month.
Resetting the standard level
for the tyre pressures
This should be done:
– when the standard tyre pressure needs to be changed to adapt to
usage conditions (empty, carrying a
load, motorway driving, etc.);
– after swapping a wheel (however this practice is not recommended);
– after changing a wheel.
It should always be done after checking
the tyre pressure of all four tyres when
cold.
Tyre pressures must correspond to the
current usage of the vehicle (empty,
carrying a load, motorway driving, etc.).
Page 142 of 290

2.26
TYRE PRESSURE LOSS WARNING (3/3)
“CHECK TYRE SENSORS”
The warning light
flashes for
several seconds, then stays on, along
with the message “CHECK TYRE
SENSORS”.
This message appears along with the
© warning light.
They indicate that at least one tyre is
not fitted with sensors (e.g. emergency
spare wheel). Otherwise, consult an
authorised dealer.
Readjustment of tyre
pressures
The tyre pressures must be adjusted
when cold (please refer to the label lo-
cated on the edge of the driver’s door).
If tyre pressures cannot be checked
when the tyres are cold, the recom-
mended pressures must be increased
by 0.2 to 0.3 bar (3 PSI).
Never deflate a hot tyre.
Replacing wheels/tyres
This system requires specific equip-
ment (wheels, tyres, hubcaps, etc.).
Please see the information on “Tyres”
in Section 5.
Contact an approved Dealer to fit new
tyres and to find out about available ac-
cessories compatible with the system
and available from your dealer net-
work: the use of any other accessory
could affect the correct operation of the
system or damage a sensor.
Emergency spare wheel
If the vehicle is equipped with an emer-
gency spare wheel, it will not have a
sensor. When it is fitted on the vehicle,
the warning light
flashes for sev-
eral seconds, then stays on, together
with the warning light
© and the
message “CHECK TYRE SENSORS”
appears on the instrument panel.
Tyre repair product and
inflation kit
Because the valves are specially de-
signed, only use equipment approved
by the approved network. Please refer
to “Tyre inflation kit” in Section 5.
Changing a wheel
The system may take sev-
eral minutes depending on
use for the new wheel pres-
sures to be recognised; check the
tyre pressures after all operations.
Page 208 of 290

4.12
BC
ED
F
A
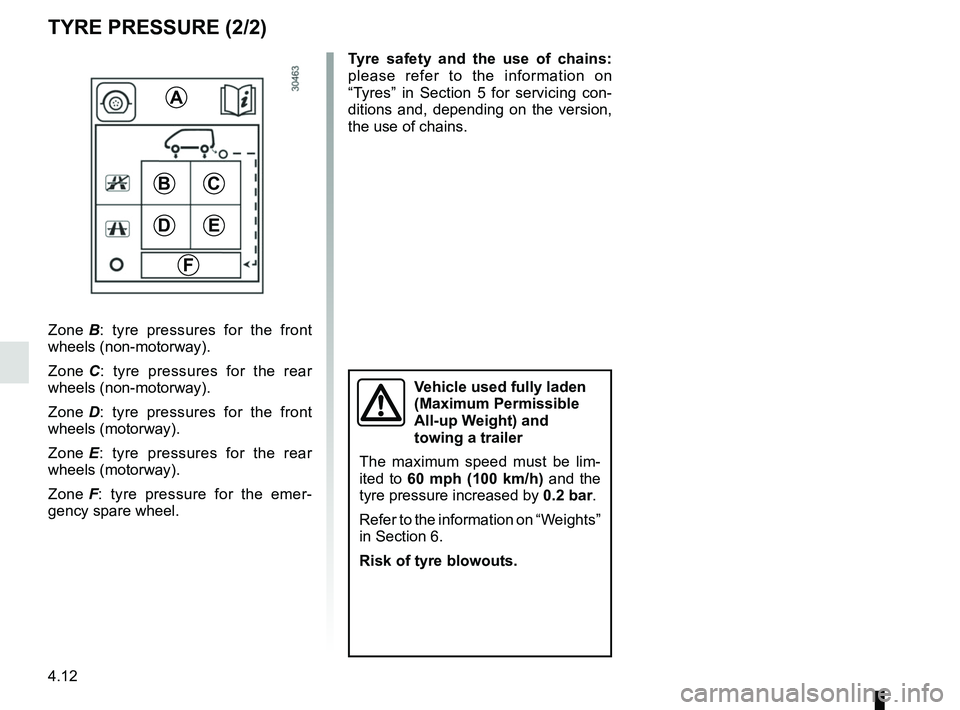
Zone B: tyre pressures for the front
wheels (non-motorway).
Zone C : tyre pressures for the rear
wheels (non-motorway).
Zone D : tyre pressures for the front
wheels (motorway).
Zone E : tyre pressures for the rear
wheels (motorway).
Zone F : tyre pressure for the emer-
gency spare wheel.
TYRE PRESSURE (2/2)
Tyre safety and the use of chains:
please refer to the information on
“Tyres” in Section 5 for servicing con-
ditions and, depending on the version,
the use of chains.
Vehicle used fully laden
(Maximum Permissible
All-up Weight) and
towing a trailer
The maximum speed must be lim-
ited to 60 mph (100 km/h) and the
tyre pressure increased by 0.2 bar.
Refer to the information on “Weights”
in Section 6.
Risk of tyre blowouts.
Page 215 of 290

5.1
Section 5: Practical advice
Puncture . . . . . . . . . . . . . . . . . . . . . . . . . . . . . . . . . . . .\
. . . . . . . . . . . . . . . . . . . . . . . . . . . . . . . . . . 5.2
Emergency spare wheel . . . . . . . . . . . . . . . . . . . . . . . . . . . . . . . . . . . .\
. . . . . . . . . . . . . . . . . . . . . . 5.2
Tool kit . . . . . . . . . . . . . . . . . . . . . . . . . . . . . . . . . . . . \
. . . . . . . . . . . . . . . . . . . . . . . . . . . . . . . . . . . . 5.4
Tyre inflation kit . . . . . . . . . . . . . . . . . . . . . . . . . . . . . . . . . . . .\
. . . . . . . . . . . . . . . . . . . . . . . . . . . . . 5.5
Wheel trims . . . . . . . . . . . . . . . . . . . . . . . . . . . . . . \
. . . . . . . . . . . . . . . . . . . . . . . . . . . . . . . . . . . . . . 5.11
Changing a wheel: hydraulic jack . . . . . . . . . . . . . . . . . . . . . . . . . . . . . . . . . . . .\
. . . . . . . . . . . . . . . 5.13
Changing a wheel: jack . . . . . . . . . . . . . . . . . . . . . . . . . . . . . . . . . . . . \
. . . . . . . . . . . . . . . . . . . . . . . 5.16
Tyres . . . . . . . . . . . . . . . . . . . . . . . . . . . . . . . . . . . .\
. . . . . . . . . . . . . . . . . . . . . . . . . . . . . . . . . . . . . 5.18
Headlights (changing bulbs) . . . . . . . . . . . . . . . . . . . . . . . . . . . . . . . . . . . .\
. . . . . . . . . . . . . . . . . . . 5.21front fog lights . . . . . . . . . . . . . . . . . . . . . . . . . . . . . . . . . . . . \
. . . . . . . . . . . . . . . . . . . . . . . . . 5.23
side lights . . . . . . . . . . . . . . . . . . . . . . . . . . . . . . . . . . . . \
. . . . . . . . . . . . . . . . . . . . . . . . . . . . 5.24
rear lights . . . . . . . . . . . . . . . . . . . . . . . . . . . . . . . . . . . . \
. . . . . . . . . . . . . . . . . . . . . . . . . . . . 5.25
interior lighting . . . . . . . . . . . . . . . . . . . . . . . . . . . . . . . . . . . .\
. . . . . . . . . . . . . . . . . . . . . . . . 5.27
Fuses . . . . . . . . . . . . . . . . . . . . . . . . . . . . . . . . . . . . \
. . . . . . . . . . . . . . . . . . . . . . . . . . . . . . . . . . . . . 5.28
Battery: troubleshooting. . . . . . . . . . . . . . . . . . . . . . . . . . . . . . . . . . . . \
. . . . . . . . . . . . . . . . . . . . . . . 5.33
Key, radio frequency remote control: battery . . . . . . . . . . . . . . . . . . . . . . . . . . . . . . . . . . . . \
. . . . . . . 5.35
Hands-free access transmitter/receiver: battery . . . . . . . . . . . . . . . . . . . . . . . . . . . . . . . . . . . .\
. . . . 5.36
Replacing wiper blades . . . . . . . . . . . . . . . . . . . . . . . . . . . . . . . . . . . . \
. . . . . . . . . . . . . . . . . . . . . . . 5.37
Towing . . . . . . . . . . . . . . . . . . . . . . . . . . . . . . . . . . . . \
. . . . . . . . . . . . . . . . . . . . . . . . . . . . . . . . . . . . 5.38
Fitting a radio . . . . . . . . . . . . . . . . . . . . . . . . . . . . . . . . . . . . \
. . . . . . . . . . . . . . . . . . . . . . . . . . . . . . . 5.40
Accessories . . . . . . . . . . . . . . . . . . . . . . . . . . . . . . . . . . . . \
. . . . . . . . . . . . . . . . . . . . . . . . . . . . . . . . 5.41
Operating faults . . . . . . . . . . . . . . . . . . . . . . . . . . . . . . . . . . . . \
. . . . . . . . . . . . . . . . . . . . . . . . . . . . . 5.42
Page 231 of 290

5.17
CHANGING A WHEEL: jack (2/2)
If you have a puncture, re-
place the wheel as soon as
possible.
A tyre which has been
punctured should always be inspec-
ted (and repaired, where possible)
by a specialist.
With the wheel on the ground, tigh-
ten the bolts firmly, starting on side C,
then E, G, D and ending with F. Check
the tightness and the tyre pressure on
the emergency spare wheel as soon as
possible.
C
E
G
D
F
If bolts are supplied with the emergency
spare wheel, only use these bolts for
the emergency spare wheel. Tighten
the bolts, checking that the wheel is
correctly positioned on its hub and uns-
crew the jack.
Note: do not lubricate the wheel bolts.
Anti-theft bolt
If you use anti-theft bolts, fit these
nearest the valve (otherwise it may
not be possible to fit the wheel trim).
Position jack 4 horizontally. Jack head 3
must be positioned level with the rein-
forcement panel closest to the wheel in
question or the contact points 5;
start cranking the jack up by hand to
align the base plate (which should be
pushed slightly under the vehicle).
Turn the wheelbrace a few times using
the wheel spanner 2 until the wheel is
lifted off the ground. Remove the bolts
and take off the wheel;
fit the emergency spare wheel on the
central hub and turn it to locate the
mounting holes in the wheel and the
hub.
3
5
3
24
Page 233 of 290

5.19
TYRES (2/3)
Tyre pressures
Adhere to the tyre pressures (including
the emergency spare wheel). The tyre
pressures should be checked at least
once a month and additionally before
any long journey (refer to the label af-
fixed to the edge of the driver’s door).
Incorrect tyre pressures
lead to abnormal tyre wear
and unusually hot running.
These are factors which
may seriously affect safety and lead
to:
– poor road holding,
– risk of bursting or tread separa- tion.
The pressure depends on the load
and the speed of use. Adjust the
pressure according to the condi-
tions of use (refer to the label affixed
to the edge of the driver’s door).
Please be aware that a
poorly tightened or miss-
ing valve cap can make the
tyres less airtight and lead
to pressure loss.
Always use valve caps identical to
those fitted originally and tighten
them fully.
Pressures should be checked when the
tyres are cold; ignore higher pressures
which may be reached in hot weather
or following a fast journey.
If tyre pressures cannot be checked
when the tyres are cold, the normal
pressures must be increased by 0.2 to
0.3 bar (or 3 PSI).
Never deflate a hot tyre.
Dual wheel versions
To inflate the outer wheel, it is recom-
mended that the inflation tube is passed
between the two wheels. Vehicle fitted with a tyre pressure
loss warning system
If underinflated (puncture, low pres-
sure, etc.), the warning light
on
the instrument panel comes on, see
“Tyre pressure loss warning system” in
Section 2.
Changing wheels around
This practice is not recommended.
Emergency spare wheel
Refer to the information on the
“Emergency spare wheel” and
“Changing a wheel” in Section 5.