2018 RENAULT MASTER battery
[x] Cancel search: batteryPage 10 of 290

1.4
Replacement, additional remote
control or transmitter/receiver
You must only contact an approved
Dealer.
– To replace a remote control, the vehicle must be taken to an ap-
proved Dealer as both the vehi-
cle and the remote control are
needed to initialise the system.
– Depending on the vehicle, you may use up to four remote con-
trols or two transmitter/receivers.
Remote control unit failure
Make sure that the correct battery
type is being used, and that the
battery is in good condition and in-
serted correctly. These batteries
have a service life of approximately
two years.
Refer to the information on the “Key,
radio frequency remote control: bat-
teries” in Section 5 for the battery
changing procedure.
Hands-free access
transmitter/receiver E
This enables the vehicle doors to be
locked/unlocked without using the
remote control unit. Refer to the infor-
mation on “Hands-free access transmit-
ter/receiver: use” in section 1.
EDriver’s responsibility
when parking or stopping
the vehicle
Never leave an animal,
child or adult who is not self-suffi-
cient alone on your vehicle, even for
a short time.
They may pose a risk to themselves
or to others by starting the engine,
activating equipment such as the
electric windows or locking the
doors.
Also, in hot and/or sunny weather,
please remember that the tempera-
ture inside the passenger compart-
ment increases very quickly.
RISK OF DEATH OR SERIOUS
INJURY.
KEY, RADIO FREQUENCY REMOTE CONTROL: general information (3/3)
Page 11 of 290

1.5
KEY, RADIO FREQUENCY REMOTE CONTROL: use (1/2)
1
A
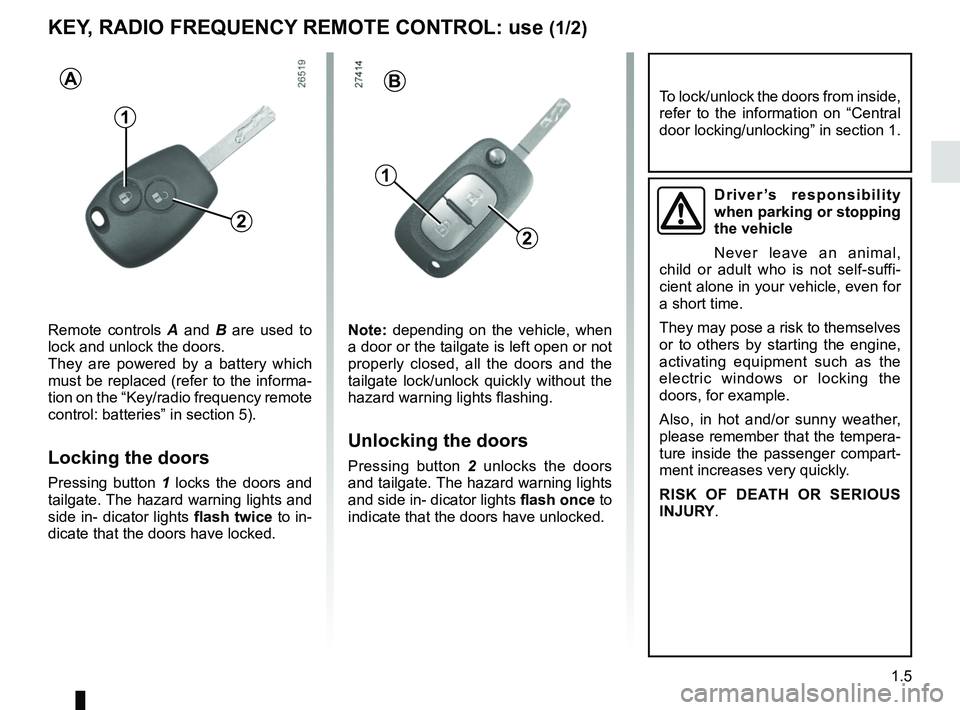
Remote controls A and B are used to
lock and unlock the doors.
They are powered by a battery which
must be replaced (refer to the informa-
tion on the “Key/radio frequency remote
control: batteries” in section 5).
Locking the doors
Pressing button 1 locks the doors and
tailgate. The hazard warning lights and
side in- dicator lights flash twice to in-
dicate that the doors have locked. Note: depending on the vehicle, when
a door or the tailgate is left open or not
properly closed, all the doors and the
tailgate lock/unlock quickly without the
hazard warning lights flashing.
Unlocking the doors
Pressing button 2
unlocks the doors
and tailgate. The hazard warning lights
and side in- dicator lights flash once to
indicate that the doors have unlocked.
2
B
1
2
Driver’s responsibility
when parking or stopping
the vehicle
Never leave an animal,
child or adult who is not self-suffi-
cient alone in your vehicle, even for
a short time.
They may pose a risk to themselves
or to others by starting the engine,
activating equipment such as the
electric windows or locking the
doors, for example.
Also, in hot and/or sunny weather,
please remember that the tempera-
ture inside the passenger compart-
ment increases very quickly.
RISK OF DEATH OR SERIOUS
INJURY.
To lock/unlock the doors from inside,
refer to the information on “Central
door locking/unlocking” in section 1.
Page 12 of 290

1.6
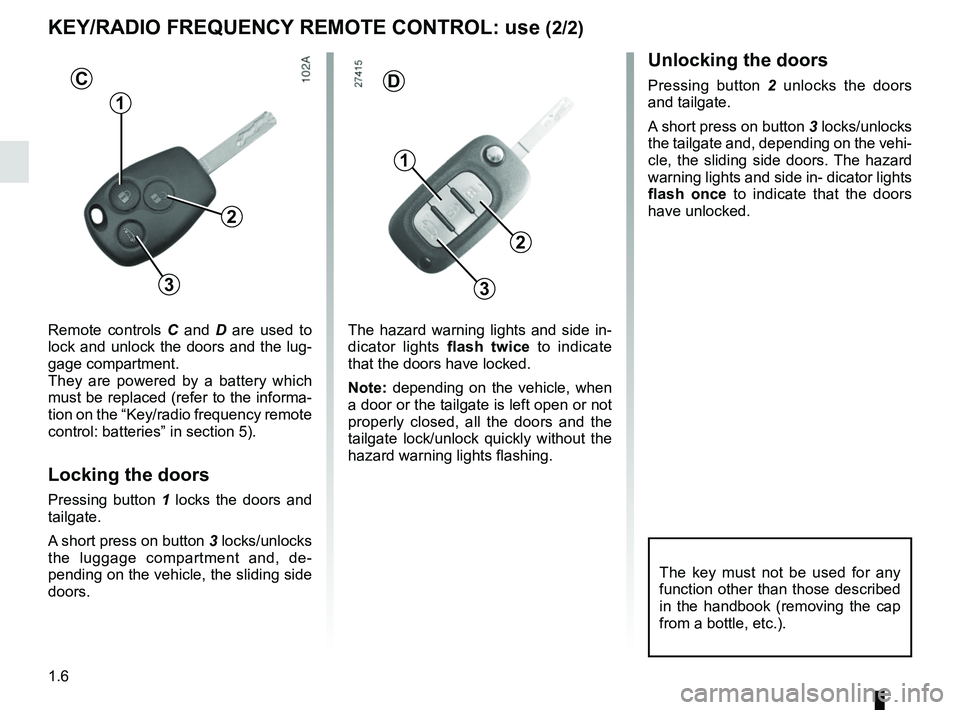
Remote controls C and D are used to
lock and unlock the doors and the lug-
gage compartment.
They are powered by a battery which
must be replaced (refer to the informa-
tion on the “Key/radio frequency remote
control: batteries” in section 5).
Locking the doors
Pressing button 1 locks the doors and
tailgate.
A short press on button 3 locks/unlocks
the luggage compartment and, de-
pending on the vehicle, the sliding side
doors.
KEY/RADIO FREQUENCY REMOTE CONTROL: use (2/2)
D
The hazard warning lights and side in-
dicator lights flash twice to indicate
that the doors have locked.
Note: depending on the vehicle, when
a door or the tailgate is left open or not
properly closed, all the doors and the
tailgate lock/unlock quickly without the
hazard warning lights flashing.
1
2
3
C
1
2
3
The key must not be used for any
function other than those described
in the handbook (removing the cap
from a bottle, etc.).
Unlocking the doors
Pressing button 2 unlocks the doors
and tailgate.
A short press on button 3 locks/unlocks
the tailgate and, depending on the vehi-
cle, the sliding side doors. The hazard
warning lights and side in- dicator lights
flash once to indicate that the doors
have unlocked.
Page 14 of 290

1.8
HANDS-FREE ACCESS TRANSMITTER/RECEIVER: use (1/2)
For vehicles equipped with transmitter/
receiver 1, in addition to the functions
of the remote control, it can be used to
lock/unlock without using the remote
control locking unit when it is in access
zone 2.
Note: the hands-free access transmit-
ter/receiver only works with the front
doors and the tailgate.
22
2
It is powered by a battery which must
be replaced (refer to the information on
the “Hands-free access transmitter/re-
ceiver: batteries” in Section 5).
1
Driver’s responsibility
when parking or stopping
the vehicle
Never leave an animal,
child or adult who is not self-suffi-
cient alone on your vehicle, even for
a short time.
They may pose a risk to themselves
or to others by starting the engine,
activating equipment such as the
electric windows or locking the
doors.
Also, in hot and/or sunny weather,
please remember that the tempera-
ture inside the passenger compart-
ment increases very quickly.
RISK OF DEATH OR SERIOUS
INJURY.
Page 84 of 290

1.78
Instrument panel A
WARNING LIGHTS (1/4)
cLeft-hand direction indicator
tell-tale light
bRight-hand direction indica-
tor tell-tale light
ÚBattery charge warning light
It should go out as soon as the
engine starts. If it comes on when you
are driving, it indicates that the circuit
has discharged. Stop as soon as traf-
fic conditions allow and contact an ap-
proved dealer.
MLow fuel level warning light
This goes out as soon as the
engine starts. If it lights up or remains
lit, fill up with fuel as soon as possible.
The presence and operation of the warning lights DEPEND ON THE EQUIPMENT\
AND COUNTRY.
If no lights or sounds are ap-
parent, this indicates a fault
in the instrument panel. This
indicates that it is essential
to stop immediately (as soon as traf-
fic conditions allow). Ensure that the
vehicle is correctly immobilised and
contact an approved Dealer.
Warning light © means you
should drive very carefully to an
authorised dealer as soon as
possible. Failure to follow this rec-
ommendation risks damaging your
vehicle.
Warning light ® re-
quires you to stop immedi-
ately, for your own safety,
as soon as traffic conditions
allow. Switch off the engine and do
not restart it. Contact an approved
Dealer.
A
uSide light tell-tale light
gFront fog light tell-tale
Rear fog light tell-tale light
áMain beam headlight telltale
kDipped beam headlight tell-
tale
Automatic main beam head-
light indicator light
Please refer to the information
on “External signals and lights” in
Section 1.
Page 96 of 290

1.90
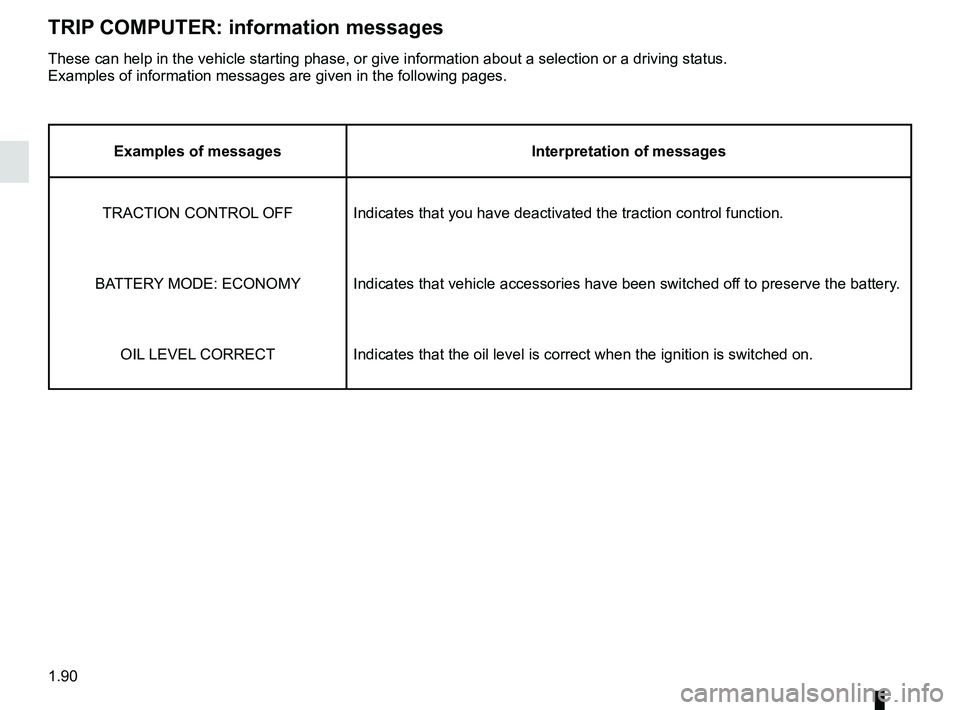
TRIP COMPUTER: information messages
Examples of messagesInterpretation of messages
TRACTION CONTROL OFF Indicates that you have deactivated the traction control function.
BATTERY MODE: ECONOMY Indicates that vehicle accessories have been switched off to preserve the battery.
OIL LEVEL CORRECT Indicates that the oil level is correct when the ignition is switched on\
.
These can help in the vehicle starting phase, or give information about \
a selection or a driving status.
Examples of information messages are given in the following pages.
Page 99 of 290

1.93
Exterior temperature
When the temperature is between –3°C
and +3°C, the °C characters flash (indi-
cates risk of ice formation).
CLOCK AND EXTERIOR TEMPERATURE
Press and hold the bottom button to
enter the hour setting mode. When they
flash on their own, press the top button
to scroll through them.
Press and hold the bottom button to
enter the minute setting mode. When
they flash on their own, press the top
button to scroll through them.
Confirm by pressing and holding the
bottom button on stalk 1.
With the ignition on
, the time and,
depending on the vehicle, the exterior
temperature, are displayed on the on-
board computer A.
Setting clock A
Display the “clock” page on the instru-
ment panel by pressing one of the but-
tons on stalk 1.
After 2 seconds, the hours and minutes
start flashing.
1
A
If the electrical supply is cut (battery
disconnected, broken supply wire,
etc.), the clock will lose its time set-
ting. The time must then be set.
For safety reasons, carry out any
adjustments when the vehicle is not
being driven.
Exterior temperature
indicator
As ice formation is related
to climatic exposure, local
air humidity and temperature, the
external temperature alone is not
sufficient to detect ice.
Page 105 of 290

1.99
EXTERIOR LIGHTING AND SIGNALS (4/5)
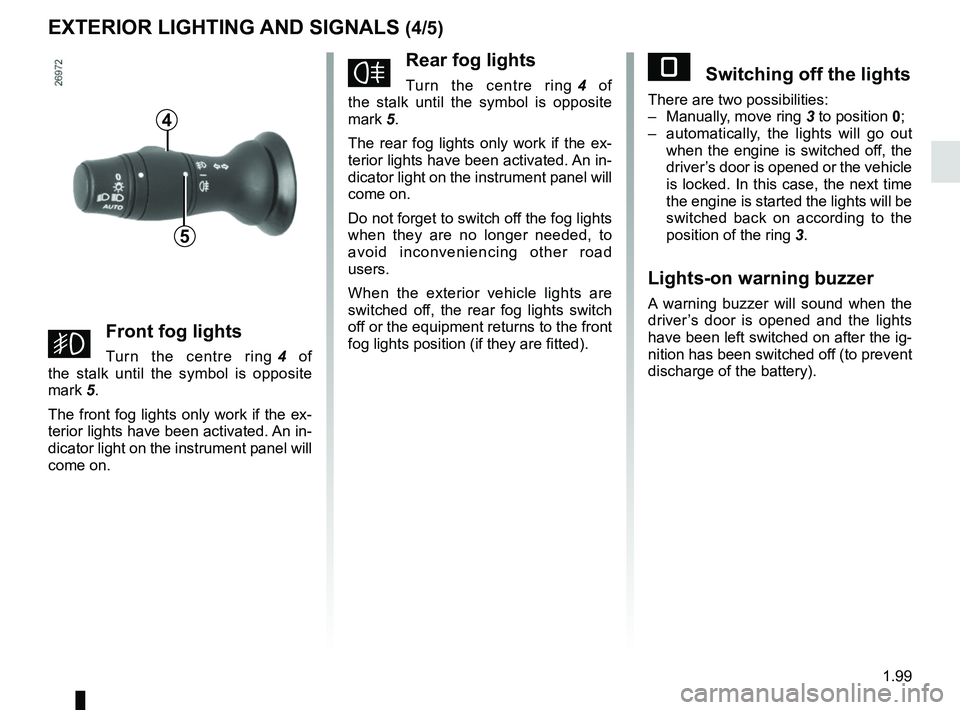
gFront fog lights
Turn the centre ring 4 of
the stalk until the symbol is opposite
mark 5.
The front fog lights only work if the ex-
terior lights have been activated. An in-
dicator light on the instrument panel will
come on.
fRear fog lights
Turn the centre ring 4 of
the stalk until the symbol is opposite
mark 5.
The rear fog lights only work if the ex-
terior lights have been activated. An in-
dicator light on the instrument panel will
come on.
Do not forget to switch off the fog lights
when they are no longer needed, to
avoid inconveniencing other road
users.
When the exterior vehicle lights are
switched off, the rear fog lights switch
off or the equipment returns to the front
fog lights position (if they are fitted).
4
5
eSwitching off the lights
There are two possibilities:
– Manually, move ring 3 to position 0;
– automatically, the lights will go out when the engine is switched off, the
driver’s door is opened or the vehicle
is locked. In this case, the next time
the engine is started the lights will be
switched back on according to the
position of the ring 3.
Lights-on warning buzzer
A warning buzzer will sound when the
driver’s door is opened and the lights
have been left switched on after the ig-
nition has been switched off (to prevent
discharge of the battery).