Page 38 of 290

1.32
ADDITIONAL METHODS OF RESTRAINT
Operating faults
Indicator light 1, å, lights up when
the ignition is switched on and goes out
after a few seconds.
If it does not light up when the ignition
is switched on, or comes on when the
engine is running, there is a fault in the
system.
Contact your approved dealer as soon
as possible. Your protection will be re-
duced until this fault is rectified.
1
The air bag is designed to complement the action of the seat belt. Both \
the air bags and seat belts are integral parts of the same protection
system. It is therefore essential to wear seat belts at all times. If se\
at belts
are not worn, the occupants are exposed to the risk of serious injury in\
the event of an accident. It may also increase the risk of minor superfi\
cial injuries
occurring when the air bag is deployed, although such minor injuries are\
always
possible with air bags.
If the vehicle should overturn or suffer a rear impact, however severe, the pre-
tensioners and air bags are not always triggered. Shocks to the underbod\
y of the
vehicle, e.g. from pavements, potholes or stones, can all trigger these \
systems.
– No work or modification whatsoever may be carried out on any part of the air
bag system (air bags, pretensioners, computer, wiring harness, etc.), except
by qualified personnel from an approved dealer.
– To ensure that the system is in good working order and to avoid accidenta\
l trig- gering of the system which may cause injury, only qualified Network personnel
may work on the air bag system.
– As a safety precaution, have the air bag system checked if your vehicle \
has been involved in an accident, or is stolen or broken into.
– When selling or lending the vehicle, inform the user of these points and\
hand over this driver’s handbook with the vehicle.
– When scrapping your vehicle, contact your approved dealer for disposal o\
f the gas generator(s).
All of the warnings below are given so that the air bag is not obstructed in any
way when it is inflated and also to prevent the risk of serious injuries caused
by items which may be dislodged when the air bag inflates.
Page 221 of 290
5.7
TYRE INFLATION KIT (3/6)
To connect the compressor, open the
bonnet and connect black clamp 10
to earth 6 (refer to the information on
“Battery: troubleshooting” in Section 5).
Then connect red clamp 11 to termi-
nal 5.
Before starting the engine,
check that the handbrake is
applied and the gear lever
is in neutral or in position N
for sequential gearboxes.
With the engine running, press switch 7
to start inflating.
After a maximum of 15 minutes, stop in-
flating and read the pressure on pres-
sure gauge 9.
A pressure of at least 4.7 bar must be
reached.
Note: while the bottle is emptying (ap-
proximately 30 seconds), the pressure
gauge 9 will indicate briefly a pressure
of up to 6 bars, then the pressure drops.
1110
7
If the correct pressure cannot be
achieved, repair is impossible. Do
not drive the vehicle. Consult an ap-
proved dealer.
If the pressure is too high, press
button 8 to lower the pressure.
8
9
5
6
6
5
Page 223 of 290

5.9
TYRE INFLATION KIT (5/6)
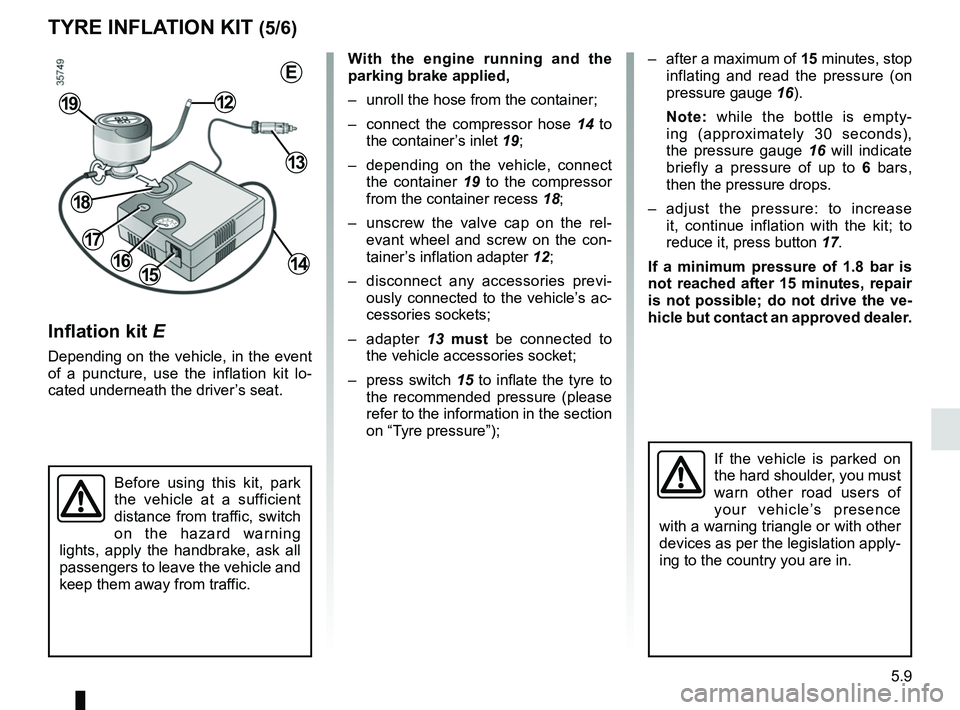
Inflation kit E
Depending on the vehicle, in the event
of a puncture, use the inflation kit lo-
cated underneath the driver’s seat.
Before using this kit, park
the vehicle at a sufficient
distance from traffic, switch
on the hazard warning
lights, apply the handbrake, ask all
passengers to leave the vehicle and
keep them away from traffic.
If the vehicle is parked on
the hard shoulder, you must
warn other road users of
your vehicle’s presence
with a warning triangle or with other
devices as per the legislation apply-
ing to the country you are in.
With the engine running and the
parking brake applied,
– unroll the hose from the container;
– connect the compressor hose 14 to the container’s inlet 19;
– depending on the vehicle, connect the container 19 to the compressor
from the container recess 18;
– unscrew the valve cap on the rel- evant wheel and screw on the con-
tainer’s inflation adapter 12;
– disconnect any accessories previ- ously connected to the vehicle’s ac-
cessories sockets;
– adapter 13 must be connected to
the vehicle accessories socket;
– press switch 15 to inflate the tyre to
the recommended pressure (please
refer to the information in the section
on “Tyre pressure”);
1516
1219
– after a maximum of 15 minutes, stop inflating and read the pressure (on
pressure gauge 16).
Note: while the bottle is empty-
ing (approximately 30 seconds),
the pressure gauge 16 will indicate
briefly a pressure of up to 6 bars,
then the pressure drops.
– adjust the pressure: to increase it, continue inflation with the kit; to
reduce it, press button 17.
If a minimum pressure of 1.8 bar is
not reached after 15 minutes, repair
is not possible; do not drive the ve-
hicle but contact an approved dealer.
13
14
18
17
E
Page 233 of 290

5.19
TYRES (2/3)
Tyre pressures
Adhere to the tyre pressures (including
the emergency spare wheel). The tyre
pressures should be checked at least
once a month and additionally before
any long journey (refer to the label af-
fixed to the edge of the driver’s door).
Incorrect tyre pressures
lead to abnormal tyre wear
and unusually hot running.
These are factors which
may seriously affect safety and lead
to:
– poor road holding,
– risk of bursting or tread separa- tion.
The pressure depends on the load
and the speed of use. Adjust the
pressure according to the condi-
tions of use (refer to the label affixed
to the edge of the driver’s door).
Please be aware that a
poorly tightened or miss-
ing valve cap can make the
tyres less airtight and lead
to pressure loss.
Always use valve caps identical to
those fitted originally and tighten
them fully.
Pressures should be checked when the
tyres are cold; ignore higher pressures
which may be reached in hot weather
or following a fast journey.
If tyre pressures cannot be checked
when the tyres are cold, the normal
pressures must be increased by 0.2 to
0.3 bar (or 3 PSI).
Never deflate a hot tyre.
Dual wheel versions
To inflate the outer wheel, it is recom-
mended that the inflation tube is passed
between the two wheels. Vehicle fitted with a tyre pressure
loss warning system
If underinflated (puncture, low pres-
sure, etc.), the warning light
on
the instrument panel comes on, see
“Tyre pressure loss warning system” in
Section 2.
Changing wheels around
This practice is not recommended.
Emergency spare wheel
Refer to the information on the
“Emergency spare wheel” and
“Changing a wheel” in Section 5.