2018 RENAULT KOLEOS brake disc
[x] Cancel search: brake discPage 145 of 332

2.41
8
7
System A (continued)
For vehicle not fitted with a
navigation system
– With the vehicle at a standstill, press and hold the switch 7 OK to access
the settings menu,
– repeatedly press the control 8 up or
down until you reach the “Driving as-
sistance” menu. Press the switch 7
OK;
– repeatedly press control 8up or down
until you reach the “Active braking”
menu, then press the switch 7 OK.
ACTIVE EMERGENCY BRAKING (3/11)
Operating faults
When the system detects an operating
fault, the
warning light lights up
on the instrument panel, with the mes-
sage “Active braking disconnected”.
There are two possibilities:
– the system is temporarily disrupted (for example: radar obscured by
dirt, mud, snow etc.). In this case,
park the vehicle and switch off the
engine. Clean the detection zone of
the radar. When you next start the
engine, the warning light and the
message go out
– if this is not the case, this may arise from another cause; contact an
Approved Dealer.
Consult an approved dealer.
Press the switch 7
OK again to activate
or deactivate the function:= function activated
< function deactivated
The warning light
is displayed on
the instrument panel when the system
is deactivated. This system is reacti-
vated each time the ignition is switched
on.
Conditions for non-activation
of the system
The system cannot be activated:
– when the gear lever is in neutral;
– when the parking brake is activated;
– while cornering.
– For 4-wheel drive vehicles, when Electronic Stability Programme
(ESC) with understeer and trac-
tion control are deactivated (please
see “Electronic Stability Programme
(ESC) with understeer and trac-
tion control” above). Warning light
comes on.The system A only detects vehicles
driving in the same direction of traf-
fic. The system cannot detect mo-
torcycles because of the difficulty in
forecasting their trajectory.
Page 151 of 332

2.47
ACTIVE EMERGENCY BRAKING (9/11)
System B (continued)
Conditions for non-activation
of the system
The system cannot be activated:
– when the gear lever is in neutral;
– when the parking brake is activated;
– while cornering.
As a general rule, if the driver shows
signs of attention (action on the steering
wheel, pedals etc.), the system delays
its operation or does not activate.
Operating faults
When the system detects an operating
fault, the
warning light lights up
on the instrument panel, with the mes-
sage “Active braking disconnected”.
Consult an approved dealer.
Temporarily not available
When the system detects a tempo-
rary unavailability, the
warning
light lights up on the instrument panel
accompanied by the message “Active
braking: sensor blind” or, depending on
the vehicle, “Radar-camera: no visibil-
ity”.
The possible causes are:
– the system is temporarily blinded (glare from the sun, dipped beam
headlights, bad weather conditions
etc.). The system will be operational
again when visibility conditions are
better.
– The system is temporarily disrupted (for example: windscreen obscured
by dirt, ice, snow etc.). In this case,
park the vehicle and switch off the
engine. Clean the windscreen. When
you next start the engine, the warn-
ing light and the message go out.
– If this is not the case, this may arise from another cause; contact an
Approved Dealer.
Page 176 of 332

2.72
ADAPTIVE CRUISE CONTROL (4/8)
Exceeding the cruising speed
The cruising speed may be exceeded
at any time by depressing the accelera-
tor pedal.
When exceeding this speed, the cruis-
ing speed and the following bars show
red and the cruising speed flashes on
the instrument panel: the distance con-
trol function is no longer activated.
Then, release the accelerator: cruise
and distance control will automatically
reactivate unless the function has been
set to standby.
Putting the function on
standby
The function is set to standby if:
– you press switch 4 (O);
– you depress the brake pedal;
– you depress the clutch pedal;
– you use the gear lever;
– the engine speed is too low or too high;
– the vehicle speed is lower than 24.8 mph (40 km/h) or over
105.4 mph (170 km/h);
– certain driver correction devices and aids are triggered (ABS, ESC, etc.)
In the latter three cases, the message
“Adaptive cruise ct disconnected” is
displayed on the instrument panel when
the function is set to standby.
Standby is confirmed by the display of
the cruising speed in grey and the mes-
sage “Adaptive cruise ctrl”. Returning to the cruising speed
If a speed is stored, it can be recalled,
once you are sure that the road con-
ditions are suitable (traffic, road sur-
face, weather conditions, etc.). Press
switch
3 (R) if the vehicle speed is
above around 31 mph (50 km/h).
When the stored speed is recalled,
activation of the cruise control is con-
firmed by the illumination of the cruis-
ing speed in green, along with the mes-
sage “Adaptive cruise ctrl”.
When the cruise control is set to
standby, pressing switch 2, side a (+),
reactivates the cruise control function
without taking into account the stored
speed: it is the speed at which the vehi-
cle is moving that is taken into account.
Note: if the speed previously stored is
much higher than the current speed,
the vehicle will accelerate to reach this
threshold.
2
a3
4
Page 255 of 332

4.9
Level 2
It is normal for the level to drop as the
brake shoes become worn, but it must
never drop lower than the “MINI” warn-
ing line.
If you wish to check the disc and drum
wear yourself, you should obtain the
document explaining the checking pro-
cedure from the manufacturer’s net-
work or web site.
Topping up
After any operation on the hydraulic cir-
cuit, a specialist must replace the brake
fluid.
Only use fluids approved by our
Technical Department (and taken from
a sealed container).
Replacement interval
Refer to the Maintenance Document for
your vehicle.
Brake fluid level
The level should be read with the engine
switched off and on level ground.
This should be checked frequently,
and immediately if you notice even the
slightest loss in braking efficiency.
LEVELS (2/3)
2
The engine may be hot
when carrying out opera-
tions in close proximity. In
addition, the engine cooling
fan can come on at any moment.
Risk of injury.
Consult your approved dealer at
once if you notice an abnormal or
repeated drop in any of the fluid
levels.
Page 269 of 332

5.5
TYRE PRESSURE KIT (2/3)
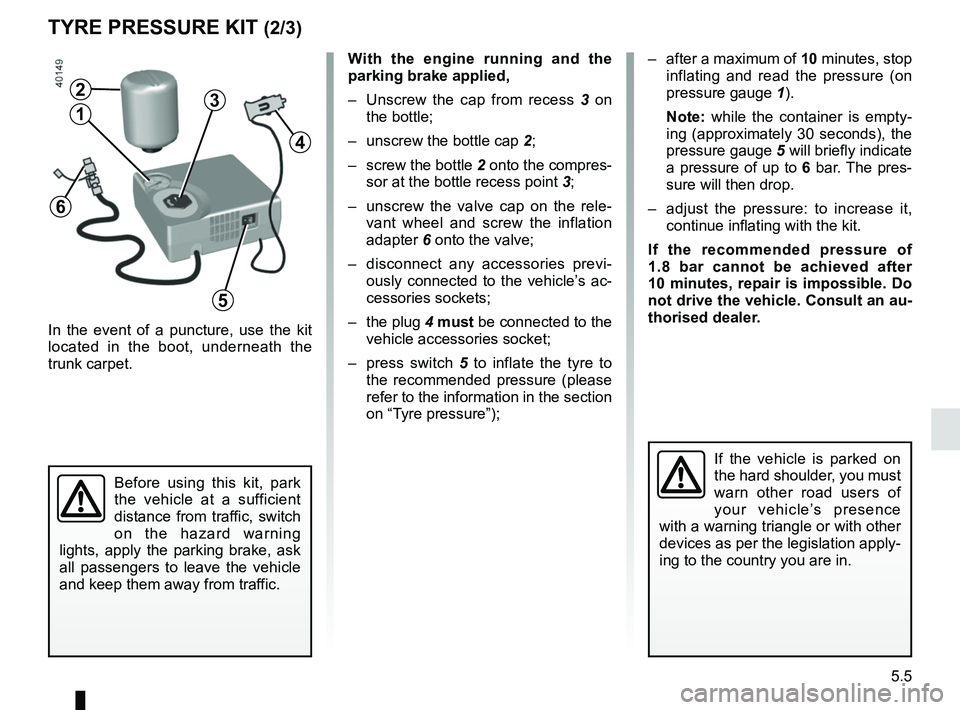
In the event of a puncture, use the kit
located in the boot, underneath the
trunk carpet.
With the engine running and the
parking brake applied,
– Unscrew the cap from recess 3 on
the bottle;
– unscrew the bottle cap 2;
– screw the bottle 2 onto the compres- sor at the bottle recess point 3;
– unscrew the valve cap on the rele- vant wheel and screw the inflation
adapter 6 onto the valve;
– disconnect any accessories previ- ously connected to the vehicle’s ac-
cessories sockets;
– the plug 4 must be connected to the
vehicle accessories socket;
– press switch 5 to inflate the tyre to
the recommended pressure (please
refer to the information in the section
on “Tyre pressure”);
Before using this kit, park
the vehicle at a sufficient
distance from traffic, switch
on the hazard warning
lights, apply the parking brake, ask
all passengers to leave the vehicle
and keep them away from traffic.
If the vehicle is parked on
the hard shoulder, you must
warn other road users of
your vehicle’s presence
with a warning triangle or with other
devices as per the legislation apply-
ing to the country you are in.
– after a maximum of 10 minutes, stop inflating and read the pressure (on
pressure gauge 1).
Note: while the container is empty-
ing (approximately 30 seconds), the
pressure gauge 5 will briefly indicate
a pressure of up to 6 bar. The pres-
sure will then drop.
– adjust the pressure: to increase it, continue inflating with the kit.
If the recommended pressure of
1.8 bar cannot be achieved after
10 minutes, repair is impossible. Do
not drive the vehicle. Consult an au-
thorised dealer.
4
2
13
5
6